Due to the improvement of assembly technologies for various types of products assembled from small metal parts (electronic microcircuits), their manual soldering is causing more and more difficulties.
A homemade soldering gun will allow the operator to cope with the difficulties that arise in these situations without any special complications and eliminate the risks that arise.
So, with the help of a self-assembled soldering station, anyone can install and dismantle parts without the threat of damaging fragile electronic elements located near the soldering site. One of the possible solutions to this problem allows you to make a hot air gun from a soldering iron, which is available in the household kit of any home craftsman.
Prologue
In the past, for all sorts of “thermal technologies” (of course, except for soldering and dismantling radio components), I used a small lighter with a nozzle. But a gas burner, in terms of producing a hot stream of air, has a number of disadvantages. With its help, it is impossible to smoothly regulate the temperature, the size of the torch depends on the amount of gas in the tank, an open flame can cause a fire, and finally, you need to buy gas in cans.
So, it was decided to make a small hairdryer from all sorts of rubbish that can be found in the bins of a DIYer. An additional incentive to produce this device was the price of a factory-made hair dryer, which starts at about $30.
I note that during the assembly and testing of the subject, I built another, still speculative, model of a hair dryer with higher power. So, if you need a more serious unit, stay tuned for new publications.
Operating principle of a hot air gun
All devices can be divided into two groups:
- household;
- industrial.
A household hair dryer for soldering plastic is an excellent device with which you can perform many jobs: from installing linoleum to welding PVC.
Some devices are equipped with a temperature controller , which allows you to select the optimal parameters for various materials. The presence of an adjustment mechanism expands the scope of application: you can solder copper pipes with a hairdryer or carry out restoration repairs of microcircuits.
Before work, it is necessary to identify the material of the part, since only polymers from the group of thermoplastics can be heated - after heating they return to their original state without loss of performance characteristics.
The degree of temperature exposure can be adjusted by changing the distance from the nozzle to the surface of the workpiece. This requires certain skills, since if it is removed excessively, the part will not warm up to the required temperature throughout its entire depth, which will negatively affect the parameters of the seam. For example, poor-quality welding of PVC fabric leads to loss of joint tightness.
Main parts and materials
I've had this fan lying around idle for a while now. These 40mm fans used to be widely used in PC 486 and video cards.
This unit will require minimal modification. You will need to re-insert the wire into the attachment point.
I didn’t have a tube of a suitable diameter for the heater air duct, so I borrowed it from a ten-watt resistor type C-5-5. To free the tube from the insides, I sawed off one of its rolled edges with a file.
I do not recommend using ceramics or quartz glass for the heater air duct, as these materials can be destroyed if flux or wash accidentally gets on a heated surface. I’ll tell you a secret, I did my first experiments with a ceramic heater air duct, which collapsed at the first thermal shock. So, it is better to choose steel or, at worst, some non-ferrous metal.
In order not to bother with making a mica frame, I used a wire with a diameter of 1.2 mm from some kind of rheostat. I think a wire with a diameter of 0.5-1.5mm will do. If you choose a thinner wire, it will not be securely fixed in the housing, and if you choose a thicker one, you will have to increase the cross-section of the cable, which will make the latter too rigid.
Mica will be needed to make a gasket that insulates the coil from the heater tube. The fiberglass will serve as thermal insulation between the heater tube and the hair dryer body.
To make it more convenient to work with recalcitrant materials, you need to use “Rubber Glue”, “88H Glue” or “Moment” glue. Mica can be glued to fiberglass or even paper. The fiberglass can simply be glued and dried. As a result, the glue will burn out, but at the assembly stage it will provide indispensable help.
The heater spiral must be wound in such a way that it is inserted into the tube with a gap, which will subsequently have to be filled with a mica gasket. If you can find a tube of suitable diameter, you can insert the end of the wire into the tube and only then wind the spiral. I didn’t have such a tube, so I simply wound the wire around a metal rod, and then screwed the central wire inside the spiral. This technique is shown in the video>>>
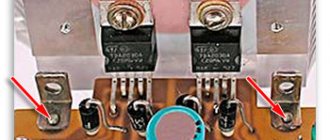
I have used these wonderful products many times to solve completely atypical problems. In this case, electrical terminal blocks will transmit current from the cable to the spiral and fix the position of the spiral relative to the front edge of the tube (to prevent the spiral from shorting to the body).
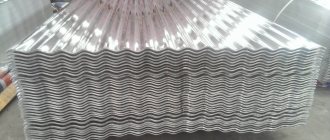
To make the body of the hair dryer, we will use tin obtained from any non-corrugated tin can.
Often the cylindrical surface of the cans is hidden by a label. If you run your fingernail along the side of a jar in a store, you can easily recognize a jar with a smooth side wall.
From the cylinder of a five-gram syringe we will make a hair dryer handle.
Hairdryer from a soldering iron
There are many cases where home craftsmen were able to make a soldering device from an ordinary hair dryer, a hair dryer, and even a soldering iron. But in the latter case, serious alterations have to be made. The fact is that a soldering iron initially does not have special air supply devices, and creating them is much more difficult than a heating element.
Regardless of which of the devices listed above you decide to use as the basis for making a do-it-yourself soldering device, you need to make sure that the finished hair dryer can maintain the set temperature.
If you find a good hair dryer with a thermostat, then be prepared to make certain changes to its design. And this will inevitably lead to the fact that the temperature scale on it will not display the real indicators created by the device on the printed circuit board.
Therefore, we advise you to first test your homemade soldering device using a contact digital thermometer. If, after numerous tests, the temperature remains in the range of 190-240 degrees, then this means that your hair dryer is ready for use. If you observe some deviations, then you will have to additionally work on its design and bring the temperature indicators to optimal levels.
The most difficult thing is to make a soldering device from a soldering iron. The fact is that here you will not only have to stabilize the temperature, but also somehow solve the problem of air supply, and for this you will have to do everything from scratch.
- To create such a device for soldering, you will need a heating element, which is placed in a glass tube, and air will be supplied through it from the other end.
- You will have to get rid of the soldering iron tip.
- For proper operation, air must enter the tube directly through the coil, which, in turn, will heat it.
- The second end of the tube should be slightly longer than the first. Subsequently, you will connect a hose to it to pump air. As suitable mechanisms for this task, you can choose a converted aquarium compressor, a home-made bellows from a plastic bottle, or you can completely abandon such devices and pump air through your mouth.
the most problems arise when creating such (setting the temperature, the inability to adjust the heating intensity), you will have to spend a lot of time and effort on making it, but even in this case you will not be sure that such a hairdryer will maintain the parameters you set . It is best to use a regular cheap hair dryer as a base, and you can use a soldering iron for other purposes.
Drawings of a homemade soldering gun
This is an assembly drawing of a soldering gun. I was too lazy to draw isometric projections, but you can see the soldering gun from all sides by watching the video posted at the beginning of the article.
And this drawing shows the attachment point for the electrical terminal block. The M3 screw securing the terminal block is isolated from the tin body using a small piece of cambric (polyvinyl chloride tube) and an M4 fiberglass washer. An M3 fiberglass washer is placed between the screw heads and the nylon handle of the hair dryer. This washer prevents heat transfer from the electrical terminal block to the hair dryer handle through the M3 screw.
A drawing of the body of a miniature soldering gun in A4 format and 300dpi resolution is located under the thumbnail. If you print it on a printer and stick it on a tin from a tin can, then you can easily make the most complex part of this homemade product.
Turbine and compressor type
The circuit diagram of a DIY soldering station can be presented in the form of a main module and a terminal device (thermal hair dryer) that provides heating of the air in the soldering zone.
Before its manufacture, you need to know that according to the method of forming a forced air flow, such devices are divided into turbine and compressor type soldering devices.
In turbine units, air is supplied to the treatment zone by means of a small electric motor with a fan built directly into the hair dryer body. In products of the second class, the air flow is formed using a special compressor located in the main module (controller for a soldering gun).
When choosing the required type of station for soldering small parts, one usually proceeds from an assessment of the following multidirectional factors:
- fan soldering stations are capable of generating a more powerful air flow, which is an obvious advantage of the hair dryer built into them. However, the flow created with their help hardly passes through nozzles that are too narrow;
- compressor hair dryers, on the contrary, are more effective when working with relatively narrow nozzles used when soldering parts located in hard-to-reach places.
The choice of the optimal version of a soldering gun capable of working with a given set of plastic nozzles is carried out taking into account the specific conditions of its operation.
Small details
Let's look under the fan to see how the coil is connected to the cable. The design turned out to be very repairable. It is enough to unscrew just a few screws to replace the spiral, for example, in order to adjust the resistance of the spiral to the voltage of an existing power source.
I soldered the petals to the heater cable, but it was possible to roll the ends of the conductors into rings and tin them, just like we do when we change a collapsible power plug.
Most of the things I intend to do with a soldering iron require both hands free. Therefore, I made this stand for fixing the hair dryer on the table. A clamp with an open perimeter allows you to securely hold the hair dryer and, if necessary, easily remove it from the stand.
This is how the soldering gun turned out.
Main characteristics
The quality of operation of an air soldering iron is influenced by the following parameters:
- Power . Depends on the type of products being connected. To work with electronic circuits, 300 W will be more than enough, and to weld banners with a hair dryer, a minimum of 1.5 kW is required.
- Voltage . The safest indicator - 12 V will not be enough to achieve operating parameters, so modern units operate with a voltage of 24-36 V. The resistance of the nichrome heating element should be 6 Ohms.
Technical data
The hair dryer fan is powered from a 12 Volt DC source.
The heating element of the hair dryer is powered by an alternating current source of 0...12 Volts. With its help, you can change the temperature of the air flow, from room temperature to 600°C.
Mini-hair dryer parameters at temperature limits.
The diameter of the nichrome wire of the heating element spiral is 1.2 mm.
The heater supply voltage is 9 Volts.
The heater current is 11 Amperes.
Heater power - 100 Watt.
Air flow temperature - 600°C.
The time it takes for the hair dryer to reach the selected temperature mode is 1 minute.
I didn’t make a special power supply for my hair dryer, so I have universal sources of different power at my disposal.
If you do not have a suitable power source, then you can adjust the resistance of the spiral to one of the output voltages of the ATX computer power supply or make the simplest power supply from the ballast of a burnt-out CFL (Compact Fluorescent Lamp). For a detailed description of the modification of the power supply based on CFLs, see here>>>
In the picture, a circuit of a switching power supply for a miniature soldering gun, assembled on the basis of a CFL ballast. Additional elements are highlighted in red. Pulse transformer TV2 has two secondary windings. One of them powers the fan, and the other powers the heater coil. To adjust the temperature of the coil, switch S1 is used.
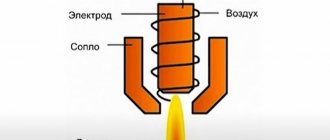
Principle of operation
The operating principle of a typical soldering station with a hair dryer is quite simple and is as follows.
The air accelerated by a fan or compressor is pumped into a special channel made in the form of a tube with an electric spiral. Passing through this channel, the flow is heated to the required temperature (from 100 to 800 degrees) and immediately enters a plastic calibrated nozzle, which directs the hot jet onto the workpiece.
In most industrial models of soldering guns, the main parameters of the heated jet (its temperature, direction of movement, and power) can be adjusted within certain limits.
About the heater temperature and the choice of material for its body
The operating temperature of the nichrome spiral should not exceed 1000°C. The temperature of a hot coil can be approximately determined by its color. The table shows temperatures in degrees Celsius.
| Metal | Temperature °C |
| Aluminum | 660 |
| Duralumin | 650 |
| Brass | 1000 |
| Copper | 1080 |
| Nickel | 1450 |
| Nichrome | 1550 |
| Steel | 1300 |
As you can see, copper, brass or steel are best suited for making the heater body. But, copper and brass quickly oxidize at high temperatures. Therefore, it is better to choose steel or nickel-plated steel.
If you have defective lithium-ion batteries at your disposal, you can make a tube from the body of one of the cans. The housings of the cans of any lithium-ion batteries and lithium-ion batteries are made of stainless steel.
The picture shows a disassembled laptop battery. The diameter of the can body is 16mm, length – 65mm. How to disassemble a laptop battery is described and shown here>>>
And this photo shows a disassembled “EN-EL1” battery from Nikon cameras. Can diameter 14mm, length – 48mm.
Attention!
The contents of lithium-ion battery cans and lithium-ion batteries are extremely toxic! Therefore, cans should be disassembled outdoors, and the extracted products should be sealed in a secure container and taken to a battery recycling point. Such items are usually available in large supermarkets and specialty stores.
How to properly assemble a homemade one?
Let's look at a diagram for assembling a reliable hairdryer for home use:
- Assembling the temperature unit. It is recommended to use a nichrome spiral with a cross section of 0.5 mm as a material for the heating element. For reliable fixation, it is wound on a cylindrical base. It is important that during the winding process the turns do not touch each other. The leads of the spirals should be secured using temperature glue.
- The temperature unit is placed in a hollow cylinder made of thermal insulating material. The outputs of the spirals are connected to the power wires. Current-carrying parts are passed through a starter and a rheostat in order to regulate the incoming voltage.
- A hair dryer is installed on one side of the tube to create air flow.
- A nozzle is installed on the reverse side, the cross-sectional size of which depends on the tasks assigned.
Making such a welding gun is not at all difficult. To expand its capabilities, we recommend developing a mechanism for replacing nozzles.
Basics of making a radio hair dryer
The main condition when assembling a soldering unit is its safe operation and compliance with the tasks of both the entire apparatus and its constituent components. You can mount such a device from all sorts of outdated or faulty soldering irons, hair dryers, and computer components.
Selection of heating component
You will have to make this important component yourself, because the heaters from home heating devices are rather weak in power. The only device is an electric stove with an open spiral, but this is difficult to find.
In order to make a spiral of the required power, you will need nichrome wire with a cross-section of up to 0.8 square millimeters. The size of its rings should be no more than 7-8 millimeters, which is required by the compact design of the device.
The electric spiral is wound on a tubular or cone-shaped core. It must be made to be heat resistant and provide electrical insulation. Porcelain or textolite tubes from broken hair dryers meet these requirements. But it would be ideal to find a halogen lamp for tubular lamps and borrow an insulator from there.
Fan options
Any small but powerful fan is suitable for use as a supercharger. It will become, perhaps, the most expensive component in an improvised hair dryer. Primary requirements for its manufacture:
- Operating voltage 220 volts.
- The blowing flow force is from 20 liters per minute.
- Power from 400 watts.
An aquarium compressor or a small household fan will do. But you can also use a computer cooler.
Selection of body part
There are several ways to make a body for a hair dryer:
- Use a ceramic or porcelain base. This will ensure reliable insulation from thermal and electrical energy. True, such a case is difficult to find and expensive to purchase. Another disadvantage is fragility.
- Heat-resistant material can be used to protect the housing from the inside. Then you can avoid heating it.
The main part of the device is made from housing parts from broken hair dryers. Their size and design are ideal for these purposes. All that is needed is additional insulation of the bow, where the device nozzle will be located, and the temperature will reach its maximum.
The shell insulation can be made from asbestos plates, quartz mica or fiberglass. The nose part of the nozzle is made of metal.
Additional details
The design of the soldering device should be ensured by the following systems:
- Switching device. It will make it possible to turn off the soldering iron in an emergency or during a long break in work. A push-button or key switch is suitable for control.
- Ability to set optimal temperature conditions and blowing performance. This can be solved by installing variable resistances. They are dismantled from the same household hair dryers.
Choosing a hair dryer for soldering plastic and microcircuits
Such devices are rarely used in everyday life. Some people have not heard of them and have no idea how a hot air gun can help cope with many everyday and specific problems.
And yet, the main task of such devices is to assist craftsmen in soldering radio components and repairing products made of PVC and other materials that can be melted.
The appearance of such equipment is similar to construction equipment, the differences are in dimensions and special replaceable equipment.
Construction hair dryer device
A construction or technical hair dryer is a power tool designed to locally heat surfaces with a stream of hot air. Outwardly, it looks like a regular household appliance, only it is slightly larger in size and creates a higher temperature - up to 650o C. The hot air gun consists of the following main parts:
- housings made of heat-resistant plastic with a pistol-type handle and holes for air intake;
- a thermal insulating casing, inside of which there is a heating element in the form of a nichrome spiral wound on a ceramic base;
- an electric motor mounted behind the casing, at the location of the air intake holes, and a fan impeller mounted on its shaft;
- nozzles through which hot air is supplied outside;
- tool power buttons;
- power cable.
A construction hair dryer consists of a thermal insulation casing with a heating element, an electric motor and a device control mechanism
Some hair dryers are equipped with temperature regulators and indicators, as well as the ability to turn off the heating function when the fan is running. The last addition to the design is necessary for cold blowing of heated parts in order to cool them faster.
Safety when using a hair dryer
To protect yourself from injury, you need to know how to use a hair dryer correctly.
- Sharing use of the device and gas equipment is unacceptable. Particularly in kitchen areas, where there is the presence of open air and flexible hoses. Improper operation and sparking may cause a gas explosion.
- It is prohibited to use a construction hair dryer to work with paint and varnish materials in an unventilated area. When heated, harmful components scatter, which are hazardous to health.
- When removing paint, you must first find out what its origin is, as there is a possibility that it contains toxic lead.
- When using a construction hair dryer for any task, it is necessary to provide for the availability of fire extinguishing means in advance.
- The work process should be carried out wearing gloves and long sleeves to protect against possible burns.
- When removing paint from windows, you should use a special nozzle that protects the glass. But a homemade device naturally does not provide for it. Therefore, it is better to purchase it or remove the paint without using a hair dryer. Since during operation there is a high probability of glass breaking and flying fragments.
- When working with such equipment, you must ensure that there are no children or animals nearby.
First, the hair dryer is checked from a safe distance. If the device functions properly: the coil heats up to a red state, air is being pumped, then this indicates that the device can be used. To try it out in practice, use something of lesser value.
Making a hair dryer with your own hands at home is not easy, since it requires certain skills and knowledge of designing electrical appliances. If you do not take into account the list of necessary requirements, then equipment breakdown is not completely ruled out. To prevent this from happening, you can watch the video tutorials below on creating devices of this type.
Features of making a hot air gun with your own hands
The key criteria for a homemade hair dryer for soldering microcircuits must satisfy the following conditions:
- The blowing jet must warm up to approximately 850 degrees Celsius.
- Two and a half kilowatts is the minimum power of the device’s spiral.
- The components of the device should be inexpensive or made from suitable parts of other equipment.
Self-made hairdryers can be either manual or stationary.
The device of a non-movable design is easier to manufacture due to the fact that its dimensions are not limited. However, if you permanently fix the location, you will have to move the elements being glued, which is not very convenient.
An alternative manufacturing method is mobile, but it must provide good thermal insulation of the device to avoid burns.