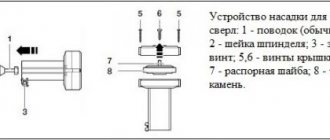
| № | Name | Rating | Nomination |
| 1 | Gunners Tool TS100 | 4.96 | Highly rated by buyers |
| 2 | Lefavor Electric Soldering Iron 936 | 4.94 | The most popular |
| 3 | SumSour Soldering Iron | 4.90 | Convenient indicator |
| 4 | NovelLife SH72 Electric Soldering Iron | 4.87 | The most reliable |
| 5 | LDKGJJS Soldering Iron | 4.85 | The best option for working in the car |
| 6 | Handskit Digital Soldering Iorn | 4.82 | Best price |
| 7 | Lefavor Soldering Iron | 4.80 | |
| 8 | SHHONG S2-4 | 4.75 | The most complete set |
| 9 | ANENG SL102 | 4.71 | Remembers the temperature |
| 10 | JCD 908s | 4.64 |
Radio components are electronic components that are used to manufacture various devices. Nowadays, there is often a need to repair a broken charger, fix a device microcircuit, etc. In this case, you cannot do without a soldering iron. When choosing, it is important to consider that you will have to work with small parts, so the tip must be pointed. It is also advisable to choose devices with temperature control, otherwise the elements of the microcircuits can simply be damaged. In addition, the soldering iron must heat up and cool down quickly, otherwise the repair will take a long time. We have collected the most functional and reliable models presented on AliExpress, with prices several times lower than in regular stores, in this review.
What kind of soldering irons are there?
Soldering irons vary in heating, design and purpose. There are both gas and arc ones. But it is electric soldering irons that have gained the greatest popularity. In this article we will look at different types of soldering irons and soldering stations, and their features.
We will mainly consider tools for soldering electronic circuit boards, rather than water pipes and massive structures.
Tools
When working on soldering circuits and wires, just having a soldering iron is not enough. For this type of installation, additional materials, tools and equipment will be required:
- Stand for the soldering iron itself. The temperature of the tip, even after completion of work, can be up to 300 degrees for some time. To protect surrounding people and objects from burns, there must be a stand. If you don’t want to spend money on it, you can easily make it yourself.
- Solder. It is an alloy of tin and lead, which is needed for contact with the surface.
- Rosin. Essentially, it is a solid resin that is used to remove oxide films and grease layers from surfaces.
You may be interested in Single-phase automatic machine c16
Important: you should not breathe vapors or smoke from solder and rosin, as this has a negative effect on the human body.
- Tweezers. Used for working with small radio components. It is best to take a tool whose ends are pointed.
- Side cutters. Mainly useful for working with wire and for stripping wires.
- File. It is used to file off the soldering iron tip if necessary.
- Screwdrivers. It’s better to buy a whole set with different attachments at once.
Copper and “eternal” stings
Before reviewing the soldering irons themselves, you need to give a general idea of the main types of tips and their differences.
There are copper tips, and so-called non-burning “eternal” tips.
Features of copper tips
Copper tips are the most common type of tips. However, today they are losing ground to other types of stings.
Let's look at the pros and cons of copper tips.
Pros of copper tips:
- Low price;
- Available at any radio store;
- They heat up faster and lose heat more slowly;
- Copper blades are low maintenance. They can even be cleaned with files;
- Copper tips can be machined, i.e. give them shape with a hammer;
- They make it easier to start your journey in soldering.
And yet, the disadvantages of copper tips are quite critical:
- A meager set of stings in shape and size. Even if you find a thin copper tip. then it will quickly lose its shape;
- There is also the need for tinning before work. It's not difficult, but it takes time;
- Copper tips quickly lose their shape due to high temperatures and need to be replaced.
Care of copper tips
It's time to forget about cleaning the tip with wooden planks. For these purposes there are sponges and copper shavings.
Caring for these stings is simple. Excess solder and soldering flux residues can be removed with a damp sponge.
And with the help of copper shavings you can remove both excess solder from the tip and carbon deposits from its surface. As a last resort, you can process the surface of the copper tip with a file. You can also give them the desired shape using a hammer and anvil. They are easily deformed by light blows with a hammer.
Copper tip tinning
Before you start soldering, the copper tip must be tinned, i.e. Cover the work surface with a small layer of solder.
Without tinning the copper tip, soldering will be difficult.
Leading fireproof tips
This is a type of tip (they are also called “eternal”) that does not need to be tinned before starting work, does not lose its shape, and can be used for years. They have a special coating, usually a thin layer of nickel alloy. These types of stings have their own significant advantages and disadvantages.
Advantages of fireproof “eternal” stings:
- Can be used for a long time;
- There is no need to tin them;
- Wide variety of different shapes and sizes;
- High-quality tips keep their proper shape for a long time.
Flaws:
- It is strictly forbidden to clean such tips with a file, needle files or sandpaper. You risk destroying the non-burnable surface of the sting. An exception is copper shavings for cleaning carbon deposits and excess solder;
- The tip gives off heat quickly and gains it more slowly, unlike a copper one (strongly dependent on the design of the tip and the soldering iron as a whole);
- Very easy to care for. Beginners may have difficulty with them;
- Non-burnable surfaces are easily corroded by soldering acid;
- It is more difficult to get used to them after copper stings.
Caring for unburnt tips
Non-flammable tips cannot be handled or cleaned with any tools. You can clean the surface of the tip from excess or old solder with a damp sponge.
The sponge should not be too wet, otherwise there will be splashes and steam. You can remove oxides and excess solder from the tip with copper shavings. Copper shavings do not damage the coating of the tip.
But the main thing to remember is one rule - there should always be solder on the tip. The exception is when you need to remove excess solder from the board or parts.
We removed the braided solder from the board contacts and immediately applied new solder to the surface of the tip. Solder on the tip protects the working surface from strong oxides that arise during soldering due to air.
If the tip is covered in oxides, then solder will stop sticking to its surface.
It can be re-tinned, and even restored using a sting activator. Read more in this article. If you had to solder with acid, then immediately after work clean the tip with a sponge or shavings to remove solder, and cover the tip with fresh solder.
It is also unacceptable to mechanically process a non-burnable tip or shape it with a hammer (as is done with copper tips).
In terms of a number of advantages, “eternal” stings are in the lead. Just one good quality tip can be used for years, and it will be like new. But not everything is as simple as it might seem at first glance.
Secrets of soldering radiators at home
It is important for almost every car owner to know that soldering the radiator is quite feasible at home. Before you start soldering car or other radiators, you need to familiarize yourself with the basic secrets of this process and gain certain skills in working with a soldering iron.
Car radiator diagram.
It is necessary to use certain knowledge about the properties of non-ferrous metals:
- upon contact with air (more precisely, with moisture that is present in the air), an oxide film is formed on the surface of the metals, which prevents reliable contact between the metal and the solder;
- For each metal there are certain solders and additives (fluxes) that accelerate the reaction:
- the higher the surface temperature, the easier it will be to solder the product
Copper radiator repair
For soldering you need to have a small set of tools and materials. This should include:
Tools and materials for soldering.
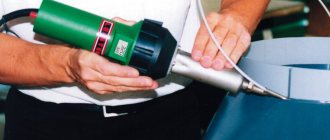
- soldering iron (power about 100 watts);
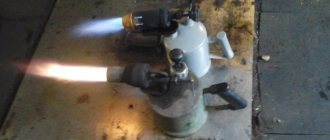
- gas burner or special hair dryer;
- solder for this type of metal;
- rosin;
- sandpaper or wire brush with relatively soft bristles
First, we clean the area of the upcoming soldering from dirt and oxide film using sandpaper and degrease the area with a solvent. Due to its chemical properties, the solvent is harmful to health, so use personal protective equipment when working with it. Using a hairdryer, the surface is heated, then it must be treated with acid. Under the influence of acid, a chemical compound is formed on the surface of copper radiators, which enhances the penetration of solder into the metal structure. After a few minutes (5-7) you can start tinning the surface: apply a thin layer of rosin to it with a soldering iron, then a thin layer of solder. There is very little left: apply a small amount of solder to the leak site. After completing the process of soldering the radiator with your own hands, the entire surface at the soldering site must be heated again.
Return to contents
Working with aluminum is much more difficult than working with other metals, so it is not recommended for an inexperienced craftsman to undertake soldering of an aluminum car element. There are special workshops for this. If you are determined to carry out this process yourself, then you will need to additionally purchase active fluxes to remove the oxide film from the surface of the aluminum radiator at the point of damage.
Scheme of gas welding of aluminum.
As a rule, craftsmen use fluxes 34-A, NITI-18 or their analogues in this case.
At home, the oxide film is removed mechanically: rosin is mixed with metal filings and the surface at the site of damage is treated with this mixture using a well-heated soldering iron.
This kind of “scrub” for the surface of aluminum radiators is designed to perform two tasks: metal filings clean off the oxide film, and rosin resists the appearance of a new one.
Directly soldering an aluminum product in the future will not differ fundamentally from a similar process for a copper radiator.
It is only necessary to take into account that the melting point of aluminum is very different from that of copper.
You will have to try not to put the radiator in a state that cannot be repaired by your actions.
Return to contents
A large crack (or other damage) on a car radiator can be repaired by soldering a copper or brass patch to the damaged area. This process is not particularly technologically advanced: the soldering points on the surface and on the patch are processed in the same sequence, the actions will be similar. The question can only be the compatibility of metals. The brand of brass and the brand of copper can differ fundamentally both in physical parameters and in the requirement for the use of fluxes. In this case, the soldering quality will be poor. Ideally, you should use patches made of the same material as the radiator itself.
For aluminum radiators at home, soldering a patch is almost impossible.
expertsvarki.ru
Conditional separation of instruments
All tools (no matter for what job) can be divided into three conditional groups:
- Tools that require experience to operate. They do not tolerate mistakes, and give a false idea of the craft;
- Tools that don't require much experience. They will help you learn this or that job, and tolerate the mistakes of beginners;
- Professional tools that are too good for beginners. They require a lot of experience to realize their rich potential in work, but can also help in training.
Now let's look at examples of soldering irons and soldering stations.
Soldering flux
In order for soldering to be of high quality, the solder must firmly adhere to the part being soldered and moisten it. But when heated, almost any metal intensively oxidizes and is absolutely not wetted by solder. Even if you manage to depict something using a soldering iron and one solder, such soldering, called “cold” soldering among experts, will not provide either good contact or mechanical strength. An example of cold soldering can be considered a photo, which on many information resources for some reason is an example of exceptionally high-quality and correct work:
The solder did not adhere to the copper of the wires at all - this solder can be disassembled with bare hands
To ensure reliable adhesion of the solder to the metal being soldered, one or another flux is used. According to the method of influence, they are divided into two categories:
- passive;
- active.
Passive fluxes, as their name suggests, do not interact with the parts being soldered. Their main purpose is to ensure good spreadability of solder and prevent the formation of an oxide film when heating the parts being soldered. Passive fluxes are easy to use, affordable, safe for humans, non-conductive and completely neutral (do not require cleaning after soldering). The disadvantages of fluxes of this type include the ineffectiveness of use on oxidized parts.
The well-known rosin is the most common passive flux.
Active fluxes not only improve the spreadability of solder and prevent the formation of an oxide film, but are also capable of destroying this film. In view of this, acid or alkaline fluxes are widely used for soldering metals that are highly oxidized or instantly oxidized in air. There are even substances that remove varnish from an enameled wire when heated with a soldering iron. The disadvantages of this type of flux include high corrosive and electrically conductive properties (the flux must be washed off after soldering) and danger to humans.
Fluxes produced by industry based on acids.
What flux is best to use for soldering wires? If you are going to work with copper, then the ideal option would be rosin or a solution of rosin in alcohol. Even if the wires are old, but it’s easy to clean them to a shine, it’s still better to use rosin. It is a good dielectric and absolutely does not interact with metal at the chemical level.
You will need active flux if the wires are heavily oxidized or made of alloys that are difficult to solder - nickel, steel, aluminum, etc. Although no one prohibits the use of these compounds for working with ordinary copper. The only thing is, if you don’t want the connection to fall apart in a month or two, do not forget to thoroughly rinse the soldering area with alcohol or gasoline after work. And, of course, immediately wash your hands with soap - acid is acid, even if it is soldering.
The simplest nichrome and EPSN soldering irons
The most popular soldering irons are nichrome soldering irons with copper tips without a temperature controller.
These are old Soviet soldering irons and EPSN. They work very simply.
The nichrome spiral heats up from the electric current passing through it (usually a mains voltage of 230 V). And it heats up the soldering iron tip.
Soldering irons with this design have been around since the dawn of electronics. They are still ideal for soldering wires and simple DIP mounting of large parts on boards. And also for soldering radiators and cooling systems.
Conventionally, 60 years ago they produced more soldering irons. Not every KT315 could withstand huge stings that heated up to 380 ℃. Radio amateurs soldered as best they could. Someone assembled a temperature controller using triacs. And someone wound copper wire over the tip, having previously tinned the edge of the wire. And in this way an even smaller tip was obtained, which was heated from the main one to acceptable temperatures.
These soldering irons are already obsolete. Yes, they are still being produced, but this is due to their cheapness and simple assembly. Of course, modern soldering irons are much better than their previous generations, but due to their features and capabilities, they are poorly suited for thin SMD soldering.
The tip of such soldering irons is usually secured with bolts or nuts with bushings. The advantages of such soldering irons:
- Low price;
- Sold in any store for radios, electricians and apartment repairs;
- They are ideal for soldering wires and large DIP pins.
However, in current realities, such soldering irons have significant disadvantages:
- Even the smallest soldering iron (25 W) overheats boards and parts. It is necessary to assemble an additional temperature regulator to reduce the temperature at the soldering iron tip;
- There is no grounding;
- As a rule, such soldering irons are powered directly from the mains and are not controlled by anything. Yes, you can buy a soldering iron powered by 40 V with a step-down transformer, but the price will be higher;
- Lack of even the simplest temperature display, not to mention calibration;
- Poorly suitable for fine work;
- It takes a very long time to heat up and cool down (heating time can reach 10 or 15 minutes depending on the size);
- Poor selection of stings due to mounting and heating.
Slightly improved soldering irons of this type are currently being produced, but they are not far removed from their ancestor. All the same copper tips, all the same simple design.
The more power a soldering iron requires, the larger it will be. A 25 W and a 100 W nichrome soldering iron differ in size by almost 3 times.
An example of a SPARTA soldering iron. Copper tip, coated. Burns out. Suitable for soldering wires and DIP parts for the first time. The price is only 150 rubles, and a soldering iron stand is also included (albeit very fragile).
Copper tips for nichrome soldering irons are of poor variety. Usually these are conical, flat and wave-type stings. All copper tips are solid, i.e. they are heated by a nichrome thread from the outside, not from the inside.
Also, copper tips for such soldering irons can be produced with a special coating, which slightly extends the service life of the copper tip (but not for long). Should beginners buy these soldering irons? Yes, at least because of its price and for the sake of the first experience. You can simply desolder parts with such a soldering iron, solder wires, or assemble simple radio sets. Enough for the first 10-15 hours of practice.
These soldering irons are cheap, reliable and simple. And are available in any radio parts and repair stores. You can solder wires and pipes (with high-power soldering irons), but nothing more. This option is not suitable for fine work. Modern electronics are much more complex, so the requirements for installation and soldering irons have changed.
The main thing is to take a soldering iron with a wooden handle, and no more than 25 W. A wooden handle heats up less and does not smell as strong as a plastic one. And it is advisable to assemble a temperature regulator for such a soldering iron. You can take, for example, an EPSN soldering iron.
Connecting wires
Before connecting the wires in the junction box, we advise you to study the rules for their installation.
After all, it is important not only to properly connect the wires to each other, but also to correctly insert them into the junction box, and also conveniently position them for possible inspection or repair
Rules for installing wires in a junction box
First of all, let's look at the rules for the arrangement and installation of wiring in the distribution network. After all, it is with this factor that any installation begins.
Standards for installing wiring in a junction box
- First of all, you should remember that no more than eight groups of wires can be laid in one groove, box or pipe.
- All connections must be made in accordance with clauses 2.1.17 - 2.1.30 of the PUE. These clauses provide for a whole range of restrictions. First of all, remember that the wire in front of any contact must have a reserve sufficient for at least one reconnection.
- Before connecting the wires in the junction box, make sure that they are free of tension. Or that this tension will not occur due to temperature changes.
- Any wire connection points must be accessible for repair and inspection. At the same time, these places should be organized so that inspection is not hampered by structural elements.
- Any connection must be insulated. In this case, this insulation must correspond to the level of the main insulation. To achieve these parameters, it is better to use electrical tape or heat shrink.
- The distribution boxes themselves must be made of fireproof or fire-resistant materials. like in the video. This is especially true for the installation of wiring on combustible structures, which are subject to additional requirements.
Options for connecting wires in a junction box
First, let's look at how to connect the wires in a junction box. After all, it is the contact connections that are often the most vulnerable point of any electrical network and any shortcomings appear very quickly.
According to clause 2.1.21 of the PUE, all connections of wires and cables must be made by welding, soldering, crimping, screw or bolt compression. Other connection methods, especially twisting, are not allowed. Based on this, let's look at each of the possible connection methods separately.
Welding connection
The most reliable connection of wires is considered to be the welding method. It has the lowest transition resistance, resulting in virtually no increased heating. In addition, over time, such a compound does not lose its properties.
Welding of wires in the junction box is carried out using a special welding transformer and a carbon electrode. The cost of such products is high enough for a simple replacement of wiring in an apartment, so you can often find homemade devices. Typically these are transformers up to 600 W and voltage 9 - 36V.
The second place in reliability is the connection using the soldering method. This method is more accessible for home use because it does not require special equipment other than a regular soldering iron.
Connecting wires by soldering
Soldering of wires in the junction box is carried out using conventional technology and does not impose any special requirements.
The only point worth paying attention to is the quality of such connections. Indeed, if heated, the tin will heat up quickly enough and the contact will disappear
To prevent this, soldering is often combined with a twisted connection.
Wire crimping has recently become increasingly popular. After all, a large number of fairly cheap tools for crimping wires have appeared on the market, and the price of consumables for this method is quite low.
Connecting wires using crimping method
But the most common method is still the screw or spring clamp method. A huge number of buses and terminals currently on the market allow for a fairly reliable connection of wires.
Note! Screw terminals should be used to clamp single-core wires. If you use stranded copper wire, then you need to purchase special tips that will prevent the screws from breaking the strands of the stranded wire when clamping
These lugs are attached to the wire using the crimping method.
Modern soldering irons are already soldering stations
What is a soldering station? This is not necessarily a soldering iron + soldering iron set. It can be one soldering iron, but with regulation, configuration, control and temperature indication. Modern soldering irons can fit all this right into the handle. Therefore, such soldering irons can be considered stations. But due to the more familiar format “just a soldering iron and a power cord from it”, it is still perceived as an ordinary soldering iron, and not a station.
A soldering station doesn't have to be expensive. It may even be cheaper than some soldering irons. Further in the article there will be examples of such conventional “soldering stations”. As modern electronics installation has become more complex, the need for different types of tips and temperature control has increased.
Requirements for modern soldering equipment for 2022
If you are going to solder boards or repair electronics, then the soldering irons and stations are required to:
- Availability of temperature control with stabilization, indication and adjustment functions;
- Various fireproof “eternal” stings in shape and size;
- Sleep and temperature memory functions (so as not to keep the soldering iron constantly on, thereby saving electricity and reducing the load on the tip);
- Good characteristics of temperature stability on the tip.
Currently, not all soldering irons meet the requirements presented. Let's look at popular soldering irons and stations among radio amateurs and electronics engineers.
Soldering irons 900 series
The next most popular are CXG soldering irons with HAKKO 900 series tips.
The most popular were the 900M. The sting sizes are given below (sometimes they may differ, especially Chinese copies).
These are the most popular fireproof stings. They are sold in almost any radio store, not to mention AliExpress. The variety of shapes allows you to perform a wide range of tasks for soldering boards and radio components (DIP, SMD and BGA).
Numerical and letter designations are practically not mentioned. Typically, stings are named by their visual shape (cone, hatchet, flat, etc.). Compared to conventional tips for nichrome soldering irons, the 900M tips are hollow (empty inside, because they are put on the heating element).
Attaching the tip to the heating element of the soldering iron differs from simple nichrome ones. Here the tip is secured with a nut and bushing.
Installed on a huge number of soldering irons of different stations. For example, on Lukey HAKKO 702, 936, 902, 701, 8586, etc. In addition to Lukey, there are different copies of the station under other names.
However, despite all the advantages, this type of tip has a serious drawback - the gap between the heating element and the tip itself.
But first, let's look at examples of soldering irons with such tips. They are also different.
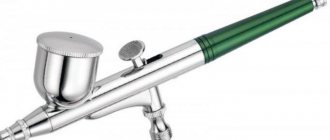
Soldering iron with blue handle SumSour 220 V from AliExpress
This is practically the most common soldering iron. Usually sold as a set with soldering tools like this: Power 60 W. Power supply: 220 V. Temperature adjustment is carried out by turning the potentiometer from left to right.
Features a typical 900M series blade mount. This soldering iron doesn't even have a thermocouple to measure and control temperature.
This is an example not from the series of “soldering stations”. This soldering iron only has power control and a power indicator. That's all. There is no real regulation here, much less control and stabilization of the temperature on the tip.
Power adjustment is carried out by changing the position of the potentiometer, which in turn regulates the BT136S triac. And BT136S supplies voltage to the heater.
These soldering irons are sold individually and in sets. It is not recommended to buy sets due to low-quality components. An example of low-quality components from a typical set:
Tweezers are curved. Low quality solder. Even the stings burn out quickly. Yes, stings from AliExpress can also be of good or terrible quality.
The tips from this set quickly lose their shape after a few days of use. The tip in the photo example on the right lasted more than 7 years. Therefore, soldering with the tips included in the soldering iron kit is not recommended.
The only thing that is really good in this set is a thin copper wire for jumpers, a sponge for cleaning the tip from solder, and a stand for the soldering iron (although it is also flimsy).
Pros of SumSour 220 V from AliExpress:
- Low cost;
- The popular 900M series tips are used;
- There is an indication of inclusion;
- There is power adjustment.
Serious disadvantages of the soldering iron:
- Mediocre build quality due to cheaper production;
- No grounding;
- Not heat resistant wire;
- No temperature control. The temperature is regulated by a triac. There is no thermocouple that would measure temperature in this soldering iron;
- The problem with overheating of the tips from the point above;
- Slow heating of unburnt tips of the 900M series (this is a common problem for all soldering irons with such tips, but here without a thermocouple everything is much more serious);
- There is no temperature display, not to mention sleep mode and other useful and mandatory functions of modern soldering irons.
This soldering iron can solder wires, DIP chips, SMD parts and even BGAs, but it is absolutely not suitable for beginners. Without experience and practice, you can stumble upon serious shortcomings of such a soldering iron. It doesn’t even make sense to buy it for such quality, not to mention sets.
If you already have such a soldering iron, then be sure to buy a new set of high-quality fireproof tips for it. And if possible, it’s better to buy another soldering iron.
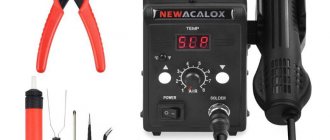
Soldering irons GS90D
These are no longer just soldering irons, but full-fledged stations. Available in different capacities.
The control and display board of the GS90D is located in the handle itself. Temperature adjustment is carried out using buttons.
The GS90D is better, and on average 3 times more expensive, than the blue handled SumSour soldering iron shown above, but it still has the same tip problem of the 900M series.
Pros of the GS90D:
- Availability of temperature indication;
- Good adjustment;
- Uses the popular 900M series tips;
- Heat-resistant wire (at first glance this is a trifle, but sometimes due to carelessness you can accidentally burn the wire and not notice it in time. Here the wire is protected from such cases);
- There are additional functions.
Minuses:
- Not the best thermal stabilization;
- Overpriced.
Of course, this soldering iron goes to a new level compared to the simplest ones, but it is not the best choice for beginners. It just doesn't hold the temperature well and has the disadvantage of the 900M series tips.
Soldering station Lukey 702
Popular soldering station Lukey 702 among radio amateurs and electronics engineers. The station's soldering iron is a clone of Japanese HAKKO soldering irons. In general, in other Lukey models the soldering iron is the same as in the 702 (there may be differences in the type of heater, but more on that below). The station has a soldering gun, which makes soldering any components much easier. This is a significant plus. This station also has a soldering iron with 900M series tips.
As you can see, this iron has more internals than the SumSour 220 V. 5 wires are connected to the station from the soldering iron. The first two are a thermocouple for controlling and measuring temperature, the other two are a heater.
The fifth wire is ground.
Grounding allows you to reduce the risk of damage to the chips on the board by static electricity, which can appear on the soldering iron tip or even on the station itself.
The temperatures of the hair dryer and soldering iron are adjusted using buttons.
There is a soldering gun and a soldering iron that can be used to perform 90% of soldering work and replacing display modules or back covers of smartphones and tablets. In addition, the hair dryer has replaceable nozzles for different sized jobs. From the soldering gun the following are connected to the station: a thermocouple, a heating element, a turbine, grounding and a reed sensor. The reed sensor responds to a magnet that is installed in the hair dryer stand. Need to put your hair dryer into standby mode? Just place it on the stand with a magnet. The hair dryer will begin to cool down quickly and go into standby mode. And if you need the hairdryer again, you just need to take it from the stand. The hair dryer will begin to heat up to the temperature at which it was placed on the stand.
On the other hand, this station has a number of disadvantages that can be problematic for both beginners and experienced electronics engineers. Let's look at the pros and cons of the station.
Pros of 702 station:
- There is a soldering iron with 900M type tips and a hair dryer;
- It is possible to change the nozzles on the hair dryer and the tips on the soldering iron;
- Easy adjustment of temperatures and air flow;
- Thermal stabilization and temperature control;
- Automatic shutdown of the hair dryer (there is a reed switch in the handle of the hair dryer that turns off the hair dryer if you put it on the stand);
- Digital temperature display;
- Fast heating;
- It is possible to calibrate the temperature.
On the one hand, this is a good price-quality station for a small workshop for repairing equipment. But it is outdated and has a number of disadvantages:
- There is no automatic shutdown of the soldering iron;
- Still the same problem with 900M tips;
- High price;
- Without disconnecting from the network, the station can turn on itself;
- Not heat resistant wires.
- Terrible PS/2 connector on the soldering iron;
- A large hair dryer with a lot of vibration in the body due to the turbine.
If desired, you can reflash the Lukey 702 using a programmer, improving the operation of the station.
Disadvantages of 702 station and its improvements
The problem with wires is that they are not heat resistant. You can melt them by mistake or accidentally. Connecting a soldering iron leaves no room for improvement. It is made through a PS/2 connector, which can be found on old computer keyboards and mice. If the mount for the computer is not critical, then for the station everything is in vain. The connector is not fixed by anything, and can often simply fall out when working with a soldering iron.
And the hair dryer cannot be disconnected from the station if it is not needed (and if it breaks, it will be more difficult to replace it with a new one). In other analogue stations there is practically no such defect. So, should we take station Lukey 702? There are two options. Either take 702 and improve it, or take a similar station that will have these shortcomings corrected.
For example, this Eruntop 8586 station has power off buttons (not to be confused with regular power off buttons, which do not disconnect the station from the network). And overall it is much cheaper. Although it does not have a soldering iron temperature indicator.
And in general, the analogues look more compact than the original 702 station itself. From the point of view of circuitry, they are identical (except for the control function for adjusting the air flow. It is digital. Although this is even more convenient.
Or here is an example of a station that is a close analogue of 702.
Therefore, the purchase of station 702 is in question. You will overpay for the brand and popularity of the station, although you can buy exactly the same modified station. And of course, the connectors for connecting a soldering iron and hair dryer to the station may differ.
There are also options with compressor control of the hair dryer. This hair dryer is lighter, it produces less vibration and noise, however, due to the compressor, the station itself is large, and the hair dryer cannot be disconnected from the station. And the compressor at the station is very noisy. If you still decide to buy a 702, then remember that it must be turned off from the network after use. Or install a plug with an off button. There is a design flaw in the station. Even if you turn off the soldering gun from the front button, and it is on the stand, it may turn on spontaneously due to the failure of the triac. Such cases have already happened. The hairdryer just caught fire. The on and off buttons on the front side of the station do not turn it off from the network. Therefore, the station must be disconnected from the network if you are finished soldering.
An example of modification of the Lukey 702 soldering station:
Problem with 900M series tips
The main problem with these tips is the presence of a large empty space between the heating element and the tip itself.
There are several possible solutions.
Reducing the gap
You can move the heating element, fill the gap with sand in empty places, or pick up a small nut on the tip of the heating element.
Or you can even move the heating element closer to the tip. Although these solutions, to put it mildly, are not very good. If you need a different type of tip, you will have to install everything again. By the way, the heating element itself is very fragile. Such modifications can easily damage it.
You can also replace the old nozzle with a new one, which is smaller in size. This will allow you to reduce the distance between the heating element and the tip.
Installation of a ceramic heater
There are two types of heating elements. These are ceramic and nichrome. Ceramic heats up faster and holds the temperature better. But it's more expensive. It’s true that simply replacing a nichrome heating element with a ceramic one will not work. Firstly, they have different temperature sensors. Secondly, you will have to calibrate the station. Well, the final touch is the need to replace the operational amplifiers that amplify the data from the temperature sensor. The sensor values for nichrome and ceramic heaters will be different. For one, the sensor can be made using a thermocouple, and for the other, using a thermistor. This is a significant difference.
In the Lukey 868 station, Japanese ceramic heaters were installed in the soldering irons, and in the Lukey 702, Chinese nichrome ones were installed. They are not compatible without additional changes to the circuits.
Station calibration
Many stations have a calibration function. There is software calibration where you can adjust the station’s custom temperature to the real one. And there is the usual setting using potentiometers. Such potentiometers are installed on boards.
Temperature meters are needed to calibrate the station. Without them, it will not be possible to accurately calibrate the station. Of course, you can set it approximately to the melting temperature of the solder, but this will not be as accurate as checking with another independent temperature measuring device.
Working together with a soldering gun
Using a soldering gun you can stabilize the soldering temperature of the soldering iron. It is enough to simply heat the soldering area with a hairdryer at 100-150 °C with medium air flow. This method allows you to avoid the appearance of large drops of solder on small contacts (especially when soldering any connectors, such as micro usb)
Use of copper tips
Alternatively, you can use copper tips. They heat up faster than non-burnable ones. You can choose an identical copper tip in shape and size exactly the same as the non-burnable one. Installs exactly the same as fireproof. Although this option is not ideal. Yes, such tips are in demand, but copper tips lose their shape during operation. Of course, they are not as expensive as fireproof ones, but this is still not a solution. They also need to be tinned constantly before work. And modern stings have long ceased to be consumables. And changing the shape is a very critical parameter, especially if you solder every day. And finding really good copper tips on AliExpress is quite problematic.
The problem with the 900M stings has been resolved in the next generation.
User manual
There are often nuances in work that need to be corrected. The main points will be discussed below.
Soldering chips
When operating microcircuits and chips, it is necessary, first of all, to exclude the possibility of overheating of the chip. To do this, you need to touch each of its contacts for no more than three seconds. After this, the contact must be cooled and only then can the soldering process be carried out again.
Before soldering, the chip contacts are prepared and processed by applying a thin layer of solder to them, which will improve contact with the surface. Flux is applied to the legs of the element and a tip with solder is passed over them. If the procedure is carried out correctly, the contact will be shiny and smooth, without various accumulations of solder.
Various types of microcircuits
Pin chips
If the chip has leads in the form of pins, then the process of soldering it into the board occurs as follows:
- The microcircuit is installed in special holes in the surface of the board.
- On the opposite (back) side, flux is applied to the pin contacts.
- Each pin is soldered on the same reverse side.
- Remains of flux are removed.
Pin chip
Soic chips
Chips of this type are soldered slightly differently. This method is most often called "solder wave". Its essence is that molten solder in a liquid state fills the space between the metallized part of the board and the contacts of the part. This creates a drop that is capable of conducting electrical impulses.
The solder wave method is performed in the following few steps:
- Tin and moisten with flux all surfaces that will provide contact.
- Place the microcircuit on the surface of the board so that all the legs are aligned with the metallized tracks.
- To begin with, you need to solder only one corner contact.
- Next, the second contact is soldered, located diagonally in relation to the first. In this case, you need to make sure that all other contacts remain on their metal tracks.
- Next, flux is applied to all soldered and free ends of the microcircuit.
- Next, using the tip, the solder is evenly distributed over the contacts.
- If solder bridges form between the contacts, you must remove them, as the jumpers will interfere with the operation of the components. Removal occurs using a special metal braid. To do this, place it on top of the jumper and pass it with the tip of a soldering iron. In this case, the solder is absorbed into the braid.
Important! When performing soldering using the “wave solder” method, there must be a sufficient amount of flux at the places where soldering is carried out directly to ensure wetting of the surfaces.
You may be interested in Magnetic generators operating without fuel
Soic chips
Dismantling microcircuits
Planar chips are desoldered from the board using the following algorithm:
- Using acetone and ethyl alcohol, remove the varnish from the contacts completely.
- Flux is poured onto all contacts that will be soldered.
- Close all contacts using solder, accelerating it with a heated tip. The applied solder must remain liquid.
- Then you need to run the sting over all contacts, melting all the solder.
- Remove the chip.
New generation of tips – T12 cartridges
The new generation of stings is structurally different from those presented above. It's not even a sting anymore, it's a cartridge.
It is even incorrect to simply compare the 900M tip and the T12 cartridge. A single T12 housing contains both a thermocouple and a heating element.
A correct comparison of T12 with 900M blades would be like this. T12 tips do not have such a gap between the tip itself and the heating element. This will allow you to achieve the best contact between the heating element and the tip itself.
There are only 2 wires coming from the cartridge itself. This is both a heater and a temperature sensor.
The 900M from Lukey 702 has separate wires for the heating element and temperature sensor.
The tip itself is made of copper inside and covered with an alloy on the outside. Of course, T12 tips (cartridges) will cost more (especially original ones) than 900M. One cartridge will cost approximately the same as a whole set of different types 900M! But do not forget that the T12 cartridge is both a heating element and a temperature sensor. And all this in one building!
Let's compare different types of stings in one photo:
And of course the T12 tips have a wider selection of different tips. No 900M tip can achieve exactly the same miniature tip as the T12 and still maintain its performance.
Now let's look at a typical T12 soldering iron.
Externally, it looks like a soldering iron with 900M tips. Of course, the cartridge (tip) changes differently. Simply unscrew the nut and sleeve and you can change the cartridge. To completely disassemble you need to unscrew the base of the handle. There is nothing inside except the contacts for connecting the T12 cartridge and the switch (vibration sensor). But where is the grounding? This soldering iron does not have it. Those. The station itself to which this soldering iron is connected is grounded, but the soldering iron itself is not grounded. There are different soldering irons and T12 stations. Somewhere there is a grounding of the soldering iron, and somewhere there is not.
The SW-200D ball switch (vibration sensor) allows you to put the soldering iron into sleep mode.
You stop using the tip, put it on a stand, and the temperature on the tip automatically decreases to room temperature. This is economical, convenient and protects the tip from unnecessary excess heat. And the most important thing is that you can use any stand. This is a ball sensor. It only reacts to prolonged inactivity. The same reed sensor in a soldering gun on a Lukey 702 will turn on only when a magnet approaches, i.e. when you place the hair dryer on the stand with a magnet. And here, while the soldering iron is in operation, it periodically moves, and the ball sensor does not put the soldering iron into sleep mode.
T12 cartridges heat up faster, transfer heat better, and are much better at soldering, unlike the above-mentioned soldering irons. Pins with T12 cartridges have deservedly gained fame as very high quality and the best of their kind among repair shops and radio amateurs.
Finding something better in terms of price and quality is currently simply unrealistic. If there is something better, it is only ten times more expensive.
Among the disadvantages of T12 soldering irons, we can highlight the wear of contacts in the body. Those. Over time, when cartridges are frequently replaced, the contacts may begin to lose contact with each other. To a large extent, everything depends on the type of soldering iron body. There are plastic cases for 500 rubles, and there are metal ones for 2,000.
Now let's look at a soldering station based on T12.
Soldering station Quicko T12-952
One of the best T12 stations.
There is a power off button and a standard network cable connection. There is also a 24 V power supply option instead of mains power. If necessary, the fuse can be changed without disassembling (although it is better to look at the station board for faults if the fuse does blow).
A display with the main menu is installed. Lukey 702 doesn't have nearly as much information about the station. When you press the encoder (temperature regulator) for 2 seconds, a menu of settings and additional functions will appear.
You can set the auto-shutdown time of the soldering iron and adjust the temperature. increase the voltage, find out the firmware version, turn off the sound notification, etc. A whole mini PC!
Among the shortcomings of the station, you can cancel the lack of grounding of the soldering iron and the lack of Russian language in the menu and settings.
KSGER T12 FX9501
This is basically the same station, but it has different firmware and a different developer. You can even select the type of tip used, the time, and even set a password for the station (although why do you need to set a password for the soldering station?).
This station has a soldering iron grounding.
The entire T12 station in one handle
There are T12 stations with a control board directly in the soldering iron handle.
True, for such a soldering iron you will need a 24 V 72 W power source.
T12 DIY KIT
Or you can even assemble the T12 station yourself without a display, only with a temperature indicator. And it will even have an automatic shutdown of the soldering iron thanks to the SW-200D ball vibration sensor. The following KIT DIY kits are sold: And in general, the station will be several times cheaper than ready-made options. True, for the station to work you will need a power supply. In the ready-made versions of T12 Quicko T12-952 and KSGER T12 FX9501, the power supply is already inside the case.
Preparing the connection
Unlike traditional methods of welding workpieces, which involve the formation of a seam joint, welding of conductors inside a junction box is possible only after they are twisted.
Before welding the twist, the ends of each wire must be thoroughly stripped. The outer insulation from the wires should be removed by 7-10 cm, which ensures a convenient length for the twist being formed.
The length of the bare parts obtained after stripping, according to the requirements of the PUE, should be about 5 cm, which eliminates excessive heating and melting of the wires during the welding process.
To better understand the features of welding wires with your own hands, it is advisable to familiarize yourself with the rules for choosing the equipment used. To do this, two important questions need to be considered: what types of welding equipment are applicable in the given conditions, as well as which welding electrodes are optimally suited for the stated purposes.
T12 competitors
In addition to the T12, soldering irons and stations similar in concept are produced. Some of them are superior to any T12, but their price is several times higher.
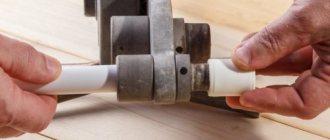
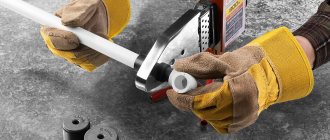
TS100
Miniature and powerful soldering iron. The entire control unit is located directly in the soldering iron handle. Combines the most important advantages of T12. And this soldering iron can be flashed and further configured via USB.
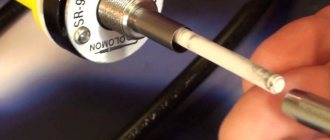
TS80
Even smaller and better TS100. It will be especially useful for those who repair equipment on the road. There is a grounding connection for the soldering iron. The disadvantages include the high price and crude firmware.
Is the TS100 AND TS80 worth buying for beginners? More likely no than yes. The price is several times higher than that of any fully equipped T12 station. In addition, some of its functions are useless for beginners.
And why do you need mobility, fine-tuning and compactness if a beginner is just learning to solder and learning the basics of electronics?
How to connect correctly?
Junction boxes with built-in terminal blocks are available. Connecting conductors to them is not difficult: the stripped conductors are inserted into the terminals and secured with a screw or spring.
But more often the box is just a body with a lid and performs only two functions:
- insulation of electrical contacts (potentially dangerous places) from building structures and finishes, usually consisting of flammable materials;
- providing quick access to conductor connections.
In such boxes, the installer connects the wires in any way at his discretion. There are a lot of connection options. Some use special devices, others do without them. For a complete understanding, it is worth considering this issue in detail.
In electrical circuits, direct contact between aluminum and copper is not allowed: both materials are quickly destroyed due to electrochemical corrosion.
A little more about originals and copies
A set of original tips sometimes costs almost as much as a full-fledged station. And this is the price of quality. Few copies can come close to the original in terms of characteristics. However, even the lowest quality copies can be soldered. Yes, copies of tips and other components for soldering irons will not be equal to the originals.
On the other hand, you can buy the original later, when you learn how to solder copies, which are several times cheaper in price. The money saved can be spent on radio components, screwdrivers, multimeters and other necessary things.
And a copy is not a fake. The fake will repeat everything, right down to the name (Lukey 702 is a copy of HAKKO, but is called and assembled differently).
Price overview
To summarize, let's consider the price level in various localities of the Russian Federation and the CIS for the 40-watt model of the ZD-200C soldering iron.
| Locality | $ | Locality | $ |
| Moscow | 6,00 | St. Petersburg | 6,00 |
| Donetsk | 6,50 | Kazan | 6,40 |
| Minsk | 6,20 | Odessa | 6,20 |
| Kharkiv | 6,10 | Vladivostok | 6,35 |
The table shows that the price of a soldering iron for microcircuits in Russia is practically no different from its cost in Minsk, Kharkov or Odessa.
Professional equipment
Professional equipment costs tens of times more than their cheap analogues and copies. At first glance it may seem that this is an unnecessary overpayment of money, but this is not so. In service centers, where the average day of soldering can be 6 or 7 hours in one day, this difference can be quickly noticed. Speed, quality and temperature control are important here.
Radio amateurs, in principle, have little need for such equipment. In assembly shops or service centers they can solder as many boards and parts in one day as a radio amateur could not solder in several months. This is not a reproach towards radio amateurs, but rather an explanation that for a hobby, professional equipment at a price of 50,000 and 100,000 rubles will be excessive, and amateur radio practice will not reveal even part of the potential of such equipment (not to mention the payback).
ATTEN ST-862D and Quick 861DW
There is no point in even comparing Lukey 702 with these stations. These stations have a hairdryer power of 1 kW.
These stations also have angled attachments for hair dryers, which are convenient to work with under a microscope.
A real battle of the titans.
JBC and HAKKO
Soldering stations from this company, as well as from the Japanese HAKKO, do not give a chance to either the Chinese T12 or the Chinese TS. Only the price for them can even reach 600,000 rubles. Thermal tweezers, attachments for any microcircuits, convenient and thoughtful ergonomics and the highest quality. It doesn’t even make much sense to consider them, since beginners don’t even need such stations in theory.
Bottom and top heating
Also, do not forget about the lower and upper heating (IR heating). Without them, it will not be possible to efficiently solder massive BGA chips. And soldering a huge number of identical boards using solder paste using only one hair dryer is quite a task. You can read more about this in the article about soldering.
Thermopro is not cheap equipment, but first you can assemble your own bottom heating using available components.
Soldering wires
Stripping the insulation from the wire
Tinning and soldering of cables in the distribution box is carried out in several stages.
- Removing the insulating layer.
- Stripping the wires until the characteristic shine of the metal appears.
- Maintenance.
- Twisting.
- Soldering.
- Isolation.
Before you start connecting the current-carrying wires, you need to analyze what length is required. The wires are cut so that when soldering the ends are located outside the junction box. Upon completion of the work, they are laid in any desired way.
To remove the insulating layer, a special tool is used - a stripper or a sharp knife. When working with a sharp knife, the movements should resemble whittling a pencil. It is forbidden to cut the insulating layer with pliers or side cutters; you cannot make circular cuts. Transverse damage will cause a break in the near future.
For a wire intended for soldering, stripping ranges from 1.5-3 cm. The number of turns is at least 2.
Main types of solder wire connections
Before soldering, the wires are thoroughly cleaned and tinned so that oxides do not appear on the surface of the conductors, which interfere with normal conductivity and increase resistance. Already tinned conductors are twisted using pliers or pliers.
Soldering twisted copper wires in a box has a similar algorithm. The twist must be tight, but not tight, otherwise the ends of the conductive wires may simply break off.
Finally, the twisted wires are soldered with a soldering iron so that the solder is covered with an even layer on all sides. The quality of the work depends entirely on how well the ends were stripped.
Bottom line
There are dozens of types of stations and soldering irons. And in general, for beginners there is an opportunity to quickly learn professional soldering on budget equipment.
What to choose
For beginners, you can buy a regular nichrome soldering iron. You can solder boards with it, desolder parts, and assemble radio sets. Available at any household. store. Learn how to handle such a soldering iron and care for the tip. Enough for 10 hours of practice. You can solder homemade printed circuit boards. And with such a simple nichrome soldering iron, you can start your journey in electronics repair, for example, by resoldering transistors and failed electrolytic capacitors.
Next are two options. Or buy T12 right away, and then buy a hairdryer separately for it, or instead of T12, Lukey 702 (or its equivalent). These two options will cover all your amateur (and even professional) soldering needs. Of course, it’s better to immediately take the T12, since the 702 and its analogues have outdated tips like 900M, which you need to get used to. But the kit includes a soldering gun, with which you can solder microcircuits and change modules on smartphones.
Is it possible to assemble a station or soldering iron with your own hands at home?
The soldering iron itself is unlikely, but the station is quite good, especially the bottom heating.
You can change the firmware, do voice control, whatever. Even modding the station by changing the color of the temperature indicators. But making a homemade hairdryer, soldering iron or tips is already unrealistic. There are ready-made options for any price and need. It’s difficult to make something new, especially if you don’t have a metal processing machine and the necessary workpieces.
Post Views: 86