The jointer's job is to make the workpiece smooth and flat. To do this, you need to know how the jointer works, how to set it up correctly and how to use it, and also know the rules for keeping the tool in working condition. Planer, a device designed to level the surface of a workpiece with sharp blades. The device has two separate tables: a receiving table and a feeding table. It is probably clear that the feeder is the table where the workpiece material moves to the cutting part of the tool - the cutting head, and the receiving table is the table where the material is placed after passing the cutting head.
The device of sharpening machines
The development of industrial equipment does not stand still. There is a constant rapid increase in requirements for speed and, most importantly, for the quality of material processing. In this regard, there is a need to create cutting tools with high parameters.
One of the main problems that arise during the work process is sharpening knives. This is what determines the basic capabilities of the machines and their suitability for use.
Depending on the tasks to be solved, such devices are divided into two types: universal and special. The first are sharpening devices for the surfaces of most cutting elements. They are equipped with a variety of devices that allow you to secure, install and sharpen knives.
The second category is designed to work with hobs, drills, circular saws and other specialized tools.
All units are equipped with various equipment, which determines the degree of automation and control of the accuracy of the work performed. The designs of the machines also vary. These can be stationary devices or temporary ones that can be placed on any horizontal surfaces.
Despite the wide range of types of equipment offered, in order to save money, a knife sharpening machine can be made by hand.
Although, of course, many models of universal devices allow you to choose the most suitable type of equipment that can solve the tasks.
Joining workpieces
Fiber direction
To connect two workpieces, the workpieces must be parallel and square. There are several tips to get a good result. Determining the direction of grain in wood, i.e. You need to feed the workpiece to the knives with the narrow part of the wedge. See the photo in the figure with illustrations of the direction of the fibers.
Cutting depth
The cutting depth is set to no more than 1.7 mm. This promotes smooth processing of the material and maintains the durability of the knives. An exception can only be when planing uneven surfaces.
Edge jointing
The workpiece must be held facing the stop. You need to start by applying pressure to the leading edge of the wood as you move towards the cutting part. The pressure then moves to the middle and to the edges. Those. the workpiece must have constant contact with the stop and the receiving table. The last pass should be slow to obtain a smooth surface. When splicing workpieces, it is necessary to adjust the edges and make sure that there are no gaps, and also take into account the direction of the fibers in order to hide the joint. The process of selecting fiber direction is not easy.
Homemade knife sharpening machine
The manufacture of homemade machines is most often due to two reasons. The first is the desire to save money. The second is to show your skill and do everything with your own hands exactly as your soul desires.
For example, very often you may be faced with the need to tidy up only certain tools. These can be drills, cutters, saws or jointing knives.
Each specific case requires a separate approach. Self-assembly of the machine will allow you to create a convenient unit for working with certain elements.
Among other things, the presence of sharpening units will significantly save costs aimed at purchasing new knives or restoring them in third-party workshops.
In addition, purchasing in a store guarantees that the device will solve the assigned tasks for a long time. You should also remember the degree of automation. Of course, professional devices use electronics that are simply impossible to make at home without the proper experience.
Option 1
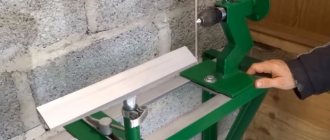
A homemade machine for sharpening a planer will not only keep the tool in good condition, but will also save time on trips to other workshops.
One option for creating such a device is to use a motor with an abrasive wheel, emery cloth, or a sharpening device with a knife fixed in it.
This device can be made partly from aluminum, metal and wood. In this case, bearings and guides are used, made from scrap materials, for example, pipe corners or others.
When the knives are level, they can be sharpened on a large abrasive stone. If this is not available, you should use sandpaper glued to a flat surface.
Depending on the requirements for the final result, you can vary the speed of this process. If there are dents, you must first use a belt sander, and at the final stage, treat the tool with an abrasive stone or a homemade one made from sandpaper.
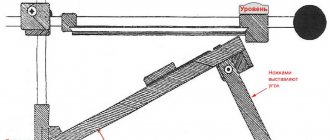
The design features of the machines may also differ from each other. The first option is a device with a fixed base. Its angle of inclination can be changed, but otherwise it is in a fixed position.
The bar is attached to a rod, which is inserted into the loop of a movable clamp located on another rod. The disadvantage of this design is the “walking” angle due to the lack of rigid fixation.
The knife is installed using two steel plates fixed to a fixed platform. Having loosened the fasteners, insert the blade and clamp it. Then adjust the height of the bar so that the required angle is set.
Option 2
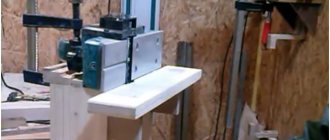
The second type of design provides a movable platform, as well as a magnetic holder. This option does not have the disadvantages of the previous unit. Fixed in this device is a frame with a bar that determines the angle.
The knife, in turn, is mounted on a movable table. The choice of holder remains with the master. You can use a magnetic type or a regular one, made of metal plates and “lambs”.
General information
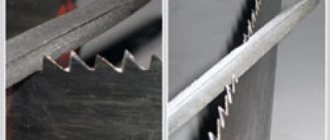
Photos of sharpened knives
- To sharpen the blade shaft of a planer or jointer, you will need the appropriate device;
- The sharpening work is done by hand;
- Craftsmen learned to assemble sharpening devices;
- When restoring hacksaws, jointing devices, sharpening knife shafts, be sure to follow several recommendations and strictly follow the technology;
- If the teeth of hacksaws and knife shafts are sharpened incorrectly, the quality of wood processing with tools will significantly deteriorate;
- Sharpening stones are a good alternative for a sharpening machine. But if you have the opportunity to assemble it yourself or purchase a sharpening machine, be sure to take advantage of it.
Preparatory activities
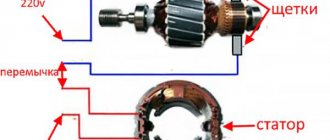
Diagram of the device for sharpening knives of woodworking machines
If you need to sharpen knives for a woodworking machine, you should start with the required preparation steps. It is not so important what parameters the knife shaft or cutting sheets of hacksaws have 13 mm, 20 mm or all 200 mm, they will definitely need sharpening.
Some people prefer to send dull shafts to special workshops, where they can easily restore the previous sharpness of a 200 mm knife or a small lathe cutter. But both ordering sharpening and buying new knife shafts is a financially expensive matter.
Preparation for sharpening begins with familiarization with the available means of restoring the surfaces of cutting tools and some recommendations.
- To keep jointers, planers, and hacksaws in working order, assemble or purchase an appropriate sharpening device.
- The simplest, budget option is a whetstone. But the quality of processing directly depends on your skills in working with stone. If there are none, it is extremely difficult to achieve the required level of sharpening. Plus, stones are not able to cope with all types of cutting tools that are equipped with modern woodworking machines.
- Choose a machine that can sharpen at low speeds, as this has a positive effect on the quality of the finish.
- The recommended equipment for a sharpening machine is a water cooling system.
- Carefully study the equipment of household woodworking machines. Often there is already a sharpening stone, which is optimally suited for processing the knives used.
- If the stone is not included in the package, it will have to be purchased separately, leveled with a special device, and smoothed. This is the only way you can sharpen the knife shafts of jointing machines efficiently.
- The machines have a function for setting the angle of inclination, adjustable with a special screw. By turning the screw and changing the position of the sharpening device, you can correctly fix the tool relative to the stone.
- The next preparatory stage is the holder into which the knife shaft is installed.
- If you are a beginner, it is not recommended to start your first job with 200 mm knives. Start literally with 13-15 mm, and gradually you will learn to process 200 mm and even 2 mm. To do this you need to accumulate certain experience.
- The length of the knife is not a fundamental parameter, since the knife in the holder can move to the distance you require.
- Make sure to hold the shaft firmly in place. Otherwise, you will get a significant distortion, due to which the quality of woodworking will suffer.
- Study the operating manual of the purchased sharpening machine in detail. If this is a DIY tool, you will have to rely on drawings and available information on the Internet about a specific sharpening device project.
Difference between jointer and planer
All new carpenters ask this basic question: What is the difference between a jointer and a planer?
The answer is simple, a lot! And is there such a thing as a jointer? No!
So what's the difference?
Each machine performs completely different deposition operations.
A planer-thicknesser smoothes the face surface or straightens and levels the edge, and a planer with the thickness of the wood.
Whether you need one, the other, or both can be easily answered by knowing how they work, what they do, and how much wood surface preparation you're paying your lumber yard to do for you. And honestly, you could probably be a great carpenter without any machine. They just save time. Heck, you can use hand planes!
Ultimately, you need to convert your wood supply into usable parts for your projects. A wooden jointer and planer will help you with this.
- What does a connector do and how does it work?
- What does the machine do and how does it work
- Various levels of surface preparation produced by timber products
What Joiner does and how it works
A jointer is used to flatten the surface of a warped, curled or bent board. Once your boards are flat, the jointer can be used to straighten and square the edges (protector removed for photo).
There is a serving table and a serving table. The tables are aligned in the same plane. The cutting head with knives is mounted between the tables, and its cutting wheel (the tops of the knives) is aligned flush with the feed table.
The feed table is lowered to a depth equal to the amount of wood you want to remove. As the board passes through the moving machine (with the guard in place), the wood is removed and the cut portion of the board is then supported on the table for unloading. The fence is used as a guide when lining up the face and as a support when joining the edges of the board. The fence is adjustable at different angles, usually up to 45 degrees.
WWGOA offers instructional videos on how to use a jointer. Also be sure to check out our guide on how to master a jointer.
What does a plane do and how does it work?
A planer is used to make a flat, joined board of equal thickness from end to end. Mechanically it is more complex than a jointer, but functionally simpler.
A flat board is placed on the planer table (bed) and pressed inward. The machine's feed roller grabs the board and pulls it through a rotating cutter above the bed, which removes the wood. The distance that the bed sets from the cutter head is the resulting thickness.
All planers have limits on the amount of wood they can remove in one pass, so multiple passes will likely be required to achieve the final thickness.
Want to see the plane in action? Watch this unique video showing a view of the planer.
Various levels of surface preparation produced by timber products
Your lumber yard may not be able to fully, partially or completely prepare the surface for the boards you purchase. The more they do, the more it costs and the less control you have.
You could take it to the extreme, give them a list of cuts, have them grade all the pieces, but you'll go broke and won't enjoy woodworking. I'll start by talking about how both machines are used to process rough lumber, and then I'll talk about three more scenarios where your lumber mill is doing more and more work for you.
Rude
I buy my rough lumber (no pop-up) or pop-up hole, which is how almost all the lumber I buy today comes from. This removes 1/16″ and levels the wood so the grain and color can be easily seen.
The pieces I need for my projects are "inside" the boards I buy and I have to machine the boards to make my pieces. I have much more control over the shape and flatness of the wood I use when I rough the board just before using it in my project. One thing is for sure with wood trim, it won't be the same size and shape tomorrow.
Sizing raw lumber requires a jointer to straighten one edge and a planer to reduce the thickness. To cut the width, you use a jointer to plane and square one edge, then cut the width on the table saw. I tear off my 1/32″ wide boards and then join the last 1/32″ together.
For more helpful tips, read my simple guide: 9 Steps to Sizing Lumber.
Surface on both sides (oversized) - S2S.
Example: You ask your lumber yard to stock 4/4 to 13/16″ boards even though you know you will end up using them as 3/4″ boards. They line the boards with a dual planer that cuts both edges at once and does a pretty good job of smoothing.
Doing surfacing this way can save you a lot of time. Then, just before using the boards in your project, you will "kiss" the boards down to 3/4" to clean up any rough surfaces left from machining the lumber, remove any dirt and oxidation that may have accumulated over time, and provide a fresh surface. which is critical for gluing. With this type of surfacing, you will need a plane for the final thickness and a jointer to straighten the edges.
surface on both sides (final thickness) - S2S.
Everything is the same as above, but this time your lumberyard covers your boards to their final thickness.
All you need now is a jointer to smooth out the edges.
S2S with straight line - SLR.
Everything is the same as S2S, but this time your lumberyard cuts one edge of each board straight and square.
Now you may be able to get by without any machine, but even if you do, having a connector to remove saw marks and smooth edges is a good thing
Think your plane isn't big enough? Check out these techniques for using a small plane and watch a video on how to get the most out of a smaller plane.
Conclusion
Remember, this is not a Joiner Planer. A jointer can be used to make the face and edge of the board straight and believable. The planer makes your boards uniform in thickness, with two parallel edges. The operations are not interchangeable between the two machines.
Owning both machines gives you maximum control over the evenness and smoothness of the wood you use in your projects. My jointer is a 12-inch monster. wide and 84 inches long. This is really good for leveling long, wide boards, but may be overkill if your projects are small. My plane is 13-in. the wide makes it the perfect companion for my wide jointer.
All photos by the author
,