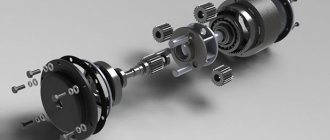
Design and electrical circuit of the grinder
Over the many years of existence of such a tool as an angle grinder, its appearance, as well as its internal structure, have remained virtually unchanged. To repair an angle grinder with your own hands, you need to know the structure of its mechanical part, as well as its electrical part.
If you look at the figure below, you can see what parts the angle grinder consists of.
- Wheel for adjusting the spindle speed of the unit.
- An electric motor consisting of a rotor and a stator.
- Start button. Sometimes a soft start system is connected to it.
- Housing made of impact-resistant plastic.
- Button for fixing the spindle (used when changing tools).
- Safety coupling. Protects the engine from overload when the tool jams.
- Protective cover. Covers the tool and protects the user from flying particles of the material being processed, and also prevents injury to a person when the tool, for example, an abrasive disc, is destroyed.
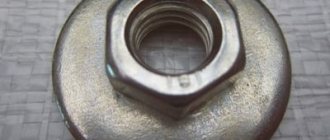
- Nut that clamps the tool. It is unscrewed using a special key that comes with the power tool. There are also quick-release nuts that can be unscrewed without a key.
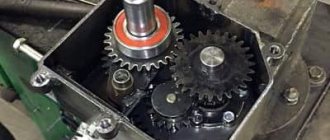
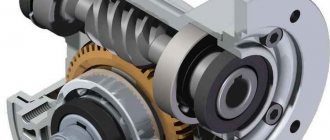
- The gearbox housing and the gearbox itself. It consists of a block of gears that transmit rotational movements from the rotor to the spindle with the tool.
The figure below shows the electrical circuit of the angle grinder.
The electrical part of the angle grinder has the following elements:
- electrical cable with plug for connecting to the mains;
- start button;
- stator;
- electric brushes (carbon or graphite);
- collector;
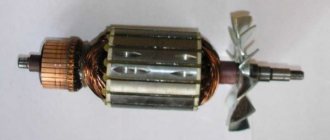
- armature (rotor).
The following figure shows the connection diagram for the angle grinder, namely its engine.
All components of an electric motor perform specific functions.
- The rotor is the shaft on which the coils and commutator are located. The rotor, rotating in the magnetic field of the stator, transmits rotational motion to the angle grinder gearbox.
- Collector. It is the part of the rotor to which all control cables are connected. Electrical signals from the control unit to the engine pass through the collector. It is to the collector that the electric brushes are connected.
- Electric brushes. Their main task is to transmit electric current from the power cable to the collector.
- Stator. It is a coil with a certain number of turns. The task of the stator is to create a magnetic field, which, interacting with the armature, sets the latter in motion.
Grinder gearbox gets very hot
Electromechanical hand-held construction tools for household and industrial use with replaceable attachments.
The instrument was invented and created in 1954 in Germany (FRG). The first models of angle grinders that appeared in the USSR at the end of the 60s were angle grinders produced in the Bulgarian town of Plovdiv, which is where their name came from, which is used in our country to refer to this tool in colloquial speech. The Bulgarian instantly gained enormous popularity. Because, prior to its occurrence, individual works achieved significant application of both material efforts and several instruments of their own kind to perform textbook-type operations.
Being, specifically, a universal device for cutting products and materials of different hardness groups, additionally for rough abrasive and grinding, an angle grinder simply performs the following types of operations:
- Cutting dark and non-ferrous metals;
- Sawing of reinforced concrete, natural and artificial stone, ceramics and other materials of this group;
- Replacing the saw attachment with a corresponding disc, you can use a grinder to saw wood products and lumber from tree species of different structure.
The angle grinder is also used for subsequent work after sawing:
- Removing scale and paint from iron and wooden surfaces;
- Removing burrs acquired and therefore sawing materials;
- Fine grinding and finishing of planes and inaccessible places.
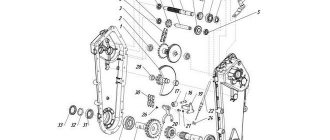
The design of an angle grinder consists of the following parts:
- Housings made of metal or plastic;
- Gearbox and its housing made of aluminum alloys;
- Wheel for adjusting the number of rotations;
- Start buttons;
- Locking buttons for quickly changing attachments;
- Working circle clamping nut;
- Protective cover of the disk and handle with variable position on the body;
- Electrical cables.
General symptoms
Before a complete malfunction, the angle grinder signals the beginning of a malfunction.
Pay attention to the work of your assistant: you should be careful if:
- The brushes began to spark too much;
- The coffee grinder becomes hot during operation;
- The motor hums inside the housing when the tool is turned on;
- The vibration of the body has become much greater when performing work;
- Inside the slot of the grinding device;
- You can hear the bearing creaking when rotating or periodically jamming when the rotor shaft rotates;
- The angle grinder is smoky or has an unusual burning odor.
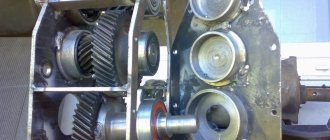
How to disassemble an angle grinder
How to disassemble an angle grinder? It's not such a complicated process. This does not require special knowledge, but everything must be done carefully and with caution. Every owner needs to know how to disassemble any working tool, because periodically it needs internal cleaning from dirt and dust, and its service life depends on this.
Nowadays on the market you can choose different types of grinders, which differ in operating parameters, size, and quality. Manufacturers are also different. Whatever model of grinding machine you buy, they all have the same model for assembling parts.
Disassembling the angle grinder will require few tools; you just need a regular screwdriver or a reversible one with a ratchet mechanism.
Having prepared the screwdriver, you can start disassembling:
- We unscrew the screws from the body and remove one side of the product.
- Remove the nut that holds the disk in place and unscrew the bolts securing the protective casing.
- Remove the brushes.
- Disconnect the wires from the engine.
- We unscrew the bolts that secure the gearbox inside and very carefully remove it; the rotor is also removed with it.
- We unscrew the bolts that hold the stator and remove it.
- We assemble the angle grinder back, put everything in place one by one in reverse order and screw it on.
When disassembling an angle grinder, it is important to remember the order in which parts are removed in order to assemble it correctly.
Why does the grinder spark strongly in the area of the brushes?
During normal operation, a small, uniform spark is observed inside the housing. If it is too strong, the brushes must be replaced. The problem occurs in the following situations:
- Damage to the armature winding - an interturn short circuit has occurred or a section of the winding has broken.
- Loss of contact between the winding and the collector plates.
- Violation of insulation between the collector lamellas.
- Severely worn “grinder” bearings , which provoke the beating of the angle grinder’s armature, causing the brushes to spark and burn strongly.
- Using brushes whose characteristics do not correspond to the speed and voltage in the network.
- Motor overheating due to continuous operation for too long.
Why does the grinder heat up?
The electric motor overheats in the following cases:
- Incorrect operating mode. As a result of too high loads, the motor windings burn out.
- Destruction of armature bearings. The result is difficulty in operating the engine and, as a result, overheating.
- Clogged ventilation ducts through which air flows to the electric motor, acting as a cooler.
- Closing the turns of the stator and rotor windings.
The angle grinder gearbox overheats due to lack of lubrication or its poor quality.
Most common faults
Gear set for Interskol angle grinder-2300Wt; DWT-230 (74x15x49 teeth, 21x10x12 teeth) ACECA. Photo 220Volt
The main reasons why grinders fail due to gearbox failure are as follows.
- During prolonged use, gears wear out. In this case, a “rustling” noise appears, and the bevel gears may slip relative to each other. Poor quality lubrication or insufficient lubrication accelerates wear of the conical pair.
- Bearings also have a limited service life. If they are not replaced in a timely manner, complete destruction of the structural integrity of the bearing assembly may occur. The reason for checking it is increased noise and vibration during operation of the angle grinder, and strong heating of the gearbox housing.
- Bearing seats are worn out. Here you can radically solve the problem by replacing the gearbox housing.
- It is possible that the fixing elements of the gearbox structure may break: nuts, screws, keys, retaining rings and other similar parts.
Getting high-quality lubricant with your own hands
If you want to use a good lubricant composition for an angle grinder gearbox, but there is no possibility of purchasing it, then you should make it yourself using lubricant for CV joints. Do not forget that the material used must have good adhesion.
The composition must adhere firmly to the rubbing elements. The composition for CV joints is characterized by increased adhesion and the ability to work at high temperature loads.
To prepare the mixture, a composition for the CV joint and MS-20 oil are taken to enhance the required viscosity and density. Using a homemade mixer, the composition is mixed with a small supply of oil (drop by drop).
You can also obtain material from a mixture of lubricants Tsiatim-221 and TAD-17. The main component is Tsiatim.
Diagnostics of the electrical part of an angle grinder
As mentioned above, most often an angle grinder refuses to work due to breakdowns of the electrical part of the unit. To correctly diagnose the electrical circuits of a tool, electrical equipment repair technicians use a special device - a tester.
If you press the start button of the unit and it does not work, then in 90% of cases the cause of the breakdown is not so serious that you cannot repair the angle grinder yourself.
Experts advise adhering to the basic rule of repairing power tools: moving from simple to complex.
The first step is to check the electrical cable and the plug at its end. If it is collapsible, then unscrew it and check the reliability of the contacts. Otherwise, you will have to disassemble the angle grinder (remove the casing of the device) and “ring” the cable with a tester, and also make sure that the current is suitable for the contacts of the “Start” button. If the device shows a break, the cable should be replaced with a new one.
The situation when current flows to the button, but does not pass further (when in the on position), indicates a malfunction of the switch. The button cannot be repaired. It needs to be replaced with a new one, but first mark the contacts you are removing so that you can connect them correctly in the future. If the contacts are connected incorrectly, the motor winding may burn out.
If during the check it turns out that both the cable and the start button are in good condition, but no current is supplied to the brushes, then it is necessary to clean the contact plates of the brush holders. If this procedure is ineffective, it is recommended to replace the brushes. Next, if everything is fine with the brushes and current is flowing to them, you should check the rotor and stator for shorts and breaks.
Checking the motor armature
The electric motor rotor may have the following malfunctions: interturn short circuit and broken conductors at the lamella contacts. You can check the armature of an angle grinder with a multimeter: the device is switched to the resistance change mode, the value is set to 200 Ohms, and the resistance between two adjacent lamellas is measured using probes. Thus, it is necessary to check all pairs of lamellas. If the resistance values are the same, then the rotor winding is not damaged. Detection of other resistance values during “ringing”, as well as detection of an open circuit, indicates a malfunction in this coil. In this case, the angle grinder's anchor will need to be repaired.
Typically, conductor rupture occurs at the junction with the winding. Inspect the places where the coils are connected to the lamellas, make sure that the contacts are soldered securely.
If you do not have a measuring device, you can check the rotor using a 12 V light bulb and a battery for this purpose. The power should be between 30-40 W. The test is done as follows: apply 12 V voltage from the battery to the plug of the angle grinder, connect a light bulb to the gap in one wire, and start rotating the angle grinder spindle. If the winding is in good condition, the light will burn evenly, without blinking. With an interturn short circuit, the degree of incandescence of the light bulb filament will change. In this case, repairing the angle grinder's anchor with your own hands will be difficult, since the armature winding scheme is quite complex, and the process itself requires special equipment and knowledge. Therefore, it is recommended to entrust this operation to specialists. But the best way out of the situation would be to replace the anchor on the angle grinder with a new one.
Prevention, maintenance, diagnostics
Carrying out prevention of angle grinders significantly reduces the likelihood of sudden failure of a power tool. Ultimately, the costs of repair work are reduced, and the grinder’s resource indicators increase. It is necessary to carry out the following maintenance work regularly, approximately once a year (depending on the intensity of use of the grinder):
- brush assembly;
- remove the gear housing cover;
- disconnect the gearbox housing together with the rotor from the electrical part of the angle grinder;
- Remove the rotor shaft from the gear housing bearing after removing the drive gear.
Clean all interior and exterior surfaces.
Check the wear of the graphite brushes. If necessary, replace them following the following procedure:
- clean the brush holders;
- clean the collector lamellas;
- install new brushes.
The brush assembly located on the body of the Makita GA9020 angle grinder provides convenient replacement of brushes. Photo VseInstruments.ru
Determination of gearbox defects.
- visually check the wear of the tooth profile and the presence of chips;
- checking the shaft for play in the plain bearing or needle bearing;
- checking the remaining ball bearings for play and presence of lubricant;
- on shafts and gears with keyed connections, check the wear of the keys and grooves under them;
- if necessary, replace the sliding bushing, bearings, and lubricant.
Inspection of rotor parts.
- carry out an external inspection of the rotor and stator windings for the presence of darkened areas and damage to the varnish coating, which indirectly indicates the presence of an interturn short circuit and overheating;
- check the rotor bearings for play and presence of lubricant;
- Inspect the commutator surface for wear and other damage.
The gearbox on the grinder is heating up. One of the possible reasons.
Inspect the wiring for insulation damage. Check the status of the contacts.
Reassemble in reverse order.
Check for a few minutes at idle speed.
Maintenance work on the angle grinder will not take much time; timely preventative maintenance will delay costly repairs.
The grinder is warming itself. We find out the reason and repair it ourselves.
Bearing wear (Lepse)
In the following video, the author completely disassembles a Lepse brand grinder made in Russia (electrical machine-building plant in Kirov) in order to determine the absence of spindle rotation with a normally operating electric motor. In this case, a complete analysis of all disassembled parts is performed. Even high-quality Soviet bearings after 10 years of operation have slight wear, determined manually by the amount of play. For a detailed description of actions in such cases, see the article at the link “Replacing bearings in an angle grinder gearbox.” In the case of the Lepse model grinder, play in the front rotor bearing requires replacing it. After replacing a defective bearing with a new one, it must be lubricated, just like all other bearings of the angle grinder.
READ Grinder cut at 45 degrees
How to change
The presented video describes the complete technological process of disassembling, identifying defective parts, replacing them and subsequent assembly of the Makita model angle grinder. This technology contains general repair principles for angle grinders of any model. When disassembling the gearbox, damage to the housing was discovered, making normal operation impossible. by replacing it with new housing with an installed fixing mechanism. In addition, worn brushes were replaced.
Backlash (CROWN, Bosch)
Increased play not only of the rotor, but also of the spindle can cause an emergency.
grinder from the following video had increased spindle play. The author drew attention to the strong end runout of the working tool. Working in such conditions can lead to the destruction of, for example, a cutting wheel, which will create an unsafe situation for the person working with the angle grinder and the people around him. The author replaced the bearing using a puller.
In the next video, the spindle play is noticeably larger. This is due to the wear of both bearing units - the ball bearing located in the housing cover and the plain bearing located in the gear housing. Lack of lubrication - this is the conclusion the author draws by analyzing the defects. It should be noted the method by which the plain bearing is removed from the housing. A calibrated rod (in this case, a drill guide) creates pressure on the grease, which tightly fills the cavity of the inner diameter of the sliding sleeve. After loading, the lubricant penetrates into the gap between the bushing and the body and squeezes the bushing out of the seat.
By analogy with the previous two, in the next video there is spindle play in a Bosch model angle grinder. This shows that no special tool is required to eliminate the defect. It is possible to remove and replace rolling and sliding bearings without the use of pullers; only available means are used, including a latch that matches the diameter.
Why won't the grinder turn on?
Most angle grinder problems are related to the electrical part. The tool may not turn on for the following reasons:
- the cable is damaged or the plug is faulty;
- the start button is faulty;
- severe wear of the brushes or lack of contact between them and the cable;
- failure of the rotor or stator windings is the most serious reason why the “ grinder ” does not start.
It is advisable to solve problems with an electric motor in a specialized workshop that employs qualified specialists and has modern diagnostic equipment and repair tools.
The main malfunctions of an angle grinder and their causes
According to statistics, most cases of angle grinder failure are associated with the electrical part of the device. Some damage may be minor, which allows you to repair the angle grinder yourself. But, for example, if the motor windings burn out, only a specialist can repair an angle grinder.
Grinder won't turn on
The reasons that the angle grinder does not turn on may be the following:
- the electrical plug is faulty;
- the electrical cable is faulty;
- the start button is broken;
- the contact between the power cable and the button is broken;
- break in the contact wire of the electric brush;
- severe wear of electric brushes;
- failure of the rotor or stator windings.
The angle grinder does not develop speed
The reasons why the angle grinder does not gain momentum can be different.
- Damage to the speed control unit. To check this version, you need to connect the device’s motor directly, bypassing the regulator, and check the operation of the device.
- Failure of the electrical cable due to constant kinks or mechanical damage. Because of this, the damaged wire begins to heat up under load, and engine speed drops.
- Collector contamination with dust. Contaminants must be removed with alcohol.
- Problems with brushes. They may be worn out or have a short contact wire as shown in the following photo.
Although the brush is half worn out, it is still fully functional. In this case, a short contact wire prevents the spring from pressing the electrode to the collector. This situation may also be the reason why the angle grinder stopped working normally.
Bulgarian sparkles
If you notice strong sparking when you turn on the angle grinder in the place where the collector is located, then the reasons for this trouble may be the following.
- Damage to the armature winding: break of one or more sections of the winding, interturn short circuit. With such breakdowns, increased noise appears, engine speed drops and brushes burn.
The grinder does not gain momentum and gets warm
The protection indicator indicates engine overload and battery overheating.
During operation, all components of the angle grinder heat up and if no measures are taken to protect the angle grinder from overheating, the tool may simply fail. What happens when overheating, that is, when the operating temperature of the angle grinder exceeds? Of course, all parts will be subject to linear expansion, the lubricant will lose its viscosity and simply leak out, thus increasing the friction force between the parts of the angle grinder. Not to mention the fact that it will be impossible to hold the instrument in your hands, and this can lead to sudden injury.
In most cases, the electric motor is prone to overheating, which can be protected in different ways. Modern designs of angle grinders provide an indicator that lights up when the temperature reaches 130 ºС; when the temperature rises to 160 ºС, the engine slows down, but when this value reaches 200 ºС, the power supply to the tool is turned off. There are models where temperature control is limited only by an overheating indicator. What is interesting is that some owners of grinders are dissatisfied with such automation and spontaneous stopping of work due to overheating. But it’s better to take an extra “smoke break” than to have the electric motor repaired.
Gearbox housing for grinder MAKITA GA5030
The most common cause of overheating is the gearbox housing of the angle grinder, inside which the gears rotate. Of course, the lubrication and ventilation of the gearbox itself removes a certain amount of heat generated as a result of friction of the parts. But the housing material from which the gearbox is made also plays an important role.
Angler impeller MAKITA 9565
Now they are increasingly making it from metal instead of plastic, and metal, as you know, removes heat better. Although it leads to a heavier overall weight of the tool, compared to the effect of heat removal, this can be tolerated. It should be noted that the term “metal” means a durable aluminum alloy, which has high thermal conductivity.
The impeller may also be involved in cooling the electric motor, the teeth of which are not made at right angles to the axis of rotation, but are inclined - which improves heat dissipation.
I bought a Fag-180/1300 “Dachnik” angle grinder for one-time work. I am not a supporter of such tools, but I chose based on the price, since I considered it irrational to buy an expensive angle grinder “for a one-time use”, and I was unable to rent an angle grinder. While the angle grinder was not in use, I already tried it at idle and discovered an interesting fact: after 1-2 minutes of operation, the gearbox gets very hot (it’s difficult to hold your hand on it). Hence the question: is this a normal phenomenon for such cheap angle grinders or is there a defect that will subsequently turn into a breakdown? I opened the gearbox: there is a lot of green grease in it.
How to determine if an angle grinder's armature is faulty
Signs of a broken armature angle grinder are: increased sparking of the brushes on the motor commutator, vibration of the motor at low speeds, rotation of the working shaft in different directions. If such symptoms are present, you should stop using the tool - this is dangerous. Suspicions can be easily verified using simple tests.
Visual inspection from outside
Troubleshooting should begin with a visual inspection of the angle grinder:
- Carry out a general inspection of the instrument.
- Pay attention to the integrity of the power cord and the presence of voltage in the outlet.
- Using a voltage indicator, make sure that current is flowing to the motor commutator and the start button.
Inspection of the device from the inside
If everything is in order with the power supply, but the angle grinder does not work, you will have to open the case to gain access to the motor. As a rule, disassembly is not difficult. But you need to follow simple rules that will help you avoid troubles during reassembly:
- Be sure to disconnect the device from the mains before disassembling.
- Remove the working disk and protective cover from the spindle.
- Open the case in a well-lit place, on a clean table surface.
- Remember the location of all parts and assemblies before disassembling. It is recommended to sketch or photograph the internal structure of the device.
- Place screws and fastening screws in a separate place so that they do not get lost.
Video: Bulgarian Woman Smokes and Warms
Remove the transmission bolts located around the body mount.
To disconnect the armature from the aluminum housing, unscrew the nut located in the gearbox housing.
Reassemble the tool in reverse order.
The clamping nut does not loosen
During operation, the disc may be tightened so tightly with the nut that it begins to crumble. You cannot unscrew a nut with a wrench. And you don't need it because you might break the grinder. First, completely break the disc in the nut. Next, find a metal plate that is slightly thinner than the drive plate. Use it to drain the rest of the disc under the nut. It can be easily unscrewed with a wrench or by hand. To prevent the tool from causing this problem, place a washer under the nut.
How to remove a tightly tightened nut
The casing cannot be removed
Some sanders, such as Bosh, have latches on the body instead of bolts. To remove it, you need to turn the cutout of the housing perpendicular to the coffee grinder. To get dressed, turn until you hear a click.
Stator check
The stator is checked with a multimeter.
Anchor check
First, visually inspect the commutator and winding. Damage may be visible: black marks, bent windings, lifted, worn or burnt commutator plates. After inspection, proceed to the tester.
Determination of breakdown by mass is carried out in the absence of a winding break. Set the maximum resistance on the device scale. Depending on the tester, it can range from 2 MO to 200 mm. Connect one probe to the shaft and the other. To each plate in turn. If there are no faults, the resistance should be zero. Do the same with the rotor. Connect one probe to the iron rotor body and move the other along the plates.
Checking the power button
Put the tester into dialing mode.
Insert one probe into the output of the button and the other into the opposite input.
READ Is it necessary to lubricate the grinder gearbox?
Press the button. A beep indicates the status of that part of the button.
Do the same with the other input and output buttons.
How to ring the start button
Checking the power cord
Connect one probe to the plug and the other. To push-button inputs. There should be a beep in one of the two positions. Do the same with the other plug of the plug.
Checking soft start and speed controller
If the power button and power cord work but the engine does not turn on, check the software control board. Remove the screw that secures the control panel. Remove it carefully. Name all the items. If the grinder has a speed control, it can be wired in series with the power button and have one soft start board. But there may be a separate fee. This is checked in the same way as a soft start.
Source
Construction and purpose of the grinder
The grinder is designed for grinding and cutting various materials. Basic elements of an angle grinder An angle grinder consists of the following elements:
- The flat aluminum alloy gear housing allows for better heat dissipation.
- Carbon brushes.
- Handle attachment.
- Electronic soft start system. Prevents jerking when turning on and reduces starting loads on the engine.
- Quick-release protective cover.
- Ball bearings.
- Electric motor.
- Grinder switch.
We offer a large selection of bearing products –
Mechanical breakdowns and their elimination
Mechanical failures of angle grinders include the following.
- Worn motor armature bearings. Typically, when the bearings wear out, you may experience strong vibration while the machine is operating. In addition, grinding and other noises may be heard. Sooner or later, the bearing will collapse, and the spilled balls will fall on the gears of the gearbox. If this happens, then in addition to the bearing, the gears will also have to be replaced. Of course, it is better not to wait for this problem, but to replace it at the first sign of bearing failure. How to get to this part of the angle grinder was described above.
- Worn ball bearing or plain bearing of the gearbox. As in the previous case, when you turn on the device, vibration will be felt and noise will be heard that is unusual for the normal operation of an angle grinder. To prevent further damage to the gearbox, it is necessary to replace the faulty part.
- Reducer gear wear. Gears wear out quickly due to insufficient lubrication. For the same reason, the gearbox heats up. It is necessary to monitor the condition of the lubricant inside the gearbox and change it if necessary. How to disassemble the gearbox was described above. You need to use lubricant specially designed for angle grinder gearboxes, and you can buy it at points where this tool is sold. If for any reason the teeth of at least one gear are broken, then the entire set of gears (a pair) needs to be replaced.
In what cases can you save an anchor and restore it yourself?
If damage to the armature is determined with guaranteed accuracy, the part must be removed from the electric motor. Disassembling the motor must be done with special care, after removing the brushes and disconnecting the power terminals. The rotor is removed along with the support bearings and the motor cooling impeller; they form a single whole with it.
If most of the wiring in the armature is damaged and the balancing is disrupted as a result of overheating, it is better to replace it entirely. An imbalance is indicated by increased vibration and an uneven hum when the mechanism operates.
How to rewind an anchor - step-by-step instructions
If the balancing of the armature is not disturbed, and the problem is only in damaged windings, then such an armature can be restored independently by rewinding the coils. Rewinding a rotor at home requires a lot of patience and accuracy.
The technician must have skills in working with a soldering iron and instruments for diagnosing electrical circuits. If you are unsure of your abilities, it is better to take the engine to a workshop for repairs or replace the entire armature yourself.
To rewind the anchor yourself you will need:
- wire for a new winding. A copper core with a diameter exactly matching the old conductor is used;
- dielectric paper for insulating the winding from the core;
- varnish for filling coils;
- soldering iron with tin-lead solder and rosin.
Before rewinding, it is important to count the number of turns of wire in the winding and wind the same amount of new conductor onto the coils.
The rewinding process consists of the following steps:
- Dismantling old windings. They must be carefully removed without damaging the metal body of the armature. If any burrs or damage are found on the body, they must be smoothed out with a file or sanded with emery. Sometimes, to completely clean the body of slag, craftsmen prefer to burn it with a torch.
- Preparing the collector for connecting a new wire. There is no need to remove the manifold. You should inspect the lamellas and measure the resistance of the contacts in relation to the housing with a megger or multimeter. It should be no more than 0.25 MOhm.
- Removing old wiring on the manifold. Carefully remove the remaining wires and cut grooves in the contacts. In the future, the ends of the coil wires will be inserted into the grooves.
- Installation of sleeves for anchors. The sleeves are made of dielectric material 0.3 mm thick, for example, electrical cardboard. Cut a certain number of sleeves and insert them into the grooves of the cleaned anchor.
- Rewinding reels. The end of the new conductor is soldered to the end of the lamella and wound in successive circular movements, counterclockwise. This laying is called “laying to the right.” Winding Repeat for all coils. Near the collector, tie the wires together with a thick thread of cotton fabric (it is prohibited to use nylon, as it melts when heated).
- Checking the winding quality. After laying all the windings, check with a multimeter for the absence of interturn short circuits and possible breaks.
- Finishing processing. Treat the finished coil with varnish or epoxy resin to secure the winding. In factory conditions, the impregnation is dried in special ovens. You can do this at home in the oven. As an option, use quick-drying varnishes for impregnation, applying the coating in several layers.
The gearbox is broken, causes and common malfunctions
Increased vibration, the presence of an uncharacteristic sound during operation, strong heating of the case, jamming of the gearbox during operation of the angle grinder require immediate intervention to determine the causes of the appearance of these factors and eliminate them. As the practice of operating angle grinders shows, the most common gearbox malfunctions are caused by the following reasons:
- wear of bearings with the appearance of critical play;
- bearings can, as they say, “crumble” due to shock loads during “hard” operation of the angle grinder;
- increased wear of a bevel gear pair, tooth breakage;
- untimely replacement of the gearbox lubricant or the presence of low-quality lubricant in it.
Bearing wear (Lepse)
In the following video, the author is made in Russia (electrical machine-building plant in Kirov) in order to determine the absence of spindle rotation with a normally operating electric motor. At the same time, even high-quality Soviet bearings after 10 years of operation have slight wear, determined manually by the amount of play. A detailed description of actions in such cases is in the article at the link “”. In the case of the Lepse model grinder, play in the front rotor bearing requires replacing it. After replacing the defective bearing with a new one, it is the same as all other bearings of the angle grinder.
Lack of gear clutch (Interskol), gearbox is noisy/clatters
When the Interskol model grinder is operating in the next video, there is a rattling noise , characteristic of a gear pair failure. The assumption was confirmed after opening the gearbox housing, where a breakdown of the drive small gear . Further disassembly of the angle grinder made it possible to determine the probable cause of the gear failure. Increased play in the front rotor bearing could cause increased forces in a pair of bevel gears, which led to failure of one of them.
Important: increased runout of the rotor, due to a malfunction of the bearing units, can lead to the armature touching the stator winding, which will lead to an interturn short circuit and burnout of the winding. Eliminating such a defect will be quite expensive.
Grease the grinder to make it work better
Advice! Experts do not recommend using materials such as solid oil and lithol.
When deciding how to lubricate the angle grinder, pay special attention to silicone-based materials or silicone oil. Such lubricants are excellent for tools that operate in a spectrum of speeds from leisurely to huge and under all loads. They are highly resistant to oxidation, protect against corrosion, and are easily mixed with plastics and elastomers. The composition contains only silicone and lithium thickener, which makes them non-hazardous based on environmental concerns. The consistency is maintained at temperatures from 50 to 190 degrees Celsius.
One of the important components of the angle grinder is the gearbox. During operation of the tool, it gets very hot, since the gears rotate behind it, which leads to strong heating. It is for these reasons that the gearbox casing is made of metal, because it removes heat quite quickly. However, one casing is not enough to cope with high temperatures; proper lubrication is also important.
Anyone who is an expert when asked how to lubricate the gearbox of an angle grinder will answer that it is preferable to use a special lubricant for angle grinders. It is specially developed for the work and criteria in which such a tool is used. This lubricant has a specific blue color. Excellent, high-quality lubricant for the grinder gearbox has the following marking: MoS2 NLGI 5 ISOL-XBCHB 2 DIN 51825-KPF 2.4 K-20. Marking means:
- MoS2 – molybdenum disulfide acts as an additive;
- NLGI 3.2 – 2nd viscosity class;
- ISOL-XBCHB 5 – compliance with ISO standards;
- DIN 51825-KPF 5 K-20 is the most important point; it means that the lubricant complies with German DIN standards.
- 51825 indicates that the material corresponds to Type K grease.
The cost of such a mixture is very high, alas, there are more affordable lubricants with similar properties: KPF 5 K-20, where:
- K – intended for plain bearings;
- R – with extreme pressure additives;
- F. with hard filler;
- 4 – mixture corresponds to NLGI;
- K – highest operating temperature 120 degrees Celsius;
- 20 – low operating temperature.
Note! The introduction of special lubricants for angle grinders will provide the highest guarantee of reliable operation.
Increased attention should be paid to lubrication of angle grinders that are under warranty. It is not recommended to do this without the help of others; this work should be entrusted to special workshops. There, high quality and unique materials will be consumed with the right dose. You can apply the consistency incorrectly with your own hands, which will have a bad effect on the longevity of the tool.
Advice! It is recommended to take to special services not only grinders under warranty, but also those whose warranty period has already passed.
Various lithols and solid oils for lubricating gears and bearings are strictly prohibited. Also, opening the case on warranty instruments will be a prerequisite for refusal of service, and the introduction of “unauthorized” lubricant is generally a gross violation of the rules for operating an angle grinder. The only exceptions are external nodes, which, according to the annotation, need to be processed frequently.
The grinder, like other tools used in household and professional activities, requires constant maintenance. Operating efficiency and long service life are ensured by timely maintenance.
Grease for an angle grinder is the main component for servicing the device. To improve performance properties, you should choose the right composition.
The main modular unit of an angle grinder is the gearbox. It only bears the main part of the load during operation. It contains helical gears that transmit torque from the rotor to the operating element. Lubricating the grinder gear reduces the friction force in the gears. It also helps to reduce the temperature that appears during operation.
Where to change the lubricant? During operation, the lubricant coating scatters around the gearbox housing. After a short time, it begins to dry out and lumps form. Lumps of course accumulate particles of dust and metal formed during operation. If, when disassembling the grinder, lumps are found, then you need a new lubricant for the grinder gearbox.
There are situations when it is necessary to replace parts of an angle grinder gearbox, or, in other words, the rotor bearing. In this case, you need to disassemble the device. Accordingly, the lubricating layer will be removed. Instead, new material is applied.
During long periods of operation, the grinder's gearbox heats up. Accordingly, the coating used also begins to heat up. When heated, the lubricant becomes watery and may leak. When finished, there is not enough left inside. You can see this if you look at the gears. They should have a thick layer. Thus, if the volume of lubricant coating is small, you need to change it.
The lubricating coating for gearboxes is characterized by the following qualities:
- viscosity no more than 800 Pas;
- drop falling temperature of at least 120°C;
- tensile strength of at least 120 Pa;
- absence of mechanical impurities;
- corrosion resistance;
- highest melting point;
- water repellency.
It is necessary to choose a lubricant that does not contribute to the appearance of notches in areas of contacting parts.
When choosing coatings for yourself, you should be guided by the condition that the lubricant coating for the bearing parts of the gearbox differs from the lubricating coating of the motor bearings.
Types of lubricants
Many people are interested in the question: how to lubricate the gearbox of an angle grinder so as not to destroy the tool and increase its efficiency. The following types of lubricants are possible:
- the brand of lubricant products corresponds to the brand of the tool manufacturer;
- composition for CV joints;
- grease and lithol.
Probably tool manufacturers always advise using a suitable lubricant for maintenance in order to avoid negative consequences during operation. When using a composition from another manufacturer, the tool is not subject to warranty repair.
Many people will think that lubricating the gearbox with the manufacturer’s compound is very expensive. After all, the price of such materials is quite high. Already today, there is a Russian automobile industry that does not produce lubricants.
When choosing solid oil, also called lithol, as a lubricant, you run the risk of causing the instrument to quickly break down. This is justified by the fact that these substances do not imply use at elevated temperatures and high friction. Therefore, after some time there are problems during the operation of the tool.
Thus, a good lubricant option for angle grinders is considered to be one that corresponds to the brand of the tool manufacturer.
Lubrication is carried out in special workshops or without the help of others. When performing lubrication on your own, do not forget that a lubricant that does not match the brand of the tool will cause the tool to break. The process of processing with new lubricants involves the complete removal of the old lubricant layer. The parts and walls of the case are not made to contain remnants of the old coating.
Stages of lubrication of an angle machine gearbox:
- disassemble the grinder;
- wash the sides and cavities of the gearbox using kerosene or a solution of kerosene and gasoline;
- dry the washed parts;
- mix new lubricant;
- coat bearings and cavities;
- assemble the tool.
When applying, the question arises: how much lubrication is required? Applying a mass of lubricant will cause excess volume to flow out during operation. If the content is low, the operation of the gearbox will be difficult and will lead to rapid wear. As follows, such a volume of material is placed in the housing so that the gear teeth are hidden under the surface of the applied layer. The approximate content of the coating on angle grinder gearboxes is less than ½ the volume of the entire gearbox.
The grinder's lubrication, specifically its richness, is checked in idle mode during a test run for a short period of time. After starting, the gearbox begins to heat up. If some of the lubricant leaks out when the gearbox is warmed up, then you need to disassemble the tool again and remove the excess.
If, after a short period of idling, signs of noise or rattling appear, then the volume of the applied layer must be increased.
If you want to use a good lubricant composition for an angle grinder gearbox, but you don’t have the ability to purchase it, then you should make it yourself using CV joint lubricant. We should not forget that the material used must have good adhesion.
The composition must adhere firmly to the rubbing elements. The composition for CV joints is characterized by increased adhesion and the ability to operate under high temperature loads.
To produce the consistency, a composition for the CV joint and MS-20 oil are taken to enhance the required viscosity and density. Using a homemade mixer, the composition is mixed with a small supply of oil (drop by drop).
And besides, always get material from the consistency of lubricants Tsiatim-221 and TAD-17. The main component is Tsiatim.
Foreign-made gearbox lubricants are more expensive than Russian ones. Among foreign brands, the Bosch brand is widely known. It is used to lubricate tools of the same brand, as well as other models of grinders. The coating has good performance properties.
Among Russian manufacturers, products called “Metal Plaque Electra” are known. Lubricants of this brand are used for most components of electronic tools.
Operating an angle grinder without a lubricant coating will initially lead to minor problems during operation, and then to failure of the tool. Lubricated gearboxes will extend the life of the tool and increase productivity. The master himself decides which lubricant is suitable for the existing device.
The angle grinder works in extreme conditions and under heavy load. This is why repeated lubrication of the grinder gearbox is necessary, because the moving components of power tools are subject to the highest lubrication requirements. Otherwise, if there is a lack of lubricant, excessive wear occurs and the service life of the power tool is reduced.
The angle grinder gearbox is designed in such a way that the grease of a pair of gears moves to the walls of the housing under the influence of centrifugal force. A sign of “draining” of the gearbox is excessive noise during operation of the grinder. When the gearbox housing is opened, the problem becomes trivial. All the factory grease is on the housing walls, the helical gears are virtually dry.
We check the degree of wear of a pair of gears and damage to the teeth. We replace gears as needed.
We clean the surface of the gears from mechanical dust. Lubricate the sealed bearings of the motor rotor and the working shaft of the gearbox with watery engine oil. We actively rotate the rotor to ensure uniform penetration of the lubricant inside the bearing. Remove excess watery grease with a clean rag. If this is not done, it will mix with the gear grease and make it more watery. Watery lubricant will not adhere well to the gear teeth.
If the factory grease for the grinder in the gearbox is of normal quality, apply it thickly to the teeth of both gears. If there are signs of aging of the lubricant, wash the gearbox with kerosene or other penetrating liquid and replace the lubricant.
Regarding the question of how to lubricate the gearbox of an angle grinder, no matter what kind of high-temperature grease is suitable, for example, for lubricating CV joints and wheel bearings of a car. At the same time, remember to apply it to the shaft support bearing.
We assemble the gearbox, carefully tightening the fasteners. If you leave free play in the gear pair, the gearbox may jam.
Also, to service the angle grinder, you need to lubricate the second rotor bearing and check the condition of the motor brushes.
Based on the intensity of use, a similar function (lubricating the grinder gearbox and checking the condition of moving parts) needs to be created frequently. This will extend the life of your power tool.
13, total, now
Source
Do-it-yourself repair of grinder gearboxes
Should the gearbox of a new angle grinder heat up?
Grinder gearboxes operate under increased loads, so the housing of even new gearboxes heats up. However, in the presence of high-quality lubrication and the absence of technical malfunctions, the body temperature should not exceed the standard values presented in the technical documentation attached to the angle grinder. Usually it should be around 40°C.
What to lubricate: CV joint and other options
The best option for lubricating the gearbox is a brand from the manufacturer of the grinder itself. This lubricant is tested on the manufacturer's models, so it is best suited for use. The main disadvantage is its high cost.
Lubricant for Makita , 30 grams. Photo
Users of grinders find options based on domestic oils, which are somewhat worse than branded ones, but much cheaper. CV joint lubricant has good adhesion. If we take it as a basis and add MS-20 liquid oil to obtain the desired consistency, then the use of such a lubricant in an angle grinder is fully consistent with the operating conditions of a bevel gear pair. More information about lubrication of grinder gearboxes can be found in the article at the link.
Sources:
https:///kuznechnoe-delo/kak-razobrat-reduktor-bolgarki/ https:///reduktor/pochemu-greetsya-reduktor-bolgarki.html https:///kuznechnoe-delo/remont-reduktorov-bolgarok-svoimi- rukami/
How to reduce the heating of an angle grinder gearbox / needle instead of a bushing
Due to the work being performed, when the appearance of stone, wood and iron dust is inevitable, as well as its entry into the body of the angle grinder and settling on the moving mechanical parts of the gearbox, the angle grinder needs repeated preventive inspection and boils down to the following actions:
- Removing dust and larger pieces of debris from the gearbox housing;
- Checking the presence of grease in the bearings on the gears, in addition to the integrity of the graphite brushes and changing them as needed.
Based on the circumstances that an angle grinder is a resourceful, massive piece of equipment that gets very hot during operation, the question of what kind of lubricant to use for the angle grinder gearbox is very important. We would like to immediately highlight the types of lubricants, the use of which for the gearbox (bearings and gears) of an angle grinder is not recommended by specialists. This:
Silicone, pigment and lithium lubricants and derivative materials based on them, produced in Russia and imported, have proven themselves to be excellent.
When choosing which lubricant to lubricate the gearbox of an angle grinder, it is worth listening to the worldview of experts in their repair, or simply called long-time users of this tool. Although their ideas will be far from unambiguous.
Thus, CV joint lubricants, widely known among car owners, are equally strongly both recommended and rejected by specialists. At the same time, both states give quite convincing reasons for and against the introduction of CV joints.
We can definitely say that the lubricant for the gearbox of an angle grinder must meet the following requirements:
- Be heat-resistant and not even leak from the gearbox during its heating;
- Increase gliding;
- Reduce the friction force between contacting and moving elements of parts;
- Moderately redistribute the thermal load, immediately performing cooling functions;
- Protect iron parts from corrosion, dirt and dust from penetrating into the mechanism.
How to disassemble an angle grinder for diagnostics
In order to diagnose the electrical part of the angle grinder, as well as eliminate mechanical breakdowns of the device, you will need to disassemble it. Disassembly is carried out according to the following algorithm.
- Using a wrench, remove the disk or other attachment from the spindle of the unit.
- Unscrew the handle.
- Remove the protective cover.
- Open the special windows located on the sides of the angle grinder casing and remove the electric brushes, having first disconnected the terminals.
- Unscrew the gear housing from the angle grinder motor housing.
- Pull the gear housing lightly and remove it from the housing. In this case, the gear unit will be removed along with the rotor.
- After removing the armature, the motor stator will remain in the casing, which can also be easily removed for diagnostics after unscrewing the fasteners.
- To disassemble the gearbox, unscrew the screws holding the cover. After removing the cover, you will see the gears of the gearbox.
- To remove the anchor from the angle grinder, you will need to unscrew the nut located inside the gearbox.
- In order to remove the bearing from the armature, it is recommended to use a special puller. Otherwise, the shaft may be damaged.
How to extend the service life of an angle grinder
If you follow all the rules and recommendations when working with an angle grinder, you can be sure that such a power tool will last much longer than its warranty period.
During the Soviet era, angle grinders were made in Bulgaria. Therefore, the angle grinder began to be called the grinder. Currently, there are many companies producing angle grinders of various models. But the basic elements are the same. After familiarizing yourself with the device, possible breakdowns and diagnostics of the tool, you can repair an angle grinder of any modification with your own hands.
Drive power and size
Grinding machines have different sizes and wheel diameters. The minimum size is equivalent to 115 mm. This wheel is designed for easier work. The largest size is considered to be 230 mm in diameter. With this wheel you can cut bricks, slabs, pipes and anything else you need. A diameter of 125 mm will be considered the optimal choice for a circle for homework. To renovate a house or apartment, you need to choose a circle equal to 180 mm. The power of the tool varies from 0.5 to 2.5 kW.
The choice of this parameter depends on the operating time and engine power. There must be enough engine power to move the disk.