The grinder is used to perform many tasks on the farm. Regular use may damage the device. The most frequently broken element is the anchor. It is subject to a high thermal load, as well as mechanical and electromagnetic influences. As a result, many craftsmen have to think about repairing this part.
Anchor device
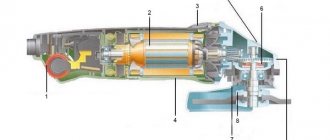
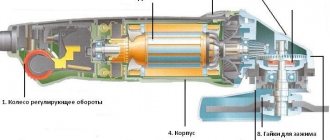
The armature of an angle grinder consists of a winding that conducts current and a magnetic circuit. The magnetic circuit contains a shaft that performs torsion. The structure of the magnetic wire is formed by plates and grooves, which are isolated from each other by coating with varnish. A specific sequence for laying the conductors of the armature winding in the grooves has been developed. The conductors form a coil. Its ends are tied together with lamellas. The layout of the beginning of the starting turn and the end of the last is drawn up in such a way that they are closed onto one lamella.
When the angle grinder motor constantly overheats, the armature melts. As a result of high temperature, the contacts of the wires that connect the primary winding to the collector may fall off. All this leads to the fact that no current is supplied.
Armature fault
There are criteria on the basis of which we can conclude that the anchor requires repair:
- the number of sparks emanating from the brushes on the engine commutator increases;
- vibration appears at low speed;
- the working shaft begins to move in different positions.
The presence of these signs indicates a broken anchor. Subsequent use may be dangerous.
The following damage to the anchor is known:
- breakage of electrical conductors;
- short circuit between turns;
- insulation failure, which leads to a short circuit of the winding to the metal surface of the rotor;
- soldering the ends of the collector;
- Uneven commutator wear.
As a result of these malfunctions, the engine gradually stops working. To find out the reason for the failure of the angle grinder, diagnostics should be carried out. It can be carried out visually or using appropriate instruments.
Checking the health of the stator
The stator is the stationary part of the electric motor that creates an electromagnetic field in which the rotor rotates. The cause of failure is often either a short circuit or a break in the turns of the stator winding (coil).
This happens for various reasons:
- water ingress;
- overheating caused by overloading the angle grinder;
- power surge;
- sharply pulling the tool plug out of the socket.
Signs indicating stator failure:
- appearance of smoke;
- smell of burnt insulation;
- overheating of the grinder body;
- stopping the rotation of the shaft or slowing it down;
- sudden spontaneous increase in speed.
Step by step instructions
You can also check the stator using a multimeter:
- The probe connectors are inserted into the corresponding sockets on the tester body.
- The device is set to resistance measurement mode. The measurement range is set from 20 Ohms to 200 Ohms.
- The probes are alternately brought to the windings and the readings are recorded on the screen.
Deciphering the results
The results of the call may be as follows:
- The tester records the same resistance everywhere - the stator coil (winding) is working.
- At some points the resistance is different - there is a short circuit in the winding, or there is a break in one of the turns.
Thus, having at your disposal even the simplest multimeter, you can determine the nature of the malfunction of the angle grinder and make an informed decision about whether it is worth repairing or whether it is better to purchase a new one. Although, for diagnostic purposes, it is better to take the instrument to a workshop, where there are more opportunities and instruments for an expert opinion.
Now you know how to check an angle grinder with a multimeter.
How to check the anchor on an angle grinder?
Visual inspection rules
Standard diagnostics involve visual analysis of the device. It is necessary to analyze the integrity of the wire and the current supply to the motor commutator. If the power supply is normal, you should inspect the grinder from the inside. Disassembling the device will not be difficult. When disassembling, it is best to photograph the location of the main modules of the device. After disassembly, visually check the anchor for the following properties:
- the anchor must move freely;
- absence of black spots and odor, which may indicate melting of the winding, the insulating varnish of which leaves traces;
- absence of crumpled turns and solder residues, which leads to a short circuit;
- there should be no burnout on the lamella contacts, otherwise you should check the connection between the lamella cockerel and the winding bar;
- no worn or burnt out records;
- the space between the lamellas should not contain graphite residues from brushes.
If a visual inspection does not reveal any deficiencies, then it is necessary to carry out an instrument check. The anchor on an angle grinder can be checked either using a tester or using a regular light bulb.
Inspection using a tester
The multimeter is set to the ohmmeter position. The resistance is set to 200 ohms. The probes are connected to the lamellas located next to each other. If the value on the device is less than 1 ohm, then there is a short circuit. If the value is greater than the average, there may be a break in the turns. If the resistance value is high or there is no value (in the case of using a digital device), a break can also be judged.
There are situations when a break is not detected. Then a test for mass is done. At maximum resistance, one of the probes is placed on the shaft, and the other moves along the plates. If the value is zero, then there is no damage. Then the rotor is checked in the same way with a multimeter. In this case, the probe moves along the lamellas. If it is impossible to check with a tester, a light bulb is used.
Control using a light bulb
In the absence of a device at hand, many are interested in the question of how to check the angle grinder for possible anchor damage. The power supply wire is broken and a light bulb is placed where one wire breaks. Then the shaft rotates. By changing the brightness of the light bulb, you can judge the short circuit between the turns. In the absence of combustion, the following conclusions are possible:
- the location of the brushes does not correspond to the working position due to the activation of the support spring;
- rupture of the supply circuit;
- short circuit or break in the stator winding.
You can ring with an indicator of short-circuited turns and an armature tester. This can be done by an experienced person.
Checking and repairing the angle grinder's anchor with your own hands 1
Almost all electrical appliances used in everyday life use an asynchronous electric motor. An important advantage of this type of motor is that when the load on it changes, the speed does not change.
This means that if, for example, you cut stone for a long time and without stopping with a household grinder, there will be no noticeable external signs of engine overload. The disk rotation speed will be constant, the sound will be monophonic.
Only the temperature will change, but this may not be noticed if your hands are wearing gloves.
The induction motor commutator is sensitive to overheating
If you are not careful, an advantage can turn into a disadvantage. Asynchronous motors are very sensitive to overheating; a significant increase in operating temperature entails melting of the insulation on the rotor windings.
At first, the motor will work intermittently, and then - when an interturn short circuit occurs - the motor will stop completely. If you overheat the grinder's engine several times, it is most likely that the anchor will melt.
In addition, the high temperature causes the contacts connecting the wires of the primary winding to the collector to become unsoldered, which leads to an interruption in the supply of electric current.
How to determine if an angle grinder's armature is faulty
Signs of a broken armature angle grinder are: increased sparking of the brushes on the motor commutator, vibration of the motor at low speeds, rotation of the working shaft in different directions. If such symptoms are present, you should stop using the tool - this is dangerous. Suspicions can be easily verified using simple tests.
Visual inspection from outside
Troubleshooting should begin with a visual inspection of the angle grinder:
- Carry out a general inspection of the instrument.
- Pay attention to the integrity of the power cord and the presence of voltage in the outlet.
- Using a voltage indicator, make sure that current is flowing to the motor commutator and the start button.
The indicator checks the integrity of the electrical circuit
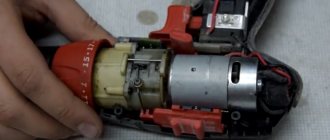
Inspection of the device from the inside
If everything is in order with the power supply, but the angle grinder does not work, you will have to open the case to gain access to the motor. As a rule, disassembly is not difficult. But you need to follow simple rules that will help you avoid troubles during reassembly:
- Be sure to disconnect the device from the mains before disassembling.
- Remove the working disk and protective cover from the spindle.
- Open the case in a well-lit place, on a clean table surface.
- Remember the location of all parts and assemblies before disassembling. It is recommended to sketch or photograph the internal structure of the device.
- Place screws and fastening screws in a separate place so that they do not get lost.
It is best to inspect the engine under bright lighting so that all small parts are clearly visible. The armature should rotate freely around its axis; properly functioning bearings should not make any sound during operation.
There should be no traces of melted wiring on the armature, the circuit windings should be intact, without breaks. You can smell the rotor. When there is an interturn short circuit, the insulating varnish burns and emits a persistent specific odor.
But such a diagnosis requires some experience.
Continuity testing of circuits with a tester
If a visual inspection does not give clear results, it is recommended to continue the examination using a multimeter.
Having set the mode switch to the ohmmeter position (200 Ohm range), you need to “ring” two adjacent armature lamellas with two probes. If the resistance on all turns is the same, this means that the windings are working properly.
If on some pairs the tester shows a different resistance or an open circuit, there is a malfunction in this coil.
Using a multimeter in resistance measurement mode, check the integrity of the coils
A wire break can occur between the winding and the core. You should carefully examine the junction of the coils with the collector lamellas in the lower part of the armature, and visually check the soldering of the contacts.
Checking contacts with a light bulb
If you don’t have a tester, you can get out of the situation using a simple 12-volt light bulb. The power can be any, optimally 30–40 W.
The voltage from the 12 volt battery must be applied to the plug of the angle grinder by inserting a light bulb into the gap in one wire. If the armature is working properly, if you rotate the spindle by hand, the light should light without changing brightness.
If the heat changes, this is a sure sign of an interturn short circuit.
If the light does not light, this may indicate the following:
- The brushes may become stuck in the non-working position. The retaining spring has worked.
- There has been a break in the supply circuit.
- There is a short circuit or break in the stator winding.
There are other diagnostic methods, but they require more sophisticated equipment, which is not usually used at home. An experienced technician will determine the breakdown with a high degree of accuracy using a “punch” or a simple transformer with a cut toroidal core and one primary winding.
In what cases can you save an anchor and restore it yourself?
If damage to the armature is determined with guaranteed accuracy, the part must be removed from the electric motor. Disassembling the motor must be done with special care, after removing the brushes and disconnecting the power terminals. The rotor is removed along with the support bearings and the motor cooling impeller; they form a single whole with it.
Diagram of an angle grinder's anchor device
If most of the wiring in the armature is damaged and the balancing is disrupted as a result of overheating, it is better to replace it entirely. An imbalance is indicated by increased vibration and an uneven hum when the mechanism operates.
How to rewind an anchor - step-by-step instructions
If the balancing of the armature is not disturbed, and the problem is only in damaged windings, then such an armature can be restored independently by rewinding the coils. Rewinding a rotor at home requires a lot of patience and accuracy.
The technician must have skills in working with a soldering iron and instruments for diagnosing electrical circuits. If you are unsure of your abilities, it is better to take the engine to a workshop for repairs or replace the entire armature yourself.
To rewind the anchor yourself you will need:
- wire for a new winding. A copper core with a diameter exactly matching the old conductor is used;
- dielectric paper for insulating the winding from the core;
- varnish for filling coils;
- soldering iron with tin-lead solder and rosin.
Before rewinding, it is important to count the number of turns of wire in the winding and wind the same amount of new conductor onto the coils.
The rewinding process consists of the following steps:
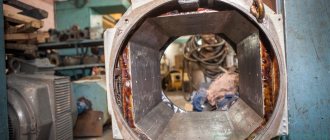
- Dismantling old windings. They must be carefully removed without damaging the metal body of the armature. If any burrs or damage are found on the body, they must be smoothed out with a file or sanded with emery. Sometimes, to completely clean the body of slag, craftsmen prefer to burn it with a torch.
- Preparing the collector for connecting a new wire. There is no need to remove the manifold. You should inspect the lamellas and measure the resistance of the contacts in relation to the housing with a megger or multimeter. It should be no more than 0.25 MOhm.
- Removing old wiring on the manifold. Carefully remove the remaining wires and cut grooves in the contacts. In the future, the ends of the coil wires will be inserted into the grooves.
- Installation of sleeves for anchors. The sleeves are made of dielectric material 0.3 mm thick, for example, electrical cardboard. Cut a certain number of sleeves and insert them into the grooves of the cleaned anchor.
- Rewinding reels. The end of the new conductor is soldered to the end of the lamella and wound in successive circular movements, counterclockwise. This laying is called “laying to the right.” Winding Repeat for all coils. Near the collector, tie the wires together with a thick thread of cotton fabric (it is prohibited to use nylon, as it melts when heated).
- Checking the winding quality. After laying all the windings, check with a multimeter for the absence of interturn short circuits and possible breaks.
- Finishing processing. Treat the finished coil with varnish or epoxy resin to secure the winding. In factory conditions, the impregnation is dried in special ovens. You can do this at home in the oven. As an option, use quick-drying varnishes for impregnation, applying the coating in several layers.
Replacing the anchor yourself at home
Practice shows that if you decide to replace the armature of an angle grinder, then it is best to change it together with the support bearings and the engine cooling impeller.
To replace you will need:
- New angle grinder anchor. Must match your model. Interchange with other models is not permitted.
- Screwdrivers, wrenches.
- A soft brush and cloth for wiping the mechanism.
How to remove an anchor
Replacing the anchor begins with disassembling the angle grinder. The following steps are performed:
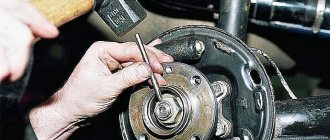
- Use a screwdriver to unscrew the brush units on both sides. The brushes are removed. To remove, you will need a wide flat-head screwdriver
- Unscrew the 4 screws securing the gearbox housing. Remove the housing carefully
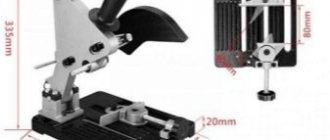
- Carefully open and remove the gearbox cover to gain access to the inside of the gear mechanism. To disassemble the gearbox you will need a puller
- The retaining ring securing the small gear to the armature is removed.
- The armature retainer is released from its fastening and the armature is removed along with the small gear and bearing.
- The gear, bearing and armature fixing disk are removed and wiped with a rag. The bearing is removed with a special puller. The puller is activated by rotating the thrust screw
How to put an anchor in place
To install a new angle grinder anchor in place, you should take a new part, and then assemble the tool in the reverse order. The sequence of actions is as follows:
- A fixation disk is installed on the armature shaft.
- The bearing is installed using the pressing method.
- The small gear is fitted and secured with a retaining ring.
- The anchor is inserted into the gearbox housing, and the docking holes are aligned.
- The gearbox mounting bolts are tightened.
- The anchor with the gearbox is inserted into the body of the angle grinder and fixed.
- The brushes are deposited in their places and closed with lids.
After completing these steps, the grinder is ready for work. The anchor has been replaced.
: how to check an angle grinder
An ancient Sufi wisdom says: “A smart person is one who is able to come out of a difficult situation with dignity. But the one who does not find himself in such a situation is wise.
» By following the rules for operating household appliances and preventing the motor from overheating, you can avoid breakdowns and troubles in the operation of the angle grinder. and keeping the tool clean and dry will prevent its mechanisms from contamination and oxidation of current-carrying elements.
Timely maintenance of the tool is guaranteed to eliminate unpleasant surprises during operation.
Source: https://100uslug.com/proverka-i-remont-yakorya-bolgarki-svoimi-rukami/
Rewinding the armature
Anchors for angle grinders can be rewound at home. To do this, you need to have certain skills when working with a soldering iron. To rewind the armature with your own hands, you will need:
- a wire with a copper core that matches the previous conductor;
- dielectric paper to insulate the winding;
- varnish for filling coils;
- soldering iron
Before starting to wind the armature, it is important to count the number of turns in the old winding and do the same number on the new coil.
Rewind scheme:
- removing previous windings - try not to damage the surface of the housing. If damage occurs, sand with sandpaper or a file;
- inspection of the collector - the resistance value of the lamella contacts in comparison with the shell should not exceed 0.25 Mohm;
- cleaning the collector from old wires - developing grooves for inserting the ends of new wires;
- placement of sleeves - they are made of non-conducting material, for example, electrical cardboard. Their size is 0.3 mm;
- rewinding the coils - the end of the new wire is attached to the end of the lamella. Rewind in a counterclockwise direction. Secure the wires near the collector with cotton thread;
- control for the absence of short circuits - measure the resistance with a tester;
- applying varnish or epoxy to secure the winding - dry it in the oven or use products that dry quickly.
If it is not possible to perform such actions, then you can replace the angle grinder’s anchor.