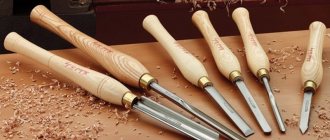
Manual finishing of wood will always be relevant, even in the era of absolute automation of all production processes, because in the vast majority of cases a unique thing can only be done manually.
The basics of turning wood on a machine can be useful not only to a professional carpenter, but also to novice designers, builders, and those simply wanting to learn this ancient skill.
Working on a wood lathe, or, as they sometimes say, lathe, in general, is not particularly difficult, but you need to learn to understand how to feel the product being processed. It is then that work becomes a true art in which a person gains self-expression, realizes creativity and develops imagination.
Types of metal turning
There are the following types of lathes.
- Screw-cutting lathes. This is the most common group of lathes. They are most often used to process bodies of rotation for:
- giving parts a taper;
thread cutting;
processing of external cylindrical surfaces; drilling, countersinking and reaming of holes; rolling corrugations; processing of ends and ledges; turning grooves; cutting off parts; cutting external and internal threads.
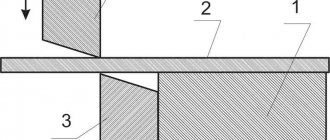
Image No. 1: main types of metal turning
Turning and rotary. These machines are used for processing workpieces of large diameters. Turning and turret. Most often they are used for processing rods, forgings and castings. Lobotovarnye. Such machines are designed for processing pulleys, wheels, semi-finished gears, flanges, sprockets, etc.
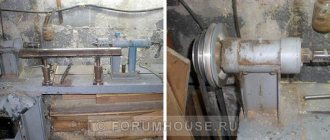
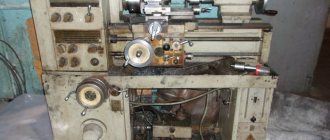
Photo No. 2: screw-cutting lathe
Purpose of the machine and what can be done with it
A lathe is a device for making wooden products in the shape of bodies of revolution. With its help, you can sharpen the material, cut it, and also sand it with sandpaper. The machining process itself is a combination of two types of motion: rotational and translational. The machine directly rotates the workpiece itself, and the turner manually, using a chisel, regulates the pressure on the workpiece to obtain the desired shape.
And it’s not only construction blanks that can be turned on a machine. It all depends on the imagination and qualifications of the master. These can be souvenirs and decorative items. For example, a beautifully made beech wine glass or unusual apple tree spoons will be a worthy decoration for any kitchen. In the hands of an experienced craftsman, any log will become a masterpiece!
What can be done?
A lathe is a tool not only for making construction workpieces. It is often used to create various souvenirs and decorative items: boxes, vases, chess, candlesticks, wooden toys and much more.
Vase
In addition to the machine, you will need other tools: chisel, ruler, compass, hacksaw, axe, plane. Considering the variety of forms that vases can take, these products can be quite simple or complex.
Let's look at a simple example:
- the workpiece, finished along the length and at the ends, is installed on the machine;
- the top layer of wood is removed and given the intended shape: oval, straight, etc.
- using a drill, a hole is made in the center of the free end with a depth less than the length of the vase;
- the cavity of the product is cut out with a “jamb” cutter;
- the product is polished, the bottom is finished manually;
- varnish coating.
Turned chess
Small wooden blanks with a cross-sectional diameter of 50–60 mm are suitable for making chess.
On one side of the workpiece, a smaller cross-section is needed - this end will fix the workpiece on the machine.
- the free end of the workpiece is trimmed with a cutter and pressed against the tailstock;
- a layer of wood is removed to give it a round shape;
- at the discretion of the master, the shape of the figure itself is turned;
- grinding, the figure is cut off from the fixed part;
- coated with varnish/paint.
Important!
The fixed part must be machined to a rounded shape, since installing a tetrahedral workpiece in the chuck will create additional load on the cutter!
Making a box
The box is a fairly simple product to make. As a base, you can use a cylinder-shaped workpiece.
The main difficulty here is the lid, which must be flush with the edges of the box body and fit into the grooves of the walls in order to close tightly.
- we fix the workpiece on the machine and use a semicircular cutter to give it a clearer shape;
- using a straight narrow cutter we form the inner cavity of the box;
- Using a triangular cutter, we bring the resulting niche to the walls of the body;
- Using a straight wide cutter, we form the bottom of the product and the groove for the lid;
- sand, apply varnish and wax.
The lid is made from a similar blank, only thinner. It goes through the same steps as the body, and the formation of the outer and inner sides, which can be straight or convex, is carried out with a straight wide cutter.
DIY wooden products from different types of wood
Even more amazing things made of wood are made entirely by hand, without a lathe. Thus, it has become popular to create a wooden case for everyday things: a flash drive, a computer mouse.
There is even a concept model of a phone made entirely of wood and with touch-sensitive buttons.
Animal figurines
Such art depends entirely only on the level of skill of the manufacturer and his imagination. Linden is better suited for such products.
This rock does not form cracks and is easy to process. But they also work with other breeds. For production you will need:
- a chisel with a rounded and triangular end to create appropriate shapes;
- a blunt knife and a knife with a beveled blade.
Before you immediately start working with wood, it is better to sketch on paper what the future product will look like. Often the drawing is transferred with tracing paper to the workpiece, and in order to avoid mistakes, before working with metal tools, an outline is drawn on the figure with a pencil.
Crafts-souvenirs
Various handmade wood products look great as small gifts and souvenirs. These can be kitchen utensils: spoons, spatulas. Various keychains, badges, entire paintings and much more.
Wooden souvenirs - homemade crafts
Craftsmen use scrap materials that cost pennies to create artistic products of the highest level. Do you want to see how a real miracle is born from resin and wood? Then look at the step-by-step photos! Such crafts delight and motivate you to create your own unique masterpieces.
First, the carpenter turns a cone-shaped blank from a log.
Then he breaks off part of the piece of wood so that an uneven cut of a peculiar shape remains. Using a plastic cup and tape, he creates a container for pouring. Mix epoxy resin, hardener, polishing varnish, add a little Easter egg dye and pour the mixture into the mold.
When the epoxy glue hardens, the workpiece is sharpened on the same lathe, giving it the shape of a Christmas tree.
After processing with sandpaper and polishes, the craft takes on a finished look and glows a little in the dark, conveying the beauty of broken wood and hardened resin.
Would you like to meet a master who creates incredible paintings from tree bark? An elderly artist collects everything that lies under her feet in the park. Then, in his home workshop, he collects his artistic masterpieces practically from garbage for sale.
Read also: Working with a plane on wood video
For retired grandmothers, working with wood is a wonderful creative activity; it is very useful for physical and psychological health and replenishing the wallet.
Another experienced craftsman in years works with birch bark. This natural material has a special texture and unique pattern. A diligent craftsman works painstakingly, putting his soul into creative crafts.
First, he soaks the bark in hot water under a lid, then holds it under pressure, and finally sticks it on the base and treats it with a special compound.
The result is wonderful birch tiles that can be used to decorate walls and be included in furniture assembly. As the Russian proverb says, the need for invention is cunning.
This is for sure, people who are not spoiled by big money create beauty from what Mother Nature generously gives.
I would like to please my dear readers and show a wonderful video with jewelry wood carvings. The art is called “Woodcarving”, and masters working in this technique are found in all countries of the world. Have you ever seen how wonderful wooden gifts made by experienced carvers are? If you haven’t seen it, then look with all your eyes and be amazed at the beauty of the created souvenirs.
To make the article full of examples, I collected photos of creative furniture, useful garden items that were created from unnecessary boxes. Look, choose ideas for your office, home or cottage!
I am sure that every reader of this article has a desire to make something out of wood with their own hands. Go for it! Tomorrow, collect twigs and dry twigs from the park and create a small artistic miracle. Write about the results in the comments, and also click on the social network buttons and share links with friends.
I look forward to seeing you again on the informative pages of the blog! Come in, you're always welcome!
Purpose of the machine and what can be done with it
A lathe is a device for making wooden products in the shape of bodies of revolution. With its help, you can sharpen the material, cut it, and also sand it with sandpaper. The machining process itself is a combination of two types of motion: rotational and translational. The machine directly rotates the workpiece itself, and the turner manually, using a chisel, regulates the pressure on the workpiece to obtain the desired shape.
And it’s not only construction blanks that can be turned on a machine. It all depends on the imagination and qualifications of the master. These can be souvenirs and decorative items. For example, a beautifully made beech wine glass or unusual apple tree spoons will be a worthy decoration for any kitchen. In the hands of an experienced craftsman, any log will become a masterpiece!
Basic techniques for working with the machine
Techniques for working with a lathe are required. User safety directly depends on this
Important:
- check the serviceability of the mechanism before starting work, including the fastening of parts and shields;
- Lubricate the drive shaft and screws every time you use them;
- check the filling level;
- turn on at idle speed - check the lever, trigger, caliper, speed and gears;
- monitor the guide and bed;
- Avoid abrupt switching to reverse or switching the gearbox to another mode.
Be sure to clean the mechanism upon completion of work. Remove any remaining shavings and wipe with a cloth soaked in kerosene.
https://youtube.com/watch?v=_51wgZE_cDA
What can you do with it?
A lathe in skillful hands and with the necessary materials for the job is an extremely effective tool for the manufacture of metal or wooden products, and this can include both high-precision parts for other equipment and a variety of handicrafts for home or leisure.
Wood products
You can make wood products both “for the home, for the family” and for sale. In the latter case, the things made have a magical prefix in their name “made individually,” which in our era of globalization of all processes has considerable weight in the eyes of many potential buyers.
You can make furniture elements for its subsequent assembly (we think everyone remembers school stools made and assembled in labor lessons), tool handles, medium and small decor - the basis for wall clocks, vases, figurines of creatures, a popular type of machine-made products are chess, checkers, backgammon.
Metal crafts
Lathes for metalworking are usually not associated with crafts, because with their help, a lot of enterprises and individual craftsmen work on the manufacture of nuts and bolts, bushings and couplings, rings and shafts for various purposes, the maximum that a person who does not have information can imagine is this boring some parts during repairs and similar actions.
However, the range of tasks performed is not limited to work. Metal crafts can be made by both an experienced worker and a novice trainee; most often these are figurines or individual decorative elements: balls and keychains, cubes and entire models (for example, cars).
In conclusion, I would like to note the following: the world of lathes, with all its size and diversity, is available to everyone who wants to try themselves on this path. Moreover, now, with the active proliferation of CNC devices, a small lathe can be installed even at home, and after taking courses on its use, with time and growing experience, you can become one of those who can turn a piece of material into a real masterpiece, be it it is intended for work or leisure.
What you can make from wood with your own hands
Watch, be surprised and be inspired to create your own exclusive masterpieces!
A real Russian fairy tale will live on any garden plot if you use a birch log for work. Funny people, a donkey with a cart, a train, bunnies made from saw cuts will be a reason for a cheerful smile and a joyful summer mood.
The backyard of your dacha will become much more cozy if you put unusual garden furniture there. For example, chairs hollowed out from a whole log or cute benches for flower seedlings.
You can place stumps with pillows throughout the area, which will serve as comfortable chairs, and if you light them, they will become multi-colored fireflies at night.
Creative wood products bring a touch of naturalness to the home environment. They cut everything out of a shapeless piece of wood: original shelves, clocks, vases, candlesticks.
Pictures made from saw cuts and wooden installations acquire a special flavor, and rugs, coasters and coffee tables look like welcome guests from the forest.
The masters don’t forget about the holidays! For the New Year, people put together fragrant pine trees, plan wooden toys, and decorate their homes with unusual magical crafts.
Do you like simple wooden products? I'm sure yes! It is impossible to remain indifferent to such natural beauty. Do you want to create unique crafts from wood with your own hands? Then read the article to the end, study detailed master classes and take ideas into service.
You can cut a soup bowl out of wood material, or you can build a real ship and go on a long voyage.
Now in 1 minute I will teach you, dear readers, to distinguish between types of wooden products:
- Lathes. It is clear that these are objects made on a lathe. The device, which is simple in design, allows you to give ideal shapes to wooden stumps. Turners use a machine to cut out dishes, vases, balusters for stairs and even magnificent sculptures.
- Carpentry. In workshops, skilled craftsmen create carpentry useful for everyday life from simple boards or logs. From carpenters you can order furniture, a curved staircase, a gazebo for a summer house, doors, a cozy booth for your beloved dog.
- Exclusive. And the third category, which unites non-standard handcrafts. If you don’t have any sawing machines at home or in the garage, but only have imagination and the desire to create, you can still create beautiful wooden products with your own hands.
Let me show you an example of how an experienced carpenter makes a luxurious table on wheels. And what does he collect it from? Believe it or not, from unnecessary boxes.
Pallets are wooden containers for transporting heavy loads. They are in great demand among craftsmen.
In half an hour, functional interior items are assembled from soulless boxes, and a visual master class will show how they do this.
Have you seen how home craftsmen assemble a mini-lathe from scrap materials? This is interesting! Watch a short video that will demonstrate the assembly of a miracle unit from simple parts in 30 minutes.
Wooden carpentry for sale
Masters in whose hands ordinary boards or hemp take on an ideal shape are highly respected in society. In Soviet times, during labor lessons, all boys were required to learn how to make a stool.
And now, starting from the 5th grade, the subject “Technology” instills in children basic everyday skills. If a guy has a passion for carpentry, then he will definitely find tools, unnecessary boards at home and put together a birdhouse, a feeder for little feathered friends.
Note to parents! A carpenter is an artist and a sculptor rolled into one.
If a child develops an aptitude for carpentry from childhood, there is no need to prepare him for medical school. A good carpenter is a person with natural talent who can create useful things and earn a living as a practicing surgeon.
See what modern carpenters look like. Almost like famous actors or rock stars, and the work they do can be compared to high art. It is noticeable that these guys make good money in real life, and on their YouTube channel their master classes collect millions of views.
Read also: Reduction gear on a walk-behind tractor
Which wood products for sale are in high demand?
The list is quite extensive and is compiled according to popularity:
- frames, doors, stairs;
- Furniture for home and office;
- hedges, fences, garden gazebos;
- small household items - rolling pins, boards, mops, coasters;
- children's toys and board games (chess, backgammon);
- dishes;
- souvenirs;
- musical instruments;
- icons.
Most carpentry products are made to order, and the income of experienced carpenters is 100-150% of the invested funds. The production of molded products (items made from boards, timber, lining) for sale has more advantages than disadvantages.
A carpenter needs a large room, technical equipment, and high-quality materials for work. The production process is dusty and unhealthy. But the pleasure and financial benefits that the master receives from creativity more than cover the technical difficulties.
Let's see how real masters work? Let's! A top-class carpenter creates simple, fashionable and comfortable furniture from solid wood. When you look at step-by-step photos of the creative process, think about how much the master will earn when he sells such a chair.
And now I suggest you relax and admire the work of a real artist. Watching a skilled carpenter work is pleasant, educational and interesting!
It is especially useful to watch such videos for teenagers who are at a crossroads and are in search of themselves.
Safety precautions when working with the unit
It is important to remember that before you start working, you must study the rules and safety measures very carefully. Important! Improper handling of the lathe can cause injury!
Important! Improper handling of the lathe can cause injury!
Basic Rules:
- before turning on the machine, you need to check its grounding and serviceability at idle speed;
- you only need to work in special clothing;
- eyes must be protected with goggles or a mask, and if necessary, wear a respirator;
- firmly fix the workpiece exactly in the center;
- when working, do not put pressure on the part, movements should be smooth;
- do not measure a rotating part;
- do not leave the machine during operation;
- do not use defective workpieces (with cracks);
- do not pass or take any objects through a working machine;
- do not stop the workpiece by braking with your hand;
- do not start work when tired;
- Do not approach the machine while intoxicated.
This is the main thing, but not everything you need to know before starting work. If you are not confident in carrying out any operation, then under no circumstances should you start it. It is necessary to consult with a specialist, and only then begin work. This will help avoid accidents and injuries.
Turning technology
Depending on the intention or the product to be produced, it is necessary to select a turning technique. The most common and simplest form is spindle turning, which is based on a cylindrical shape.
The firmly fixed material rotates smoothly around its axis, and special knives or planks shape the wood. In this way you make legs for chairs and tables, separate partitions for railings or fences.
Longitudinal or transverse turning will be used in the production of decorative elements or bowls, containers and toys. Here you can interestingly combine mechanical processing of the material from the outside with modification of the cavity inside the tree.
Other types of turning include, for example, annular, multi-axis or segment turning. However, for normal wood processing, knowledge of classical techniques and their combinations is sufficient.
- When working, pay attention to high-quality equipment. It’s definitely not worth saving on knives.
- High-quality, well-sharpened steel guarantees ease of use.
- The material under the blade will change smoothly and there will be no unevenness or unwanted edge abrasion.
- Choose knives, lathes, chisels only from high-quality manufacturers with the possibility of repeated grinding.
Quality knives are an investment, but it will come back to you soon. This will save your time, complex repairs of finished products and damaged material.
What can be made?
An experienced craftsman can use a lathe to produce a huge number of items, ranging from simple slats to exquisite pieces of furniture.
Salad bowls
Depending on the size of the workpiece, you can make deeper salad bowls or flat ones. In any case, the work requires patience and fixing the workpiece at one end.
Boxes
These products require more skill from the turner. But the result can be a real work of art.
Furniture legs
Here the master's imagination is limitless
By combining different decorative elements, you can make truly graceful legs that will attract everyone's attention and admiration.
Toys
Dolls, bears, and, of course, nesting dolls - all this in the hands of an experienced turner can be obtained from a simple wooden block.
Cups
A wooden cup is suitable as a reward for the winner and will decorate the shelf of any sideboard. Additionally, you can burn a memorial inscription.
Vases
Wooden vases made on a lathe are distinguished by a variety of shapes and decorations. Flowers always look much more beautiful in them, and the atmosphere is closer to natural.
Wet and dry wood
Wet wood usually processes better. The advantage is not only the simple and quick capture of material, but also the minimal dust formation during operation.
However, the resulting product will undergo major changes over time. Gradual drying can change the shape and size of the object. Rapid drying may even cause cracking.
Unlike fresh wood, when processing dry wood, you can count on stability of shape and final color. However, such turning work is more labor-intensive, but a number of modern devices solve this problem.
The lower availability and higher price of dried wood are also important.
Carpentry workshop equipment
A few more interesting suggestions on how to make equipment for home carpentry using a regular screwdriver.
Wood lathe
When making wood products, it is difficult to do without a lathe. You can build it yourself. A flat wooden workbench is ideal for the bed. A screwdriver can be used as a headstock and rotation drive. You need to place the tool in a wooden bed made from a block in the shape of a screwdriver and secure it with a clamp. The block can be secured with a clamp, and if the machine is constantly used, screwed with self-tapping screws. A tooth mandrel must be inserted into the chuck. The tailstock is made of two bars with an adjusting screw, which is sharpened to a cone. It is installed opposite the fixed screwdriver so that the axis of the tool coincides with the axis of the tailstock adjusting screw. The back support structure is secured with a clamp. If you plan to process large parts, then the fastening should be more reliable. The tool rest can also be made from a block, securing it to the workbench with a clamp. A primitive lathe for the home workshop is ready.
Bench Drilling Machine
Another equally important piece of equipment is a drill. It can also be made from a screwdriver. To do this you will need a used screwdriver. From it you need to take a motor with a gearbox and a cartridge. Now you need to make two clamps from textolite, which will perform the function of fixing the drilling head of the machine. To achieve maximum alignment of all holes on the clamps, it is better to process them together, in one installation. Then you will be able to avoid distortions.
Bushings with internal threads are used as limiting posts. They must be the same size, corresponding to the distance between the clamps. After this, another clamp is made from textolite and two bosses from caprolon. They are drilled off-center, resulting in two eccentric bushings. The clamp is installed on the rod and the backlash is selected using eccentrics. After this, install a wooden lever on a spring so that the drilling head returns to its original position. To supply power, you must use a transformer with a power of more than 150 watts and an output voltage similar to the screwdriver you are using. After this, you need to install a diode bridge and a capacitor, and install the drilling head on the frame.
Manual router from a screwdriver: step-by-step instructions
It can be converted into a hand router. To do this, you do not need to purchase expensive materials. Everything you need can be found in the workshop or garage, practically under your feet. To make a manual router from a screwdriver, you will need pieces of thick plywood or chipboard, a clamp for attaching the tool, fasteners in the form of bolts and self-tapping screws, plumbing tools and a feather drill for wood. In the latter case, you can use a drill bit.
Assembling a homemade router is quite easy. To do this you need:
- From pieces of the selected material, cut out a base, a vertical stand on which a screwdriver will be attached using a clamp, a stop and a gusset to impart rigidity to the structure. The dimensions of the parts are chosen arbitrarily, in relation to the dimensions of the power tool.
- Using a pen drill, drill a Ø 40 mm hole in the base for free access of the cutting tool to the processing area.
- Make a clamp according to the diameter of the hand tool.
- Using a clamp, secure the screwdriver to a vertical stand so that its chuck is a few millimeters from the base.
- Install the stiffener.
- Secure the screwdriver with the stop on the vertical stand.
- Install the cutter into the tool chuck.
The screwdriver cutter is ready for use. Such a machine cannot become a full-fledged replacement for a manual milling cutter due to its low power and low spindle speed, but it will solve the problem of milling small parts in a home workshop.
Circular Saw
In addition, for your carpentry workshop you can make a circular saw from a screwdriver. To do this, you need to make a working surface using a sheet of chipboard or thick plywood. You need to make a cut in the tabletop to allow the circular saw to exit. The screwdriver must be securely fastened to the underside of the work surface using metal or wooden clamps. In the same way it is necessary to mount the shaft
It is important that the saw blade extends above the working surface of the table by no more than a third of its diameter
Working methods on a lathe
Using an angular center finder, draw 2-3 lines on both sides of the workpiece with a simple pencil, the center cross of which will become the center of the end.
By hitting the marking core firmly with a hammer, make grooves and an axial depression at the ends of the workpiece.
Place the workpiece on the driving center, bring the tailstock closer to the opposite end and use it to press the workpiece so that the drivers optimally cut into the recesses on the end, and then remove the center of the tailstock. After this, the workpiece will be able to hold on its own.
Once again bring the center of the tailstock closer to the workpiece in order to fix it along the axis of the centers. If the wood is soft, then turn the tailstock flywheel ¼ turn; if it is hard, half a turn will be enough. The workpiece must be fixed in such a way that it can be turned by hand without resistance.
Bring the tool rest as close to the workpiece as possible. Rotate it by hand, make sure that it turns without obstacles, without hitting anything. The supporting plane of the hand rest should be approximately 5 mm below the point of rotation.
Roughing
Wood turning on a lathe involves rough processing. To rough turn a cylinder using a rake, it is necessary to set the rotation frequency (or speed) to 1000, maximum 1500 rpm. The more precise the shape of the cylinder must be, the higher the speed should be set. Workpieces with a small machining allowance can be machined in one stroke along the entire length; if the allowance is larger, then you need to act progressively, moving towards the spindle from the tailstock.
Start the work gradually, resting the cutter shaft on the tool rest and holding the blade so that the heel of the cutter touches the wood. After this, lift the handle of the chisel until the edge of the point begins to cut into the wood, while removing even and well-twisted chips.
Guide the cutter in the direction of twisting the chips like this: the hand that holds the handle sets the movement, and the other only supports the blade, preventing pressure on it.
When roughing a square piece of material, carefully start cutting off the corners with a chisel, without pressing too hard on it. Wait until the workpiece is ground to a cylindrical shape of the highest diameter, moving towards the axis of rotation as the stock is turned.
Based on the shape you want to give the parts, draw the basic lines for marking the concave and convex parts with a simple pencil, turning the workpiece by hand. Mark it in such a way that the wider parts of the part are located at the edge of the headstock each time.
Start grinding both edges of the workpiece with a chisel. When supported by a tool rest, it should enter the tree smoothly (without rough movements), being perpendicular to the axis of movement.
Checking the size
Check the size systematically using a caliper. Professional carpenters typically press the cutter against their thigh with their elbow to free up their hand for the measuring tool. When the caliper starts to shake, reduce the chip depth. Grind the maximum diameters in this way first, and then proceed to turning the remaining parts:
- shoulders,
- necks,
- tori,
- balls and so on.
To carve the one and a half, use a grooved chisel. It is useful for shaped surface treatment. It must be held perpendicular to the axis. “Lower” the cutting edge from the outside into the depth of the workpiece. The handle of the machine needs to be lifted and turned slightly. In order to get a whole torus, you should perform the same manipulation on each side.
The arch (neck) is turned with the same cutter that was used for the torus.
After finishing the rough finish of the bottom in the center of the neck, grind the right half-neck, only this time moving the tool up from the bottom and to the right. Under no circumstances move the cutter in one step from one side of the neck to the other - they must be turned one by one.
Turning sheets
The leaves (small rims often left on each side of the neck) are turned using a meisel cutter. It does not have back angles on the side edges of the rod, which is how it differs from a chisel, but instead there is a thin track for removing chips.
You can use the “fillet” technique in your work: this is a soft transition from one surface to the second. It is essentially a combination of a neck and a torus. In this regard, first sharpen the neck, and then the torus that is adjacent to it.
Place a wedge between the lid and the box and tap it a little with a mallet, then remove it. Using a drill bit attached to the tailstock, drill a hole in the workpiece, which will subsequently set the depth. Hold the scraper or other cutting tool along the axis of rotation, lifting the handle until you find the best cutting angle. The scraper can be manipulated by moving it towards the edge of the workpiece from the center or vice versa. You need to check the depth periodically. Once the inside is chiselled, line the seating hole for the tire with fine-grained sandpaper, and then you can start cutting the box using a Meisel cutter.
Decorating the details
A part fixed on both sides is never completely cut off. Grind it out from both edges of the track, keeping the jumpers of small diameter, and, after stopping the machine, disconnect the ends with a hacksaw.
To complete finishing of the part, remove the tool holder and process the part from below with fine sandpaper (grit M16-M63). While working, the sandpaper should be turned crosswise to avoid circular scratches.
For a beautiful appearance of the product on a wood lathe, you can rub it with a piece of wax or paraffin while rotating, and then polish it with cork or thick cloth.
Making a wooden box
The recommended wood for making the box is acacia, which, when sanded, gives a beautiful light green color. To make crafts with your own hands, you will need various turning tools made of good steel.
- First of all, the workpiece must be rounded and the edges removed from it. First, you can use a semicircular cutter, then a smoother jamb cutter, which is used to make indentations, a kind of decorative grooves.
- Then both sides of these indentations are cut off, which creates bulges on the box.
- Then we round off the resulting edges.
- Now you can move on to creating the internal cavity. We move the support bar to the end of the workpiece and start making a recess from the center to the edge with a straight narrow cutter.
- Then you need to smoothly expand the cavity to the very bottom. To do this, we use the tip of a triangular cutter.
- Using a wide cutter, we level the bottom, give it the required thickness and make a groove for the lid.
- Let's move on to sanding. We clean the bottom and walls with sandpaper.
- When everything is ready, use a hacksaw to separate the part from the machine.
The lid of the box should be dome-shaped, the size matching the dimensions of the box itself. For this we need a semicircular cutter.
Woodworking Machine
The woodworking equipment market offers an extensive line of wood lathes. Each consumer makes his choice taking into account his interests, but the main criterion is the drive power. For a home workshop where turning work is performed sporadically, a simple tabletop machine with an electric motor power of 1 kilowatt and a spindle speed of 3500 rpm is suitable.
https://youtube.com/watch?v=xs8KOp1HoFI
The main components and mechanisms of a wood lathe correspond to the classic structure of a lathe, which processes workpieces by rotation. Three main mechanisms:
- drive - electric motor, single-phase or three-phase;
- transmission - a set of devices that transmit the rotation of the motor shaft to the spindle head;
- the executive is the support.
Four main nodes:
- bed - the body on which the mechanisms are fixed;
- front spindle headstock - for attaching a faceplate or lathe chuck;
- rear fixing headstock - for installing a rotating center or drill chuck.
Popular articles Bouquet of clothes for newborns
Design feature
You can assemble a wood lathe with your own hands from available materials. The design is simple and does not require much time to manufacture. The main part of the machine is a bed made of a channel, in which a groove is cut along the central center line with a grinder for fixing the tool rest and tailstock. The fixation principle is an eccentric mechanism.
The tailstock design is standard. The quill has a hole for Morse taper No. 2 to set the center of rotation. The drill chuck shank matches the quill hole. It is recommended to use a factory made tailstock.
Under the quill, machine a hollow cylinder with a blank end wall, in which a thread is cut for the flywheel screw. The moving part of the quill is a cylinder with a conical hole and a keyway along its entire length. The moving part moves with the help of a flywheel screw along a key welded in the headstock body.
The tool rest is classic, has an adjustment function with fixation to the diameter of the workpiece being processed, the base of the tool rest moves across and along the bed. It is fixed with an eccentric with a handle. The upper part is a regular corner.
The headstock has two angular contact bearings. The spindle shaft has an M14 thread, step two. This is a thread that is used on grinders and grinders. Thanks to this, all the attachments used by the grinder can be attached to the spindle.
DIY spindle head
The quality of the entire structure depends on the accuracy of the headstock manufacturing
Therefore, special attention must be paid to this node. Craftsmen recommend making the headstock of a lathe with your own hands. To do this, you need to machine a cylindrical body with a wall thickness of 10 mm
To attach it to the frame, you need to make a special stand. A section of channel is suitable for this. The channel end is welded to a corner made of sheet steel 10 mm thick. The headstock body is attached to the resulting stand
To do this, you need to machine a cylindrical body with a wall thickness of 10 mm. To attach it to the frame, you need to make a special stand. A section of channel is suitable for this. The channel end is welded to a corner made of sheet steel 10 mm thick. The headstock body is attached to the resulting stand.
To make a wood lathe with your own hands, drawings and dimensions do not matter, since everyone makes the design individually, taking into account their capabilities. Sectional view of a cylindrical body:
- outer diameter 56 millimeters;
- wall thickness 10 millimeters;
- length 180 millimeters;
- mounting sockets for bearings with a diameter of 24 millimeters;
- shaft with a diameter of 30 millimeters.
Simple accessories make the machine universal and increase the list of operations. For example, by installing a sanding drum with sandpaper in the chuck, you can sharpen the tool. The device for turning on a copy machine looks like this:
- copier;
- a pipe installed along the frame, acting as a slide;
- circular electric saw that acts as a wood cutter.
The milling attachment will replace the milling machine. Arbor with disc cutter
is clamped into the chuck. Instead of a tool rest, a work table with a stop ruler is installed. You can mill platbands, baseboards, and blanks for frames.
Enthusiasts and lovers of making homemade items are constantly coming up with mechanisms that make manual labor easier. Such people always have an answer to the question of how to make a woodworking machine.
Description of the lathe
A wood lathe has one limiting function: it can only rotate a piece of wood. A carpenter is capable of slowly turning a finished object from an ordinary piece of wood, for example:
- salad bowls,
- boxes,
- railing posts,
- furniture legs,
- toys,
- lamp body,
- cups,
- vases
Unlike other woodworking machines, which are used only at certain intermediate stages, a lathe is suitable for any operation: from pre-processing to polishing. The necessary tools are grooved (V-shaped or cylindrical) and flat scrapers, cutters, chisels of various shapes and sizes. The machine rotates the workpiece, and the master’s hand controls the movement of the cutter. Based on what item needs to be made, there are two options for attaching the workpiece.
In the first case, the wooden part is mounted in a horizontal position between the centers of the front and rear walls. The second method takes into account that the wood turner secures the workpiece only in the headstock using a faceplate or chuck. If you are new to working with this machine, it would be wise to start using the first method.
Lathe with electronic adjustment (equipment):
- "Start-Stop" switch,
- bed,
- front and rear grandmas,
- speed switch (with variator),
- spindle,
- leash center,
- tool rest (tool holder).
- rear center grandmas,
- set of cutters.
Equipment option:
- grooved chisel,
- Maisel cutter (2 mm),
- semicircular cutter,
- cutting cutter,
- beveled chisel (jamb),
- semicircular chisel - for finishing shaped surfaces,
- grooved chisel (reyer) - for roughing.
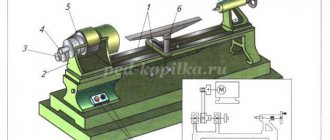
Principle of operation
The entire structure of the machine is mounted on a frame, which is made of aluminum, cast iron or profile beams or two steel bars. On one side of the bed, the wood turner places the headstock, and inside it there is an electric motor (0.5-1.5 horsepower). It rotates a spindle having a Morse taper; if necessary, a driving center (with one tip and 2, 3 or 4 knives), a faceplate or a chuck is inserted. The tailstock is located on the opposite side of the machine, and its center presses the workpiece, securing it in a horizontal position.
The tool rest, turning in any direction , is located as close as possible to the blank, guides the cutter and supports it.
On machines with manual adjustment, the frequency (speed) of movement can be switched using the gearbox lever, the speed of which is from 450 to 2000 rpm. It contains pulleys with bearings.
In much more complex modifications of the machines, instead of a gearbox, there is an electronic variator, which makes it possible to gently regulate the speed of movement.
Types of turning equipment
Despite the variety of joinery products, all turning operations can be implemented using the following types of units:
- milling;
- turning;
- thicknesser;
- sawing
Milling is used for cutting out profiles and relief elements. To obtain the required shape and specified relief size, a milling cutter of a specific size is used.
A wood lathe allows you to carry out the entire range of turning, cutting recesses, grinding and polishing operations.
A sawing machine is necessary for carrying out work related to the preliminary preparation of flat wooden blanks. Sawing can be done along the installed beam or across it while maintaining the texture of the wood.
All woodworking (including turning) units are divided into three categories:
- industrial (used at large woodworking enterprises, furniture factories);
- semi-professional (used in organizations performing work in small quantities);
- household or desktop (used for individual work in home workshops).
The main differences are performance and weight and size characteristics.
Lathe without lathe
Hello comrades! I dream of a lathe, but, unfortunately, I don’t see one in the near future. In the meantime, I’m dreaming, I’ll have to do the turning work without it and on a homemade CNC router. Under the cut there will be a lot of photos, a small purchase on AliExpress, some harmful/useful information and, of course, DIY... Yes, I actually have been wanting to buy a tabletop lathe for a long time, but, to be honest, it’s not that straightforward needed in everyday activities (“Well, yes, well, yes...” said the awl in one place)
. Now there are so many channels on YouTube where they sharpen all sorts of cool “piptics” that you sit on your couch, envy with white/black envy and want to sharpen the same, and even cooler! But things usually don’t go beyond what I wanted... And then a terrible thing happened - an idea came to mind, for the implementation of which I needed to make miniature chess pieces from brass and duralumin. Only this “terrible” turned out to be not so terrible that I rushed to find 60 - 70 thousand rubles. for a tabletop lathe of the type that is popular among garage and home craftsmen (this is not an advertisement, but an observation).
All efforts were thrown into finding a solution, taking into account the fact that I already have at my disposal a homemade CNC milling machine, although a toy, but still not made of plasticine. Here it is (though the MDF sacrificial table in the photo has been temporarily removed). Initially, I thought about the most obvious solution - to attach a turning cutter instead of a spindle, and attach some kind of motor to the workbench, to which I could attach a chuck and rotate, rotate anything in it, why not a CNC lathe? But no, I didn’t like the idea, especially since chess pieces don’t require a large cartridge. Suddenly, I thought that I had blanks - brass rods with a diameter of 6 mm, and the collet spindle was also 6 mm. Coincidence? I think that I have once again encountered the reinvention of the wheel, but I deliberately decided not to ask Google about such a solution, so as not to introduce errors into the orderly train of my thoughts.
For inexperienced readers who have not yet fully understood what I had in mind, let me clarify. In my case, the headstock of the lathe will be a movable spindle, which can move in all directions. But the turning cutter (or cutters) will be stationary, fixed on the work table. Accordingly, we turn everything upside down and force the rotating workpiece to move relative to the stationary cutter. Since the rivers didn’t turn back in due time, at least we’ll have a break here
And then there’s the problem again - I don’t have turning tools. I wanted to try to sharpen old broken cutters, but like them, I was also broken, because on AliExpress I saw cutters with replaceable carbide inserts - an ideal option for those who are not a real turner and do not know how to sharpen cutters correctly. I ordered two cutters (holders + inserts) - a through cutter and a cutting cutter (please correct me if I am wrong with the terminology), as well as sets of replacement inserts for them. Link to the store for those who need a walk-through cutter - a regular link, not a clever one))
According to the law of the genre, I had to measure and hang them, but this is a little off topic, so I’ll just give the markings and parameters, and at the end I’ll compensate with cats
. Cut-off cutter. Holder – MGEHR1010-1.5, square section 10×10 mm, designed for cutters with a width of 1.5 mm. Insert – MGMN150-G PC9030, cutting width 1.5 mm. Yes, I didn’t say, each holder comes with a hex wrench. Passing cutter. Holder – SVVBN1010H11, square cross-section also 10×10 mm. Insert – VCGT110302-AK, angle 35 degrees, rounded tip radius 0.2 mm, length of the working cutting part 11 mm.
I’ll immediately get ahead a little and say that I wasn’t able to use a cutting cutter, I still need more rigidity of the machine, otherwise it’s not turning, but some kind of crushing with knocking out :). Therefore, I will not mention it further and will leave it until better times.
And in connection with this, there is another problem - how to cut figures without a cutting cutter... At first I thought that I would rearrange the holder of the pass-through cutter at an angle (17.5 degrees), so that one edge of the plate would be parallel to the work table, well, I think it’s clear. However, I would like not to be distracted by reinstalling the tool after each operation, so I had to invent two more holders on the go. One with a cutter angle of +17.5 degrees, the other -17.5 degrees. For what? But it turned out that there is such a figure - a rook, the top of which is flat and also requires a special angle.
I chose noble “duralumin” as the material for the additional holders. Well, excuse me, I can’t chew other metals on my router, except maybe brass. Someone will say: “Yes, there is not enough rigidity!”, “But this is not the point!” And I agree, yes, there is not enough rigidity, yes, this is not the case... for serious work and serious loads. I plan to remove no more than 0.2 mm per pass during roughing, and no more than 0.1 mm during finishing. In addition, I will try to make the holders stick out minimally from the tool holder, which, by the way, will also appear in this story soon.
So, for homemade holders, I found a 12x12 mm square made of duralumin. There is no point in explaining the process in particular. I think everything will be clear from the pictures - the machine was working, and I just plugged it in and pressed the button. To ensure perpendicularity, I first made the workpiece fit in a piece of MDF clamped in a vice, and then completed all the other milling operations.
This is what happened. It looks normal, almost like a normal person’s holder—we’ll check it in action. As I already said, it is not planned to reinstall the cutters after completing each stage, given that although the production is small, it is still a series (32 figures) and it is not advisable to waste time. Therefore, I decided to fix three incisors on the table at once. One stage is completed, we switch to a new coordinate system, move to another cutter and perform the next one. It's a good plan, I'll try to implement it.
For a tool holder for three cutters, I again used a duralumin blank (there was a 16 mm thick piece left from the sidewalls of the machine portal). I understand that I could simply attach the cutters to the workbench with self-tapping screws, but I wanted to install them relatively accurately and comfortably. This is what this device looks like. I made a bunch of threaded holes so that the cutters could be fixed with screws, as well as through holes to attach this tool holder to the table.
The first cutter is the main one, for almost all operations, the second is for making a boat with a flat top, and the third is exclusively for cutting figures. In the figure I tried to depict the installation configurations of the cutters for each operation, as I (NOT A TURNER) imagine it. With this everything is clear, let's move on.
And then I’ll probably hide the information under a spoiler; not everyone will be interested in reading about the coordinate systems of the CNC machine and their switching. There was no need to write about this at all, but I consider it as a reminder for myself. Here I will make a reservation, I am entering a minefield - I am an amateur hobbyist and the theory of controlling CNC machines is far from my strong point, so everything that I write next may be controversial and I ask you not to throw slippers at me.
About coordinate systems
I plan to perform each operation in my own coordinate system. Why is that? Simply because I plan to do the calculation of all control programs (for each operation) in one system, so that at the calculation stage I don’t have to think about how and where my cutters will be installed. And when all the programs are ready, at the beginning of each I will add a command to switch to the desired system. In my case, these are the commands G54 (base system), G55 and G56. The picture shows what and how I'm going to do. But before starting work, I will have to set points on the working field in order to determine the zero points for each system, and, more correctly, to indicate the offsets relative to the machine coordinates (mechanical) of the machine - G53. If I correctly perceived the information from the description of G-codes, then the necessary offsets for each coordinate system are performed with the following command G10 L2 Pppp Xxxx Yyyy Zzzz, where ppp is the serial number of the coordinate system (1 - G54, 2 - G55, 3 - G56, ...) xxx, yyy, zzz – offsets relative to G53 machine coordinates. Well, as an example, if the zero point for performing the 2nd operation (in the G55 system) is located at X100 Y50 from the zero point of the machine coordinates, then before starting work you need to execute the following code G10 L2 P2 X100 Y50 Z0 and then switch to this system, calling code G55
By the way, an observation - in LinuxCNC, after executing a control program in a system other than the base one (for example, in G56), upon completion it automatically switches to the base one (G54). Thus, it is advisable to indicate a forced transition to one or another system at the beginning of the file with the control program, otherwise unpleasant incidents are possible if, after completion, you want to repeat the execution of the control program
Before I start setting up the machine, I need to calculate the control programs for each figure. And here I decided not to use specialized software for calculating NC for turning
, although I understand perfectly well that, for example, in
Fusion360
this is not long and not difficult to do. I will calculate the processing path almost manually. Why do I need this? Firstly, sporting interest, and secondly, a better understanding of the process. In addition, not everyone and does not always want or have the time to deal with new and varied software when solving one-time tasks. At the same time, I will make a clarification - I am for progress and development, therefore, when possible, you need to use ready-made solutions, this will significantly save you time. And in this post I simply propose one of a million ways to solve the problem here and now. I drew the profiles of the figures in MS Visio (except for the horse, the horse is a different story) and they look like this:
I'm an artist - that's how I see it. And then all the fun begins. To develop the UE, I will use the Vectric Aspire program (this can also be done in everyone’s favorite ArtCam). Using the example of a pawn, I will show the main stages of manual preparation of a program for a machine. But before that, I’ll show you schematically what the cutter looks like, this is an important point and will be useful in calculations.
We are interested in a rounded tip, with a rounding radius of 0.2 mm. Let's just remember. Then I perform all the actions in Vectric Aspire: 1. I take the sketch of the pawn, cut off the missing half from it and position it relative to 0, as is convenient for me. 2. After this, taking into account the rounding radius of the cutter of 0.2 mm, I create a vector contour that is exactly 0.2 mm away from the contour of the figure. This contour will be used as a path for the finishing cut of the cutter. 3. After this, I make a “knight’s move” - I plan to make a finishing pass with a removal of 0.1 mm, so it is necessary to create another contour with an offset relative to the finishing contour by 0.1 mm. This outline will limit the roughing passes, leaving 0.1 mm of material for the finishing pass. 4. Next, I will make auxiliary lines with an interval of 0.2 mm relative to each other, these lines will be used to remove excess material (I do not explain how I cut off excess lines, this is not the topic of this post) 5. Now you can make a trajectory for rough removal of excess material. To do this, by removing the extra lines, we get a kind of snake. For this snake, we will use the “2D Profile” strategy with the “On” parameter (that is, along the contour). I think everything is clear from the picture. 6. For uncovered residues we use the same tactics. These are still rough passes.
7. Now only the finishing pass remains, this is the contour that is 0.2 mm away from the outline of the pawn, and only 0.1 mm of material remains for removal. The strategy is still the same “2D Profile”. 8. In order to cut off the figure, the following trajectory will be used. You will notice that the cutter does not completely cut off the figure and a small tail remains. I deliberately do not go into details and nuances, it seems to me that if someone wants to repeat the process, the direction is clear, then only your experience with programs for creating UE and a little bit of imagination.
The only thing I would like to pay attention to is the axle. As you understand, modeling and creation of control programs are carried out in the XY plane, but as we remember, the workpiece relative to the cutters will move in the XZ machine plane. To correctly start the program execution process, there are two options: 1. Correct the G-codes by replacing the coordinates, Z with Y, Y with Z. But this trick will only work if you do not use circular interpolation. In this case, you will have to make changes to the parameters of the arches I, J, K, but it seemed to me that this would be long and futile. 2. Reconfigure the machine so that when executing the control program, movement along the Z actually occurs along the Y axis, and Y along the Z. I chose the second method. To control the machine, I use LinuxCNC and can create different configurations of the machine by launching the desired one (shortcuts are created on the desktop to launch each configuration). I will show an example of the main configuration for milling and an additional one for turning. And now, if you are still with me, let’s move on to the practical, more interesting part of my opus. First of all, using a test square, I will set the cutters so that the offset is the same - this will save you from problems in the future. And then I’ll take a small block of MDF and cut out a seat for the tool holder on it. This seemingly unnecessary procedure is necessary to install the tool holder with the long side along the Y axis (and given that I reassigned the coordinates, then along the Z axis) and keep the cutters perpendicular to the X axis.
We can say that all preparations are completed, all that remains is to specify the coordinate systems - to be honest, this is the most unpleasant part of the work and I spent some time determining what offsets need to be specified for each cutter. On the piece of paper I wrote down the offset along the X axis incorrectly, in fact it is negative. I think, based on the similarity of the offsets along X, it is clear why I set the overhang of the cutters - this really eliminated the problems. And before starting the turning process, I will execute the commands that set the zero points for the G55 and G56 coordinate systems.
That's it! Let's go! I'll start with the infantry. Roughing and finishing passes are done on the first cutter. I set the spindle revolutions to 2000. After the base of the pawn is ready, we send it to the third cutter for trimming and sharpen it again.
The process itself is now complete. To be honest, the feeling from the process is indescribable and visually it looks very sticky. Just in case, let me clarify - the diameter of the base of the figures is 5 mm
So that you can also feel the process, I will attach a video - a purely turning procedure, without preparation and other tinsel, which you already read in the text. Making a pawn
And for a snack - making a queen from a D16T rod (duralumin)
Of course, I’ve already delayed the publication quite a bit, but I think many people are interested in how I made the horse (at least three people offline have already asked about this). With the horses, I decided to do this - I made these blanks using a turning method And then secured these blanks and mill it out, like this. As for me, they turned out more like unicorns))), but in general it’s ok, considering the size of the figures. I’m not talking about the whole project, but if you’re interested, you can watch the full video on my YouTube
Full video
And now Linux and I will play a game
Thank you all for your attention!
Varieties
There are many types of lathes
Before purchasing, it is important to familiarize yourself with the features of each type in order to make the right choice.
Find out why the LT-10M universal lathe is so good
Tabletop for home workshop
A small machine is fixed on a special table. It is lightweight and small in size, but allows you to perform a large number of operations. In addition to external processing, drilling and boring can be performed. Its advantages are low cost and energy consumption. There is almost no noise during operation.
Household, miniature (mini), small-sized
The weight of such machines often does not exceed 50 kg, but the technical characteristics of many models are not inferior to large-sized analogues. The bed is made mainly of cast iron - this reduces vibration during operation. The working diameter of the chuck is 50–100 mm, the spindle speed is 100–3800 rpm, and the motor power varies from 0.55 to 2.25 kW.
Automatic with cross feed
They are used in mass production for various operations with small parts, including processing of shaped surfaces. They are also used for turning products made of copper, brass, and alloy steel.
Universal
A common group of machines that are found in serial and mass production. This includes a screw-cutting lathe. Such equipment is distinguished by a wide range of modes (spindle speed, tool feed speed), as well as the ability to perform work of various profiles.
Classification of universal machines:
- Heavy - they can process large parts with a diameter of 1600–4000 mm.
- Up to 15 tons - designed for processing parts with a diameter of 600–1250 mm.
- Up to 4 tons - the maximum permissible workpiece diameter is 500 mm.
- Lightweight - for working with small products with a diameter of 100–200 mm.
Universal units also include turret lathes. They are intended for mass and serial production of parts from rods. The main thing that distinguishes it from a screw-cutting lathe is the presence of a turret head, to which several tools can be attached at once in the sequence necessary for work.
Mobile
Portable machines are compact in size and have a powerful design with hydraulic or pneumatic drive. Depending on the modification, it is possible to process external and internal cylindrical surfaces, pipes, flanges, and grooves. The machine is attached to the edge of the workpiece.
Features and Benefits:
- Easy installation and fixation of the part.
- Performing operations in hard-to-reach places.
- Possibility to use additional devices.
- High precision and processing quality.
Unusual
There are unusual types of lathes found in industry. This is expensive, narrow-profile equipment, which is serviced by highly qualified workers.
These include:
- Multi-spindle - allows you to process several parts at the same time. Used in mass production conditions.
- Semi-automatic copy machines - perform complex operations using several tools.
- Lathes - designed for parts whose diameter is many times greater than their height (pulleys, flanges, wheels).
- Carousel - industrial machines for precision processing of large parts.
- Backing - designed for sharpening cutting tools (mills, taps, reamers, countersinks).
Manual
The group combines types of manually controlled lathes (not CNC). They are not equipped with automation; the turner performs all actions manually. The tailstock is moved and the quill is fed by the worker without the help of additional mechanisms.
Only the feeding of the cutting tool is automated. Manual machines are gradually being replaced by analogues with CNC, automatic and semi-automatic machines.
Micro
Equipment is limited to a weight of 30–35 kg. The machines are used for small-scale work in the home workshop. They are powered mainly from a 220 V outlet. Low power consumption and lack of noise allow you to work without disturbing your neighbors.
Finishing the workpiece
This method is used to process cylindrical elements of varying lengths, fixed between the centers of the tailstock and headstock. Accordingly, you have the opportunity to make any parts: from railing posts and table legs to tiny chess pieces. In particular, skilled craftsmen are skilled at making and sharpening billiard cues.
The first step of the job is to determine the location of the axle of the piece of wood to clamp it between the center of the tailstock and the driving center.
The second stage is to make a blank (from cutting a log or a square block of wood). This can be done in the 1000−1500 rpm mode. In this case, the chips should be removed from right to left using a grooved concave wide chisel to pre-process the reyer. If the workpiece is long, then roughing is carried out in several steps; the tool rest moves closer to the part as it is finished, without changing its height position.
When turning parts, there are tools of various shapes for processing shaped surfaces:
- hook,
- semicircular cutter,
- flat chisel,
- beveled chisel (or popularly - jamb),
- grooved chisel, etc.
Depending on the type of tool used and the stage of the work process, it is necessary to bring the tool rest closer to the workpiece from time to time. At the end of the process, when the part is ready, the final finishing is carried out:
- polishing,
- toning,
- grinding,
- waxing, etc.
The finishing touches occur when the support has already been removed.