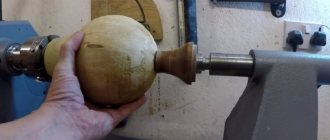
Vase
How can you make a vase on a lathe?
To make it, you may need a certain tool. In addition to the lathe, you need to take cutters, a plane, a hacksaw, a ruler, a compass, an ax and a saw, sanding paper and a chisel. The process of turning a vase is extremely simple. True, it should be noted that vases can be complex in configuration and simple. Let's look at how you can carve a simple option.
- First, a block of wood 10-20 cm long is cut out with a saw.
- It must be trimmed with a plane, both from the ends and along the length.
- The workpiece is installed in the machine chuck.
- The machine is turned on and checked for runout of the part.
- If it is present, alignment must be carried out.
- The top layer of wood is removed to a depth of 1 cm.
- A chamfer is removed at an angle of 45° from the outer end.
- A drill is inserted into the tailstock.
- A hole is drilled with a depth less than the length of the workpiece by 3-5 cm. That is, the bottom of the vase is determined.
- Now, using a cutting tool called a jamb, the cavity of the product is cut out.
Since the vase can have different shapes: straight, oval, and so on, the boring of the upper surface is accordingly maintained in the exact shape. After which the product is polished outside and inside. What is sandpaper used for? The wooden product is removed from the machine, the bottom is finished by hand using a plane and sandpaper. After which the souvenir is varnished.
This is interesting: Foundation for a lathe - we present it in detail
Metal crafts
You can make quite a lot of different intricate crafts from metal, including jewelry elements. Before you start working, you can put the drawings on paper. One of the interesting decorative elements is the figurine “Two people playing checkers.”
We take two nails, no more than 5 cm long, several small nails and four nuts. We bend the nails with pliers, following the contour of the sitting people. Two nuts are “chairs” on which the little men will sit, the other two are the gaming table on which miniature checkers should be placed. The board can be made from a small piece of cardboard, and bitten off nail heads are suitable for checkers. To secure all these figures, use special glue or spot welding.
Owning a lathe, a craftsman with a rich imagination will always be able to decorate his home with his own hands and make a worthy gift to his loved ones in the form of an elegant homemade product.
Video instructions for making the “Dodecahedrons in a Ball” craft on a metal lathe
Crafts on a wood lathe: photos, videos and drawings
Wooden crafts and dishes are very beautiful and many still use them in everyday life. Since ancient times, craftsmen have been turning such dishes. To show all the beauty of the wood, it was processed not along the grain, but across it. At the same time, the wood pattern stood out expressively.
The article will discuss several master classes on making crafts on a lathe.
Wooden vase on a lathe
Tools:
- A lathe, or a homemade one.
- Various cutters, you can make them yourself. Photos and videos of the manufacturing technology of such can be easily found on the Internet.
- Plane.
- Hacksaw.
- Compasses, rulers.
- Axe, saw.
- Drill, drill bits.
- Sanding cloths, files, chisel.
- Oil, non-toxic varnish, brushes.
Manufacturing process:
- Saw off the log to a length of about 20 cm. Split it into two halves.
- Go over the wood at the split site with a plane.
- Then you should measure the center of the circle and draw a circle.
- At the next stage, saw off the corners and ends of the workpiece (45° angle).
- Drill a hole at the point marked by the center of the circle, 10 mm deep, 5 mm in diameter.
- Secure the workpiece in the machine.
- Using a jamb cutter, carve out a cavity in the workpiece. Without touching the technological rod.
- Treat the outside of the craft and give it a cup shape.
- Completely clean the cavity of the product.
- Sand the wood externally and internally.
- The product is removed, there will be no more work on the machine. The bottom of the vase is processed.
- The rod is cut off and the cut area is sanded.
- Coat the outside of the vase with wood varnish, and wipe the inside with sunflower oil.
Nowadays, craftsmen publish a lot of photos and videos about wood carving, so choosing the type and shape of the product is not difficult.
https://www..com/watch?v=knemzdYI9mc
Wooden salt shaker box
Materials and tools:
- Acacia tree.
- The cutters are homemade from ordinary files.
- Hacksaw.
- Sandpaper.
- Wax, varnish.
MORE ABOUT: Pattern of a cute owl from felt
Stages of making a salt shaker on a lathe:
- Take a cylindrical piece of wood and attach it to a lathe. Why is acacia wood preferred? Because its wood has a decorative light green tint, and after sanding it gives off a mother-of-pearl appearance. Look at photos of other types of wood, maybe you like darker shades.
- First, round the block of wood by removing the edges with a semicircular cutter.
- Then, using a jamb cutter, make a smoother rounding and make indentations for the decorative bands of the salt shaker.
- Cut off both sides of the recesses to create bulges and round the edges.
- The next step is to cut out the inside of the box. Using a straight narrow cutter, make a recess without sudden movements, going deeper in steps. Approach this process diligently, it’s good if you watch a video of such work.
- Using a triangular cutter, moving center - edge, smoothly expand the cavity to the very bottom.
- Using a wide straight cutter, level the bottom and make a groove for the lid.
- Sand the bottom and walls of the craft with sandpaper.
- Use a hacksaw to cut the product from the machine. You can do this when the machine is turned on, by moving the hacksaw away from you towards the part. Before finishing, stop the machine and cut the workpiece.
- To finish, coat the top of the salt shaker box with varnish and the inside with wax.
Making a lid for a salt shaker box
Materials and tools:
- Acacia tree.
- The cutters are homemade from ordinary files.
- Hacksaw.
- Sandpaper.
- Wax, varnish.
Stages of work:
- The technology for making a domed lid is presented here, but you can learn how to sharpen other types of lids from photos and videos of various craftsmen. So, the lid should be adjusted to the size of the salt shaker.
- The inside of the lid is formed using a semicircular cutter.
- Then form the outer part of the lid and handle.
- Clean the lid with sandpaper and open it with varnish.
Wood crafts are not very complicated, but they require practice and precision of movements; watch photos and videos of master classes by other masters and you will be able to discover new techniques and styles.
MORE ABOUT: Corrugated paper flowers: roses, tulips, carnations
https://www..com/watch?v=bS5BjRHCBis
The fillet is sharpened with a “spindle” chisel
Having turned several cylinders 200 mm long, mark lines on them in increments of 12 mm and begin to practice turning fillets.
The cone for the baluster can be turned with a roughing chisel and a “spindle”.
At the same time, the tool is slightly tilted in the direction of processing.
You can turn a fillet with only one tool - a “spindle”. First, a series of lines are drawn on the cylinder with a pencil in increments of 12 mm. The processing is carried out only with the tip of the chisel and the cutting edge is kept parallel to the surface being turned. You need to imagine how they cut the grass in the ditch. If you move along it, the mower goes horizontally, but when you need to mow the slopes, the tilt of the mower increases. The chisel should move similarly, but you need to watch the cutting edge, not the shank. Compared to working with a peeling chisel, the position of the hands on the “spindle” is the same, but the grip is weaker.
Place the chisel so that the heel of the cutting lump slides along the workpiece, and the chisel itself should be at a right angle to its axis. Lifting the handle, lower the cutting edge and grind a very small groove exactly in the middle of one of the 12mm sections.
To sharpen the right side of the fillet, turn the blade of the chisel counterclockwise and, touching the workpiece at the marking line with the tip of the chisel, rotate the blade in the opposite direction (clockwise), turning the fillet to its bottom. The rotation should be controlled and even, and the handle should move freely, so you don't have to rest it on your hip.
Now the left side of the fillet is machined in the same way. At the bottom of the fillet, the chisel should slide on the tool rest very easily. Then they alternate processing from the right to the left to obtain the desired fillet depth, but always finish the pass exactly in the middle.
It is impossible to sharpen a fillet with a chisel. For narrow fillets you also need appropriate chisels.
The roller for the baluster is the reverse of the fillet. And I think it's the hardest thing to learn how to sharpen. I sharpen them only with a “spindle”, although there are supporters of performing this operation with an oblique chisel. But sharpening the small rollers usually found in balusters with an oblique chisel is a risky business.
When making balusters, an elliptical roller looks good, and not in the form of a half circle. Therefore, it is not as tall as it is wide. To practice on a cylindrical workpiece, use a V-shaped cutting chisel to make grooves 3 mm deep in increments of 10 mm. You will get a row of rings 10 mm wide.
Like the fillet, the roller is sharpened in two stages - half at a time and always down the slope. To carve the right side of the roller, tilt the chisel slightly to the right and start processing from the middle of the ring. The processing is carried out to the right, while simultaneously moving the chisel handle to the left and turning the blade clockwise. To turn an elliptical roller, when processing to the right, the handle of the chisel must be moved to the right.
Then on the left they mirror what was just done on the right. At first, a beginner usually ends up with asymmetrical rollers due to the fact that a right-handed person is pulled a little to the right, and a left-handed person - to the left. As you gain experience, the problem goes away on its own.
On large rollers, processing should begin closer to the edge of the ring and the first pass should only round the corners. Subsequent passes increase the curvature. You should not try to remove a thick layer of wood in one pass.
The effect of the roller is greatly enhanced by emphasizing the corners with the toe of an oblique chisel.
Direct drive or belt drive
There are several ways to convey the rotation of a part. The simplest is direct drive. In this case, the workpiece is fixed directly on the motor shaft. The distinctive feature of this design is its simplicity. However, direct drive has a number of significant disadvantages.
Firstly, a direct drive machine does not allow you to adjust the speed, which is very important when working with hard material. It is also worth considering the load on the electric motor, especially when working with large workpieces
Since it is centered, vibration cannot be avoided. Motor bearings are not designed for longitudinal loads and often fail.
To protect the motor from damage and make it possible to regulate the speed of rotation of the workpiece, it is worth considering a belt drive. In this case, the motor is located away from the axis of rotation of the workpiece and the torque is transmitted through pulleys. Using pulleys of different diameters, it is easy to change the speed over a fairly wide range.
It is recommended to equip a home machine with pulleys of three or more strands, which will allow you to process wood of any species with equal success, and, if necessary, work with soft alloys.
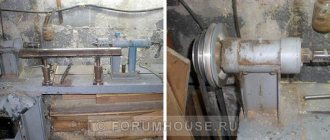
Let's get to work - make the bed, tailstock and tool rest
The tailstock will be made from a chuck and head piece taken from the body of an old electric drill.
To ensure that the equipment lasts a long time and does not fall apart a year after use, it is best to use a drill with a metal body. In order for your homemade machine to stand properly, not wobble and thereby not create problems in operation, you should pay special attention to creating a stand. It is installed on the machine bed, so that the operator later has the opportunity to move equipment units longitudinally along the axis
The cartridge will make it possible to carry out significant longitudinal loads. And this has a positive effect on the use of this element in the overall design of the unit.
To make a frame with your own hands, you will just need channels. After this, the frame elements should be attached to each other. We do this using a welding machine. To install the headstock (an electric machine for sharpening knives), you need to immediately place a sheet of thick plywood as a base.
Drive unit
It also needs to be mounted on a special plate. It will be installed on the table, where the equipment installer will be placed. It must be done taking into account the movement of the operator while working on the machine. This way the user will be able to regulate the speed of the shaft, which is located on the headstock.
Bed, tailstock.
Don't forget to install the caliper
This device will serve for uniform movement along and across your lathe equipment bed. This is where you need two pipes with different diameters to build it at home. A tool rest will be placed on it, which serves as a support for the incisors.
When you're all set, be sure to go to a hardware and lighting store to buy a small sheet of clear plastic and a lamp for yourself. They are useful for protecting you from chips and chips that may fly out during grinding and sharpening of equipment. And the lamp will help you cope with your work easier.
Tip: choose a lamp with a movable rod so that you can direct the light flux to a poorly lit area.
All that remains is to buy working tools. It’s better to buy it immediately as a set, but it will cost the owner of a homemade lathe, made by hand, in the region of 300 to 2,000 rubles.
Order a tape machine pilam.ru/piloramy-lentochnye/ at a favorable price.
Important! Do not forget to ground the installation with a wire with a solidly grounded neutral
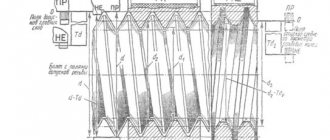
The device of a wood lathe
This unit includes several main components. Each of them performs a specific function. To make a homemade device, you will need to become more familiar with the structure of these elements.
A homemade lathe, which you make yourself, will allow you to significantly save on the purchase of such expensive equipment
Bed. The basis of any machine, including woodworking. This unit ensures the stability of the structure on the working surface and also facilitates the fixation of individual elements of the machine. Thanks to the frame, all components are located in the right places.
It is important to remember that stationary devices have a larger frame equipped with legs. In turn, desktop units have a more compact base, which makes them mobile
When making a woodworking machine with your own hands, you need to pay special attention to this unit, since the accuracy and efficiency of the structure as a whole depends on it
Headstock. This unit performs a very important function: it ensures the rotation of the wooden block during its processing. The workpiece is fixed in a chuck located in the spindle shaft. It is worth noting that some small-sized machines include a headstock that can move along the guides of the base (bed). Its movement allows you to adjust the location of individual parts relative to each other.
When the part is being machined, the headstock of the lathe is securely secured. Models that are classified as stationary often combine this element with a frame, which makes it completely motionless.
Wood lathe diagram
Tailstock. This unit, which is part of the woodworking structure, is not static. It performs a very important function: it fixes the blank in the desired position during processing. Securing the workpiece by means of the rear assembly takes into account its pressing against the chuck. Due to the fact that the tailstock is able to move freely along the guide elements of the frame, fixing and processing of parts of different lengths is ensured.
Caliper. A very important design element, thanks to which the movement of the cutter is realized. Moreover, the latter may have a different location in relation to the spindle. In most homemade devices of this type, this function is performed by a tool rest, securely fastened in the working position.
This part of the machine is capable of moving along the guides of the base (bed). Small-sized desktop devices, as a rule, involve the use of an element such as a stop for cutters.
The support of a universal lathe is designed to move a fixed cutter along the spindle axis
Thus, both a serial and a home-made machine is a rather complex design. Any wood processing unit includes several interconnected units. Before you make a wood lathe with your own hands, you need to clearly understand the purpose of its components.
Carpentry workshop equipment
A few more interesting suggestions on how to make equipment for home carpentry using a regular screwdriver.
Wood lathe
When making wood products, it is difficult to do without a lathe. You can build it yourself. A flat wooden workbench is ideal for the bed. A screwdriver can be used as a headstock and rotation drive. You need to place the tool in a wooden bed made from a block in the shape of a screwdriver and secure it with a clamp. The block can be secured with a clamp, and if the machine is constantly used, screwed with self-tapping screws. A tooth mandrel must be inserted into the chuck. The tailstock is made of two bars with an adjusting screw, which is sharpened to a cone. It is installed opposite the fixed screwdriver so that the axis of the tool coincides with the axis of the tailstock adjusting screw. The back support structure is secured with a clamp. If you plan to process large parts, then the fastening should be more reliable. The tool rest can also be made from a block, securing it to the workbench with a clamp. A primitive lathe for the home workshop is ready.
Bench Drilling Machine
Another equally important piece of equipment is a drill. It can also be made from a screwdriver. To do this you will need a used screwdriver. From it you need to take a motor with a gearbox and a cartridge. Now you need to make two clamps from textolite, which will perform the function of fixing the drilling head of the machine. To achieve maximum alignment of all holes on the clamps, it is better to process them together, in one installation. Then you will be able to avoid distortions.
Bushings with internal threads are used as limiting posts. They must be the same size, corresponding to the distance between the clamps. After this, another clamp is made from textolite and two bosses from caprolon. They are drilled off-center, resulting in two eccentric bushings. The clamp is installed on the rod and the backlash is selected using eccentrics. After this, install a wooden lever on a spring so that the drilling head returns to its original position. To supply power, you must use a transformer with a power of more than 150 watts and an output voltage similar to the screwdriver you are using. After this, you need to install a diode bridge and a capacitor, and install the drilling head on the frame.
Manual router from a screwdriver: step-by-step instructions
It can be converted into a hand router. To do this, you do not need to purchase expensive materials. Everything you need can be found in the workshop or garage, practically under your feet. To make a manual router from a screwdriver, you will need pieces of thick plywood or chipboard, a clamp for attaching the tool, fasteners in the form of bolts and self-tapping screws, plumbing tools and a feather drill for wood. In the latter case, you can use a drill bit.
Assembling a homemade router is quite easy. To do this you need:
- From pieces of the selected material, cut out a base, a vertical stand on which a screwdriver will be attached using a clamp, a stop and a gusset to impart rigidity to the structure. The dimensions of the parts are chosen arbitrarily, in relation to the dimensions of the power tool.
- Using a pen drill, drill a Ø 40 mm hole in the base for free access of the cutting tool to the processing area.
- Make a clamp according to the diameter of the hand tool.
- Using a clamp, secure the screwdriver to a vertical stand so that its chuck is a few millimeters from the base.
- Install the stiffener.
- Secure the screwdriver with the stop on the vertical stand.
- Install the cutter into the tool chuck.
The screwdriver cutter is ready for use. Such a machine cannot become a full-fledged replacement for a manual milling cutter due to its low power and low spindle speed, but it will solve the problem of milling small parts in a home workshop.
Circular Saw
In addition, for your carpentry workshop you can make a circular saw from a screwdriver. To do this, you need to make a working surface using a sheet of chipboard or thick plywood. You need to make a cut in the tabletop to allow the circular saw to exit. The screwdriver must be securely fastened to the underside of the work surface using metal or wooden clamps. In the same way it is necessary to mount the shaft
It is important that the saw blade extends above the working surface of the table by no more than a third of its diameter
Work process when fastening between two centers
One of the most popular ways to work on a lathe is to turn a part secured between the headstock and tailstock. Using this method, you can make various products, including quite large ones. In addition to its versatility, this method is safe; it is recommended for training beginner turners to use a wood lathe.
Grinding to cylindrical shape
Using a semicircular cutter with a smooth cutting edge, the part is aligned. Starting at one end of the workpiece, without pressing hard, slowly and carefully remove excess material. There is no need to chase speed, this work does not tolerate fuss. As a result, all planes should disappear from the surface, and the workpiece should take the shape of a regular cylinder of the required diameter.
Leveling with a flat cutter
After the blank is shaped into a regular cylinder, the lathe is turned off. Since a certain amount of material was removed during the work, the workpiece became thinner, therefore, it is necessary to move the tool rest closer.
Further alignment is performed using an oblique flat cutter. This is a simple and effective technique. The blade of the cutter rests on the tool rest, it is supported with one hand, and the other is held by the handle, slightly lifting the tool to counteract the rotation of the workpiece.
From time to time the machine is turned off and the diameter of the part is checked using a caliper.
Using a parting cutter
This type of cutters is used if it is necessary to cut a piece of wood of a certain length. It leaves a perfectly even cut, requiring virtually no subsequent sanding.
To ensure an accurate cut, it is recommended to first mark the parts. A regular pencil will do for this. Holding the cutter perpendicular to the workpiece, press it into the wood with light pressure. The cut is not made to the full depth; a thin neck is left, which is subsequently cut off with a knife or saw.
Making decorative elements
The main decorative elements that are made on a lathe are the roller and the groove. Most often, a cylindrical belt is left between them. By combining these three simple parts, you can turn a wide variety of wood products: from cornices to furniture elements.
It will be easier to work if you do some preliminary marking. For this, a ruler and a simple pencil are enough. Marks are made when the machine is turned off, and when the workpiece begins to rotate, they are made using the same pencil. It is enough to bring the stylus to the rotating surface, the line will be clear and contrasting.
The work begins by making a groove with a cutter slightly to the side of the intended line. The groove depth is approximately 3 mm. By tilting the cutting part in one direction and the other, the groove is expanded.
All that remains is to give the roller the correct shape; to do this, place the cutter exactly in the middle of the groove and slowly turn the handle, allowing the cutting edge to remove excess wood. The other side of the roller is done in the same way.
It is convenient to create grooves using a semicircular cutter. Slowly moving it along the workpiece between marks, remove excess wood, gradually increasing the depth of the excavation. You can complete the groove using an oblique cutter. They form the transition from the groove to the roller or cylindrical belt.
What can you do with it?
A lathe in skillful hands and with the necessary materials for the job is an extremely effective tool for the manufacture of metal or wooden products, and this can include both high-precision parts for other equipment and a variety of handicrafts for home or leisure.
Wood products
You can make wood products both “for the home, for the family” and for sale. In the latter case, the things made have a magical prefix in their name “made individually,” which in our era of globalization of all processes has considerable weight in the eyes of many potential buyers.
You can make furniture elements for its subsequent assembly (we think everyone remembers school stools made and assembled in labor lessons), tool handles, medium and small decor - the basis for wall clocks, vases, figurines of creatures, a popular type of machine-made products are chess, checkers, backgammon.
Metal crafts
Lathes for metalworking are usually not associated with crafts, because with their help, a lot of enterprises and individual craftsmen work on the manufacture of nuts and bolts, bushings and couplings, rings and shafts for various purposes, the maximum that a person who does not have information can imagine is this boring some parts during repairs and similar actions.
However, the range of tasks performed is not limited to work. Metal crafts can be made by both an experienced worker and a novice trainee; most often these are figurines or individual decorative elements: balls and keychains, cubes and entire models (for example, cars).
In conclusion, I would like to note the following: the world of lathes, with all its size and diversity, is available to everyone who wants to try themselves on this path. Moreover, now, with the active proliferation of CNC devices, a small lathe can be installed even at home, and after taking courses on its use, with time and growing experience, you can become one of those who can turn a piece of material into a real masterpiece, be it it is intended for work or leisure.
DIY - How to make a TRIDENT from A4 paper with your own hands?
Instructions on how to make a trident from A4 paper. Required materials: 11 sheets of A4 paper, glue, scissors. Approximate time to create 1 paper craft: twenty-six minutes. Reference: A trident is a bladed weapon consisting of a single shaft and a tip of three sharp teeth. It was often used in close combat as a piercing weapon, and thanks to its design, it could easily disarm your enemy. It was especially widely used during the Roman Empire in gladiator battles. They were worn by retiarii, this is a special type of gladiator warrior, literally translated, it sounds like “a fighter with a net”, their weapons consisted of a trident and a net, their armor consisted of one shoulder pad that covered the shoulder or the left side of the chest. gladiator The tactics of the retiarii was to throw their net at the enemy, if he was lucky enough to do this, then he would attack him with his trident. In Greco-Roman culture, it was a symbol of lightning, and was the weapon of the most important Greek god Zeus (Jupiter). Also, the trident is a symbol of power over the seas and oceans and the entire water element. It was a permanent personal attribute of the ancient Greek god Poseidon (Neptune). In Christianity, the trident is a symbol of the Trinity. But it has gained fame as a satanic weapon; it is with it that the devils torment sinners in hell. In Hinduism, it is already a weapon of the Hindu god Shiva; it was often depicted as a mark on the foreheads of his followers. In other cultures• It is a sign of the Maserati company.• It was a personal sign (tamga) of the great Genghis Khan. • The trident is a symbol of the princes of the times of Kievan Rus. Today, the Trident is the coat of arms of Ukraine.• Also depicted on the flag of the Crimean Tatars and Barbados. ——————Weapons made of paper: https://www.youtube.com/playlist?list... Subscribe to the YouTube channel “Origami and crafts from A4 paper”: https://www.youtube.com/channel/UCQRY ... Link to this video: https://www.youtube.com/watch?v=FzTWh... And most importantly, remember that every origami you make with your own hands ennobles you a little, and the folding process itself teaches attentiveness and patience. Thank you for watching our DIY video. Just don’t forget to rate this video about a paper trident later!))) The composition “BTS Prolog” belongs to the performer Kevin MacLeod. License: Creative Commons Attribution (https://creativecommons.org/licenses/…).Original version: https://freepd.com/Unclassified/BTS%20….Artist: https://incompetech.com/Composition “Faceoff” » belongs to the artist Kevin MacLeod. License: Creative Commons Attribution (https://creativecommons.org/licenses/…).Original version: https://incompetech.com/music/royalty-….Artist: https://incompetech.com/
Read also: How to solder aluminum wires at home
Safety precautions when working with the unit
It is important to remember that before you start working, you must study the rules and safety measures very carefully. Important! Improper handling of the lathe can cause injury!
Important! Improper handling of the lathe can cause injury!
Basic Rules:
- before turning on the machine, you need to check its grounding and serviceability at idle speed;
- you only need to work in special clothing;
- eyes must be protected with goggles or a mask, and if necessary, wear a respirator;
- firmly fix the workpiece exactly in the center;
- when working, do not put pressure on the part, movements should be smooth;
- do not measure a rotating part;
- do not leave the machine during operation;
- do not use defective workpieces (with cracks);
- do not pass or take any objects through a working machine;
- do not stop the workpiece by braking with your hand;
- do not start work when tired;
- Do not approach the machine while intoxicated.
This is the main thing, but not everything you need to know before starting work. If you are not confident in carrying out any operation, then under no circumstances should you start it. It is necessary to consult with a specialist, and only then begin work. This will help avoid accidents and injuries.
Exploitation
Tips for operating the lathe:
After installing the cutters, you need to check the reliability of their fastening. When processing metal workpieces, it is important to use a protective plastic shield. It will protect your eyes from metal shavings. It is necessary to regularly tighten the fasteners and lubricate the moving parts of the equipment. It is important to regularly check the tension of the belts in the gearbox. When lubricating moving parts, do not get oil on the belts.
This can lead to poor friction and poor tension.
A lathe is an important type of equipment used for processing and manufacturing metal parts. In order not to spend money on a factory machine, you can assemble it yourself. Homemade equipment will not cope with large volumes of work, but is suitable for carrying out household work with metal workpieces.
Selecting wood for turning
Before you start turning your planned product, you need to do some preparatory work: select a suitable material and dry it.
Dense, fine-grained wood species are best suited for turning work. It is desirable that the material does not have defects: cracks, falling knots, tar and sprouts. But curling and cross-layering, usually considered defects, are not problems when turning. On the contrary, due to the fact that twisted wood is difficult to split, it is often used to make mallets and handles.
Almost all types of wood are suitable for turning, but birch, alder, beech, maple, walnut, pear, linden and hornbeam behave best when processed, but pine, oak, spruce and ash are a little worse. Pear and apple trees are ideal for turning, especially wild species. The wood of these trees is easy to process and polishes well. The paint adheres well to it.
About blanks
There should be a sufficient number of blanks, at first twice as many. Newbie marriage – 4 out of 10. After two spoiled workpieces in a row, a break of several minutes is necessary.
It is better to immediately exclude workpieces with knots from processing. Before important, urgent work (when making the simplest part), I strongly recommend not to sharpen the tool, because the chance of spoiling the workpiece increases significantly and can reach 80%. If possible, do not use other people’s blanks, glues, or tools. Trim the workpiece if there are end cracks measuring 5-15 cm. Monitor drying and mark longitudinal cracks.
In some species (oak, pear), the cracks converge during drying. For the first turning experiments, use linden, for scraping beech.
Unusual products made from wood
Wood is a unique material, and anything can be made from it. Those who believe that wood is needed only for construction or furniture production are greatly mistaken. Sometimes things made from wood are simply amazing. A table lamp, a case for a camera or laptop, a joystick for a game console or, for example, a coffee machine.
All these things look very elegant and give their entire surroundings a unique charm. And how stylish a wooden bathtub looks, and how pleasant it is to take it. But the fantasies of craftsmen are unlimited. What is the cost of a wooden bicycle or a car (!), the body of which is also made of wood. This model will look worthy among the most expensive cars in the world.
But these are all works of experienced masters who have devoted many years to this art. We will look at several products that anyone who has decided to seriously work with wood can do.
DIY wooden spoons
In Rus', wooden spoons have been made for centuries. And today, making wooden spoons is not only a useful activity. In addition to a beautiful decorative item, the master also receives great satisfaction from the process itself.
Choosing a tree, making a blank, turning it on a lathe, decorating it and as a result getting an exclusive item is a fascinating experience, especially for beginners.
Next you need to do the following:
- draw a picture of the future spoon, then transfer it to a wooden blank;
- using a lathe to perform rough turning;
- polish the workpiece;
- using flat chisels and a grinding wheel, shape the workpiece;
- using semicircular chisels, cut out the inner cup-shaped part;
- cut off all excess;
- sand with sandpaper;
- make a drawing on the handle of the spoon;
- use a special knife to carve the handle;
- soak with wax or any varnish, but if the spoon is intended to be used for food, then with hot linseed oil.
Making spoons with your own hands allows you to acquire skills in working with a machine and other tools, as well as feel how wood behaves.
Sharpening a wooden ring
Wooden rings can be used for various purposes, both as part of furniture decor, round mirrors or cornices, and as an independent decoration.
To turn a wooden ring, you will need a special chisel, which has two cutting edges, one straight and the second (side) semicircular. Turning should start from the end of the workpiece:
- fix the workpiece in the machine and grind along the entire length, leaving an allowance of 2-3 mm;
- point the chisel inside the cylinder with the side edge facing you, the depth of insertion of the cutter should slightly overlap the cross-sectional diameter of the ring itself;
- deepen into the workpiece and sharpen until a semicircular profile is formed inside the cylinder;
- Bring the chisel to the outside of the workpiece and, using gentle pressure from yourself, cut out the outer profile of the ring.
What can be made?
An experienced craftsman can use a lathe to produce a huge number of items, ranging from simple slats to exquisite pieces of furniture.
Salad bowls
Depending on the size of the workpiece, you can make deeper salad bowls or flat ones. In any case, the work requires patience and fixing the workpiece at one end.
Boxes
These products require more skill from the turner. But the result can be a real work of art.
Furniture legs
Here the master's imagination is limitless
By combining different decorative elements, you can make truly graceful legs that will attract everyone's attention and admiration.
Toys
Dolls, bears, and, of course, nesting dolls - all this in the hands of an experienced turner can be obtained from a simple wooden block.
Cups
A wooden cup is suitable as a reward for the winner and will decorate the shelf of any sideboard. Additionally, you can burn a memorial inscription.
Vases
Wooden vases made on a lathe are distinguished by a variety of shapes and decorations. Flowers always look much more beautiful in them, and the atmosphere is closer to natural.
When you can't do without a hammer
A device for sharpening chisels.
For the purpose of gouging and chopping, both chisels and mallets are used at the same time. For both procedures, the mallet is held in one hand and the chisel is positioned perpendicularly in the other hand. When you hit the chisel with a hammer, it rotates simultaneously. Thus ensuring that the end of the tool is always in the right place.
They produce special devices that are intended specifically for chiselling, their name is chisels. Manufacturing companies that have similar products are MATRIX and KIRSCHEN. The handles of such devices necessarily have shockproof properties and high strength, because they will often take a heavy load.
Unlike the gouging procedure, you may encounter some difficulties during the cutting process. Using a chisel it is possible to cut out, for example, recesses for door hinges. Any modern door between layers of wood has a layer of hardboard or MDF. Due to this, warping (change in shape) is avoided. But if the wood is not dried enough, even this measure will not save.
The loops will have to be slightly seated. To set the seating depth of the loops, the material is cut along the direction of the fibers by hitting the chisel with a hammer. Each specialist chooses the direction for cutting independently, focusing on personal convenience, from himself or to himself. The chisel is held as carefully and accurately as possible, so as not to spoil the material and not to injure yourself.
When they come closer to the marking, they try to make the chisel spring back after knocking. Why are hammer blows performed with a drawbar? When selecting wood at the edges of the markings, do not use a mallet; they work manually, adding a little more effort to remove excess material.
Types of turning and principle of operation
There are more than a dozen different types of turning work, and they differ from each other in the types of parts and their sizes. Consequently, there can be many types of turning. But there are three main methods on which all others are based: longitudinal, transverse and angular. They differ in the direction of movement of the cutter relative to the axis of rotation of the workpiece:
- longitudinal – the cutter moves parallel to the axis of rotation;
- transverse - the cutter moves perpendicular to the axis of rotation;
- angular (tangential) – the cutter moves at an arbitrary angle to the axis of rotation.
What method to use is decided by the master, based on the goals that he faces.
Making a box (salt shaker) from wood on a lathe
To make the salt shaker box, I took acacia; this is a very decorative tree of a light green hue, which, when polished well, gives an unusually beautiful mother-of-pearl effect.
To make the box you will need various cutters for a lathe; I have homemade ones from simple files. Their steel is quite suitable for carving.
Wooden box manufacturing technology.
1) We clamp the cylindrical blank for the body of the box into the lathe and first roughly round it, removing the edges. For this purpose we use a semicircular cutter:
2) Round it off more smoothly with a jamb cutter.
3) Using a jamb cutter, we apply indentations that will serve as decorative bands for the box.
4) Then we cut on both sides of these recesses, creating bulges on the box.
5) Round off the resulting edges.
6) Now we need to make the internal cavity of our salt shaker. To do this, we move the support bar to the end of the workpiece and begin to deepen it with a straight narrow cutter from the center to the edge. We do everything smoothly, without sudden pressure. Let's go deeper into the steps:
7) Then, using the tip of a triangular cutter, we smoothly expand the cavity from the center to the edge, reaching the bottom.
8) We level the bottom with a wide straight cutter, use it to form the required thickness and make a groove for the lid.
9) Sand the bottom and side walls of the box with sandpaper.
10) When everything is sanded, cut the workpiece from the machine with a hacksaw. I do this with the machine turned on. But to do this, you need to confidently hold the hacksaw in your hand, you need to constantly watch how much is left until the end of the cut so that the work does not fly out. It is also necessary to remove chips stuck between the swells, otherwise they cause friction:
Yes, you need to move the hacksaw away from you towards the part! Before completing the process a little, you need to stop the machine and cut the workpiece.
11) Now you need to make the lid of the box. I have it dome-shaped. We adjust the lid to the size of the inner diameter of the box, for which we try it on:
12) Make the inner part of the lid dome-shaped, forming it with a semicircular cutter:
13) When the inner part of the lid is ready, we begin to form the outer part with the handle:
14) Sand the lid of the box with sandpaper to a light shine.
15) For final finishing, it is better to cover the inside of the salt shaker box with wax (if it will be used for food purposes). Non-toxic varnish can be used outside.
Making a Chiseled Mallet
- home
- Master Classes from “Master Class Direction” by tag: turning
Today we will make a turned mallet from 2 different types of wood based on Wood-Master magazine No. 5, 2009. This type of carpentry tool is often used when working with chisels and is quite easy to make with your own hands.
The hammer will be according to the drawing of the mallet from the magazine, the handle is arbitrary, so to speak, “under the arm.”
Mallet drawing
The maximum diameter of the mallet is 78mm, the length of the striker is 120mm, the length is 255mm
First of all, let's select the material. And let's do it literally - beech is a waste from our production of workbenches, and a sapele die is a waste from the production of our friends.
Material for making a mallet
The beech block must have a cross-section of 40mm x 40mm and a length of at least 350mm. This can be done either with a jointer and a planer, or with a hand plane (for the sake of sport) We process all 4 sides
IMPORTANT! All edges must be strictly perpendicular to each other and the same size!
Sawing sapele into planks
We cut a 20mm thick sapele die on a band saw into 4 strips: at least 70mm wide and 160mm long.
Gluing the workpiece
We fume one face and one edge. We glue each layer one by one to the beech block.
Glued mallet blank
This is how it turns out.
Mark the center and prick with an awl.
IMPORTANT. Accurately find the center for symmetry of the pattern in the finished product when transitioning from one wood to another. We install the workpiece in the lathe, securing it in the centers
We place the workpiece in the lathe, securing it in the centers.
We create a round one from a square blank. To do this, we will use a semicircular cutter - a reyer. Rotation speed 1000 rpm.
We mark the main diameters - the handles.
To turn the main surface of the handle we use a semicircular cutter.
To turn thin cylindrical belts and trim, we will use a cutting tool. Rotation speed 1500 rpm.
The main template for turning the handle is HAND. By periodically taking the workpiece (naturally motionless) in your hand, we achieve the greatest comfort.
We work with meisel
We level the surface of the striker to a diameter of 78mm and a length of 120mm with meisel. Rotation speed 1000 rpm.
Mark the lines of the main transitions with a pencil.
We smoothly draw out the surface of the striker according to the drawing, also with meisel. Rotation speed 1000 rpm.
We cut with a cutting cutter, leaving a thin isthmus. This will allow us to finish the mallet on the machine. We grind. Consistently reducing the abrasive grain: first 120, then 180, 240, 360
To do this, we use worn-out, but still fully functional, eccentric sander wheels.
We remove dust. It is better to use a blow gun and a vacuum cleaner. Apply the first layer of shellac varnish (primer). Let it dry completely.
We sand with steel wool and apply a second layer of shellac varnish... In this way we apply up to 5 layers.
We cut off the excess with a saw, grind the ends, also consistently reducing the grain size of the abrasive. And coat it with shellac varnish. Also preferably 5-6 times. Now you can work with such a wonderful wooden mallet.
I hope we have answered all possible questions on how to make a mallet yourself.
You can look for industrially made mallets in our store.