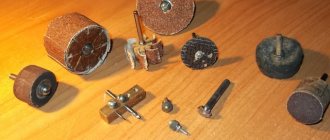
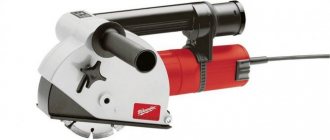
Assortment of attachments
The most common products for processing automobile bodies are: sponge-like, abrasive with varying degrees of grain, felt, having a soft surface. They are conventionally classified according to the type of production into two types:
- petal (has high productivity and high price);
- surface grinding (made like a rubber disc with an additional coating for processing).
The material for these items is dense foam rubber or felt, which has different diameters. However, kits are sold that consist of several elements that have different purposes and manufacturing complexity.
Making your own nozzles
If there is no suitable option on sale, then for a disk with a high level of rigidity you can make a soft layer of great thickness and place it between Velcro and a plastic base. Using a utility knife, you need to cut off the Velcro where the soft layer will be glued. For the soft layer, a bath sponge is mainly used. It must be remembered that individual elements can shift, breaking the overall symmetry.
You can also use a felt disc, which is used in a polishing machine and machine. First, you should make a pin with a suitable diametrical size and apply a thread on one side. On this side you need to secure the disk, which is surrounded on both sides by a wide nut and a limit washer. This device is not difficult to manufacture and can be used to process various surfaces.
Application nuances
A drill attachment for car polishing can be purchased at any store that sells car products. However, you should choose these devices carefully.
Body elements of new cars are made using modern technologies. An anti-corrosion compound and paint are applied to the metal, which are wear-resistant. They will last approximately 15 years. However, this coating is better preserved if it is properly cared for. The polishing device restores the original shine and removes defects from the surface. Together with a special product, such a product will cost less than services provided in a workshop.
Features of use
Progress does not stand still, and drill attachments for polishing are now available in various designs. New compositions for production are constantly appearing, which are lower in cost, but at the same time their reliability and quality remain at a high level. The devices are sold in any stores that stock automotive products. You should be careful when choosing, as you can easily make a mistake, and in the end the purchase will turn out to be unsuitable.
Body parts of new cars are produced using the latest technologies. Anti-corrosion compounds and paints that are resistant to wear are applied to the metal surface. Their warranty period is about 15 years. But the paintwork retains its characteristics better with proper care. An attachment for polishing a car allows you to restore the original shine, remove imperfections on the surface, and together with specialized compounds they will cost much less than going to a workshop.
Using a polishing wheel
By using a polishing wheel on a drill, you can update the appearance of your car. This procedure is most effective if you need to smooth out small chips or remove tarnishing of the surface.
The work is carried out in 2 stages:
- removing paint from the body surface;
- applying polishing compound.
Protective treatment is also carried out to reduce the negative effects of various types of precipitation and ultraviolet radiation. It is mainly done when preparing a car for sale. A protective layer (it contains wax or silicone) is distributed over the surface of the body to form a film that is invisible to the eye, repels moisture, and makes the body shiny. You can polish a used car with a soft pad if there is no paint damage. It can also be used with careful treatment with a protective agent.
Materials for car body processing
To carry out the car processing procedure, the following materials are needed:
- foam;
- sandpaper;
- grinding compound;
- bike;
- polish.
The product that will be used to treat the body surface must be selected carefully.
A paste containing abrasive particles is needed to remove the top layer of varnish. It must be selected depending on the type of cracks and chips present on the body. A product with a large number of particles is necessary if the defects are very noticeable. Nowadays there is a large assortment of drugs on sale that add brightness to color. The protective coating of a new car may develop cloudy streaks. In such a situation, a restorative paste containing a grinding additive will be sufficient.
A variety of tools allow you to solve any problem. For vertical surfaces it is convenient to use a thick paste. It can be used to process any part of the machine. It is often added to components that increase the brightness of the color.
A polish with a liquid constitution is suitable for a horizontal surface, for example, a roof or hood. The main advantage of this product is that it cannot damage the enamel.
Convenient to use aerosols. They are economical and effective. However, the can does not contain very much product.
You have a polishing machine, but no felt pad for it! Then you can make it yourself, for example from felt boots or, like me, from rolled felt, in general, whoever is good at what.
How to demagnetize metal at home?
Judging by numerous reviews, when starting to carry out any work, home craftsmen often encounter one problem - magnetization of tools.
According to experts, this property of the metal in some cases significantly helps in work, since the tools become better.
For example, using a magnetized screwdriver it is much easier to tighten screws in the most difficult to reach places.
But many are also interested in the other side of the issue. How to demagnetize magnetized metal? This interest is due to the fact that in some cases magnetization is undesirable.
It is unlikely that you will be able to make high-quality markings with a caliper with metal shavings stuck to it. It is also inconvenient to use a magnetized cutter. These tools, as a result of exposure to a magnet, noticeably reduce their performance properties.
You will find information on how to demagnetize metal at home in this article.
What is the cause of magnetization?
Before you become interested in how to demagnetize metal, you should understand the nature of this phenomenon. According to experts, magnetization is carried out by paramagnets, diamagnets and ferromagnets.
Products based on alloys of iron, nickel and cobalt have their own magnetic field, which is higher than the external one. Tools become magnetized if they are used near electric motors or other emitters.
As a result, they will take away some of the magnetic properties.
According to experts, some instruments are deliberately magnetized. These are mainly screwdrivers that are used when repairing mobile phones, computers and various household appliances. Such screwdrivers will become indispensable in situations where you need to tighten a screw, but there is no way to support it with your hands.
It is better not to subject watch instruments to the magnetization procedure, since this can stop their working mechanisms. It is not advisable to work with a magnetized drill or cutter, since small metal particles sticking to the working part of the tool will cause a lot of trouble for the master. Read on to learn how to demagnetize metal.
About the special device
Magnetometers are available especially for this purpose, through which a tool can be both given a magnetic charge and removed. For those who do not know how to demagnetize metal, experts recommend doing the following:
After these steps, you should touch the magnetometer area to the instrument, as a result of which the latter will be demagnetized.
How to check?
According to experts, the entire work will take no more than 10 seconds. To check the functionality, the magnetized metal must be brought to the screw. This way the master will see at what level of magnetization the tool is. If the result is unsatisfactory, the procedure should be repeated and then checked again.
How to demagnetize metal using an electric motor?
First, the home craftsman should acquire a low-power asynchronous unit. In this case, the magnetization will be reduced by an alternating decaying magnetic field. Before you begin, you need to remove the rotor from the electric motor.
If you need to remove magnetization from tweezers or a drill, then you just need to insert these products into the stator for half a minute. If the stator windings are disconnected from the power supply, the rotation of the magnetic floor will begin to gradually fade away.
According to experts, the remaining magnetization of the tool will be so small that small metal shavings will no longer be able to stick to them.
Alternative option
Judging by numerous reviews, not everyone has the opportunity to get a low-power asynchronous electric motor.
Experts advise such craftsmen who do not know how to demagnetize metal at home to use a step-down transformer field. There must be an air gap inside its core.
You need to insert a magnetized tool into it for half a minute. It happens that the procedure does not produce results. In this case, it should be repeated.
Using a magnet
Often beginners are interested in how to demagnetize metal with a magnet. It is not difficult to cope with this work. The master should acquire an ordinary, but fairly large magnet, preferably round in shape.
Similar products are available in speakers. Next, a drill, tweezers or scissors are passed over the surface of the magnet. It can also be any other metal instrument.
The distance from the product to the magnet should be minimal.
About working with large batches of parts
There are times when it is necessary to remove magnetization from many metal products. This is possible through the desired temperature.
How to demagnetize metal by heating? According to experts, this will require heating the products to a certain state, which is also called the Curie point. Iron is heated to a temperature of 768 degrees. A ferromagnet will require a higher range.
Upon reaching the desired temperature threshold, spontaneous magnetized domains are formed.
The process goes as follows. First, one part is brought to the Curie point. Next you should cool it. It is important that it is not affected by external magnetic fields (the only exception is the Earth’s magnetic field).
Next, using a sensitive induction meter, the maximum magnetization is assessed. Next, in the control zone at a distance of no more than 2 cm from the part, the range of different values obtained by the MF-23 or MF-23M indicator is measured.
Magnetic induction should be +/- 2 mT.
see also
Comments 17
good video, everything is clear, accessible, nothing superfluous, thanks comrade
So the felt doesn’t stay on with Velcro?
What is the sandpaper attached to or glued to?
It clings with teeth, like Velcro on clothes.
The other day I was polishing the cylinders of the compressor, made it as written from felt boots, cut the round timber with a crown, the result is impressive 
... and then you will cut sausage for a snack with this knife! In such felt you can find all sorts of inclusions, and instead of polishing you can make very good scratches. In the army, we insulated cars with this kind of felt in the winter, it didn’t work out very well, and we simply called it “koshma.”
Don’t look at it on an empty stomach, I want condensed milk)))
Knife forging tools
What tools are needed for forging:
- large hammer up to 4 kg and small hammer up to 1 kg;
- anvil;
- welding machine and grinder;
- grinder;
- bake;
- pliers and an adjustable wrench.
Damascus steel knives.
Knife made of tool steel rod. Blade forging. Forged knife blade. Decoration of a forged knife. Artistic forging of knives. A forged knife is a souvenir. You can buy a stove, or you can make it yourself. The main requirement for such a stove is to obtain a temperature from 900° to 1200° for quite a long time. Thick sheet metal is best. A mandatory tube for air to enter the stove. You can heat the stove with regular charcoal.
Varieties
There is a wide range of nozzles that are suitable for various surfaces, the most common are sponge-shaped, abrasive, having different degrees of grain size and felt with a soft surface. Conventionally, they are classified according to their design into flap and surface grinding types. The latter are made in the form of a rubber circle (partial use of this material is also possible) with an additional coating for processing.
They are usually made from dense foam rubber or felt of various diameters. The petal nozzle for polishing is characterized by greater productivity and, as a result, high cost. You can also find kits for body surface treatment, which consist of several elements that have different purposes and complexity of execution.
How to forge a knife from a cable?
The workpiece is placed in the lit crucible and allowed to heat up to 800 °C. At this stage, the cable strands are released (annealing), the material becomes pliable. Additionally, oil and dirt burns out.
After cooling, the workpiece is clamped in a vice and one of the ends of the cable is welded using electric welding. Using an adjustable wrench, it is “tightened” as we weave to maximum density. The other edge is scalded while simultaneously fastening a piece of reinforcement for ease of work.
The wire clamps are removed, the workpiece is heated to 1200 °C, and generously sprinkled with borax. This is necessary for better penetration. After reheating, forge “welding” is performed. Using a heavy hammer, the cable is broken flat and periodically sprinkled with borax.
The workpiece is constantly heating up. The more often this is done, the more intensively the forging occurs, the better the material is “welded.” After rough processing, they move on to forging the blade, the future cutting edge, and the shank. At this stage, a smaller hammer is used more, giving the workpiece an outline reminiscent of a sketch of the future blade.
Form
Car polishing attachments are usually made in the form of a cone or a circle. They often come as an addition to polishes, along with polishing belts and sheets. There are many options that are used for both bodywork and jewelry or optics.
Thanks to such elements, the aesthetic and technical characteristics of the car are preserved, since any vehicle will look much better after a thorough washing and polishing.
Curved descent at the tip
0 I removed the curved trigger at the tip and the part of the blade that is adjacent to the bolster/guard. Ganz. ru tells you that this is called the edge of the trigger and the sub-finger radius. Well, or a rounded rectangle in my case.
0
0
This is what the blade profile looks like now.
Rigidity
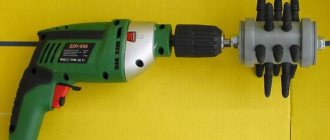
A regular drill often acts as a grinder. But it can ensure high-quality work only if it is supplemented with suitable components. A variety of materials are used for polishing wheels. The most common attachment for a drill for polishing a car is made of felt or foam rubber. The choice of one option or another is determined by the degree of softness of the polishing paste. Manufacturers produce wheels in various colors, depending on their hardness:
- The softest is the black polishing attachment;
- orange elements are suitable for all types of pastes;
- hard compounds are used with white circles.
DIY polishing attachments
Sometimes it is not possible to find a suitable option in the store, in this case, if you have a hard circle, you can make a soft, thick layer and place it between Velcro and a plastic base. Using a stationery knife, the Velcro is cut off, onto which a soft layer is glued, which is an ordinary bath sponge. It is worth noting that during the work, it is possible that individual elements may shift and, as a result, the overall symmetry may be disrupted.
Also, a convenient attachment for a drill for polishing a car is obtained from a felt disk used in polishing machines and machines. First you need to make a pin with a suitable diametrical size and apply a thread to one of its sides. A polishing disc is fixed to it, surrounded on both sides by a wide nut and a restrictive washer. The formation of such a device does not cause any particular difficulties, and it is suitable for processing many types of surfaces.
View from the second side
0 The master put his mark on this workpiece. It will be visible as processing progresses.
0
Removed the top burnt layer. And I just thinned the workpiece, it was too thick, more than 6 mm.
0
This is what happens when you remove metal on a grinder (belt grinder). You work for 5 minutes, remove the chips for a minute.
0
Getting closer and closer to the desired thickness.
When is polishing needed?
Such processing, despite many positive aspects, can correct only a limited list of defects. It is impossible to do without major repairs of body elements if they have pockets of corrosion, chips or damage through which the steel frame is visible. Before starting work, you should carefully inspect the machine and make sure that any defects can be eliminated. A car polishing attachment for a drill will be effective in the following cases:
- slight difference in shades obtained after partial dyeing;
- the presence of graininess and streaks of the enamel composition;
- the surface has roughness, scratches and cloudy stains;
- the paint layer became less bright and shiny.
What does the polishing attachment achieve?
Polishing makes it possible to give the body a renewed appearance. Carrying out such treatment is especially important when leveling small chips and in case of tarnishing of the surface. The work is being carried out in two stages. First, the surface layer of paint is removed, after which polishing compounds are applied.
There is also a protective treatment that is used to reduce the negative effects of various precipitation and ultraviolet radiation. Most often, it is included in the pre-sale preparation of the car. The protective coating is distributed over the entire surface and can have a different composition with the addition of components such as silicone or wax. They form a water-repellent, invisible film and provide a brilliant shine. The soft drill nozzle for polishing is suitable for used cars on the surface of which there is no damage to the paint layer. It is also used in gentle treatment with protective agents.
Polishing agents
Before you begin restoring the surface, you should make sure you have the necessary materials, such as:
Treatment products should be carefully selected. Pastes with abrasive particles are necessary to remove the top varnish layer. They are selected according to the type of cracks and chips on the surface. Preparations with a large number of particles are indispensable when eliminating noticeable defects. Compositions that add brightness to color are quite common.
Cloudy stains often appear on the protective coating of new cars; in this case, you can use a restoration paste that does not contain grinding additives.
A variety of polishes allows you to choose the right product for any task. Thick pastes are suitable for vertical surfaces. They can be used to treat any part of the car. Such products are often characterized by the presence of components that increase the brightness of the shade.
Liquid polishes are only suitable for horizontal surfaces, for example, the hood or roof. The main advantage is the absence of the possibility of damage to the enamel.
Aerosols are quite convenient to use. Such compositions are economical and effective in operation. But it is worth noting that the cans, despite their size, do not contain much material.
Finishing
After finishing the forging manipulations, let the blade cool. You should move on to grinding work. We remove carbon deposits and level the slopes. We do preliminary sharpening of the blade. Final works:
- An angle grinder with a cutting wheel will definitely help you adjust the shank to the mounted handle. Mark and cut as required.
- An important stage that gives the blade the quality of hardness and wear resistance is hardening. After heating the workpiece to 500-700 °C, it should be quickly lowered into oil. Be careful - the oil actually splashes and there is a risk of fire.
- Tempering of the blade is mandatory; it should be carried out at a temperature of 200-220 °C for 2-3 hours. Upon completion, the blade should be treated with fine-grained sandpaper.
- We make the handle from a block of wood, drilling holes in it and fitting the shank. It should be given the necessary shape. After making sure that the parts match perfectly, pour epoxy glue into the hole in the handle and hammer the blade with the shank inward. Let the glue dry for a day and treat the handle with oil or special impregnation.
- The final stage is sharpening the blade for finishing. It is preferable to perform these manipulations on diamond stones. The process is long and tedious, but the result is magnificent.
Learning to forge a knife from a drill yourself is not an easy task. There is no need to be afraid to learn. Live and learn. It’s not for nothing that they came up with a saying. We wish you to overcome all the difficulties of this skill and show the whole world the products you made by hand.