On the issue of fixation
Half-timber joinery joints do not have a mechanical connection, so they are secured using gluing. We discussed in detail how to properly glue wood and choose the appropriate glue in previous materials.
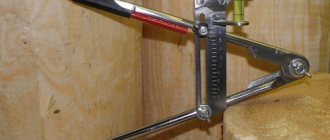
While drying, the structure must be secured with clamps. When placing the clamps, make sure that their pressure is distributed evenly. An incorrectly installed clamp can deform parts or disrupt the fit of the connection.
Unlike frame structures, logs or beams are strengthened using a different technology. In this case, screws, dowels or dowels are used to secure the connection.
The type of connection based on the insertion of a tenon into a groove appeared in Europe almost simultaneously with floorboards and lining. The finishing material is simple and easy to install and has a lot of advantages. True, the cost is more expensive than ordinary boards and strips, but the joints are much neater, and the service life is much longer.
The groove connection increases the strength of the coating.
GROOTS CAN BE MADE EVERYWHERE
With a groove connection, the end of one part fits into a shallow groove cut across the grain of the other. This connection is an improvement on the simple butt connection. The groove shoulders provide decent strength. In fact, such a connection cannot be broken, for example, by pressing on a shelf. If it fits tightly, it can withstand oblique loads well, when the force is directed diagonally across the body. Installing back walls in cabinets or chests of drawers and bottoms in drawers further strengthens the entire structure. Finally, the groove makes assembly easier by defining the position of the parts and keeping them from slipping.
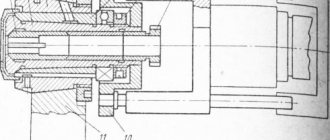
Using just two types of groove connections, you can make almost any body part. The main joint, where the groove engages the full thickness of the adjacent piece, allows for the assembly of bookcases, toy chests, wall shelves, or any other cabinets in which the side walls extend beyond the adjacent pieces (Figure 1).
. Main groove connection. Rice. 2
. Modified groove/tenon connection.
If these "through" angles are unsuitable or unsightly, use a modified joint (Figure 2) called mortise/tenon.
Marking of the second part
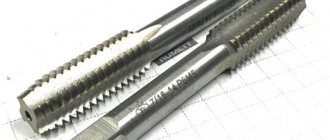
Tenon joint elements.
After this, we move on to marking the second part of the connection. To do this, you need to take the two parts that are supposed to be connected and attach them tightly to each other. In this case, you need to ensure that it matches the lines of the cuts. When the parts are perfectly attached to each other, it is recommended to clamp them in a vice so that they do not move.
Now that the parts are properly fastened, you need to apply marks with a pencil on the second part that has not yet been marked, and then make the initial cuts with a file. These will not be solid lines, but just thin marks, similar to scratches. But it is still necessary to do them, since it will be easier to work later. Only when making marks, try to do it in such a way as to achieve perfect evenness and avoid bending.
Related article: Technology of interior finishing with gypsum bricks
After this, it is necessary to release the parts and move them further relative to each other. It is important to take this into account. If you move the parts just a little by the width of the file, the connection will turn out to be quite rigid. And if you make the shifts a little more, it will be freer.
However, it cannot be said that any of the options is bad. It all depends on the nature and size of the parts being connected. And also on the specific type of wood used. If you use plywood, then you can make shifts only along the width of the cut, since in any case it will not be subject to severe deformation.
Preparation
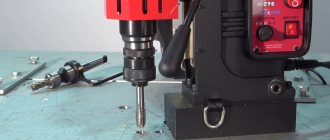
Before production, it is necessary to prepare the CNC machine for operation. Setting up the unit involves two stages. The first is represented by setting up tool blocks, and the second - by working mechanisms.
Setup is carried out step by step:
Additionally you need to check:
When serial processing with cutters, you should carefully monitor the processing of the first workpiece. With its help, you can determine whether there are errors after adjustment. If there are inaccuracies, additional corrections must be made. If there are several elements, the layout on the sheet saves plywood. After setup, there is no need to check the control program - it will produce parts according to similar parameters.
Making planks with grooves at home
Often you have to make furniture or make repairs at home, using the simplest methods and what is at hand.
If you need to make a groove in the board with your own hands, be patient and have the necessary tools:
- A circular saw. The most practical tool, but, unfortunately, not everyone has it.
- A regular hacksaw for wood. It will take longer to work with it, but this accessory can be found in every home.
- Electric drill. It is also quite accessible, but before making a groove in a board with a drill, it is advisable to practice on an unnecessary block, practicing the skill.
Making a groove with a circular saw
Making a groove with a circular saw.
The optimal materials are wooden boards, bars and the like. The price of raw materials is minimal; in extreme cases, what is available on the farm is used. The most successful solution is a through, single open straight end connection.
The joint will be strong and reliable:
- It is recommended to make tenons with a thickness of ¼ of the thickness of the plank and a groove of the same size.
- The height and length of the groove must correspond to the dimensions of the plank.
- Prepare a pencil and ruler for marking.
- Decide on the coordinates of the cut and mark it.
- The cut should be made along a line inside the side that will then be separated.
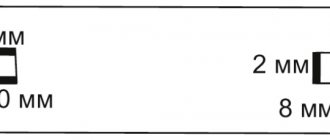
- For a circular saw, the instructions recommend a blade width of 2-4 mm.
- Sawing in the middle of the marked line removes 1-2 mm of excess, since two grooves are made on each plank.
Note! To prevent the workpiece from being damaged, make cuts along the inner sides of the drawn lines. In this case, a visual correction is made for the thickness of the canvas.
- If you need to join two parts at a 90º angle, cut the pieces at 45º at the ends.
- For an end-to-end open miter connection (single straight), mark the cut locations on the oblique cuts of the planks.
- Before removing the groove from the board, double-check that the cut is correct on all sides.
- For an angular single connection that is not through the eye, an eye is made instead of a groove. In this case, the width of the tenon is left unchanged, and the length will be 0.3-0.8 of the width of the board being attached.
- Since the circular saw rounds the edges of the eye, leaving the shape of the tenon unchanged, it is advisable to refine the corners by turning them with a rasp.
Groove using a drill
The photo shows a groove being cut out with a drill.
The method is quite labor-intensive, but it can be called an alternative to the one described above. If you were unable to get a hand router, prepare a drill and chisel, ruler and pencil.
- Select a drill with a diameter corresponding to the width of the future groove.
- To guess the depth of the groove, you can make a mark on the drill itself (for example, draw it with bright paint).
- Draw two parallel lines along the block at the required distance from each other.
- Having secured the workpiece in a vice, drill a furrow, carefully monitoring the vertical position of the drill and maintaining the depth.
- When finished, remove all excess with a sharp chisel and sand with emery cloth.
Note! It happens that a furrow with a concave bottom and a spike with a convex end are required. Before making the moon groove in the board completely, drill to a depth slightly less than required. Subsequent processing and adjustment can be conveniently done with coarse sandpaper or a round file.
Using a hacksaw on wood
Making a transverse groove with a hacksaw.
Well-done markings will help a lot here.
Select a hacksaw blade that is smooth and durable:
- To avoid mistakes, draw two lines along the length of the board, on opposite sides. The distance from the top plane to them will be the depth.
- Securely secure the block and begin sawing.
- It is important to monitor, checking the lines, how far the canvas fits into the wood.
- If the tool is skewed, you can ruin everything, so periodically watch the hacksaw’s entry into the material from the side angles.
- With a wide groove and a thin blade, it is more effective to make two cuts, again along the inner sides of the cut.
- All excess is carefully removed with a chisel and cleaned.
Methods for making a quarter
You can select a quarter using several methods using different tools. For example:
website design/logo © 2022 Stack Exchange Inc; User materials are provided under the terms of the cc by-sa license. rev 2021.8.13.39972
By clicking “Accept All Cookies” you agree that Stack Exchange can store cookies on your device and disclose information in accordance with our Cookie Policy.
This connection option is a little more complicated than the previous one, because the groove is cut from both sides. It looks like the first one, only two perpendiculars are cut out at the top and bottom at ¼ of the thickness of the frame on each side. If you do the sampling yourself, you can use a chainsaw as a tool or purchase a special milling cutter.
This connection method is the most complex, but at the same time very high quality and durable, because the correctly chosen groove allows you to fit the logs together like a children's construction set. The bowl in this method is cut through on all four sides and, as in the second option, each cut is made to ¼ of the thickness of the timber. To make sampling easier, the ideal solution would be a timber groove router; with its help, the cuts will be smooth and neat, especially when compared with a chainsaw or jigsaw.
Useful DIY crafts
In order to make something useful, for example, a box, it is not necessary to have a whole arsenal of complex equipment and expensive tools. You can get by with a minimum of tools and mechanisms. To perform carpentry work you will need:
You can use absolutely anything as a material - for example, scraps of parquet boards, pieces of plywood and waste chipboards, but always at right angles. To simplify the work, you need to make a simple milling table. To process workpieces, you will need a large-diameter straight groove cutter. The process looks something like this. On a makeshift table, plan the ends of parquet board scraps. Mark the sides of the box and use a jigsaw to remove all excess.
You can connect the sidewalls together with a mustache. To do this, you need to mill the ends of the sidewalls with a conical cutter with an angle of 90 degrees. This can be done using a router. Thus, the ends of the sidewalls have the same bevels of 45 degrees. Next you need to make grooves in the sides for the bottom. For this, an end mill with a diameter of 6 millimeters is used, equal to the thickness of the plywood.
In order to make a tool box, it is necessary to strengthen the carpentry joint of the sides by inserting additional tenons. The operation is called cutting tenons with a hand router. It is very difficult to do it manually, so you need to make a simple device - a milling table. The principle of its manufacture is simple:
We invite you to familiarize yourself with the DIY headrest for a bath, dimensions
One of the most commonly performed carpentry operations is making paneling. It is performed with a special cutter. To perform the work efficiently, it is necessary to make a simple device for the tabletop of the milling device. To do this, you will need thick-layer plywood measuring 500 x 300 x 10 millimeters.
To exit the cutter, a hole with a diameter of 100 millimeters is cut. The parallel stop is attached to the table with clamps. The cutter is set taking into account the distance from the table surface to the sharp edge of the cutting tool of one millimeter. All sides of the workpiece are processed sequentially. The thickness of the panel is adjusted by lifting the cutter.
Using a hand router, it is very easy to create a furniture facade on the doors. To do this, you will need a shaped end mill, a copy sleeve and a plywood template. The technological process is very simple:
The result is a neat design of the furniture facade.
Processing of wooden parts
The first thing you need to learn is to correctly set the milling depth. To do this, you need to set the zero point. It is impossible to set it rigidly, because it changes every time the cutter is changed. The zero point is the position of the tool when the end of the cutter touches the material and is fixed with a special device called a clamp.
It is necessary to pay attention to the fact that each router has a different position when fixed. To control the depth of immersion of the cutting tool into the body of the material, a stop pin with a coarse adjustment scale is used.
We suggest you familiarize yourself with How to work with a hand router on wood: making a groove and cutting tenons, making furniture
When milling with an end mill, the counterforce from the cutting force moves the router to the side. To prevent this from happening, you need to use a rip fence. The milling process is as follows. Place the cutter along the marking line and secure the position of the stop with a special screw. Set the milling depth and turn on the machine. If the rip fence is installed on the left side, you need to pull the router towards you, when on the right side - away from you.
In order to select a quarter on a beam, you need to set the cutting edge of the cutter at the very edge, fix it, set the depth of the quarter, turn on the router and pull it towards you (if the stop is on the left edge of the beam). Milling the surface of narrow bars has its own peculiarity. The problem is that it is very difficult to hold the router on the narrow side of the workpiece. If it wobbles during operation, the groove will be inaccurate.
Working with a hand router can replace working with a planing machine. To do this, you will need several accessories for the milling mechanism. It looks like this: attach a milling mechanism to two equal-sized slats and use it as a planer, where a large-diameter milling cutter is installed instead of a shaft.
How to choose a groove with a router?
The solution to the problem depends on where the grooves are located and what size they are. Here are some recommendations for home craftsmen:
- The use of open grooves involves securing it to the tabletop and guiding the workpiece along the cutter.
- Accuracy is determined by the height of the cutter and the location of the bar.
- It is recommended to use wood waste for trial operations. This allows you to avoid mistakes.
- Sampling is carried out in stages, with several passes being carried out.
Step-by-step schemes for beginners
To understand the basics of wood carving, it is worth mastering the lessons step by step - from the simplest to the more complex. For beginners, and especially for children, you should immediately talk about safety precautions in order to prevent possible injuries.
To learn to cut
any objects with your own hands, it is important to know what is needed for this and what the sequence of actions should be.
The simplest technique is to learn contour carving, for which you need to prepare the basic equipment:
- wooden blank;
- chisels;
- blunt knife;
- pencil and paper for sketching;
- sandpaper;
- paints.
In order to cut wood , it is important to tell everything about chisels and show them in action. Handmade work is distinguished by its subtlety, so don’t rush and start cutting without a sketch. Drawings are prepared on paper, carefully thought out, and then transferred to wood .
The basics of working with chisels and a jamb knife are carried out on workpieces with straight and wavy lines.
A beginning carver must get a feel for the tool and learn how to work with it. As soon as it starts to work out consistently, you can choose a sketch and try to bring it to life. The most common themes for carving are animals and natural landscapes with various objects. After the work is completed, the workpiece is sanded and painted.
Contour
Contour carving is considered one of the simplest techniques, since patterns are applied to a flat prepared surface, going slightly deeper into the material, which allows you to form the outline of the future pattern.
This type of work belongs to geometric carving and is divided, in addition to contour carving, into triangular-notched and bracketed techniques.
To start work, you need to come up with or select a pattern you like and apply it to the tree
, which should be as smooth as possible.
Do not use sandpaper or other abrasive products on workpieces, as fine particles will interfere with neat carvings and cause the cutting tool to become dull.
The optimal cutting depth is considered to be 1.5-2 mm and the tool angle is 40°. Having made one line, you can start the next one, but tilting the cutting tool in the opposite direction to make a geometric recess . If the movements were made correctly, the edges of the lines will be smooth and the surface shiny.
Sources:
https://9692.ru/info/kak-sdelat-uglublenie-v-dereve/ https://vplate.ru/rezba-po-derevu/dlya-nachinayushchih/
SAWING A GROOVE/TENK CONNECTION ON A CIRCULAR
Since this is a very simple connection, it is easier and faster to combine marking and installation. Check the settings on the scrap boards (Fig. 6 and 7).
It's easier to fit the tenon to the mortise, so make the mortise first. Set the depth of the cut by measuring or by eye, pressing the disc against the part in which the groove will be. Then set a ruler to cut out the inner shoulder of the groove (Fig. 6, step 2), make a cut in all parts with grooves, rearrange the ruler and cut out the second shoulders.
Narrow parts, such as the sides of bookcases, can be sawed using a dividing head, keeping the end of the work piece in contact with a straightedge as you work. You can also attach a limiter to a ruler in front of the disk so that the end of the part rests against it.
The most accurate way to select a groove on a circular saw is to place the workpiece on the table and, pressing it against the ruler, cut out the shoulder. Then place the part on the end and cut out the thickness of the tenon. This method allows you to accurately control the thickness of the tenon, but it is inconvenient for long parts or those that are sawed across. It is better to make tenons on these parts using several horizontal cuts. After sawing the shoulder, press the piece against the ruler and use a dividing head to cut out the excess wood in several passes. Unlike the first method, here the thickness of the tenon depends on the thickness of the workpiece.
No matter how carefully the tenons are made, there is usually some variation in their size, especially when sawing into solid wood. Here we can advise you to cut the tenons a little thicker, and then, when fitting, trim them with a plane for the shoulders. The blade of a shoulder plane runs across its entire narrow sole, so you can cut right into the corner of a tenon shoulder.
HOMEMADE DEVICE FOR SELECTING GROOTS
Although the device looks complicated, it is quite easy to make (Fig. 10). Cut the workpieces to size, and then carefully plane the planes and edges. Then select a groove in the fixed bar for the fixed ruler using a few cuts on a circular saw. Then, to ensure a tight fit and square edges, use a sharp chisel to trim its shoulders. The half-wood connection on the adjustable ruler is made so that its upper surface is in the same plane as the fixed ruler.
Mill out all the cracks in the planks and rulers using a ruler pressed to the base of the router (Fig. 8). First, releasing the cutter approximately 3 mm in each pass, mill narrow through slots in several passes. Next, mill out pockets for the screw heads and T-nuts.
Small clamps are used as clamps. The pressure pad is a T-shaped nut at the end of the screw. The locknut prevents the pad from coming loose when it presses against the workpiece. Select the grooves in the adjustable bar so that the clamps can hide behind its edge. Rice. 10
. Device for making grooves.
Types of groove boards
Many users have no idea how to choose a groove in a board, believing that the store will offer them only one option for connection and material.
This is far from true; there you will be greeted by a large assortment:
- Symmetrical groove. This is the simplest type. In it, the lengths of the upper and lower shelves are the same, and they protrude at the same distance.
- Asymmetrical groove. Here the upper shelves are longer than the lower ones.
- Block house, used mainly for finishing walls and ceilings. The planks often imitate the relief of timber and have a semicircular or shaped profile on the front side.
- Euro lining, like block house, is often supplied with a relief pattern.
- Decking boards, made of wood and polymer, also have tongues and grooves that simplify installation.
Note! If you plan to mount walls that are not level, have protrusions and dents without a groove board, do not expect good quality from the result. The cladding will not lie flat, height differences and cracks are inevitable.
How to cut round holes
"Manual" method
This method allows you to more accurately fit the circle into the 3-D model grid, but you will have to spend much more time. Create a sphere using Standard Primitives and convert it to Editable Poly.
Let's switch to Vertex mode and check the box next to Ignore BackFacing, this way we won't accidentally catch points on the other side of the sphere.
Mark any grid square, select its three vertices (as indicated in the screenshot) and connect them with a diagonal using Connect. We create two diagonals using this method.
Select a point at the intersection of the diagonals and press the Champfer button, enter the radius.
Go to the Edge level and select two opposing grid lines, then click the Connect button, set 4 segments.
We do this with all the edges adjacent to the circle.
Let's switch to the Vertex points mode; we should have selected points belonging to the future circle. Add the Spherify modifier.
We get a round hole. Now we can convert the object, for example, to Editable Poly, in order to manipulate it.
Creating a Square Hole Using Connect
We looked at another way to create a hole in this lesson. It can be used when working in 3D max to make holes in the wall of a building that has a more complex shape than a square. For this we use the Connect command.
The polygonal mesh is thus not cluttered, there are no extra lines.
Curved cuts
A curved cut can be made with an electric hacksaw, jigsaw or band saw. The hacksaw is good for large radius cuts and thick wood, when the cutting line goes away from the edges.
Curved cut
Hacksaws are equipped with rotating bases that change the cutting angle, and depending on the type and thickness of the material, different saw blades should be used. For curved cuts of small radius and with wood thickness less than 50 mm, use a jigsaw or jigsaw.
Jigsaw machine
Install the new file and tighten it until it rings when you click it with your finger. If you need to cut an opening, you can do two things: either start cutting from the edge, or, if you do not need to touch the edge, first drill a hole in the part to be removed, then release one end of the file, pass it through the hole made and clamp and tighten again.
This saw makes it easy to make cuts at any angle. Place the cutting blade on the frame at the required angle (90, 45, 36, 22.5 or 15°) and fix it. Set the depth gauge to the desired mark. Place the workpiece on the saw table, press it against the fence, and then make the cut using smooth back and forth movements.
Peculiarities
Computer numerical control equipment allows operator intervention to be kept to a minimum. After manufacturing, the part does not require additional processing.
Using machine tools, several types of processing can be performed:
There is also plasma treatment. But it is used less frequently than other types. Depending on the type of processing, there are both advantages and disadvantages. It is necessary to pay special attention to their consideration if you do not know which machine is better to choose.
The most suitable materials for work are sheet type materials. Of the listed types of manufacturing, the most popular is milling. on the machine ensures the production of parts with precise dimensions and smooth edges. Laser cutting is more suitable for cutting plywood.
When cutting, you must adhere to the rules for using the unit.
Using milling you can create almost all types of parts. Modern models are compact, so they can be placed in a room with a small area. Numerical control ensures easy operation. Thanks to this, you can handle plywood processing without any experience. When purchasing a machine, you will receive instructions that describe how to operate it.
Tool that can be used
Let's consider what devices can help you when carrying out work:
| Fraser | There can be two options here - either a full-fledged machine that can perform any work, or a manual milling machine, with which you can quickly perform some operations right at the construction site. |
The first solution is used by professionals, since the price of the machine is high; the second type of tool is also suitable for home use
Specialists use special machines for longitudinal profiling of timber
OPERATING THE DEVICE
Marking the grooves is very simple. Determine the shoulder line for each groove by making a pencil mark on the face of the piece. You can put two side walls together and mark all the grooves at once, or mark the second side wall after routing the first.
Once the fasteners are aligned and the cuts are marked, line up the stationary straight edge with the mark (Photo C), lightly tighten the clamps and make the cut with a router, then move the fasteners to the next mark. A well-chosen groove should fit the Tenon without gaps or play (photo D).
Creativity without limits
Milling equipment is indispensable when processing wood. With its help, you can turn a wooden blank into an elegant decorative product. This equipment is most often used by professionals, but experienced amateurs can also master it. Using mechanisms is not an easy task , so before you start working with them, you need to ensure your comfort and safety. Organization of the workplace is very important. The home craftsman must remember that during work there is a possibility of damage not only to the cutter or mechanical device, but also to health.
Woodworking is not only about working at the machine , but also about preparing the workplace and planning the sequence of work performed. Before you start milling, you need to select the appropriate type of cutter for a specific task, taking into account its shape and size. You should select the speed of the machine and the cutting depth and do not forget that the material being processed must be securely attached to the table.
Depending on the specific type of milling device, the rules for their use are different in many aspects. Today, vertical milling machines in which the spindles are located above the work table are widely used. They have proven themselves to be excellent in operations such as wood milling, processing the edges of shelves and round tabletops, making a groove, and joining wooden parts. When processing round structures, an indispensable addition is a special compass with a support plate, which ensures precision processing.
When working with a router, you need to learn how to move it calmly and smoothly. The key is to move the material being processed correctly and safely. This should not be done too slowly, as burn marks may appear on the wood, which can lead to damage to the material.
Chips appear when milling woodworking against the direction of the wood grain. In one pass it is necessary to mill to a depth of up to 8 mm; some models allow adjustment with an accuracy of 0.1 mm. Deep grooves and quarters need to be milled in several passes.
Rating of the best electric planes 2022 - 2022
DIOLD RE-1100-01
A relatively inexpensive, productive plane for home use. The planing width is 82 mm, which is quite enough for processing timber for doorways and roofs. The 1100 W motor produces up to 16,000 rpm, resulting in fairly clean and high-quality planing.
The device comes with a rip fence, so you can make quarter cuts up to 12.5 mm. Please note that an aluminum rather than steel platform is installed here, which contributes to the low weight of the device - only 2.9 kg. Sawdust can be thrown in any direction. At the same time, the manufacturer included a dust collector and an adapter for a vacuum cleaner in the kit. Some users have noticed that the bearings need to be additionally lubricated for better performance.
Interskol R-82/710
A good domestic unit for home woodworking work. The planing width, like all devices in our rating, is 82 mm. In one pass, the electric planer is capable of sawing up to 2 mm. The cleanliness of the planing here is at a good level. The kit includes a parallel stop that simplifies the removal of quarters (up to 15 mm). Interskol R-82/710 is equipped with a power lock button, which eliminates the need to constantly keep the power button pressed.
There is a V-shaped groove for chamfering a piece of wood. Note that the manufacturer includes fasteners for permanent installation in the kit with the device, allowing you to turn the model into a jointer. In addition, there is a set of spare blades, a drive belt and a dust container. However, sawdust is ejected only to the right.
Bosch GHO 6500 Professional
This planer model belongs to the professional class of household power tools. The build quality here is excellent: the bearings fit securely, the sole does not move and there are no defects. There are three V-shaped grooves in the sole for chamfering the ends of wooden workpieces. They differ from each other in the width of the cut. During normal planing, the maximum unit is capable of removing up to 2.6 mm of material.
The sole of the electric planer is made of steel - it can withstand loads somewhat better than aluminum, but it is also heavier. The kit includes a parallel stop that allows you to remove quarters up to 9 mm. Just like in Interskol, there is a power-on lock button. This product belongs to the “blue” class, so by registering it on the official Bosch website, you receive a 3-year warranty.
Metabo HO 26-82
Metabo's parameters are similar to the previous Bosch: cutting width 82 mm, planing depth up to 2.6 mm. However, this model has richer equipment. For example, there is immediately a bag for collecting sawdust and an additional adapter for connecting a vacuum cleaner. There is only one V-shaped groove, but it is enough for chamfering various furniture designs.
One of the advantages of the device is its rather long power cord of 4 m, which allows you to work with it without extension cords. For continuous operation there is a power lock button. Note that with a motor power of 620 W, the device produces as much as 17,000 rpm, which makes planing clean and smooth. Also, the device itself is quite lightweight - only 2.4 kg, so you can work for a long time without fatigue in your hands.
an engineer will help - Milling grooves in wood
Both the groove and the notch can pass through, that is, through the entire surface of the product, or not reach one edge or both edges. There are many methods to ensure the accuracy of the work, but the operation of the machine remains more or less the same.
Making a through groove
Lower and lock the router's vertical movement mechanism. Place the base of the machine on the workpiece without touching the cutter to the wood, then turn on the engine. Move the machine forward evenly along the workpiece until the cutter exits the material at the other edge of the part. Turn off the engine and wait until the cutter has come to a complete stop before putting the tool down.
Making a no-go groove
Before turning on the router with a vertical movement mechanism, lower the cutter onto the surface of the workpiece and place it exactly at the beginning of the groove. Raise the cutter, turn on the motor, and slowly lower the cutter to the set maximum depth. Bring the cutter to the end of the intended groove and release the vertical movement mechanism and turn off the engine. Using a chisel, trim the ends of the groove. Making a groove parallel to the edge Most grooves are cut parallel to and close to the edge.
Included with any router, manufacturers supply side rulers (stops) with bolted screw fastenings, which can be adjusted to set the router to the required distance from the edge. If you have them, then place the router on the workpiece and align the cutting edge along one side of the groove marked on the surface. Adjust the straight edge so that it touches the edge of the piece and tighten its clamp screws. Make the groove by pressing the ruler against the workpiece throughout the process.
Basic parameters and classification
The parameters by which drill cutters intended for wood processing are divided into various categories are:
Basic geometric parameters of a wood cutter
Types by purpose
Today, many tools are used to perform milling work on wood using an electric drill, since technological operations with this material can be different. Depending on the main purpose, the following types of wood cutters are distinguished.
Using such a tool, the corners of wood products are rounded.
These cutters are used to cut V-shaped grooves on flat wood surfaces. Using such a tool, you can make various patterns and inscriptions on the product, as well as process edges.
These are wood cutters, with the help of which grooves and grooves of various widths and depths are cut out on the surface of the workpiece.
Such cutters are similar in purpose to disk cutters, but they allow you to create wider grooves on the surface of the product. Cutters of this particular type are used in window production, where they are used to cut grooves in wooden frames to accommodate glass.
Using cutters of this type, semicircular grooves can be created at the end of the workpiece. Wood fillet cutters equipped with a support bearing are used for the manufacture of decorative furniture slats.
These are tools with a cutting part made in the shape of a reverse cone. With their help, you can create dovetail grooves in wood products. It is these grooves that are used to create open and hidden tenon joints between two or more parts made of wood.
These wood cutters are designed for processing the edges of wooden products. The design of the edge cutter may contain a bearing, which, resting against the edge of the workpiece, ensures its correct position and limits the depth of its cut.
Wood cutters of this type can be made with straight or helical cutting edges. Using such tools, flat surfaces are processed.
These cutters are also designed for flat surface processing. Unlike cylindrical ones, they have cutting teeth on the end part.
Using these cutters, chamfers are removed from the edges of the workpiece. Such a wood cutter, used for installation on a drill, can also have a thrust bearing in its design, which limits the depth of the tool’s cut into the wood.
These wood cutters are used to create complex grooves and recesses on the surface of the workpiece.
These are cutters used to form elements with a complex configuration on the surface of a wood product.
Types by design
Milling tools used in conjunction with drills can have different designs. Thus, there are solid and prefabricated wood cutters, which should also be selected depending on the characteristics of the material to be processed.
How to make a groove in a board - All about timber and woodworking
Knowing how to make a tenon and groove with a hand router, you can even at home make not only beautiful but also reliable furniture, but also various wood structures characterized by excellent load-bearing capacity. The tongue-and-groove system connects not only elements of various furniture (tables, chairs and shelves), but also frames of low-rise buildings that experience significant loads during operation.
A tongue-and-groove joint made by hand
In order to make a tenon on a wooden beam using a hand router, several conditions must be met:
- securely fix the workpiece and correctly orient it in relation to the guide sole of the router;
- set the height of the working part of the cutter so that the tool removes a layer of material of the required thickness from the surface of the workpiece.
Drilling holes
Use a drill press and Forstner bits to drill large holes accurately and accurately. Mark the center of the hole, attach the corresponding drill bit and set the depth stop. Then press the workpiece with clamps to the workbench (this will take some time, but it will be completely worth it).
Drilling holes
To drill holes for screws and installation holes for nails, you should use a drill, and it is more convenient to use a cordless drill. If you need to screw in a lot of screws, install the screwdriver included with this tool into the drill chuck.
Driving screws with a drill
Drill saw
Neither a hand saw nor an electric hacksaw will help if you need to cut a small hole in the workpiece - less than 10 cm in diameter. A jigsaw may also be useless if the workpiece is large. In this case, the most suitable tool is a drill saw. With its tip it bites into the wood like a drill and thus makes a “starting” hole for further cutting. Externally, the saw is similar to a round file with the difference that its shaft is surrounded by a spiral around the cutting edge.
Drill saws are available with interchangeable attachments of various diameters, designed for processing both soft and hard wood, as well as a variety of materials made from it.
The working body of a drill saw is a metal rod with a cutting tip, like a gimlet, and a cutting edge that goes around the rod in a spiral.
This is what the narrowest of hand saws looks like. Thanks to the fastening unit, the blades in the hacksaw can be changed depending on the nature of the material being processed.
Drill attachment
One of the most popular and convenient options for cutting a hole is a special attachment for a drill. It is made in the form of a crown comb and has a rounded shape. With this attachment, cutting holes occurs quickly, and they turn out quite smooth.
drill bit for holes
Nozzles come in different diameters, which allows you to cut a hole of the required diameter. If you have already prepared a hole, we can advise you to try your hand at options trading.
Drill
You can also cut a large hole using a drill. To do this, it is necessary to pre-mark the outline of the hole to be drilled. Next, use a small drill to drill through holes along the contour prepared in advance. Next, using a jigsaw or a very sharp knife, we cut off the holes, thereby connecting the holes. After which you can smooth the circle using sandpaper of various grain sizes.
Chisel
You can also cut the required hole using a chisel. It is enough to remove the wood layer by layer along the contour. This option is the least suitable for interior decoration. The hole must be smooth, which cannot be achieved by using improvised and unsuitable materials for the job. The best option would be to use a drill bit. The hole is even and has smooth edges.
Thus, to summarize, it becomes clear that you need to choose a tool for cutting a hole based on your goals. If you need a high-quality cut, then you cannot do without a special tool.
Milling a pattern on plywood with an edge router
I decided to write a short master class on milling. This master class will help in implementing ideas for making interesting decorative elements using budget woodworking tools. After completing it, you will not have to turn to carpentry specialists for help. Because the lesson will help you master the skill of figure milling. In order to start studying this direction you will need: - a sheet of plywood; - pencil; — an edge router, any that weighs little and fits comfortably in the hand (usually the weight does not exceed 2 kg); — a cutter or several cutters of different diameters; - a little imagination; — work space (it will be dusty); — safety glasses; — protective headphones; - respirator (optional). First, find or buy a sheet of plywood. Usually a sheet of plywood has dimensions of more than 1.5 by 1.5 meters; find a hypermarket or store that could cut this sheet for you into smaller pieces so that you can easily transport it to your home or place of work, if necessary. . To work at the learning stage, you need a small sheet, even 30 cm by 50 cm, with a thickness of at least 1 cm (10 mm), is enough. Let's assume there is a leaf. At this stage you will need imagination, draw the sheet with any lines: straight, oblique, curved, in the form of balls, squares, perhaps these will be illustrations or stencils of leaves, insects, trees, etc., keep in mind that the smaller the size of the drawing, the You will need less of a cutter to select a design stencil from the plywood. Since the router makes a very loud noise when milling, and also generates a large amount of dust and gouging emissions from work, you will have to find and use glasses, headphones, and a respirator, the latter is optional. Below is my photo, which shows a sheet of lined plywood. A simple drawing was chosen, which I made in one minute. The photo shows that the milling cutter has already slightly selected part of the pattern and a kind of depression has been created. Please note that it is best to set the milling depth to the minimum possible, so the cutter will easily move along the surface of the plywood. If you set the milling depth to be greater than the thickness of the plywood, then it will be possible cut out objects and separate them from the general sheet, but that's another story.
Yes, and be careful, although the router is small, the number of revolutions per minute is about 30,000, which is very fast. Pieces of wood bouncing off the workpiece can accelerate to several tens, and maybe hundreds of kilometers per hour.
After about 40 minutes of work, you will get the result, well, someone may work slower or faster, it all depends on the complexity of the drawing. In general, working with an edge router is a great pleasure. This is what happened. The technique is not new, but you can depict something, especially if your imagination and hands are good. The choice of materials for work in this direction is possible with any wood; it can be any solid board, planed log, board, tabletop, steps. Regarding MDF, I don’t know how it will work, but you can try it if you want.
Source