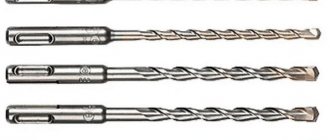
Types of groove boards
Many users have no idea how to choose a groove in a board, believing that the store will offer them only one option for connection and material.
This is far from true; there you will be greeted by a large assortment:
1. Symmetrical groove. This is the simplest type. In it, the lengths of the upper and lower shelves are the same, and they protrude at the same distance.
Asymmetric connection
2. Asymmetrical groove. Here the upper shelves are longer than the lower ones.
3. Block house, used mainly for finishing walls and ceilings. The planks often imitate the relief of timber and have a semicircular or shaped profile on the front side.
4. Euro lining, just like block house, is often equipped with a relief pattern.
5. The decking board, made of wood and polymer, also has tongues and grooves that simplify installation.
Note! If you plan to mount walls that are not level, have protrusions and dents without a groove board, do not expect good quality from the result. The cladding will not lie flat, height differences and cracks are inevitable.
How to choose the right disc
The selection criteria depend on many important nuances. For example, in order to make a clean cut on wood, a circular saw blade must have certain parameters. But for the correct selection, you first need to familiarize yourself with the characteristics of the wood. And according to its structure, look for the required cutting wheel in your inventory.
First you need to comprehend the upcoming task. That is, what kind of cut needs to be made - longitudinal or transverse. Then the thickness of the wooden blank and its structure are assessed. After all, each type of wood will require its own disk rotation speed.
Optimal speed of sawing tool:
- soft wood - from 50 to 90 m/s;
- hard rocks - from 50 to 80 m/s;
- exotic type of tree - from 80 to 85 m/s;
- joinery wood and chipboard - from 60 to 80 m/s;
- MDF – from 30 to 60 m/s;
- laminate – from 40 to 60 m/s.
After this, you can search your inventory for a suitable cutting wheel. And tool marking helps a lot with this. The disk contains all the necessary information. And a reliable and consumer-respecting manufacturer will definitely apply it using a laser in the form of pictograms.
Laser pictograms on the saw blade Source hobbywood.ru
Making planks with grooves at home
Often you have to make furniture or make repairs at home, using the simplest methods and what is at hand.
If you need to cut a groove in the board with your own hands, be patient and have the necessary tools:
- A circular saw. The most practical tool, but, unfortunately, not everyone has it.
- A regular hacksaw for wood. It will take longer to work with it, but this accessory can be found in every home.
- Electric drill. It is also quite accessible, but before making a groove in a board with a drill, it is advisable to practice on an unnecessary block, practicing the skill.
Making a groove with a circular saw
The optimal materials are wooden boards, bars and the like. The price of raw materials is minimal; in extreme cases, what is available on the farm is used. The most successful solution is a through, single open straight end connection.
The joint will be strong and reliable:
- It is recommended to make tenons with a thickness of ¼ of the thickness of the plank and a groove of the same size.
- The height and length of the groove must correspond to the dimensions of the plank.
- Prepare a pencil and ruler for marking.
- Decide on the coordinates of the cut and mark it.
- The cut should be made along a line inside the side that will then be separated.
- For a circular saw, the instructions recommend a blade width of 2-4 mm.
- Sawing in the middle of the marked line removes 1-2 mm of excess, since two grooves are made on each plank.
Note! To prevent the workpiece from being damaged, make cuts along the inner sides of the drawn lines. In this case, a visual correction is made for the thickness of the canvas.
- If you need to join two parts at a 90º angle, cut the pieces at 45º at the ends.
- For an end-to-end open miter connection (single straight), mark the cut locations on the oblique cuts of the planks.
- Before removing the groove from the board, double-check that the cut is correct on all sides.
- For an angular single connection that is not through the eye, an eye is made instead of a groove. In this case, the width of the tenon is left unchanged, and the length will be 0.3-0.8 of the width of the board being attached.
- Since the circular saw rounds the edges of the eye, leaving the shape of the tenon unchanged, it is advisable to refine the corners by turning them with a rasp.
Groove using a drill
The method is quite labor-intensive, but it can be called an alternative to the one described above. If you were unable to get a hand router, prepare a drill and chisel, ruler and pencil.
- Select a drill with a diameter corresponding to the width of the future groove.
- To guess the depth of the groove, you can make a mark on the drill itself (for example, draw it with bright paint).
- Draw two parallel lines along the block at the required distance from each other.
- Having secured the workpiece in a vice, drill a furrow, carefully monitoring the vertical position of the drill and maintaining the depth.
- When finished, remove all excess with a sharp chisel and sand with emery cloth.
Note! It happens that a furrow with a concave bottom and a spike with a convex end are required. Before making the moon groove in the board completely, drill to a depth slightly less than required. Subsequent processing and adjustment can be conveniently done with coarse sandpaper or a round file.
Using a hacksaw on wood
Well-done markings will help a lot here.
Construction portal No. 1
Tenon and groove joints are one of the fundamentals of carpentry. For centuries, such joints have been used to make everything from house frames to coffee tables. No wonder there are so many ways to make them!
How to cut a groove?
Here are three ways to make a groove.
Drill and chisel.
Mark the groove, secure a Forstner drill bit of the same diameter as the future groove (or slightly smaller) in the drill chuck. Using a drill guide or dowel clamp, drill two holes and use a wide chisel to line up the sides.
Plunge router.
In this case, you need to install a guide template (collar) on the sole of the router and apply a simple clamp. Make a slot in the clamp the same width as the template and take a cutter whose diameter is equal to the width of the groove. Press the clamp onto the workpiece with a clamp and select a groove, making several successively deeper passes.
Device for selecting nests.
This device consists of a cutter of the same width as the groove, into which the drill fits with a small gap. All cutter edges are sharply ground. The drill removes the bulk of the material, and the router trims the sides of the hole, making it square. Repeat this operation along the entire length of the future groove. In this case, either a special machine for selecting grooves or a special device for the drilling machine is required. The drill press option is suitable for most types of hardwood, but the job will progress more slowly than using a dedicated machine.
How to cut a tenon?
And there are three common methods.
Tenon saw.
Mark the tenons on the ends and edges of the board. Place the board in a vice at an angle of 45° and use a tenon saw to cut along the waste part of the workpiece. Change the position of the workpiece and make a cut on the other side. Clamp the board perpendicularly and cut to the ledge line. Finally, make a cut along the ledge line to remove any unwanted wood.
Circular saw.
Cut the side edges of the tenon using a tenon clamp to hold the piece upright as it passes through the saw blade (set to the length of the edge). Next, cut the tenon shoulders using a miter jig to guide the workpiece through a saw blade set to the length of the side edge of the tenon.
Milling table.
Set the router table guide so that the distance to the outer edge of the cutter is equal to the length of the side edge of the tenon. Adjust the cutter to the length of the side edge of the tenon. Using a miter cutter, guide the workpiece through the router bit. Each cut will require a minimum of two passes.
How can I increase the thickness of a tenon that is too thin?
Glue thin wood spacers, pieces of veneer, or even pieces of shavings to the sides of the tenon (you should do this on both parallel edges to keep the tenon centered). Once the glue is dry, sand the edges with a folding plane or sanding block to the desired thickness. Be careful not to round the edges of the ledge, otherwise the joint will not be as tight.
What is the difference between end-to-end and dead-end connections?
In a blind joint, the groove is not cut to cover the entire thickness of the board. Choose a socket that is 1.5mm deeper than the tenon length to allow room for glue.
In a through joint, the socket is cut through the entire thickness of the board so that the end of the tenon is visible from the opposite side. This design does not affect the strength of the connection, but is often used as a decorative element. Make the through tenon 1.5 mm longer than the socket so that after assembly the protruding part can be removed by grinding.
Does it matter what you cut first: tenon or mortise?
In an ideal world, this wouldn't matter. However, in the world of carpentry, it is better to cut the groove first. It will be easier to adjust the width of the tenon if you make a mistake.
What is a groove thicknesser?
A socket thicknesser is a small tool with two adjustable teeth that mark the edges of mortises and tenons. The adjustable stop allows you to position it correctly on the workpiece.
How wide should the groove be?
Typically, the width of the groove is one third of the thickness of the workpiece. As a result, the tenon can be made quite strong, and the groove can have walls of sufficient thickness. If you are working with a 19mm thick piece, the groove width should be 6mm.
How tightly should the tenon fit into the groove before gluing?
If the tenon fits into the groove too tightly, it will push the glue to the bottom of the groove, resulting in an insufficiently strong joint. If the tenon fits in too loosely, the glue will not be able to make a strong connection. How do you know what is right?
Everything is based on sensations. If you can easily assemble the joint by hand and the pieces don't fall apart when you don't hold them, then you can assume that the tenon size is exactly the same as the mortise size.
My buddy leaves a few extra inches of material on the end of the piece when selecting the groove and then trims off the excess later. For what?
The extra material helps keep the end of the workpiece from cracking. This is especially important when you work with hand tools.
I've heard that you can get a tighter fit by trimming the tenon shoulders. What is it about?
Trimming in this case means removing a small amount of material from the inner corners of the shoulder so that only the outer edges of the shoulder contact the part in which the socket is made. As a result, the connection looks tighter without losing strength.
Creativity without limits
Milling equipment is indispensable when processing wood. With its help, you can turn a wooden blank into an elegant decorative product. This equipment is most often used by professionals, but experienced amateurs can also master it. Using mechanisms is not an easy task , so before you start working with them, you need to ensure your comfort and safety. Organization of the workplace is very important. The home craftsman must remember that during work there is a possibility of damage not only to the cutter or mechanical device, but also to health.
Woodworking is not only about working at the machine , but also about preparing the workplace and planning the sequence of work performed. Before you start milling, you need to select the appropriate type of cutter for a specific task, taking into account its shape and size. You should select the speed of the machine and the cutting depth and do not forget that the material being processed must be securely attached to the table.
Depending on the specific type of milling device, the rules for their use are different in many aspects. Today, vertical milling machines in which the spindles are located above the work table are widely used. They have proven themselves to be excellent in operations such as wood milling, processing the edges of shelves and round tabletops, making a groove, and joining wooden parts. When processing round structures, an indispensable addition is a special compass with a support plate, which ensures precision processing.
When working with a router, you need to learn how to move it calmly and smoothly. The key is to move the material being processed correctly and safely. This should not be done too slowly, as burn marks may appear on the wood, which can lead to damage to the material.
Chips appear when milling woodworking against the direction of the wood grain. In one pass it is necessary to mill to a depth of up to 8 mm; some models allow adjustment with an accuracy of 0.1 mm. Deep grooves and quarters need to be milled in several passes.
Types of cutters for processing wooden workpieces
By purpose they are as follows:
- Copy edge, equipped with a bearing
- Profile figured
- Facade double
- Conical
- Kalevochnaya
- Rebated, it is used to make grooves and select quarters in wooden products
So, we have decided that it is most convenient to use a rebate cutter to select a quarter. It has a cylindrical shape and is equipped with a bearing. The diameter of its cylinder is larger than the diameter of the bearing, which allows you to select a quarter of the desired depth in several passes of the cutting tool.
It is convenient to use a template when milling. The bearing, rolling along the template, forms the exact direction of movement of the tool, simplifies the work and makes the result neat and even.
Useful DIY crafts
In order to make something useful, for example, a box, it is not necessary to have a whole arsenal of complex equipment and expensive tools. You can get by with a minimum of tools and mechanisms . To perform carpentry work you will need:
- milling cutter;
- electric jigsaw;
- Sander;
- several clamps;
- set of cutters
You can use absolutely anything as a material - for example, scraps of parquet boards, pieces of plywood and waste chipboards, but always at right angles. To simplify the work, you need to make a simple milling table. To process workpieces, you will need a large-diameter straight groove cutter. The process looks something like this. On a makeshift table, plan the ends of parquet board scraps. Mark the sides of the box and use a jigsaw to remove all excess.
The resulting blanks must be processed with a thicknesser to maintain the size of all sidewalls. If you don't have a surface planer, you can use a milling table. To do this, set the stop to the size of the workpiece and move the part between the stop and the rotating cutter towards you. The next operation to calibrate the sidewalls in length is performed with a jigsaw.
You can connect the sidewalls together with a mustache. To do this, you need to mill the ends of the sidewalls with a conical cutter with an angle of 90 degrees. This can be done using a router. Thus, the ends of the sidewalls have the same bevels of 45 degrees. Next you need to make grooves in the sides for the bottom. For this, an end mill with a diameter of 6 millimeters is used, equal to the thickness of the plywood. The parts are connected using glue. The product looks neat and beautiful both outside and inside. What else can you do with a hand-held wood router? Anything: for example, a shelf for things, drawers for storing vegetables or tools, kitchen furniture.
Toolbox
In order to make a tool box, it is necessary to strengthen the carpentry joint of the sides by inserting additional tenons. The operation is called cutting tenons with a hand router. It is very difficult to do it manually, so you need to make a simple device - a milling table . The principle of its manufacture is simple:
- Assemble a simple wooden table consisting of a table top and legs.
- Attach a hand-held milling machine to the bottom of the tabletop, making a hole in the tabletop for the cutter to exit.
- Make a carriage with a stop bar from thick-layer plywood according to the size of the table top. A groove is cut in the carriage for the cutter to exit.
A device for cutting tenons in a board works as follows. Mark the place to be milled and, pressing the board against the stop bar, move the carriage, directing it towards the cutting tool. The resulting finger joint between the parts will be strong and reliable.
How to make a panel
One of the most commonly performed carpentry operations is making paneling. It is performed with a special cutter. To perform the work efficiently, it is necessary to make a simple device for the tabletop of the milling device. To do this, you will need thick-layer plywood measuring 500 x 300 x 10 millimeters. To exit the cutter, a hole with a diameter of 100 millimeters is cut. The parallel stop is attached to the table with clamps. The cutter is set taking into account the distance from the table surface to the sharp edge of the cutting tool of one millimeter. All sides of the workpiece are processed sequentially. The thickness of the panel is adjusted by lifting the cutter.
Construction portal No. 1
Tenon and groove joints are one of the fundamentals of carpentry. For centuries, such joints have been used to make everything from house frames to coffee tables. No wonder there are so many ways to make them!
How to cut a groove?
Here are three ways to make a groove.
Drill and chisel.
Mark the groove, secure a Forstner drill bit of the same diameter as the future groove (or slightly smaller) in the drill chuck. Using a drill guide or dowel clamp, drill two holes and use a wide chisel to line up the sides.
Plunge router.
In this case, you need to install a guide template (collar) on the sole of the router and apply a simple clamp. Make a slot in the clamp the same width as the template and take a cutter whose diameter is equal to the width of the groove. Press the clamp onto the workpiece with a clamp and select a groove, making several successively deeper passes.
Device for selecting nests.
This device consists of a cutter of the same width as the groove, into which the drill fits with a small gap. All cutter edges are sharply ground. The drill removes the bulk of the material, and the router trims the sides of the hole, making it square. Repeat this operation along the entire length of the future groove. In this case, either a special machine for selecting grooves or a special device for the drilling machine is required. The drill press option is suitable for most types of hardwood, but the job will progress more slowly than using a dedicated machine.
How to cut a tenon?
And there are three common methods.
Tenon saw.
Mark the tenons on the ends and edges of the board. Place the board in a vice at an angle of 45° and use a tenon saw to cut along the waste part of the workpiece. Change the position of the workpiece and make a cut on the other side. Clamp the board perpendicularly and cut to the ledge line. Finally, make a cut along the ledge line to remove any unwanted wood.
Circular saw.
Cut the side edges of the tenon using a tenon clamp to hold the piece upright as it passes through the saw blade (set to the length of the edge). Next, cut the tenon shoulders using a miter jig to guide the workpiece through a saw blade set to the length of the side edge of the tenon.
Milling table.
Set the router table guide so that the distance to the outer edge of the cutter is equal to the length of the side edge of the tenon. Adjust the cutter to the length of the side edge of the tenon. Using a miter cutter, guide the workpiece through the router bit. Each cut will require a minimum of two passes.
How can I increase the thickness of a tenon that is too thin?
Glue thin wood spacers, pieces of veneer, or even pieces of shavings to the sides of the tenon (you should do this on both parallel edges to keep the tenon centered). Once the glue is dry, sand the edges with a folding plane or sanding block to the desired thickness. Be careful not to round the edges of the ledge, otherwise the joint will not be as tight.
What is the difference between end-to-end and dead-end connections?
In a blind joint, the groove is not cut to cover the entire thickness of the board. Choose a socket that is 1.5mm deeper than the tenon length to allow room for glue.
In a through joint, the socket is cut through the entire thickness of the board so that the end of the tenon is visible from the opposite side. This design does not affect the strength of the connection, but is often used as a decorative element. Make the through tenon 1.5 mm longer than the socket so that after assembly the protruding part can be removed by grinding.
Does it matter what you cut first: tenon or mortise?
In an ideal world, this wouldn't matter. However, in the world of carpentry, it is better to cut the groove first. It will be easier to adjust the width of the tenon if you make a mistake.
What is a groove thicknesser?
A socket thicknesser is a small tool with two adjustable teeth that mark the edges of mortises and tenons. The adjustable stop allows you to position it correctly on the workpiece.
How wide should the groove be?
Typically, the width of the groove is one third of the thickness of the workpiece. As a result, the tenon can be made quite strong, and the groove can have walls of sufficient thickness. If you are working with a 19mm thick piece, the groove width should be 6mm.
How tightly should the tenon fit into the groove before gluing?
If the tenon fits into the groove too tightly, it will push the glue to the bottom of the groove, resulting in an insufficiently strong joint. If the tenon fits in too loosely, the glue will not be able to make a strong connection. How do you know what is right?
Everything is based on sensations. If you can easily assemble the joint by hand and the pieces don't fall apart when you don't hold them, then you can assume that the tenon size is exactly the same as the mortise size.
My buddy leaves a few extra inches of material on the end of the piece when selecting the groove and then trims off the excess later. For what?
The extra material helps keep the end of the workpiece from cracking. This is especially important when you work with hand tools.
I've heard that you can get a tighter fit by trimming the tenon shoulders. What is it about?
Trimming in this case means removing a small amount of material from the inner corners of the shoulder so that only the outer edges of the shoulder contact the part in which the socket is made. As a result, the connection looks tighter without losing strength.
Cheap and cheerful
Wood carving is always beautiful, rich and expensive. This is done by talented people, artists or sculptors. But there are ways of carving that anyone can do. For example, cutting patterns on wood with a hand router is very easy. The work is performed with a small diameter end mill along the contour of the pattern. To do this, you need to select a hardwood board, nail a stencil cut out of cardboard, and mill it according to the template.
A milling machine of any power is suitable for the job. It is desirable that it be light and comfortable, then it will be easier to copy the drawing. Therefore, you don’t need to worry about which router to choose for beginners; the main thing is to choose cutters with a diameter of 2 millimeters or more. When working, you need to be diligent in order to evenly pass the thin cutter along the contour of the design and not break it. The next step is to deepen the background; for this, a large-diameter flag cutter is used.
Assembly algorithm
Before making a router from a drill, you should prepare all the necessary materials and a drawing, indicating the dimensions and how the drill replacing the manual router will be attached.
- Mark the center of the spindle axis on the table or base.
- Cut a hole for the tool exit.
- Place the electric drill on the stand and mark the position of the clamp and stop, secure them.
- Screw the stand and gusset strictly at right angles.
- Secure the tool body to the base.
A machine made by yourself must be durable, without backlash or distortion. Then you can work on it like a router.
Hazardous factors
Milling machines require complete safety and high qualifications of the worker. When using electric machines, accidents may occur due to material ejected during milling. Therefore, the performer of the work must have special work clothes.
If heavy dust is generated during the milling process, you must wear safety glasses. Maximum safety in this situation is provided by special clamps and vices that effectively hold the workpiece, preventing it from being thrown out. Do not hold the workpiece in the rotation zone of the cutter with your hands or directly touch the rotating tool. It is necessary to use special clamping devices to advance the part during milling.
So, we have a beam measuring 10 by 15 cm, in the middle of which we need to select a 5-centimeter notch. First of all, let's make the markings. It is advisable to draw on wood with a marker or a construction pencil; the lines will be more visible.
We will also need a hand-held circular saw. On it we will set the cutting depth we need, in this case 5 cm. Having set it, we will make a cut on some piece of wood, measuring its depth. This must be done so as not to make a mistake with the cutting depth and not spoil the wood being processed.
After making sure that the depth of the cutout is 5 cm, we proceed to cutting out the groove. We will install a special stop on the circular saw and adjust it so that the disk is opposite the drawn line. This limiter will rest against the edge of the beam and the cut will be perfectly smooth. Once set up, you can start cutting the groove.
Having made one cut, move the limiter 5 mm towards the notch and make another cut. The more cuts you make, the easier it will be to remove the wood from the groove. For a 5-centimeter notch in our case, we made 11 cuts. The result will be something like a comb; inside the beam there will be several thin strips.
Now let's turn the timber over with the groove down and shake out the sawdust from it. Let's take a chisel with a wide blade and start cleaning the wooden plates. They break easily, with a slight crunch. Finally, use a chisel to clean the bottom of the groove, making its surface even and smooth.
In this simple way, you can quickly and easily select a groove in a timber, log or board with your own hands, without involving highly paid specialists in this work. If you liked the article, share it on social networks.
VIDEO
Construction portal No. 1
Tenon and groove joints are one of the fundamentals of carpentry. For centuries, such joints have been used to make everything from house frames to coffee tables. No wonder there are so many ways to make them!
How to cut a groove?
Here are three ways to make a groove.
Drill and chisel.
Mark the groove, secure a Forstner drill bit of the same diameter as the future groove (or slightly smaller) in the drill chuck. Using a drill guide or dowel clamp, drill two holes and use a wide chisel to line up the sides.
Plunge router.
In this case, you need to install a guide template (collar) on the sole of the router and apply a simple clamp. Make a slot in the clamp the same width as the template and take a cutter whose diameter is equal to the width of the groove. Press the clamp onto the workpiece with a clamp and select a groove, making several successively deeper passes.
Device for selecting nests.
This device consists of a cutter of the same width as the groove, into which the drill fits with a small gap. All cutter edges are sharply ground. The drill removes the bulk of the material, and the router trims the sides of the hole, making it square. Repeat this operation along the entire length of the future groove. In this case, either a special machine for selecting grooves or a special device for the drilling machine is required. The drill press option is suitable for most types of hardwood, but the job will progress more slowly than using a dedicated machine.
How to cut a tenon?
And there are three common methods.
Tenon saw.
Mark the tenons on the ends and edges of the board. Place the board in a vice at an angle of 45° and use a tenon saw to cut along the waste part of the workpiece. Change the position of the workpiece and make a cut on the other side. Clamp the board perpendicularly and cut to the ledge line. Finally, make a cut along the ledge line to remove any unwanted wood.
Circular saw.
Cut the side edges of the tenon using a tenon clamp to hold the piece upright as it passes through the saw blade (set to the length of the edge). Next, cut the tenon shoulders using a miter jig to guide the workpiece through a saw blade set to the length of the side edge of the tenon.
Milling table.
Set the router table guide so that the distance to the outer edge of the cutter is equal to the length of the side edge of the tenon. Adjust the cutter to the length of the side edge of the tenon. Using a miter cutter, guide the workpiece through the router bit. Each cut will require a minimum of two passes.
How can I increase the thickness of a tenon that is too thin?
Glue thin wood spacers, pieces of veneer, or even pieces of shavings to the sides of the tenon (you should do this on both parallel edges to keep the tenon centered). Once the glue is dry, sand the edges with a folding plane or sanding block to the desired thickness. Be careful not to round the edges of the ledge, otherwise the joint will not be as tight.
What is the difference between end-to-end and dead-end connections?
In a blind joint, the groove is not cut to cover the entire thickness of the board. Choose a socket that is 1.5mm deeper than the tenon length to allow room for glue.
In a through joint, the socket is cut through the entire thickness of the board so that the end of the tenon is visible from the opposite side. This design does not affect the strength of the connection, but is often used as a decorative element. Make the through tenon 1.5 mm longer than the socket so that after assembly the protruding part can be removed by grinding.
Does it matter what you cut first: tenon or mortise?
In an ideal world, this wouldn't matter. However, in the world of carpentry, it is better to cut the groove first. It will be easier to adjust the width of the tenon if you make a mistake.
What is a groove thicknesser?
A socket thicknesser is a small tool with two adjustable teeth that mark the edges of mortises and tenons. The adjustable stop allows you to position it correctly on the workpiece.
How wide should the groove be?
Typically, the width of the groove is one third of the thickness of the workpiece. As a result, the tenon can be made quite strong, and the groove can have walls of sufficient thickness. If you are working with a 19mm thick piece, the groove width should be 6mm.
How tightly should the tenon fit into the groove before gluing?
If the tenon fits into the groove too tightly, it will push the glue to the bottom of the groove, resulting in an insufficiently strong joint. If the tenon fits in too loosely, the glue will not be able to make a strong connection. How do you know what is right?
Everything is based on sensations. If you can easily assemble the joint by hand and the pieces don't fall apart when you don't hold them, then you can assume that the tenon size is exactly the same as the mortise size.
My buddy leaves a few extra inches of material on the end of the piece when selecting the groove and then trims off the excess later. For what?
The extra material helps keep the end of the workpiece from cracking. This is especially important when you work with hand tools.
I've heard that you can get a tighter fit by trimming the tenon shoulders. What is it about?
Trimming in this case means removing a small amount of material from the inner corners of the shoulder so that only the outer edges of the shoulder contact the part in which the socket is made. As a result, the connection looks tighter without losing strength.
What does drying out lead to?
A typical case: you made a shed at your dacha to store household equipment and for other needs.
They did it for themselves, so they pulled together the boards from which the walls were made, carefully, without the slightest crack. Two or three months pass; the boards dry out and the entire wall glows with cracks. In winter, snow blows through them; in summer, the wind blows dust inside the barn. To prevent this from happening, you need to use quarter boards for wall cladding. A wall covered with such boards will never have through gaps. With their quarters, neighboring boards overlap each other and when they dry out, through cracks no longer appear.
Unfortunately, lumber is very rarely sold with a quarter finished. Therefore, an amateur craftsman should know the ways in which boards can be modified if necessary.
What does drying out lead to?
A typical case: you made a shed at your dacha to store household equipment and for other needs. They did it for themselves, so they pulled together the boards from which the walls were made, carefully, without the slightest crack. Two or three months pass; the boards dry out and the entire wall glows with cracks. In winter, snow blows through them; in summer, the wind blows dust inside the barn.
To prevent this from happening, you need to use quarter boards for wall cladding. A wall covered with such boards will never have through gaps. With their quarters, neighboring boards overlap each other and when they dry out, through cracks no longer appear.
Unfortunately, lumber is very rarely sold with a quarter finished. Therefore, an amateur craftsman should know the ways in which boards can be modified if necessary.
Selection options
When choosing one or another method of milling wood, first of all you should pay attention to the possibility of installing a milling attachment on a drill. To do this, the power tool must have a cylindrical neck, in the extension of which a chuck is installed
In the absence of one, it is not recommended to use a specific drill model for milling. If it is installed on a specialized drill device intended for milling, then you can select cutters. First of all, you should pay attention to the type of work. The milling tool is not universal, so each operation will require its own model of equipment. The diameter of the shank must allow clamping in a specific drill chuck. It is not recommended to use large cutters, as they can require significant spindle power.
It is also necessary to take into account processing modes. Many wood tools require high RPMs that are unattainable with drills. It should be remembered that any electric drill is not designed for long-term loads. Therefore, it is not recommended to apply great effort to it and perform work continuously for a long time.
What does drying out lead to?
A typical case: you made a shed at your dacha to store household equipment and for other needs. They did it for themselves, so they pulled together the boards from which the walls were made, carefully, without the slightest crack. Two or three months pass; the boards dry out and the entire wall glows with cracks. In winter, snow blows through them; in summer, the wind blows dust inside the barn.
To prevent this from happening, you need to use quarter boards for wall cladding. A wall covered with such boards will never have through gaps. With their quarters, neighboring boards overlap each other and when they dry out, through cracks no longer appear.
Unfortunately, lumber is very rarely sold with a quarter finished. Therefore, an amateur craftsman should know the ways in which boards can be modified if necessary.
HOMEMADE DEVICE FOR SELECTING GROOTS
Although the device looks complicated, it is quite easy to make (Fig. 10). Cut the workpieces to size, and then carefully plane the planes and edges. Then select a groove in the fixed bar for the fixed ruler using a few cuts on a circular saw. Then, to ensure a tight fit and square edges, use a sharp chisel to trim its shoulders. The half-wood connection on the adjustable ruler is made so that its upper surface is in the same plane as the fixed ruler.
Mill out all the cracks in the planks and rulers using a ruler pressed to the base of the router (Fig. 8). First, releasing the cutter approximately 3 mm in each pass, mill narrow through slots in several passes. Next, mill out pockets for the screw heads and T-nuts.
Small clamps are used as clamps. The pressure pad is a T-shaped nut at the end of the screw. The locknut prevents the pad from coming loose when it presses against the workpiece. Select the grooves in the adjustable bar so that the clamps can hide behind its edge. Rice. 10
. Device for making grooves.
Hello! In principle, you can put a cutter in a drill if we are talking about a hand router cutter. But the effect will not be very good. I tried to install and process it manually, but the quality of course left much to be desired. And the chuck constantly relaxed and the cutter flew out. I made a special table and installed a new cartridge. The quality has certainly improved, but the processing speed is low and the processing depth is difficult to regulate. In general, you can install it, but there will be some inconvenience and the drill has a small rotation, not for milling, and the motor may burn out!
If the only question is what is possible or not!, then you can certainly adapt the cutter to a drill and you can mill with it, but what the result will be is a completely different question.
At first, the rotation of the drill is not enough; for a clean cut of the cutter, the cut will be torn and unsightly - you will have to additionally process everything with sandpaper, and perhaps there will not be a smooth surface at all, since due to the lack of rotation, wood fibers will be torn out!
Secondly, in order to work with a drill with a mounted cutter, you will need to construct a holder device, because a working cutter will constantly be pulled out of the processing area and it will be very problematic to hold it with your hands!
Thirdly, if it is a large shaped cutter with a significant diameter, then working with such a cutter is not possible at all, and even more dangerous!
In general, the conclusion is this: if there is some rough work, such as cutting or grooves, for example, for a lock or internal parts, then it is quite possible to cope with this work with a drill and a cutter!
Driving screws
You have a choice of mild steel, stainless steel, brass or aluminum screws with straight or Phillips slots and countersunk or pan heads. Semicircular heads stand out clearly on the surface of the wood, countersunk heads are either flush with the surface, or edged with brass washers, or hidden by wooden plugs. The screws are screwed in with a hand screwdriver, a drill with an appropriate attachment, or a screwdriver.
Driving screws with a drill or screwdriver
When using a drill, install the locking mechanism so that the screw is screwed in to the required depth. If the wood is soft, the installation hole can be made with an awl; if it is hard, drill it with a drill of a smaller diameter.
The installation hole can be made with an awl
To be able to hide the screws under the wooden plugs, you will have to drill a hole for the plug with a countersink drill and a corresponding cutter for the plug. Don't use steel screws on oak - they react with the wood and moisture and cause stains. Instead, choose plated steel, brass, or stainless steel screws.