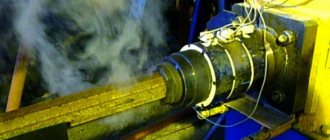
Hanging equipment
To make a snowmobile fast and strong, you need to put a good engine on the frame.
If you install a low-power motor, then such a structure will move poorly. You also need to correctly calculate the caterpillar. If the area is too small, it will sink in large snow and will not pull even on flat terrain. Particular attention should be paid to skis, which should create good stability and safety when moving at high speed
DIY rubber caterpillar
To easily move through the snow, it is very important to give your homemade snowmobile a good rubber track. It is not easy to make such a device with your own hands and it is better to purchase it in a store completely with rollers
Installing a standard factory track on a homemade structure is not difficult. To do this, you just have to secure the drive shaft and rollers with bearings to the frame. If your financial situation does not allow you to buy the entire device, then the most expensive parts can be easily made yourself. For this you will need:
- Conveyer belt.
- Plastic pipe.
- Bolts, washers and nuts.
A cheap homemade snowmobile track is usually made using a thin conveyor belt. To do this, plastic pipe blanks are sawed off to fit the width of the rollers. Then they are cut lengthwise into two equal parts and holes are drilled for small bolts. After this, the halves of the plastic pipes are secured to the conveyor belt with bolts, washers and nuts. The caterpillar is ready and further construction needs to begin.
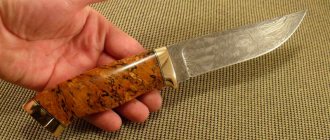
Homemade skis
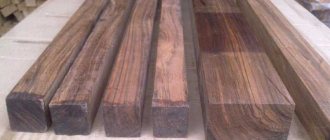
It's no secret that in winter it is much more convenient to travel on deep snow on skis. They also serve well as a control device on a snowmobile. It is not difficult to make a wooden structure, but only strong boards made of birch or oak are suitable for this. They need to be well dried, planed, and then heated and the ends bent. It's no more difficult to make metal skis. To do this, you will need to cut two plates from sheet steel and weld a thin corner on the sides.
In order for the skis to turn freely, metal pipe stands are welded to them. In working condition, they are held in the front bushings of the frame, where they rotate easily.
The steering wheel itself is easy to make with your own hands, or it’s easier to remove it from an old motorcycle. Thus, all that remains is to install the motor, as well as the driver’s seat, and you can hit the road.
Do-it-yourself wooden sled-drag for a snowmobile
It is difficult to make drag sleds from plastic at home. The easiest way to use wood for these purposes. In particular, you will need multilayer plywood and edged boards. To assemble a sled-drag for a snowmobile with your own hands, you don’t need drawings. It is enough to cut a rectangle measuring 3x1 m from plywood. The bottom is formed from it. The edges of the plywood blank are bent and heated in a steam bath.
Wooden drags do not have skis
Skis are not placed on drags. The sled will move through the snow with a plywood bottom. The sides are formed from boards. The plywood is attached to their ends with self-tapping screws. On the inside, the joints are reinforced with overhead metal plates. When finished, the drags resemble a deep wooden trough.
Frame and body
Before work, it is recommended to draw up a drawing of the frame. The structure is welded from a square pipe 25 x 25 mm with a wall thickness of 2 mm. For a payload of over 150 kg, the section size is increased to 30 x 25 mm. The loading area and body elements are covered with plywood. The seats are selected with a hydrophobic coating.
In the center of the fracture frame there is a hinge that allows rotation around a vertical axis. The maximum rotation angle is limited by welding metal plates. The front half is used for steering, and the engine is placed on the rear half frame.
The solid frame is welded in the form of a rectangle, inside of which axles and tracks are located. The engine is placed in front on a special platform, rigidly welded to the rest of the frame. In both cases, the motor is installed in the transverse direction (the shaft faces the end).
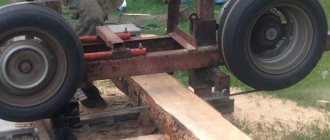
Snowmobile sled. / Siberian hunter
As they say - prepare a sleigh in summer, a cart in winter!)
I rode the first winter, the snow was broken in, and for the next season it was decided to get a sled. I looked in stores and on websites, but I wanted something that was reliable and functional! Having never found anything ready-made, I decided to make it myself. I looked at the forums, various photographs, read and listened to the advice of experienced people, and thoughts began to boil in my head.
I started looking for materials in the spring, the main task was to find a HDPE pipe, there was iron in stock, there was plenty to choose from for cutting and “sewing.” When communicating during the spring hunt, the conversation turned to snowmobiles and sleighs. and I said my thoughts out loud.
As they say, the world is not without good people, so after a few weeks, 7 meters of 230 pipes with a wall thickness of 25 mm lay in the yard, happiness knew no bounds))) The beginning is here! And now summer has come, it’s time to prepare the sleigh!
The piece was cut lengthwise into runners with a jigsaw, into three equal parts, 3 meters long
I cut cross members from short pipes, the width of the snowmobile skis. First I cut out a template from cardboard
and then it was not difficult to mark and cut out the crossbars, it turned out clearly and equally
The following picture was painted
Time passed and summer flew away. the sleigh needed to be jew's harp, and there was a catastrophic lack of time. either a business trip or porcini mushrooms. then the milk mushrooms, the opening for ducks is on the way, the berries are growing warm... and it’s already September. There’s also everyday life, but everyone knows how it happens, it seems like it’s summer, but it’s already autumn, and winter is right here! It’s not for nothing that the proverb says, prepare your sleigh in the summer! I’m a little distracted, but in fact it happened and I’m writing as if in spirit!
The blanks were prepared, the iron was cut, bolts were purchased, and of course the tools. electrodes, grinder wheels, etc. Krail sometimes during the day, sometimes at night. I even thought about taking part in a homemade competition, but I couldn’t meet the deadlines))), this didn’t upset me at all and I moved forward to the best of my ability, Dad supported me, sometimes with advice, sometimes with real help, it’s more fun together!
Much was prepared, the base was assembled, the ends of the skis were bent. a little about bends - I bent them with a hairdryer, this is the most sensible thing, a blowtorch is not suitable in this case, I heated them, bent them, and fixed them with bolts.
How to make a snowmobile
You can make a snowmobile from different vehicles that are in the garage.
From a motorcycle
You can make a snowmobile from a motorcycle using different models. The most popular are IZH and Ural. The advantages of such a rework are that no special changes need to be made. If the product is in good condition, you can even keep the original frame.
The conversion technology is as follows:
- Make a rectangular frame from metal pipes or appropriate corners. Its optimal dimensions are 150*43.5 cm.
- In addition to the IZh motorcycle, it is necessary to make a steering beam. It is made from metal corners. The optimal dimensions are 50*50*5 mm. Additionally, the beam is sheathed with metal plates.
- After this, it can be installed horizontally on the drilling machine. Treat the connection area. Do the same with the frame. In these places you need to make special grooves for reliable fixation. Additionally, attach a corner to the front frame.
- Now you can attach the seat for motorcyclists.
- You need to make holes in the side members.
- A channel must be placed between the front and middle parts of the frame to strengthen the structure.
- Regardless of whether the snowmobile is made from a Ural or another model of motorcycle, it is necessary to select a track sprocket and rubber band in advance. The optimal dimensions are 220*30 cm with a thickness of no more than 1 cm.
- Before installation, it is recommended to cover the track with nylon, which will allow the material not to delaminate during operation.
- Now you can move on to the transmission. It consists of two parts. The first, the front axle, is the drive axle. It is made of a tubular shaft, a track sprocket and a roller. The second is the rear axle. It is made from a caterpillar drum and a tubular shaft.
- You need to complete the snowmobile manufacturing process by welding sheet metal skis.
When converting a motorcycle into a snowmobile, it is important not to change the steering system. In the final product, this part must perform its original functions
The principles of modification are the same, they do not depend on the vehicle model. But the snowmobile from the Ural motorcycle will be heavier.
From Zhiguli
The design of the car is characterized by simplicity, ease of operation and high maneuverability. To make it you need to follow the instructions:
- Frame assembly. It's better to make it from pipes. The frame consists of front and central beams (steel pipes with a diameter of 5 cm), two lower diagonal elements (bent pipes with a diameter of 3 cm) and a rear strut. Welding is used to fix the elements.
- Installation of steering columns. To do this, you need to place two bushings on the front beam.
- Fixing the axle shaft. It is located on the rear frame; first you need to weld the body under it. It is made from a metal pipe with a diameter of 6 cm. Secure the axle shafts using bushings and electric rivets.
- Installing a car engine. First you need to make the front and rear fastening units on the central beam of the frame. First they need to be placed on the engine itself, and only then welded to the frame.
- In a homemade snowmobile, you can install large diameter wheels or skis made of sheet metal. In the first case, the rear and front wheels need to be connected in pairs with a metal pipe. At the same time, make grooves in the hub for the bearings, which are subsequently secured with spring rings. Additionally, install a spacer between the bearings.
- Install a sprocket on each wheel depending on the expected maximum speed. This snowmobile can be used at any time of the year. For a snowy winter, a design in which the front wheels are replaced with skis is suitable.
- Installation of the steering system. It is taken whole from a car, for example, from a Zaporozhets, or a motorcycle. The choice depends on personal preference. In the first case, gas, clutch and brake pedals are additionally installed. The gearbox is controlled using a lever and a rigid rod.
- Installation of a snowmobile cabin, the role of which is played by the car body.
Snowmobiles sold in stores have a fairly high price and often do not fit into the budget. But you still need to move in the snow. Fishing, hunting and just active recreation in the wild require cross-country ability. Therefore, we will look at ways to make a snowmobile with your own hands.
Snowmobile from motorcycle
The first model was assembled at a service station from scrap parts, plus a little welding. The engine is from a Voskhod 1 motorcycle, the sled is welded from metal pipes.
How to make skis at home: detailed instructions
It is not at all necessary to buy ready-made sports equipment; you can make skis at home. Making any skis is not a complicated process; you will need a minimum amount of materials and a little free time.
Wood selection and preparation
Homemade skis can be used by children, adults, hunters, in alpine skiing, and in team sprinting. As for hunting ones, they are wider and do not fall through. With their help they move across any landscape and overcome difficult obstacles.
When choosing wood, you need to decide for what purpose the wooden sports equipment will be used. Durable boards are made from birch and maple, but spruce and aspen help create the lightest possible sports equipment.
It is better to harvest material in spring or autumn. Moreover, the boards should be in a well-ventilated area. In the summer, the bark is removed from the wood and stored for about another year. Drying should not be accelerated artificially, otherwise cracks may appear on the equipment in the future.
Selecting ski size
Choosing your ski size is easy. The greater the person’s weight, the larger the area of the products should be. When manufacturing, you need to focus on the following indicators:
- for a person weighing 60-70 kilograms, the width of the skis should be 16-18 centimeters;
- with a weight of 70-80 kilograms, sports equipment should have a width of 18-20 centimeters;
- with a weight of more than 80 kilograms, the width of the sports equipment is more than 20 centimeters.
What tools and materials will you need?
First of all, high-quality wood is prepared: light, strong, elastic. Homemade products are made from material without rot, cracks, or through knots. Do-it-yourself plywood skis are made mainly for children and infrequent walks in the park.
To prevent the skis from being handed over when climbing a mountain, and the snow not sticking to them, the equipment must be covered with camus, which is made from genuine leather. Horse, deer or elk leather is best suited for this.
You will also need to prepare:
- reinforcement materials;
- edgings;
- wood glue;
- epoxy resin;
- masking tape.
What kind of ski presses are used?
Any amateur craftsman knows that the main element in manufacturing is the press. It is thanks to it that all layers of wood, pre-impregnated with resin, stick to each other.
The material is glued using the following types of press:
- vacuum – vacuum bag technology is used;
- classic – gluing using milled forms;
- pneumatic - a special metal frame applies uniform pressure and bends sports equipment.
How to choose reinforcing materials?
Regardless of the purpose for which the homemade product is used, for sports or hunting, you need to use special reinforcing devices that help increase the strength and rigidity of sports equipment.
Use one of the following materials:
- aluminum alloys;
- aramid;
- carbon;
- fiberglass.
All materials are of high quality, the only difference is that special fabrics work directly along the fibers, while alloys strengthen the skis in all directions. Special rubber bands are often used as fastening. They hold the boot perfectly. This device is inexpensive, easy to use, but it won’t last long. Also, roller skis, which are used to ride around the city in the summer, have gained considerable popularity. In this case, roller fittings are used.
How to assemble a wood core?
How to make skis at home correctly? First, a wooden core is prepared. The part is the last component and is made of wood. Making a part is simple; it is placed in the core of the structure, hence the name of the part.
For the production of cross-country, alpine, and hunting skis, aspen, ash, and maple cores are used. Sports equipment made from these tree species is considered durable and of high quality. They are the ones that can withstand heavy loads. Poplar is suitable for the production of children's equipment, and bamboo will be an excellent additional support.
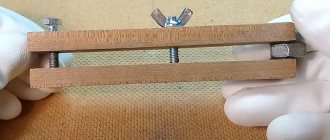
How to make a bend
When making sports equipment themselves, many people ask the main question, how to bend skis at home? The first priority will be to prepare a simple drawing according to the appropriate parameters. To properly bend sports equipment, adhere to the following instructions:
- Wooden blanks are cut into bars, tied at the edges, and a spacer is installed between them.
- The resulting blanks are placed in a warm place for several weeks before being bent.
- When the wood has dried, the outline of the future skis is applied to it. Excess material is removed, and the workpieces are treated with Sherhebel.
- The ends that will bend are placed in hot water for several hours, boiling water is periodically added to prevent the liquid from cooling.
- To get a deep but smooth bend, they are placed in special blocks, where the skis take on the desired shape. They are fixed with clamps or sticks.
- Next, skis for racing or hunting are dried for about 6 days and subjected to finishing.
How to make a snow scooter with a chainsaw engine with your own hands
To make a children's gas snowmobile with your own hands, you can take the motor from a chainsaw. For example, common options:
“Friendship” is simple, the device will be without unnecessary details. At the same time, the weight is 12 kg, and the power is small - 1 kW
Another disadvantage is that there are no safety covers, which is especially important for children. “Ural” - the weight is approximately the same (almost 12 kg), while the power is much greater - 3.6 kW. The engine is two-stroke and works even in cold weather. “Shtil” is a saw of medium power, but it is not so noisy
It does not produce strong emissions, which is also important for children.
Required materials and tools
To make a snow scooter with a motor with your own hands, you will need ready-made structures and installations: a gasoline engine, steering wheel, windshield, seat, chassis, shock absorbers. You can take a ready-made backrest for a snow scooter or make it yourself.
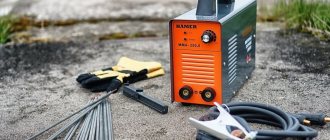
For work you need to prepare the following materials and tools:
- Welding machine with electrodes.
- Duralumin pipe D16.
- Bearings: 2 pcs. 16 mm each, 1 pc. – 10 mm.
- Plugs for plastic pipes – 2 pcs.
- Star element.
- Tracks 5 cm.
- Plywood, plastic or fiberglass (sheathing).
- Steel shafts.
- Pipe for frame with a diameter of 25 mm.
- Aluminum profile (letter “P”).
- Profile steel pipe with a cross section of 20*20 mm.
- Fastening elements (nuts, bolts).
Drawings and assembly diagram of a snow scooter
The easiest option is to take a ready-made children's snow scooter and mount the motor yourself. If you wish and have the necessary elements, you can assemble the structure yourself by taking the engine, steering wheel, making the chassis and other parts. You can take a ready-made drawing as a basis.
When assembling products with your own hands, you must follow safety regulations.
Step-by-step instructions for assembling a snow scooter with a motor consists of the following steps:
- First you need to make a frame. Using spot welding, a steel sheet 2 mm thick is connected in the middle of the entire structure. The chain drive shaft will be mounted here, as well as the gearbox.
- A seat is located in the middle of the frame. You can do this yourself - then you can save money on assembling a snow scooter with a motor yourself.
- The support base is fastened with a beam to the front axle crossbars. A water pipe with a diameter of 15 mm or more can be used as a connecting element. Bushings for the steering wheel are welded at the ends, and a stand is mounted in the middle.
- The next stage of assembling a snow scooter with a motor with your own hands is the stand. For installation, use steel corners with sides of 30*30 mm. They are connected by steel crossbars - 2 mm gussets are suitable for this. The motor will be mounted on this rack.
- The caterpillar is taken ready-made, for example, from the Buran snowmobile. The workpiece needs to be shortened by 50 cm. The caterpillar is secured with transport tape. And the gears are made from cardboard sheets 15 mm thick.
- The drive shaft is made of 14 mm thick pipe. The gears are fixed with the upper flange, and trunnions (tips) are welded behind the drive shaft.
- Now you need to attach the scooter motor. You can also do this with your own hands at home. To do this, take a working unit, weld it and mount it to the rear.
- To make sprockets, you need to take two tips, and the right one should be longer than the left one (to make a keyway that will fix the chain drive sprocket). The sprocket is secured with a pre-threaded nut.
- You can also make the snow scooter's steering wheel yourself. To do this, take a ready-made device from a bicycle or scooter. For proper installation, it is necessary to place it on the central axis so that the traction force controls the skis well.
- At the last stage, you can install a windshield, as well as headlights for illumination at night. It is not necessary to install the brakes yourself for a children's snow scooter with an electric motor or a gasoline engine, since the vehicle does not gain high speed. If necessary, you can always brake with your foot or release the gas.
A finished snow scooter with a motor, assembled with your own hands, is in no way inferior to the factory design
Types of homemade sleds for snowmobiles
In general terms, a sled is a universal vehicle. There are several types, but they all simply attach to any snowmobile. To decide on a suitable model, you need to take into account a number of factors:
- the complexity of the route along which you have to navigate;
- thickness and quality of snow cover;
- terrain features of the site;
- type of cargo transported;
- travel distance;
- driving style.
Initially, it is worth finding the answers to each item. After this, it will be easier to choose a sled for your snowmobile, and all models are divided into three types:
- Volokushi are considered the simplest type of sled. In the factory version, they are often made of plastic and resemble a rectangular trough in shape. The drags do not have skis. While driving, the bottom slips on the snow. The weak point of the drag is considered to be the front part. It is most often destroyed. However, such a product is inexpensive, it is easier to buy it than to make it yourself. The drags are shaped like a rectangular trough, and the bottom is not equipped with skis
- Passenger sleds are extremely rare for sale. This is due to low demand. The design is a covered booth mounted on skis or a skid. There is one or more seats for passengers inside. Advanced models have heating and lighting. In such a booth it is convenient to go fishing together or just relax. Most often, passenger sleds for snowmobiles are assembled with their own hands, which significantly reduces the cost of the design. Their main disadvantage is their heavy weight. You can only attach it to a powerful snowmobile. Passenger sleds are convenient for going fishing or relaxing in winter, but they can only be attached to a powerful snowmobile
- The cargo sled took all the best qualities from previous varieties. They are more resistant to drag due to the presence of skis. With small dimensions, they are lighter than passenger sleighs, although they can withstand several times more load. Due to the presence of skis, maneuverability and maneuverability on difficult terrain are improved. The main purpose of the sled is to transport goods. However, people can ride them with success. Devices in the form of springs are usually installed between the skis and the bottom of the cargo sled to increase the load capacity.
READ ALSO: Step-by-step instructions for soldering polypropylene pipes - DIY for home and garden
Of all the options, the most popular on the farm are cargo sleds. Volokushi and passenger models are used by amateurs for entertainment and recreation.
In the video, a homemade sled for a snowmobile with your own hands in running-in:
How to make a caterpillar attachment for a walk-behind tractor
When assembling a snowmobile with your own hands, special emphasis is placed on the caterpillar track. Let's look at the features of assembling a homemade product: how to make a caterpillar attachment to a walk-behind tractor with your own hands.
Some craftsmen install parts from a walk-behind tractor or make them with their own hands, and those who cannot manufacture them purchase a universal factory caterpillar drive. A homemade caterpillar can be made from:
- bushing roller chain and conveyor belt;
- tires;
- belts
A homemade tracked attachment to a Buran series unit is often found. For such a unit, the entire chassis together with the engine weighs 20-30 kg.
The snowmobile attachment “CAM” for the walk-behind tractor is produced only in Nizhny Novgorod. It goes on 3 rollers and is all-terrain. It can be driven both in snow and mud.
For a homemade snowmobile there is also a prefix “CAM”, only in this case you will clearly need to know the shape and parameters of the gearbox shaft.
Crawler module for walk-behind tractor. Thanks to the wide tracks, this attachment can easily move through deep snow. It fits the Neva, Oka, Tselina, Cascade, Luch walk-behind tractors, and can also be used on walk-behind cultivators with some modification of the seats. In the finished console, you can adjust the tension of the tracks, which stretch when moving.
The driven part attached to the walk-behind tractor is also of no small importance. This is the driver's seat and luggage space
In this case, you can use whatever comes to mind: a board, a stool, a sleigh, a chair, etc. The only important condition when choosing is that the seat is waterproof.
Read also: What is masonry mesh used for?
Ready-made crawler attachment for the Neva walk-behind tractor. There are universal tracked attachments on sale that are suitable for any mini-unit, including the Neva walk-behind tractor. They are easy to assemble and install. Very compact and do not take up much space when stored. The optimal width of the tracks increases the maneuverability of the device. The risk of getting stuck in snowdrifts or mud is minimized. The undoubted advantage of ready-made tracks is their long service life and affordable price.
Cargo homemade sleds for snowmobiles
A special feature of cargo sleds is their resistance to heavy loads. This is achieved by using durable materials, such as metal. Skis are made wide. Due to this, the runners do not fall into the snow. Improves maneuverability and stability when the snowmobile moves at high speed. Shock absorbers are sometimes provided between the runners and the platform frame. They smooth out impacts on bumps. The sled bounces less, which reduces the likelihood of damage or loss of cargo.
Shock absorbers smooth out impacts when riding a snowmobile on uneven terrain, thereby improving cargo safety
READ ALSO: Greenhouses made of metal arcs with covering material
The snowmobile sleds shown in the photo are made from metal with your own hands. The platform is covered with plywood. The sides are welded from tubes. They won't interfere with cargo sleds. It is convenient to secure the transported cargo with straps over the sides.
Homemade motorized dog: technology
Before starting work, you need to prepare all the necessary tools and equipment for the motorized dog. You can learn more about the progress of the work by watching the thematic video.
Preparing for work
To avoid problems with using a motorized dog, it is important to immediately determine its main technical parameters:
- load capacity;
- engine power;
- transmission type;
- engine starting system - manual or electric.
You should also think about additional accessories for the motorized dog - a winch, lighting, protective elements, seats. Then an accurate drawing is drawn up, which will reflect all the nuances. Next, you can order a set of parts for a motorized dog or select them yourself from those available from other equipment.
Required Tools
When working, you cannot do without a welding inverter, a drill and grinder, and a set of wrenches. Also, to install the motorized dog, you will need screwdrivers, a file, and other small tools. The craftsman must have access to lathes and milling machines.
Assembling a motorized dog
First, they make the frame of the motorized dog, which will help secure the engine, gearbox, and chassis. To do this, selected pipes (a beam or channel is also suitable) are welded into a rectangular frame. Then the fastenings for all the important components of the motorized dog are welded. Afterwards you can install the engine.
Making a sleigh
Tools and materials
Once you have decided on the sizes, you can start working.
In order to make a snowmobile sled from PVC pipes, you will need the following tools and materials:
- polymer pipes for sleds (they can be purchased at the store, but you can also use old ones left over after repairing or dismantling an old water supply system);
- a hacksaw or special scissors for cutting plastic pipes;
- apparatus for welding pipes and fittings;
- an industrial hair dryer, with which plastic pipes will be heated and bent;
- sharp mechanic's knife;
- sanding paper, file;
- marker for marking parts;
- bolts and nuts for securing parts;
- metal corners that will strengthen the assembly points.
Operating procedure
It’s not difficult to make a sled from plastic pipes with your own hands. The price of the material is low, which will save a significant amount of money that you would have spent purchasing ready-made models sold in specialized stores.
The manufacturing instructions consist of several sequential steps:
- The first step is to mark the lines on the pipes along which they will be cut . It is necessary to pay special attention to careful adherence to the dimensions, otherwise the sled will turn out asymmetrical, and the work will need to be redone. The ends of the pipes should be fused or connected using fittings. If you are not going to do this, you can saw the ends of the parts at an angle of 45 degrees and fasten the frame using metal corners.
- Considering that the sled, as a rule, has a rectangular shape, the frame will need two long and two short parts . After marking and cutting, the ends must be thoroughly cleaned with sandpaper or a file.
- After this, the frame is placed on a workbench or floor and checked again to ensure compliance with the design dimensions . Then it is welded. If you do not have a special soldering iron, the connection can be made using bolts and nuts. In this case, metal corners are used to add strength.
Advice! Using a welding machine is preferable. With its help, stronger connections are obtained, and it will take less time to work. If you don't want to buy specialized tools, you can rent them from a specialized hardware store.
- To give the frame strength (especially when you are making a cargo sled), it needs to be reinforced with additional cross members . For this purpose, you need to cut several pieces of pipes of suitable length and process their ends with a file, giving them an oval shape corresponding to the diameter of the pipe. Next, they are inserted into the frame in the form of spacers and melted or secured with metal corners. Remember, the strength of the sled will depend on the quality and thoroughness of the frame assembly.
- The next stage is the manufacture of racks . The height of the sled above the level of snow crust will depend on their length. In this case, it is advisable to take into account the following nuances:
- a sled that is too tall will often flip over when turning due to its high center of gravity;
- a platform on low racks will not pass well through deep snow, and the cargo located on it will get wet.
Advice! The optimal height of the sled is from 20 to 30 cm. The racks connecting the frame to the runners should be exactly this length.
- The number of supports depends on the length of the sled, but for strength and reliability they need to be made larger . It is advisable that 6-8 pieces are mounted on each side. They should also be processed with a file (round section) for a tighter fit to the frame. As you work, constantly try on the part to the place where it is welded. The lower part of the racks can be different:
- flat - if you plan to use flat, wide runners (for example, from large cut polymer pipes);
- semicircular - if the runners of the sled are round (from ordinary plastic parts of small diameter).
- After adjusting the dimensions, the runner stands are attached to the frame using a soldering iron or corners . Make sure that they are all installed smoothly, without distortions.
- Now it's the turn of the runners . To do this, you need to decide on their shape. The easiest way is to make round skis from ordinary pipes. However, this option is less comfortable to use, since the sled will often fall through the snow crust and turn poorly.
Why does the rear suspension need modification or replacement?
Whether a snowmobile needs tuning, in particular changes to the rear suspension parameters, is determined by the purpose for which the vehicle will be used.
Are there two types of snowmobile suspensions? connected and unrelated. A connected suspension has two main advantages:
- she shares the toughness;
- controls weight transfer if the vehicle picks up speed.
Often this type of rear suspension is installed in snowmobiles that will be used for sporting purposes or for transporting cargo. This is necessary in order to cope well with sharp turns, strong shaking and frequent redistribution of weight.
Unconnected pendants have their own characteristics. Their front and rear elements are independent. Therefore, if the front part deviates, the rear either deviates only a little or remains in place.
Unlinked harnesses are best attached to snowmobiles that are used in deep snow or have long tracks. They are more capable of increasing traction and also distribute weight well. Also, improving the performance of the suspension may be necessary if the snowmobile engine has been tuned. After all, in order for a vehicle to cope with new loads, a comprehensive modification is necessary, and the suspension in this case? not an exception.
First of all, suspension tuning includes replacing shock absorbers. The main types of shock absorbers for vehicle suspensions:
- simple shock absorber;
- telescopic shock absorber;
- shock absorber for enduro;
- shock absorber for crosses.
In case the main purpose of the snowmobile is? normal riding, then enduro shock absorbers are needed. They are applicable in production 440 Pro vehicles, but the price of such shock absorbers is also considerable. Shock absorbers for tuning sport snowmobiles are often equipped with additional volume gas chambers that allow them to be tuned for specific applications.
Also, the rear suspension often needs adjustment. The choice of adjustment level depends on what kind of physical load is planned for this vehicle, what the weight of the driver and passengers is, how the driver is used to driving the vehicle, what his personal preferences are, the speed mode and the condition of the roads. Each part of the rear suspension is responsible for specific functions. Therefore, in order to know what you will achieve by adjusting the suspension, you need to decide which part needs to be adjusted.
- The job of the rear springs is to ensure smooth movement.
- The purpose of the extension cord? provide reverse movement, taking into account the loads and condition of the snow paths.
- The shackle is adjusted taking into account the condition of the snow path and what the loads will be.
- How comfortable it will be to drive the snowmobile depends on the adjustment of the central spring.
- The tape limiter controls the redistribution of weight.
- Thanks to the shock absorbers, the snowmobile is easy to control and comfortable to ride and sit on.
Design features of the sled
Before you begin design work, you need to understand what basic elements the sled consists of. The fact is that the manufacturing process includes several stages, at each of which some key part is made.
It is necessary that you have a good understanding of the purpose of each of them:
- The main part of any sled is the frame, which is the basic supporting element for the entire structure. It must be as durable as possible, since it depends on:
- safety of operation of homemade sleds;
- duration of trouble-free operation;
- reliability of the device as a whole.
Considering that the snowmobile sled will be used in difficult conditions, the frame must be able to withstand negative ambient temperatures, as well as the impacts that the sled is constantly exposed to when driving through forests or bushes.
Otherwise, you will be unpleasantly surprised when the loaded sleigh falls apart while riding and dumps all your belongings on the snow in the middle of a forest clearing.
- The second important element is the runners. Strength is also very important here, however, another important detail is ease of control. This determines whether the sled will tip over when cornering or not.
The last point is the dimensions of the structure. This parameter is selected individually based on the tasks that are supposed to be solved with its help.
The sled may be small, but maneuverable and light. Or it will be a durable, reliable structure designed to move significant loads. You decide.
Step-by-step instruction
Before starting work, calculations are made of all design parameters, draw a diagram of the snowmobile on a sheet of paper, prepare all the parts and tools:
- wide ski up to 80 cm long;
- two small metal pipes with a cross section of 50 mm;
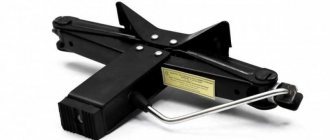
- a small piece of channel;
- a metal plate measuring 25x50 mm, thickness 4-5 mm;
- cameras from a KAMAZ vehicle;
- wrenches of different sizes;
- hammer;
- pliers;
- electric drill;
- welding machine.
The experts have established experimentally that for good performance and stability of the snowmobile, it is better to use pipes with a diameter of 40 mm and a profile of 25x25 mm, with a wall thickness of 2 mm.
Assembling the front part of the snowmobile
It’s best to start by replacing the front wheel with a ski to reduce friction with the snow. Making your own skis is not difficult.
To improve the quality of the structure, it is recommended to make skis from duralumin or chipboard.
- To do this, take 4 pieces of plywood with a thickness of 5 mm. Pieces of plywood are glued together and attached to the steering base.
- Then a spring made of high-strength steel is well secured to the structure. Instead of a homemade ski, an old skateboard or out-of-use factory skis are also used.
- The next step is to remove the front wheel of the bicycle. Then fasten the piece of channel in the center to the prepared ski - this is done using four M8 or M10 bolts.
- Then cut two pieces of pipe of the same size, attach them to the bicycle fork - one pipe for each arch of the bicycle. To make the structure strong, it is better to secure the pipes to the bicycle fork using clamps or clamps - use at least two fasteners for each fork arc.
- The pipes must be fastened symmetrically relative to each other. To make the structure durable, rigidity is added. To do this, through holes are drilled in the middle of the tubes, which are tightened together with bolts.
- The tubes attached to the bicycle fork bars are cut to be 20-30 cm longer than the bottom of the bicycle.
- The ski is mounted with a bracket. To do this, symmetrical holes are drilled on both sides of the channel. At the edges of the fork tubes, holes are made the same size as in the channel - no less than 11-13 mm. The structural element is connected with long M10-M12 bolts.
- To strengthen the frame at the joints of the parts, weld a transverse pipe to the bottom of the steering wheel. You need to attach the ski attachment to the transverse pipe using hinges.
- Using a washer, bushing, steel pin, and two nuts, assemble the hinge joint.
After all the operations have been completed, the ski is already installed on the bike - it moves vertically, which means the descent or ascent is made at any angle, just like on a bicycle.
Installation instructions
Just like when installing soft bindings, the first thing to do is find the center of gravity on both skis. The resulting lines are marked with a pencil. Next you need to start installing the plate. Installation must be carried out so that the front edge of the clamp coincides with the line marked with a pencil. Another important requirement is that the longitudinal axis of the plate and the axis of the ski itself completely coincide. After this, you need to install a bracket under each plate. The kit always contains two brackets, on which there are marks L and R. Each of them has its own lock.
Next, holding the bracket with your hand, screw the plate to the ski. To do this, you can use the screws that are included in the kit (if this is a purchased model). Similar actions are carried out on the second board.
Here you need to pay attention to what material the skis themselves are made of. If they are plastic or semi-plastic, then the holes for the screws should be made as follows:
- The marks are marked using an awl, drilled with a drill, the drill must be of a suitable diameter for the screws.
- The resulting holes are filled with epoxy or BF glue.
Only after this can the mount be installed.
Bindings and poles
For making fasteners
Various materials are used for hunting skis. They can be metal, fabric, leather, canvas or plastic. Each hunter selects the most comfortable option for himself individually. The classification of fasteners depends on the method of their fixation.
There are 4 main types of ski bindings
- Simple
. They are a sock loop into which your foot can be easily threaded. They are chosen most often, since attaching the mount to hunting skis is not difficult, and the diameter of the ring can be changed at your discretion (so that the foot can enter up to the 2nd phalanx on the big toe). - Soft
. In addition to the toe, the heel is also securely fixed. The foot is in a comfortable position, and the person does not experience discomfort when climbing or walking on loose snow. - Semi-rigid
. Semi-rigid bindings for hunting skis are available in the form of a hard plastic base equipped with two straps. One is responsible for fixing the forefoot, and the second – the heel. - Tough
. Used only for snowshoes, since this type of ski binding prevents slipping.
Usually people go on hunting skis in the forest without poles.
As a last resort, they use an ordinary walking staff, which hunters make themselves from durable wood. It helps not only to maintain balance, but also to check the depth of the snow cover.
Ski add-ons
Pads are often called expanders, as they help improve flotation and stability of equipment by increasing the sliding surface area. Their design helps make riding in deep, powdery snow easier, and installation is very simple. Snowmobile owners say that with the presence of wideners, movement through forest windbreaks is noticeably simplified. The pads on the market can be universal or have spouts designed for different models of snowmobiles. Extenders can be:
- for plastic skis. Characterized by a deep central groove;
- for metal ones. The central groove is not as deep because metal skis are not the same size as plastic skis;
- universal. The scope of their application is very wide. They can be equipped with Taiga snowmobiles, as well as vehicles of other manufacturers.
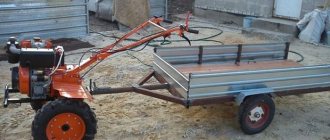
How to make your own snowmobile from a walk-behind tractor
For our country, a snowmobile is the best vehicle in winter. It is characterized by high maneuverability in snowdrifts, as well as good maneuverability. In addition, it has minimal fuel consumption.
You can find snowmobiles from different manufacturers on the market, but they are not cheap, and not everyone can buy them. Craftsmen have gotten the hang of making a snowmobile from a walk-behind tractor with their own hands. This requires the appropriate tools, parts, time and a little ingenuity. The standard kit for creating a snowmobile is:
- frame;
- engine;
- tank;
- seat;
- skis;
- steering wheel;
- caterpillars;
- drive unit.
The steering system of this vehicle is located in front. It is controlled by skis.
Let's look at how to make a snowmobile based on the Neva walk-behind tractor. In order to assemble such a machine, you first need a walk-behind tractor. It acts as a motor. In our country, the Neva walk-behind tractor with a Japanese engine and air cooling is very popular. There are a total of 8 models of this brand. The engine runs on gasoline, the power of which varies from 6 to 9 hp depending on the model. Speeds are switched by a chain gearbox. There are only four of them. The capacity of the fuel tank varies from 3 to 5 liters.
Due to its power, the Neva walk-behind tractor is ideal for conversion into a snowmobile. It is universal, since the engine power is enough to transport bulky cargo or several people. The walk-behind tractor can reach speeds of up to 60-80 km/h. There is a caterpillar attachment for sale for the Neva unit, which can be easily assembled and installed.
Let's figure out how to make a snowmobile for a walk-behind tractor with your own hands. First you need to develop a remodeling plan and clearly imagine what you have to do. The ideal option is to create a drawing from which calculations can be carried out accurately. If you are not good at drawing, then you can find ready-made drawings of previously manufactured snowmobiles, and having selected a more suitable option, start assembling.
For beginners in this business, it is recommended to create a small model that can be made from ordinary cardboard. To imagine a future device, it would be a good idea to consider other people’s already made models in order to have a better idea of the work ahead. There are many homemade snowmobile prototypes on the Internet.
The next step is to make a list of the necessary materials, parts and tools needed for the snowmobile. After purchasing everything you need, you can safely proceed to assembly. In general, it is better to divide the assembly of the walk-behind tractor into several stages, this will make it easier to cope with the task. The workflow looks something like this:
- Making the frame. The optimal solution is a ready-made motorcycle frame. If there is none, then durable pipes are used. Using a pipe bender, you can get a platform of the desired shape and, using a welding machine, connect the ends.
- Mounting parts. A support (bracket) is welded to the frame, to which the walk-behind tractor will be attached. Next comes the installation of the walk-behind tractor, seat and various parts: steering columns, shock absorbers, runners, etc.
You need to be very careful and pay special attention to the size of the parts. They must be executed clearly according to the diagram, otherwise the snowmobile attachment to the walk-behind tractor will be subject to rework due to inaccuracies
Manufacturing process
Let's consider several options for making skis with your own hands. First, let's determine what this part should consist of. Typically, a ski consists of a base, a shock absorber, a link leg, a fork, its rod and a bipod. Also, sometimes an amplifier is welded and an additional ridge is installed.
First DIY option? skis based on plastic linings. To do this, purchase expanders from the store and install homemade connections to the suspension. One of the simplest models of snowmobiles is a mini snowmobile. An old moped is used for it, including the engine and frame with a seat. Any skis are suitable for this option, as the design is lightweight.
The second option is somewhat more complicated. It involves making skis from metal. The required bend is determined by the owner himself. So, initially you will need the following materials: a metal sheet 3–4 mm thick, a piece of hydraulic pipe, a 6 mm pipe for rigidity, a polyethylene pipe with a diameter of 85 mm, bolts, screws, metal for the mounting area, paint. The length of one ski should be calculated taking into account the bend. As a standard, it is at least 1 m. The width of the sheet can be determined as 20–25 cm.
Other options for a crawler snowmobile made from a walk-behind tractor
The example considered shows a snowmobile on one wide track. This model is considered the best cross-country ability in deep snow and difficult terrain. However, there are other homemade tracked snowmobiles made from a walk-behind tractor, which are assembled with your own hands from tractor tires and other materials.
No less popular are models with two tracks, which use the same conveyor belt. The base and tracks are made from it. To do this, strips are cut and secured to the base with bolts or rivets.
If you cut the tread out of a tractor tire, the finished ring will act as a caterpillar. The chassis of a snowmobile uses wheels. They are placed on a walk-behind tractor from a passenger car. The tread from the tire is pulled onto the wheels.
Choosing between homemade and factory options
When it comes to this topic, the root of it lies in a financial problem or the inability to find a particular ski model. It is at this moment that a person thinks about whether he can make the necessary part with his own hands. Homemade options are also offered by craftsmen who easily make not only skis, but also snowmobiles themselves.
Of course, factory parts? this is the standard of quality. They are created for a specific model by experienced specialists, and snowmobiles on these skis are first tested in various conditions. If the car is an expensive sports car, then it is better to purchase components for it from the factory. How to proceed ? Buy a new model in a store or make everything yourself? The choice is up to the owner of the winter vehicle.
There are several manufacturing options: you can use tin, wood, plywood, old hunting skis and snowmobile extensions. [ads-pc-2]
Extender differences
Plastic pads are molded under the skis of a specific vehicle, after which they go on sale under a certain name. They differ in shape, length, width and plastic thickness. Taiga snowmobile extensions can only be used for specific ski models. However, sometimes when buying pads it turns out that they do not completely match the shape of the skis. There are often gaps or bending discrepancies that you can fix yourself. If this is not done, after installing extensions on Taiga snowmobiles, snow may be thrown onto the driver at a speed of more than 40 km/h. Such a defect in the ski lining of the Taiga snowmobile may be associated with a violation of technological cooling. In this case, the problem is easily solved by uniform heating, for example, with a technical hair dryer, after which the overlays are given the desired shape. It is important to let the pads cool.
Given that extenders are created for specific vehicles, it is possible to select imported lining options for domestic vehicles - and vice versa, but it is important to try them on. For example, foreign-made linings are well suited for some Taiga snowmobiles. You can also make your own overlays. [ads-pc-2]