How does a sandblasting machine work?
There is a surefire remedy for surfaces contaminated with rust or paint - a sandblaster. It is universal and is used everywhere: both by auto mechanics and in the home workshop.
However, this machine is highly expensive and it is more expedient and smarter to make it at home, if possible.
Do-it-yourself sandblasting itself requires only a sufficiently powerful compressor, an electrical and crane system, as well as a tank in which the abrasive material is placed, that is, sand or its analogues. To successfully complete this task, you will need to strictly follow the instructions and diagrams.
To store sand, a relatively small container is required. It is quite possible to make sandblasting with your own hands, even from a used empty fire extinguisher. It is worth noting that the sandblasting machine is mainly controlled using a gun.
What can a compressor unit be made of?
The installation uses a number of auxiliary devices. They are needed to regulate the work process and supply compressed air.
Installation design:
1 – pipeline for filling oil; 2 – starting relay; 3 – piston compressor; 4 – copper-plated pipelines; 5 – reinforced hoses; 6 – air filter; 7 – filter for liquids and fuels and lubricants; 8 – suction hole; 9 – pressure control relay; 10 – distributor; 11 – safety device; 12 – tee; 13 – receiver (capacity for accumulating compressed gas); 14 – pressure gauge installed on the pressure reducer; 15 – compressed air dryer (oil and moisture condenser); 16 – pneumatic automatic engine start.
A powerful compressor, capable of creating pressure up to 8...12 bar, can be made on the basis of refrigeration equipment. From a refrigerator that is morally outdated, you need to remove the main unit, as well as auxiliary devices, with the help of which it is easy to organize the switching on and off of the unit.
A compressor unit can be assembled from individual components; they are used to complete the device being created. It is worth considering what and how the structure is assembled.
Sandblasting machine operation
The main principle of operation of this machine is the release of consumables along with air or liquid under considerable pressure. All this works thanks to a compressor and tubes that deliver air or liquid.
The abrasive material coming out of the sandblast easily removes the top layer of the surface you are working with.
Sandblasting machine from a plastic bottle
Creating sandblasting from a plastic bottle does not require too many materials: the basis is a sandblasting gun, which you can make yourself, and a bottle.
As mentioned earlier, a sandblasting machine is used to clean a huge number of types of surfaces from dirt and corrosion, but sandblasting from a bottle is a fairly mobile device that allows you to easily clean small surfaces.
A sandblaster is used to clean most surfaces, but it can also be used to make metal, for example, shine.
Making sandblasting with your own hands from a bottle is not at all difficult. Sandblasting is made from a blowing gun, taps and a plastic bottle of a certain volume you need: a tee is attached to the gun device and the bottle is connected.
It is important to note that you cannot use a metal nozzle, because under the influence of sand it will collapse over time. Connect your device to the compressor and you can start cleaning.
Required Parts
If you have a desire to make sandblasting with your own hands from a gas cylinder, it should be noted that it is no more difficult than sandblasting from an ordinary plastic bottle.
- ball valves in the amount of two pieces.
- gas cylinder.
- pipe, it will be used to fill the reservoir with consumables.
- tee in the amount of two pieces.
- sleeve 15 millimeters in the amount of two pieces.
- clamps.
- tape required for sealing at joints.
Note!
- Do-it-yourself compressor: selection of materials and tools for assembly at home + step-by-step instructions for making and assembling yourself
Homemade products for the garage with your own hands: options for products for arranging a garage, detailed diagrams and drawings for creating with your own hands
- Do-it-yourself press - design features, choice of manufacturing materials. Step-by-step instructions for making it yourself + simple diagrams and drawings
Design and operating principle of a sandblasting machine
Do-it-yourself sandblasting can be assembled based on two design schemes that differ in the physics of supplying abrasive material to the output path. However, they will have almost the same list of significant nodes.
- A compressor is the main device for pumping air.
- A receiver that can be made from a gas cylinder.
- The container for the abrasive material is of a fairly small volume, which is made from a freon cylinder or a fire extinguisher.
- The pistol is the main tool of the installation operator.
- Connecting hoses.
Important! To ensure long-term operation and stable parameters of the abrasive mixture, the sandblasting machine must include a moisture separator. If a piston compressor is used, it is recommended to install an oil filtration system in the air inlet path.
Any homemade sandblaster should produce a stream of air-abrasive mixture at the output. In this case, the pressure circuit uses pressure to supply abrasive to the outlet pipe, where it is mixed with the air flow from the compressor. A household ejector-type sandblasting machine uses the Bernoulli effect to create a vacuum in the abrasive intake path. The latter enters the mixing zone under the influence of the atmosphere.
The drawings and diagram of a homemade sandblaster, according to which you can assemble the device at home, are extremely diverse. The reason is that artisans use what is at hand for their products. Therefore, it is reasonable to consider the general principles by which homemade sandblasting equipment is built.
Assembly steps
Now that you have all the necessary parts, you can begin assembly. Be sure to follow the instructions. For more visual instructions, you can watch a video on how to make sandblasting with your own hands from a gas cylinder:
- Prepare the tank: thoroughly clean it using special detergents to remove dirt and residue.
- You will need to make several holes in the workpiece, one at the top, used to fill the balloon with sand. It is important that the hole matches the size of the pipe. The second is from the bottom, this is useful for connecting taps.
- Install the faucet as you see fit: by welding or by screwing it onto an adapter.
- A tee is attached to the tap. Next, you need to finish everything with a special tape for sealing.
- Now valves and tees are being installed.
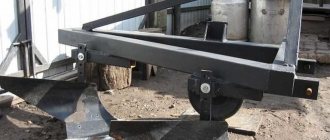
To prevent the device from being bulky and having to be carried manually, you can design a special carrier for it. It can be easily made from various scraps and fittings.
Attach wheels to them and note that this structure must support the weight of the cylinder. You can also see how to make sandblasting with your own hands using drawings.
Finally, channels for transmitting consumables and air are attached to the device.
- A tube is attached to the tap located at the bottom of the cylinder.
- The 15 mm hoses are attached to the tee.
- A compressor is attached to the last hole at the tee.
- Finally, the sleeve with the gun is attached to the last hole.
If you want to understand the assembly process more thoroughly, you can watch a video on how to make sandblasting with your own hands.
How to make sandblasting with your own hands at home: drawings and assembly steps
Sandblasting allows you to quickly and efficiently clean surfaces from dirt and frost glass. The first type of operation is in great demand in small auto repair shops and even private garages.
The problem is that the equipment sets on the market are expensive. At the same time, let’s say a home craftsman has a fairly powerful compressor.
In this case, you can assemble a sandblasting machine with your own hands, using, literally, discarded items and parts that can be bought at any hardware store.
Design and operating principle of a sandblasting machine
Do-it-yourself sandblasting can be assembled based on two design schemes that differ in the physics of supplying abrasive material to the output path. However, they will have almost the same list of significant nodes.
- A compressor is the main device for pumping air.
- A receiver that can be made from a gas cylinder.
- The container for the abrasive material is of a fairly small volume, which is made from a freon cylinder or a fire extinguisher.
- The pistol is the main tool of the installation operator.
- Connecting hoses.
Important! To ensure long-term operation and stable parameters of the abrasive mixture, the sandblasting machine must include a moisture separator. If a piston compressor is used, it is recommended to install an oil filtration system in the air inlet path.
Any homemade sandblaster should produce a stream of air-abrasive mixture at the output. In this case, the pressure circuit uses pressure to supply abrasive to the outlet pipe, where it is mixed with the air flow from the compressor.
A household ejector-type sandblasting machine uses the Bernoulli effect to create a vacuum in the abrasive intake path. The latter enters the mixing zone under the influence of the atmosphere.
The drawings and diagram of a homemade sandblaster, according to which you can assemble the device at home, are extremely diverse. The reason is that artisans use what is at hand for their products. Therefore, it is reasonable to consider the general principles by which homemade sandblasting equipment is built.
What can sandblasting be made from?
To understand how easy it is to make sandblasting with your own hands, it is enough to dwell on the operating features of each structural unit. In this case, the selection of available parts or finished products becomes obvious:
- Mixing unit. Sand for sandblasting and compressed air from the compressor come here from two hoses. The output is a ready-made air-abrasive mixture. In this case, no requirements, for example, the volume of the mixing chamber, are imposed on the unit. On this basis, you can use a regular plumbing tee to make it.
- Control devices. A normal manual sandblaster should be able to adjust the air flow and the intensity of the abrasive material. In this case, no requirements are imposed on the control device. At home, this role is well performed by water ball valves made of steel.
- Connection points. To connect the hoses, conventional fittings are installed on the portable sandblasting machine. They can be equipped with clamps for secure fastening. All these components are easy to buy in stores.
- Receiver. This part of the design is needed to facilitate the operation of the compressor and stabilize the pressure. You will definitely need a receiver if you want to get a powerful sandblast with your own hands. This device can be made from a powder type fire extinguisher with a large housing capacity. Another option is to make a receiver from a gas cylinder.
- Abrasive chamber. The components for its manufacture may differ depending on the type of installation being created. For example, an ejector-type mini sandblasting machine is assembled with a plastic bottle for abrasive. A pressure installation will require a durable container made from a fire extinguisher or a freon cylinder.
Important! The connection diagram for moisture separation and oil collection devices depends on the specific product purchased for this purpose. However, most of the models on the market will only require the manufacture of an outlet from a plumbing tee onto which the hose fittings are mounted.
Algorithm for making sandblasting from a gas cylinder or fire extinguisher
The simplest sandblasting design that you can do yourself is a pressure-type installation . To make it you will need (the principles of selection and purpose of the components are described above):
- ball valves, 2 pcs;
- freon cylinder, gas or fire extinguisher;
- a piece of pipe to create a funnel for pouring abrasive into the chamber;
- tees, 2 pcs;
- hoses with internal diameters of 10 and 14 mm for releasing abrasive and supplying air from the compressor, respectively;
- fittings and clamps for fastening hoses;
- plumbing fum tape for connecting structural elements.
Sandblasting is produced according to the following algorithm.
- The camera is being prepared. To do this, gas is released from the fire extinguisher or powder is poured out, and the contents are removed from any cylinders under pressure.
- Holes are made in the cylinder. From above - for pouring abrasive (corresponding to the diameter of the selected tube), from below - for welding the tap.
- The tap for adjusting the supply of abrasive can be tightly welded into the cylinder. Another option is to pre-install an adapter onto which the regulator is screwed.
- After the tap, using fum tape, a tee and mixing unit are installed.
- A tap is mounted on the cylinder valve, followed by a tee.
The assembly of the main structure is completed by welding wheels or carrying handles. Support legs will also help so that the sandblaster is not only mobile, but also stable.
Sandblasting chamber in a home workshop
A sandblasting chamber is a multifunctional device, which is a container for processing small parts. This container can easily be made from various types of materials: be it wood or various metal scraps.
Note!
- Do-it-yourself winch: classification, manufacturing materials, description of work stages + instructions for DIY construction
- Do-it-yourself clamp - step-by-step production and description of options for using a clamp
DIY knife | A step-by-step description of how and from what materials to make a homemade knife
As a last resort, you can buy a ready-made container in the store. However, it is worth remembering that if you make it at home, you will have to cover it with sheets of steel.
How to assemble a sandblasting chamber at home?
If you often work with small parts, it is recommended to make a sandblasting chamber yourself. For comfortable and safe work with parts in this design, you will need to make protective glass on the top edge of the container.
For greater convenience, you can make it at an angle. Protective glass is extremely important when working with a camera, because consumables flying out under pressure can seriously damage the skin. This is also why you should handle parts strictly wearing safety glasses.
It is impossible to process parts with bare hands in a sandblasting chamber, so gloves are attached to the side edges of the container, and the homemade sandblasting itself, made with your own hands, is carried out and attached inside the chamber.
Gloves and protective glass wear out over time, so it's worth stocking up on them in advance. It is also strongly recommended to choose them from those made from high-quality materials, because this will not only extend their service life and will not distract you during work, but will also protect you from injury.
Note!
- DIY vices: simple and reliable homemade vices from A to Z (190 photos)
- Do-it-yourself vibrating table - selection of materials, components and assemblies for a vibrating table with a step-by-step manufacturing description
- Do-it-yourself grain crusher - operating principle, types and features of creating a device for processing grain crops
Compressor designs for self-production
The main types of air compressors that you can make yourself are:
- Piston - in them the piston makes a reciprocating movement. The operation is controlled by the intake and exhaust valves. Such devices are most widespread.
- Screw - compression and pushing of gas is carried out by two screws that rotate towards each other. The space between the rotating shafts decreases, so the gas entering it is compressed.
- Diaphragm - they have a crank mechanism, it acts on the membrane through the drive fluid. As in piston devices, valves are responsible for the suction and injection of gas. The productivity of such installations is low, although they can create quite strong pressure.
- Gears have a chamber in which the gears rotate towards each other. The compressed gas moves around the periphery. Such devices have good performance, but high pressure can only be developed when working with liquids.
- Rotary-vane - they have a rotor and a stator. The stator is a hollow cylinder with polished internal surfaces. The rotor has grooves in which the plates move. As it rotates, the volume in the space between the moving and stationary elements constantly changes. The compressed gas is pushed into the supply line. So far, such installations have not become widespread. The problem is the seal between the plates and the walls.
Of all types of devices, only these compressors can be used for a sandblaster. In practice, several more types are used, but their purpose is completely different.
How to work with a sandblasting chamber.
Another container should be placed on the bottom edge, which will serve to collect used abrasive material.
Make sure that it is removable, otherwise the camera will not serve you for long. There should also be a hole on the top edge or at the top of the side edge through which air will flow.
It should be placed on the side where your working hand is, because in this case the risk of injury from the consumable is minimized. Please note that a sandblasting machine made with your own hands must fit into a container, and for this you need drawings.
To make it convenient to work in a container, it is worthwhile to provide lighting in it. There are no specific requirements for choosing lamps; you can choose the one with which it is most convenient for you to work. Most often, fluorescent lamps are installed in the chamber.
You will also need to make a hole with a flap or door through which you will supply the parts for processing. Remember that not all sizes of parts will fit in this chamber, and if the part is too large and inconvenient to work with in the chamber, you will have to work with it outside using sandblasting machines. To learn how to make a sandblasting machine with your own hands, you can watch the video.
Alternative manufacturing methods
The many options for homemade sandblasting are determined by the needs of the owners and the different materials available. You can make your own effective installation using products intended for other work. For example, a high-pressure washer unit will help you assemble a dust-free sandblasting machine with your own hands. Below are several working and effective options for homemade installations.
From a pressure washer
You can assemble a sandblaster from Karcher. This car wash creates high water pressure with low water flow. To obtain an efficiently operating dust-free installation, you just need to assemble a special nozzle for the outlet tube. Required:
- a self-made or store-bought ceramic nozzle;
- reinforced hose;
- mixing block, a tee with a suitable fit diameter is suitable;
- feed adjustment unit, cylindrical type dispenser;
- a tube for collecting abrasive, equipped with an air supply path into a closed container with sand or other material.
Water sandblasting from Karcher operates on an ejector circuit. High-pressure water passing through the mixing unit at high speed creates a vacuum in the abrasive supply path. Sand flows in and out with high pressure fluid.
The water sandblaster of this design has some features.
- The flow intensity is high with low water flow. This allows the installation to be used for glass, frosting or other processing.
- For stable feeding, an abrasive of uniform dispersion and small fraction must be used. For domestic use, fine, sifted river sand is suitable.
From a blow gun
Small and efficient - this is how sandblasting from a blow gun can be described. This device will allow you to carry out, for example, body work with fairly high efficiency. However, the performance depends entirely on the compressor used. To assemble the device you will need:
- ready-made pneumatic blow gun;
- plumbing tee;
- ball valve for adjusting the abrasive supply;
- outlet nozzle with clamping nut.
The design is not complicated. How to assemble it can be seen in the next photo.
Either a lightweight powder fire extinguisher bottle or a plastic bottle can be used as a container for abrasive.
Using a spray gun
You can create a homemade sandblast using a spray gun. For this you will need:
- mixing valve from a conventional spray gun;
- handle with air supply mechanism for the spray gun;
- bottle for abrasive mixture:
- tee;
- ball valve regulator.
The operation diagram of the finished device is as follows:
To assemble the structure you will need:
- sharpen the spray gun to use a nozzle of the required dimensions;
- attach the mixing tee to the gun;
- install and secure the supply and circulation hoses.
Important! The supply of sand or other abrasive from the container is started by simply pressing the trigger. The volume of the bottle is enough to treat small parts or surfaces for 20-30 minutes.
Selecting consumables
Oddly enough, ordinary sand is not suitable for a sandblasting machine, because its particles are different from each other, and this can negatively affect the final result.
Too large particles in regular sand can cause serious scratches. The solution to this issue is an abrasive mixture, which can be found in almost any specialized store. They may differ in particle shape and size. All this affects the intensity and quality of processing, but it is worth considering that not every mixture is suitable for very soft surfaces.
Hand-cleaned coastal sand can also be used as a mixture.
As soon as sandblasting devices appeared, it was customary to use ordinary sand for them, because it is one of the most affordable consumables for purchase.
Currently, it is recommended to move away from previous traditions, because the market offers other, more effective mixtures, and besides, sand is quite dangerous for the human lungs.
In some countries of the European zone, the use of this material is even legally prohibited due to the fact that it can cause harm to humans.