How to make embossing with your own hands
Embossing is a type of art when a design or pattern is embossed onto the surface of a metal sheet. The entire process is done manually by a craftsman. The craft of embossing has a long history - many museums store ancient embossed household items and jewelry, icons and sculptures. The art of embossing is not so difficult that you wouldn’t try to do it yourself.
The metal most often used in work
Alloy steel or stainless steel is a difficult material to process, but has many advantages over other metals. Hot rolled steel sheet has different thicknesses. It is most convenient to use 0.5 - 0.8 mm for embossing. Advantages of steel sheet: 1. Beautiful modern material 2. Strength - can be used for large products
3. High corrosion resistance
A popular material is aluminum foil. Pros of use:
- High strength
- Plastic
- Does not require heat treatment
- Easy to mint
- Corrosion resistant
Brass is an excellent material for embossed jewelry and paintings. Its beautiful color looks very advantageous in inexpensive jewelry. Pros of using brass:
- Easy to process
- High ductility
- Possibility of coating with precious metals
- Well polished
Red copper is very often used in the craft of minting, as it has a number of advantages:
- High ductility
- Easily takes on different shapes
- Returns properties after firing
- Ability to roll into very thin sheets
You can also use other materials that can be the highlight of the finished product. It all depends on the idea and skill of the master.
Master class embossing on foil
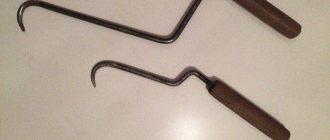
- Embossing is a fairly simple technique that even a child can master, so for clarity, let’s look at a simple drawing made on aluminum foil. Materials required: - aluminum foil - thick backing - a stick with a rounded end (for sushi, for example) - drawing on paper (template)
- - soft lining (for example, a magazine)
We assemble layers of soft lining, foil, thick paper and a template. Using a stick, we begin to draw the contours of the design, pressing the foil. Be very careful not to make holes in the foil. If a hole is formed, the chasing is damaged. We'll have to start all over again. The next step is filling in the background. At the author's discretion, the background can be filled with dots, dashes, waves, etc. Fantasy is our everything. And, of course, we draw internal lines to achieve the volume of the drawing.
Happy minting!
Foil for embossing
Metal chasing is one of the oldest forms of art. The ancient masters of India, China, Egypt and Crete, long before our era, created chased masterpieces: utensils, weapons, jewelry. Embossed images were valued much higher than the vessel or decoration on which they were applied. Master minters had to master their subtle art for a long time, and often, not without reason, considered themselves initiated into the highest sacrament.
The most widely used materials for household utensils were copper and bronze due to their widespread availability. Silver and gold were also used for embossed jewelry and religious objects. Metal coins were also produced by minting. Interest in coinage continued throughout the Middle Ages and the Renaissance. In Asia and Europe, Africa and America, local craftsmen created masterpieces - from cups by Benvenuto Cellini to blackened silver frames of Russian icons.
Currently, embossing, or producing three-dimensional images on a thin sheet of metal, is common in art workshops. As in the past, mastering the subtleties of the craft requires a lot of time and special tools.
To understand whether you have a passion for this type of creativity, it is not necessary to spend years learning and improving your skills in working with metal and professional tools. You can try your hand at embossing and embossing techniques using a sheet of food foil and a simple set of tools - stationery. And after mastering the technique of foil stamping, you may want to master the secrets of the ancient masters of embossing.
DIY foil embossing master class for children
Coinage was done in ancient times and such products were so expensive that only the rich could afford such luxury. Nowadays, not only can everyone buy it, but also make it at home. How? This will be discussed in our article. We will look at a master class on how to make foil with your own hands, which you can hang or place in your home. It is also perfect as a gift.
To begin with, we will look at a simple option for creating coinage.
Let's start simple
In any store you can always purchase ready-made creativity kits. But it’s much more interesting to do everything from start to finish yourself, and also come up with a drawing. All you need is effort and patience.
The following materials will be needed:
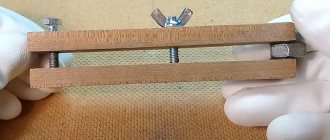
a sheet of foil or an aluminum can; backing sheet for foil
Important: the thicker the sheet of foil, the softer the backing should be. Felt and rubber are suitable as a backing; To apply the drawing you will need a tool
It can be a sushi stick, a brush (its hard tip), a non-writing pen, etc.; a stencil, a drawing template, or you can come up with one yourself; scissors; ruler.
Let's start making coinage. We take the jar. We cut off both bottoms. Now cut the jar from one edge and straighten it to form a sheet. Now use a ruler to straighten the edges and cut them off. The option of using a sheet of foil is not excluded.
Now place the material face down on the backing. The drawing will then appear in a mirror image. Now we put the stencil on the sheet and use a tool to press the picture. You can push either a solid line or a broken line. Now you can make a frame in a similar way.
Every child at least once gave their parents gifts made with their own hands. Undoubtedly, the parents were happy to see the little surprise from their baby. One of the gift options could be embossing for dad. Today we will look at step by step how you can make a cute “Car”.
We will need:
- foil;
- cardboard;
- tool (brush, sushi stick);
- template or stencil;
- backing (it could be an album or felt).
Let's get started. We put the album, the foil on it, and then the template as follows:
Exactly along the contour we trace our drawing with a tool.
After drawing the lines, remove the template and get the following.
Now, using the same tool, we make points around the machine.
Now we mint individual parts of the machine. You can start with the windows.
Now turn the foil over and trace the same part along the contour.
If you turn the work over, this is what you should get:
We then make the remaining parts of the machine according to the same principle.
Now we turn the foil over and trace around the office and parts of the machine with the tool again.
As a result, you get such a wonderful gift for your parents.
Now, back side up, we place our work on the table. Let's take cardboard.
Then place the cardboard on the foil.
We bend the edges.
The gift is ready! If there is a suitable frame, then you can put your work in this frame. For children, the process will seem very exciting, you can be sure. Girls can use the same principle to make a flower for their mother.
Video on the topic of the article
And in the following videos you can watch master classes on creating coinage.
Video Master class Forging embossing Embossing on thick foil video Foil
If you manage to find thick foil (toothpaste used to be made from it in tubes, now some types of perfume products remain), then remember the fascinating technique of embossing. Although in a simple version, it can rather be called foil stamping. Children cope with such work very easily, and the crafts turn out to be unusual and cute.
. everything new is well forgotten old.
Yes, at one time we were taught this technique at Pedagogical School No. 2 of the Moscow City Executive Committee: a tin from a tube, a rod from a pen. And what wonderful work turned out.
LEARNING IS ALWAYS HELPFUL!
beauty! It’s good that there are still people who care and who are passionate about teaching children
Very interesting technique! It’s just a pity that the material for work is not always available.
You can buy foil for thermal insulation of saunas; saunas are sold in rolls, 1 meter wide, 6 - 12 meters long.
Enough for a long time!