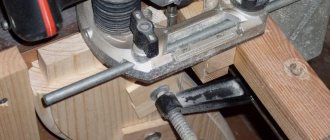
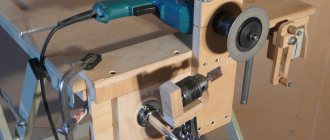
A hand-held electric tool such as a milling cutter can be successfully used to perform various types of processing of wood products. With the help of this equipment and a set of working attachments, you can not only decorate the surface of a wood product, but also qualitatively prepare a furniture façade or door for installation by using a router for cutting in locks, door and furniture hinges. Of course, you can perform the procedure for selecting grooves in a wooden product manually (using a regular chisel and hammer), but when using a router, the productivity of such an operation increases significantly, and the quality of the final result also increases significantly.
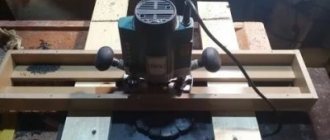
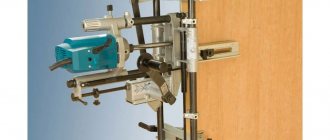
Making a recess for the lock using a router placed on a special device
The essence of the technique
Instead of hollowing out a groove in the wood with a hammer and chisel after marking the loop, we resort to another method. Using a finger cutter , we will make these indentations much faster and more beautiful.
@youtube.com, channel Repairman School
Please note: it is better to make a socket for a mortise lock using a feather drill, without making a face or reconfiguring the router. Next I will describe this technique.
Preparing to cut in canopies
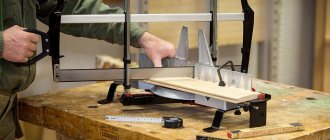
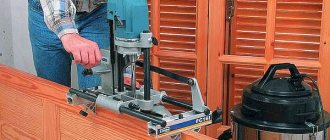
Cutting canopies with a router
This procedure is the most common and is used both when replacing an old door and when installing a new one. In addition to the cutter, you will also need an ordinary carpenter's ruler, as can be seen in the video.
At the first stage, it is necessary to mark the frame for the existing hinges of the interior door so that the adjustment takes place quickly and correctly. The position of the hinges should be adjusted taking into account the least likely distortions when opening/closing the door. Marking can also be done using a special template that you can make yourself. Sometimes an unnecessary fragment of door molding, the dimensions of which coincide with the dimensions of the door frame, is also adapted to the template.
First, one of the edges should be trimmed. The marked square is installed on the outer sides of the door and strips of adhesive tape are glued in the necessary places - they will serve as a kind of limiter for the movement of the router.
Recess for the locking part
Before embedding the lock into the interior door, mark the selected height on the door. Make this more convenient using a tape measure. We place a mark at the end and transfer it using a square or building level to both sides of the door leaf.
- Take the lock/latch and apply it to the end of the door so that the middle of the lock falls on the drawn line. We mark the width of the metal locking part and the level at which the lining ends.
- We take a 16 mm feather drill and apply it to the part of the lock that will be inserted into the door leaf. Using a marker or masking tape, or a piece of electrical tape, make a mark on the drill. This mark should be slightly further than the lock. We will use it to guide us to what depth to make the holes. This is especially important if the lock is installed against glass. Otherwise, you may drill too deep and damage the glass.
We put a mark on the feather drill - this way we will control the drilling depth - Having installed a feather drill, we make several holes one under the other, forming a recess for the lock. The number of holes depends on the size of the lock. In some models 4-6 are enough, in others you will need 8-10.
- The edges of the holes were uneven, and the wood had lifted in places. We take a chisel and remove the protruding wood fibers from the edges, working lightly and in depth (but don’t get too carried away).
The edges turned out uneven, remove the protruding fibers using a chisel - We take a regular 16 mm drill and put it in the drill. Use it to align the edges of the hole made. To do this, move it up and down, pressing lightly on one side or the other of the notch. This operation is needed to speed up the process, but the drill must be strictly controlled. If you are unsure, it is better to level the notch using a chisel and mallet.
Leveling faster with a drill - Insert the lock into the resulting hole. It is usually a little larger, so there are no problems. If necessary, using a chisel or drill it can be increased to the desired size.
- We set the lock to the desired position and attach it to the door leaf using two self-tapping screws (one at the top, the other at the bottom).
How to embed a lock into an interior door: modifying the recess - Using a pencil or a utility knife, trace the perimeter of the lock lining. We remove the lock, take a chisel and remove 1-2 mm of wood, MDF or veneer inside the markings made.
Don't miss: What are side doors: their advantages and disadvantages
The depth of the recess for the locking part depends on the thickness of the decorative strip. Usually they try to make sure that the strip is flush with the end of the door, but it may protrude a little. Shoot little by little as you work—it’s easier to edit it than to try to restore what you shot.
We put the handles
To finish installing the lock on the interior door, you need to make holes for installing handles. The work is much less than what has already been done, but accuracy is required. Mistakes are not too critical, although it is better to try to avoid them.
The handles come complete with self-tapping screws for wooden doors and tie bolts for installation in a metal door. It is better to replace the self-tapping screws from the kit - they are usually made of soft metal. Unless you bought a branded foreign lock, in which the screws are hardened. And so, buy several good screws with a diameter of 1.5-2 mm and a length of about 1 cm.
- We take the lock and apply it to the side surface of the door, matching the height.
- Using a pencil, marker or awl, we make marks through the slots for installing handles. We make marks on both sides of the door
- We repeat the operation on the other side of the door leaf.
- We install a crown or a feather drill of a suitable diameter on the drill. Place the center of the drill/bit at the marks and make holes. An important point: we do not drill through, but from both sides, towards each other. That is, as soon as the drill falls into the recess made for the lock, we stop the work and start from the other side.
- We remove the shavings from the recess for the lock, put the lock plate in place, and secure it with self-tapping screws.
- We loosen the clamping screws on the handles - the central rod should “move” freely, and install it in place.
We install and secure the handles - Align and fasten with self-tapping screws. It is better to pre-drill holes in veneered doors.
- You just need to tighten the fastening screw that connects the two handles and the lock cylinder. They are usually located on the underside of the handle. Take a screwdriver and tighten the screws on both handles. Installing decorative trims
Some models have decorative overlays. We align them using a square.
Installing the lock latch
Locks for interior doors usually have a rotating latch on one side that locks the lock, and on the other side there is only a lining with a slot. That is, you can’t just open the door from the outside—you need a special key. Installing this part of the lock takes literally a couple of minutes, but there are some nuances.
- We take the central part, which is inserted into the lock. We insert the side where there is no slot into the cover without a handle, insert this structure into the lower hole from the outside.
How to embed a lock into an interior door: installing a lock retainer - From the side of the room, we put a cover with a wrap on the pin.
- Tighten the clamping screw (before securing it with self-tapping screws).
- We fasten with self-tapping screws, if provided for by the design, and install decorative overlays.
That's it, inserting the lock into the interior door is almost finished, all that remains is to check the work.
Mate insert
The counter part must be installed clearly so that the doors do not play and there are no problems with closing. Therefore, we try to mark as accurately as possible and take a sharpened pencil.
- We close the doors so that the latch tongue rests against the jamb. Mark the position of the latch with a pencil (top and bottom).
- Using a triangle, we draw horizontal lines along the marks.
- We measure the exact distance from the edge of the door leaf to the middle of the lock. The middle of the lock is the middle of the tongue or the center of the fastening hole. The middle of the castle is easy to find
- On the lines marking the position of the tongue, we mark the measured distance (we measure it from the bar against which the door leaf rests). Draw a straight line through these two points. This is the marking for installing the lock mate.
- We take a 14 mm drill or a feather and drill a hole in the jamb according to the given marks. The depth of the hole is slightly greater than the length of the tongue.
- Use a chisel to straighten the hole. We check the holes according to the marks and refine it with a chisel.
- We close the doors, checking whether the tongue fits normally. If you pull the closed door towards you, there should be a small gap - a couple of millimeters - for installing the adjusting tongue on the trim. If necessary, adjust the hole.
- We put the strike plate in place and screw it on.
- We close the doors and check for play. If there is one, we remove this play using the adjusting tongue. Near this tab there is a slot for a screwdriver. We insert a screwdriver into this hole and press it a little. We close the doors and check. Repeat until the backlash disappears.
Removing the backlash of a closed door
You know everything about how to fit a lock into an interior door. The description takes up a lot of space, the process itself takes 25-30 minutes if you’re doing it for the first time. It will take more time if you level the holes with a chisel rather than with a drill. But the total duration will still not be more than an hour.
Sources
- https://stroy-podskazka.ru/freza/dlya-vrezki-zamkov/
- https://mobilspecstroy.ru/mebel/podbiraem-instrumenty-dlya-vrezki-zamkov-v-mezhkomnatnye-dveri
- https://molotokmarket.ru/stati-instrumentah/kak-vybrat-frezer/
- https://www.stroyportal.ru/articles/article-obzor-shablonov-dlya-vrezki-petel-i-zamkov-v-mezhk-11272/
- https://stroychik.ru/dveri/ustanovka-zamka-v-mezhkomnatnuyu-dver
- https://BurForum.ru/elektrooborudovanie/frezy-dlya-vrezki-petel-i-zamkov.html
[collapse]
Post Views: 5,266
Marking for loops
I will not describe the making of templates for marking, since the hinges on different doors may differ in size and geometry. Therefore, we do this: we measure from the upper end of the fabric from the loop side down along the standing side one and a half times the size of the loop . Let's say, if the loop has a size of 120 mm, we retreat 180, and do the same with the lower canopy.
If there are three hinges (and this also happens when the door is quite massive), then the third canopy is placed according to the same pattern. It should be located at the top one and a half sizes from the top overhang, and not in the middle of the height of the door. Master this simple diagram so you don’t get confused with sizes and distances in the future.
@youtube.com, channel Repairman School
The markings on the door frame are done like this. After it has been assembled in rough form, it is placed on a level place. Place the door leaf in it so that the gap at the top is about 2-3, and at the bottom - 7-8 millimeters , since the door tends to sag slightly on the hinges. This rule is especially relevant if the box has a threshold. On the sides, the gap between the canvas and the box should ideally be five millimeters on both the lock and hinge sides. Outline the position of the hinges on the end of the box (with the door inserted into it).
After the marking has been applied with a pencil, I strongly recommend that you lightly walk along its contour with a chisel . This will greatly simplify the task during subsequent sampling. Pay special attention to areas where the chisel is located across the grain of the wood (if wooden doors are hung).
@youtube.com, channel Repairman School
Attention! Don’t hesitate to fit the door into the dimensions of the frame! This advice is especially relevant if the door suddenly turns out to be not perfectly rectangular. It happens, take my word for it.
How to choose the right hand router
When choosing a router that you plan to use for inserting locks and hinges, as well as a device for any other purpose, you need to pay attention to the following parameters of such equipment. To perform not too intensive and not too complex work in a home workshop, low- and medium-power milling cutters are quite suitable, which can also be used for mortising door locks. More powerful devices, which are used mainly in the professional field, although capable of coping with more complex tasks, cannot provide the high rotation speed of the tool used
In addition, as power increases, the weight of such power tools also increases significantly.
More powerful devices, which are used mainly in the professional field, although they are capable of coping with more complex tasks, cannot provide a high rotation speed of the tool used. In addition, as power increases, the weight of such power tools also increases significantly.
To perform not too intensive and not too complex work in a home workshop, low- and medium-power milling cutters are quite suitable, which can also be used for mortising door locks. More powerful devices, which are used mainly in the professional field, although they are capable of coping with more complex tasks, cannot provide a high rotation speed of the tool used. In addition, as power increases, the weight of such power tools also increases significantly.
Ability to adjust tool rotation speed
The presence of such a function allows you to optimally select modes for each of the technological operations performed by the milling cutter. Of the manual routers that have this option, it is better to choose models whose speed switch is protected from external mechanical influences and contamination from wood dust and sawdust. In addition, it is better to give preference to models with switches that operate on a discrete principle.
The amount of overhang of the working part of the tool above the end of the chuck
It should be borne in mind that the most important parameter is the actual overhang, and not the maximum tool stroke length, which is indicated in the marking of each model.
The longer the cutter overhang, the less you will have to drill the groove to install the lock.
To assess this parameter, you should take into account several characteristics of the device, such as the weight of the router, its functionality, the convenience of the location of equipment controls, and the length of the electrical cord. Not only the user’s comfort, but also the quality of the processing performed depends on how convenient it is to use a hand router.
Quality of view of the working area
This parameter is ensured not only by the design features of the router, but also by the presence of special lighting in its equipment.
Milling unit equipment
The functionality and ease of use of the equipment largely depend on this characteristic. That is why, when purchasing any router (including for inserting hinges), opt for models equipped with various holders, additional attachments and other elements.
When choosing a router, you must not only hold such a device in your hands, but also be sure to turn it on. This way you can evaluate how freely and easily the working head of the equipment moves, test the moving elements of the milling cutter for the presence of play and distortions in them, and determine the level of noise emitted by the device during operation.
A useful addition to the router is a device for cutting hinges and door locks
By following these simple recommendations when choosing a hand router, you can purchase a device that will suit you both in terms of its technical characteristics and ease of use.
Lock markings
Immediately estimate the height at which it would be convenient for you to place the door handle. For some it is better to take 80 centimeters from the bottom of the door leaf, for others it is better to raise it to a meter. a handle height of about 90 cm is usually comfortable . This is where we start when marking.
We place the mortise lock on the door frame so that its bar is flush with the end of the door. Mark with a pencil the point where the handle will be located.
@youtube.com, channel DIY apartment renovation (Remontkv.pro)
Next, insert the door leaf into the latches with the lock side up. We apply the strip to the end, outline it, making sure that it is attached to the door evenly, without distortions. After this, use a chisel to carefully knock out the outline around the perimeter of the marking. To clearly determine the seat for the lock, I advise you to make auxiliary vertical markings on the lock end of the door , finding the middle of its thickness, as a rule, this is 16-20 millimeters . It will come in handy when drilling a socket with a feather drill.
Price
The cost of installing a lock on an interior door is constantly changing (they can change throughout the year). This, first of all, depends on the company that will do the cutting. If you take a wooden door, then the prices for inserting locks into it range from 1000 to 3000 rubles.
An insert into a PVC door costs a little more, from 1500 to 3000 rubles (and this is not a guarantee of 100% quality).
To install a lock in a door, you first need to buy this lock. To choose the right lock, you need to know two parameters: the width and thickness of the vertical bar of the door. If the thickness is less than 40 cm, then there is no point in embedding the lock.
Locks come with handles and without handles. If the choice fell on the first option, then first the lock is cut into the door, the next step is installing the handle. Stores also sell latch handles. And although they are structurally quite simple, cutting them in is not so easy - this process requires experience and the necessary set of tools.
Well, the choice has been made. Let's move on to installing the lock.
Installation of the locking mechanism
The door lock is usually cut into the center of the left or right door strip, so you need to measure 1 meter from the floor surface and mark the place where the door handle will be located. Drill a hole for the lock mechanism. The diameter of the drill must be equal to the thickness of the lock, the length of the lock must correspond in size to the depth of the hole. Using a chisel, we knock out a platform for installing the support plate for the lock. Drill a hole for the handle. We install the lock and mark the place for the screws. We make holes and secure the lock with self-tapping screws.
Handle attachment
To attach the handles on both sides of the door, you need to install the linings and secure them with self-tapping screws. We check the operation of the lock and handles. The process of installing the handle is not complicated, but it can only be used for doors that are made of wood. A lock can be embedded into a wooden door absolutely anywhere, but doors made of steel or MDF require a completely different approach.
To insert a lock into an MDF door, you will need experience and theoretical knowledge, since such a door has an additional wooden beam, which is located at a distance of 1 meter from the floor. The rest of the door is completely hollow. Without knowing this feature, you can try to embed the lock above or below this beam, which will damage the door. Therefore, it is better to entrust this to experienced craftsmen.
To install a lock in metal doors, you need to contact a highly specialized company, such as ours. Trying to do everything yourself will lead to wasting your time, breaking the lock, and damaging the door. We don't think you need such expenses.
Lock mortise process
Using
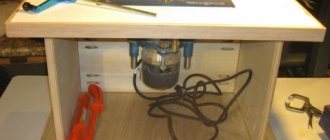
a router
The lock can be inserted using a router. For insertion, a submersible universal milling cutter is used. Most people associate the word “milling machine” with some kind of large machine, but it is a small and convenient manual machine. It allows you to make grooves, grooves, align edges, cut profiles, and all this without the use of special and expensive equipment.
Briefly, the lock installation process looks like this:
- We mark the place for the castle.
- We make a recess with a router.
- We drill holes, remove excess wood, clearing the area for the lock.
- We install the lock and handles.
Without
a router
If a router is not available, then you can install the lock without it. Although, when inserting a latch lock, you will still need a cutter.
Fashionable interior trends dictate their conditions, thanks to which people began to change both entrance and interior door leaves more often. At the same time, their replacement is associated with certain costs, the lion's share of which goes to pay the workers who will install the door. An obvious solution to the problem would be to install it yourself, but this requires skills and special tools. For example, to carefully cut into a locking device you will need a cutter; we will talk about this in more detail later.
Hinge sockets
Let’s make a reservation right away: I assume that the reader has worked at least a little with a hand router and at least knows how to turn it on, adjust the speed and raise/lower the cutter. So, we take an unnecessary block, adjust the output of the cutter to the depth of the loop from the router support and try to select a small fragment from it. We make the fragment size such that it is possible to measure the depth of recessing of the loop. Guide the router in the direction of rotation of the cutter - this makes it much easier to work.
@youtube.com, channel Repairman School
We tried it on, figured it out - let's get down to business. Having made sure that the canvas placed in the clamps with the loop side up does not dangle, we select the mounting socket for the loop using the markings. Then we try it on so that it fits the dimensions and is completely recessed into the mass of the canvas.
Advice: if you don’t have enough experience, make a couple of test canopies, all on the same unnecessary block. This is a very worthwhile investment of your time and effort.
When hanging on a box, instead of a block, take the scrap formed during its assembly. The fact is that the selected quarter on the box, or, as it is also called, the fold, will not allow you to place the router platform directly on the plane where the hinge will be located. The milling cutter will have to be reconfigured. You’ll see exactly how when you start twisting a piece of the box in your hands.
I recommend: in order not to reconfigure the router several times, first hang hinges on all door leaves (if there are several of them), then start fiddling with the boxes .
Cutting holes
You can use a straight mortise bit to cut holes in wood pieces. If the hole has a complex shape, then it is cut with a router according to a pre-prepared template using a copy ring. The latter is attached to the base of the milling cutter and, when the unit is operating, sets the movement of the tool in the desired direction.
So, to cut a hole in a wooden piece, you need to perform the following operations:
- secure a straight slot cutter in the collet of the machine;
- attach a copy sleeve to the router sole;
- place the workpiece in which you want to make a hole on the workbench;
- place small pieces of chipboard under the workpiece to slightly raise it above the table (this is required for the tool to come out when cutting through the part);
- place the template with the already prepared hole on the workpiece and press both parts to the table with clamps;
- set the minimum value of the cutter overhang (about 3 mm) relative to the base of the device;
- turn on the router and carefully lower it onto the template so that the cutter gently enters the material;
- mill along the entire perimeter of the template;
- lower the cutter another 3 mm and repeat the above operation;
- Continue adding 3mm depth at a time until the cutter goes right through the workpiece.
In the same way, you can cut a round hole according to the appropriate template. But in order to cut a circle in a workpiece, there is a much simpler way. Most models of routers already include a compass device. It consists of a rod with an adjustable (pointed) screw on one side.
The rod is attached to the sole of the unit, and a pointed screw is inserted into a hole that serves as the center of the future circle. Next, you need to set the desired radius taking into account the diameter of the cutter. The following figure shows how to correctly calculate the radius of a hole.
Milling is carried out in the usual way in several stages, each time deepening the tool by 3 mm.
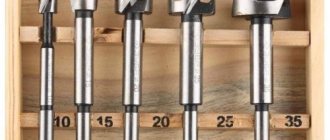
You can also use a router to drill holes, for example, for installing furniture hinges. This is done as follows.
- Clamp a Forstner drill of the required diameter into the collet of the unit.
- Set the spindle speed to minimum.
- Place the router on a flat surface.
- Lower the cutter so that the spike in its center does not reach the table surface 2-3 mm, and fix the drive on the guides.
- Next, lower the depth stop onto any step of the turret stop and secure it with the locking screw. Thanks to the depth limiter, the cutter will not be able to drop below the required level.
- Remove the drive lock so that it can move freely up and down along the guides.
- The center of the future hole should be marked on the workpiece.
- Place the router pad on the workpiece and lower the cutter so that the tenon located in its center exactly hits the intended location on the part.
- Raise the cutter slightly above the workpiece, turn on the unit and, after reaching full speed, smoothly begin to plunge the tool into the material until the depth stop reaches the stop. At this point the drilling operation can be considered complete.
Before drilling on a workpiece, you should perform the same operation on some unnecessary piece of wood or chipboard of similar thickness.
If you need to make a through hole, then it is not necessary to install a depth stop. For a “clean” cutter exit on the back side of the workpiece, drilling must be carried out in 2 stages. At the first stage, the cup drill is immersed into the workpiece until a small hole from the tenon is formed on its reverse side. Next, the workpiece is turned over, the drill spike is installed in the resulting hole, and further drilling is carried out. This way, the edges of the hole on both sides of the workpiece will be smooth and without chips.
Castle part
First of all, you need to select and prepare a feather drill. The diameter should be 2-4 mm larger than the thickness of the embedded part of the lock. It’s better to give a larger margin: it’s difficult to ideally hold the drill perpendicular to the end of the door; there will probably be a small error due to the fact that the drill may twitch slightly along different fibers . To ensure that the hole does not turn out to be too small, or, conversely, too deep, we wrap the perk with electrical tape at a level slightly larger than the dimensions of the recessed part. Markers and pencils are not very suitable for marking as they wear out quickly.
@youtube.com, channel DIY apartment renovation (Remontkv.pro)
After the nest is ready, we are not in a hurry to choose a recess for the cover. Firstly, we check whether the lock fits into the socket , and secondly, we set up the router on the block. And only then we select the recess.
The hole for the handle is drilled last. And then after we once again assessed the lock against the main frame and made sure that we had not made a mistake with the preliminary markings. Again, take a drill with a diameter of 12-16 millimeters - the handle will block the hole, and no one has canceled the error in measurements.
A common mistake is that the mating part of the lock on the frame is marked until the door is already installed and the mounting foam has dried. Don't do this! The answer will take its position only after installation, so do not try to calculate or guess it. There is no need to rush here, otherwise, most likely, you will have to interrupt it in place - for some reason the lock tongue will not fall into the slot intended for it.
Source
Fitting
- The next step will be trying on the lock. It should not dangle in the groove.
- Now trace with a pencil the front lining of the lock inserted into the finished recess.
- Use a chisel to cut away any excess wood from the inside of this outline. This item is considered completed provided that the lock escutcheon exactly coincides with the plane of the door end.
- After this, you can finally insert the lock and secure it with screws through the holes made.
Adjusting the strike plate
- Insert the cylinder, screw it with the bolt from the kit and make sure that the product functions well. The key should turn without effort. If so, you can secure the handle.
- Next you need to apply something to the latches that leaves marks. After closing the door, turn the key so that marks remain.
- Drill holes along these marks and level them with a chisel.
- You have finished cutting the lock into the wooden door. The last thing you need to do is prepare the hole for the strike plate, align it and tighten it with self-tapping screws.
There is nothing impossible; it is easy to embed a lock with your own hands, provided that you strictly follow the instructions. The only difficulty is that the grooves are perfect, however, if you use a router, it will be easier for you.
Instructions for installing hinges in interior doors with your own hands
Author of the article: Alexandra Ivanova March 18, 2021
Door hinges are an important element of an interior door, on which its functional purpose and correct opening/closing depend. The most popular are mortise hinges. By following the instructions and recommendations of experienced craftsmen, you can install them yourself.
Additional tools and recommendations for them
To install a lock on an interior door, you must use a tape measure. It helps to accurately measure the required distances. In addition, useful devices will be:
drill with a diameter of 0.2 cm.
In some cases, a hammer drill can be of great benefit. It is needed to level and enlarge the opening. Using a hammer drill, holes are drilled where the anchor dowels will be placed. When purchasing or renting a screwdriver, you should find out whether the necessary attachments are included in the kit. If you have to process hard-to-reach areas, unravel platbands or trims, sometimes you need to prepare an electric jigsaw.
When choosing pencils and markers for marking the canvas, you need to avoid buying products with very hard rods. They will leave traces that will be extremely difficult to get rid of. To more accurately measure all dimensions, you need to use a tape measure with a tape 3 or even 5 m long. A caliper will help you determine how deep you need to cut the lock. To more accurately orient the locks, eliminating distortions, you need to use a bubble level.
But since the locks are usually installed on a small part of the door, you will have to use a steel ruler. It is much stronger than wood and plastic and can withstand even accidental impact from a tool. Using metal test squares, angles are measured. This device is also needed to tune an electric instrument. You definitely need to prepare a set of screwdrivers, especially since it will also be useful when installing hinges.
You should also prepare: a mounting gun for supplying foam, chisels and peaks for the hammer drill, files for a jigsaw.
How to embed a lock into an interior door yourself, watch the video.
Features of working with different types
Installation differs depending on the type of fittings. Types of mortise hinges :
Detachable hinges are easier to install, since the two parts are installed separately, after which the door is hung. This type is used when you have to frequently remove the interior door, for example, when moving furniture. Divided into left and right. When purchasing them, you must take this point into account. Detachable hinges require clear markings, without the slightest errors.
It is more difficult to install a universal hinge, since the hinge is fixed to the box after the second part is secured to the canvas. Therefore, the door must be held in weight or use stops. This type is one-piece. If you need to remove the door, you will have to unscrew the hinge.
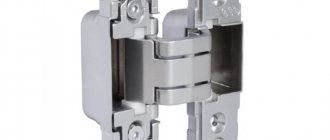
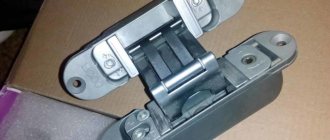
According to the installation method, mortise hinges also include hidden hinges. It can be difficult for a non-professional to install them, because the body with a hinge is placed inside the canvas. Using a router, a deep seat is made. Installation requires extreme precision.
The best edging routers
The edging or edging router is designed to:
It is possible to perform engraving operations. The accuracy of work and productivity are affected by tool power, frequency and speed control.
WORTEX MM 5013-1 E – inexpensive
The tool performs operations on the surface of wood, plywood, and laminated workpieces. The design allows for adjustment of the immersion depth, which ensures precision and accuracy of the processing process. The cleanliness of the work area is ensured by a connected vacuum cleaner.
INGCO PLM5002 – for private workshop
The universal small router processes edges and chamfers wood, plastic and composite materials. Milling is carried out on a vertical, horizontal, inclined or shaped surface. Long service life is ensured by the power of the electric motor. A milling depth limiter is provided. Equipped with a parallel stop.
HAMMER FRZ 710 – for small businesses
Quite lightweight, equipped with a powerful engine, the trimmer is used for precise work on milling grooves, grooves, and boring edges. Performs operations on profile and copy processing of wood and drywall. The design provides the “Soft Start” function, adjustment and maintenance of a constant speed when the load changes. It is possible to use collets of three sizes.
MAKITA 3709 – optimal for a private master
A compact, lightweight, vertical edging router is used for boring grooves of any configuration, making through and blind holes, and shaping edges and chamfers. Capable of working on wood, drywall, ceramic tiles and composite materials. This is facilitated by the high spindle speed and a fairly powerful engine. Convenient for installation work when installing interior doors.
Dewalt DWE 6005 – easy adjustment
Trimmer for engraving, copying, chamfering and edge shaping. The ergonomic design creates comfortable conditions for carrying out technological operations with wood, plastic, and composites. The design ensures smooth start-up, speed control, and maintenance of selected parameters during the processing of the workpiece. It is completed with a copier on bearings and a stop.
Bosch GKF 600 – long life
A small compact trimmer for milling work on wood, plywood, chipboard, MDF, plastic blanks and composite materials. Performs the entire list of technological operations, including engraving and decorative formation. It features a high-quality electric motor and an effective ventilation system, which contributes to long-term operation of the tool. Good additional equipment allows you to get started right away.
Tools for insertion and how to work with them
To insert hinges into an interior door, the following tools are required::
Professionals prefer to use templates and a milling machine. This equipment makes the work easier, and the result is an even selection for the loop map.
Many masters use Pavel Soldatov's template . The procedure for setting it up:
A plunge router is used to cut the hinges.
If you don't have a template, you can do without it. In this case, the location of the loops is marked, outlined with a sharp pencil and cut with a knife.
It is preferable to use a small router bit, in which case you will need to cut less material by hand in the corners of the recess.
Work progress :
After installing the card on the canvas, move on to the box. The location of the loops is transferred to it. To do this, the canvas is combined with a loop beam, taking into account the upper gap of 3 mm. A mark is made. Having attached a loop to it, circle it around the perimeter and cut it with a knife. If the stand is flat, without a protrusion, then there will be no difficulties when working with a router. The sampling is done in the same way as on the canvas.
If there is a protrusion (thrust quarter) on the hinge beam, then it will interfere with the operation of the router ; the sole will lie on the plane with only one side. In this case, some wizards offer the following method:
Which router is better to buy for your home?
If you plan to work on wood without excessive loads, it is quite enough to purchase an entry-level model. In addition to saving money, the relatively low weight is useful, which simplifies handling of the equipment. But you should correctly assess the significance of larger investments when purchasing professional-grade equipment. With this choice you can count on the following advantages:
The presented rating of the best routers for professional work and at home is recommended to be used taking into account the characteristics of future operation. The distribution of positions in the list is made on the basis of a comprehensive technical analysis after studying customer reviews and evaluation by professional experts.
Source
Manual method
If you don’t have a milling machine, you can cut in the hinges manually by making a cut using a chisel and hammer.
Marking
The location of the upper and lower hinges is marked on the door leaf.
To do this, use a tape measure or ruler to measure 20 cm from the top and bottom edges. To avoid mistakes, craftsmen draw an arrow indicating where the loop will be directed from the mark. The arrows are directed towards the center of the door end. Place the loop map against the mark and trace its outline with a sharpened pencil. The hinge part must not touch the door leaf.
It is not recommended to simply measure the length and width of the card and draw a rectangle with this data on the end, since the card may not have a strictly rectangular shape - it may be beveled or trapezoidal.
The loop will fit perfectly into the groove made along the contour. In order not to confuse the loops during installation, they are signed with a marker B (top) and H (bottom).
Inset
The hinges are cut in stages:
Installation
Having screwed one part of the hinge to the door leaf with self-tapping screws, proceed to inserting the other part into the hinge beam. Different masters carry out this stage in different ways.
What types of locks are there for MD?
Taking into account the insertion, use and other parameters, locks are:
Flat. They have a rectangular frame and tongue that are separate from the locking latch. They also have a push handle (halve). Such designs are very reliable.
Flat lock
- Round. In such mechanisms, the cylindrical body, latch and tongue are connected. The shape of the handle can be arbitrary. In such devices, the stopper and the cylinder are embedded in the spindle.
- Small flat with a rotary handle. No latch provided;
- round with a knob handle.
Round castle
To install a lock, you need to know the thickness and structural features of the door. Modern MDs are:
- with MDF 3.5 or 4.5 cm wide;
- New type wooden MD with a width of 5 cm;
- Wooden fiberboard door with an old design (with a plank frame).
Installation of the device in the MD can be done without outside help, but to do this you need to know the design features and operation of the lock.
Flat
These locks are the most expensive. They are more difficult to install, but they have good burglary protection. They load the door leaf (DP), so it is better to install them in an existing door.
Only a small flat lock can be installed in MDF panels with a thickness of 35 cm. Also suitable for them are locks with a wide tongue of about 1.5 cm. The width of the end is a maximum of 2.4 cm. This limitation is explained by the fact that only a wooden frame can withstand the load created by the lock.
MDF door
Choosing a tool
Let's start by choosing a suitable router. Today, models are produced that have different purposes and, accordingly, bear different names:
In general, if you need a router for inserting hinges, both the first and the third model will do. But keep in mind here that submersible models are highly specialized. At the same time, combined ones are more likely to be considered professional. Having more weight, they are more difficult to set up.
If you do not have experience working with routers, then it is better to use a regular plunge router
Therefore, if you do not have experience working with milling cutters, it is better to give preference to a standard submersible one - there will probably not be any problems.
Using a template
The procedure in question is also carried out with a special template. You can get it yourself as follows:
- First, the offset of the cutter is measured.
- You can determine the dimensions of the template for insertion using conventional measuring tools.
- 2-3 passes are performed.
- This step produces a finished hole.
After receiving the special element in question, you can embed the hinges using other various tools.
In conclusion, we note that the process of cutting hinges with a router is carried out to obtain a high-quality niche. The features of the tool can significantly speed up the process and reduce the likelihood of serious defects. By using special attachments, you can significantly expand the capabilities of the device.
If you find an error, please select a piece of text and press Ctrl+Enter.
Main settings
Once you have decided what type of router you will use, it is also a good idea to decide on a specific model. Each of them has a number of important factors.
One of them is power. Everything is quite simple here. The higher the power, the larger the layer the cutter can immediately remove. Therefore, experienced professionals usually buy powerful milling cutters in order to quickly cope with a large amount of work. But for a home craftsman, a tool with medium power is better suited. After all, you have to pay for power - such models cost much more, and even have more weight. Often, beginners, when they pick up a powerful router, simply cannot handle it and damage the work surface. Therefore, there is no point in chasing high power.
It is also worth paying attention to the presence of a speed control function. And here it is advisable not to save money - take a model with this function. Thanks to this, it will be possible to select the optimal speed mode for performing any job. Select a high speed for roughing and a slower speed for fine finishing. Then the result of the work will be more accurate.
Some models have a backlight function. This is not a waste of money at all - if you work in low light conditions, it can be difficult to get the job done really smoothly. Therefore, it is definitely worth investing in a tool with such a function.
A backlit router is often needed when working in low light
The remaining functions (unless you are a professional choosing a universal tool) can be considered unnecessary, increasing the cost of the router and the complexity of working with it.
Finally, it wouldn’t hurt to simply hold the router in your hands, weigh it, estimate how ergonomic its handles are, and whether it will be convenient to work with. Be sure to make sure that the model you choose is not too heavy for you. Otherwise, when using the tool, you will not concentrate so much on the work as on not dropping the router.
The best professional routers
This category contains models designed for heavy loads. To extend the service life, this equipment is equipped with effective protective devices. A solid safety margin of individual components prevents damage. Manual milling machines in this category are highly powerful and suitable for processing metal and ceramic workpieces. Extended equipment helps you perform complex work tasks accurately and quickly.
Which router is better to choose? In any case, it is necessary to clarify the features of the operating mode. A particularly important parameter is reliability. For a correct assessment, it is recommended to check the configuration of the compared models, protective and auxiliary functions.
Makita RP1801F
Due to its sufficient energy potential, a professional milling cutter can be used to create recesses in solid workpieces. The powerful engine operates without overload, ensuring optimal thermal conditions are maintained. At relatively low speeds, large cutters can be used. This is useful for delicate processing of products with low heat resistance. Careful assembly ensures minimal play.
Pros:
Minuses:
BOSCH POF 1400 ACE
Using this router, it is equally convenient to create standard recesses for hinges and complex threads with a unique pattern. The proprietary Fine Depth Control adjustment system ensures processing accuracy with an error of no more than 0.1 mm. Engine speed is maintained automatically using an electronic control circuit. Stability is maintained even with significant voltage drops in the power supply network. A special fastening system allows you to securely fix and dismantle the copy sleeve without additional tools. To immediately lock the rotation, you can use a large button, which is located in a convenient place for the user on the right side of the case.
Pros:
Minuses:
DeWALT D 26204 K
A good router performs its functions without excessive noise, quickly and accurately. Uniform illumination of the work area simplifies the processing of workpieces. Speed adjustment allows you to select the optimal mode of rotation of the cutter. Correctly balancing the motor armature prevents excessive vibration. Smooth start-up extends the life of the router. With the light weight of the tool, it is not difficult to perform long and complex technological operations. The efficient sawdust removal system ensures a clean and comfortable environment.
Pros:
Minuses:
Setting up the router before work
In many ways, the ease and quality of work depends on how correctly the router for door hinges is configured. So, before you start cutting the grooves for the door hinges, you need to do certain things. The most important thing here is the depth to which the cutter will cut into the surface being processed. It depends on the thickness of the hinges that will be installed on the door. Therefore, it is advisable to already have them on hand in order to be able to correctly configure the router.
All work can be done in several stages:
As you can see, there is nothing complicated here - every beginner can cope with this work.
Conductor for inserting locks Gidmaster pitfalls
Attracts with its affordable price compared to Virutex. From 10 to 12 thousand rubles. However, the conductor is not universal. Used only as a template for inserting locks.
Moreover, all work will have to be done with a drill. It is extremely inconvenient, the speed is too low, you can damage the door - you often end up with chips and torn edges on the door. Especially if it is covered with enamel.
- An obvious drawback is that it is difficult to set the size correctly.
- Works only with cutters with threads on the collet.
- It is impossible to embed hinges, strikers and crossbars.
Installing hinges with a router
To carry out the work, the home craftsman will only need the hinge router itself, as well as a pencil, felt-tip pen or office cutter - any tool that allows you to leave marks on a wooden surface will do. However, if you do not have jewelry precision, then it would not be a bad idea to stock up on a well-sharpened chisel and a small hammer.
Before starting, be sure to mark the loops with a pencil or felt-tip pen
The entire process of making grooves with a milling cutter occurs as follows:
At this point, the work can be considered complete - all that remains is to insert the hinges into the prepared grooves and securely fix them with self-tapping screws.
The article was prepared with the information support of the Multicut company https://www.multicut.ru/catalog/frezery/ milling and engraving machines from the manufacturer.
Source
Overview of species
A set with a router may contain a cutter, which is equipped with protectors and rods for performing the same type of work. The convenience of a manual router is that, if necessary, you can buy various types of sets of wood cutters that cut the required holes quickly and easily.
There is a huge range of cutting tools available for sale. They can be purchased at specialized construction stores or at the construction market. According to their purpose, cutters are divided into groups. For example, a spiral cutter will be needed to make a round hole in an interior door for mounting a handle. The classification is truly impressive; there are even devices for making lining.
According to their design, cutters are divided into the following types:
- with replaceable cutting edges;
- monolithic;
- prefabricated
Grooved
Based on the name, it is not difficult to guess that the main purpose of this cutter is to make grooves on wooden surfaces. You can also make recesses, grooves and recesses using a groove cutter. To embed a locking device into interior doors, you will have to use this particular type of cutter during the work process. For the best quality of work, you will need a groove cutter that is ideal in length. It will help to make the optimal recess at the end of the door.
There are 3 types of slot cutters:
- structural – will help to make such types of connections as “swallow tail” and “P” type groove hole;
- straight – mainly used in processing straight grooves;
- fillet – produces decorative carvings.
To produce grooves of different sizes, it is necessary to change the equipment to a larger size or adjust the router.
Edge
An edge cutter is used for making various carved elements and patterns on the area of the material being processed; it will also help in making the edges of products.
There are 4 types of edge cutters:
- straight – used in work using templates;
- edge cutter with a disk shape - this type has high accuracy and is used when making rebates;
- horizontal edge cutter – used for decorating edges;
- shaped type of edge cutter - will help in processing baseboards, facade frames and panel edges.
Almost always, this type of equipment is equipped with a bearing, which allows processing of ends and edges.
Curvy
Figurine cutters are used for cutting out various decorative elements on furniture and doors. Milling cutters of this type are equipped with a bearing - this allows you to work not only with straight workpieces, but also with a curved edge, which is very convenient.
There are 2 types of figurine cutters:
- horizontal;
- vertical.
In turn, the horizontal view is divided into 2 more types:
- one-sided;
- double sided
The difference between the devices is that single-sided cutters process the edge on only one side. Double-sided ones are designed for simultaneous processing both from above and from below. Vertical figurine cutters are used for deep milling of panels and are used to create skirting boards.
Top rating templates for inserting hinges and locks into interior doors
Door hinge installers need to have a set of good construction equipment. Along with the usual set, they use a template for inserting hinges and locks. A milling device is needed when installing door hardware.
Why do you need a template for a router?
To buy a template for inserting hinges and locks, you need to study their types and operating features. In fact, there are only two types of them.
Below we describe in detail the pros and cons of each tool for installing hinges and locks. Based on the professional opinion of installers of interior doors, we will draw the right conclusions and reveal the whole truth about templates for inserting locks and hinges.
What template do professional craftsmen choose for inserting hinges and locks?
Qualified installers meticulously select the right tools from the variety offered. They know that the slightest mistake will ruin expensive doors and they will have to pay for them.
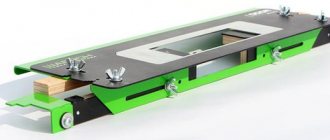
Carriage for the UVK-Profi router.
The market leader among templates for inserting hinges and locks. Surpasses similar construction equipment in cost, service life, convenience and functionality. Produced by the domestic company Master Profi, which produces professional and amateur tools for inserting fittings into interior doors. They know what is needed for precision when installing fittings.
Material used in the production of ufk-porfi: processed duralumin, structural textolite, polyacetal, capralon, hardened 16 mm stainless steel shafts are used to move the matrix, the vice is made of 8 mm steel shafts. using trapezoidal thread.
Linear bearings are enlarged, closed type, made in Germany. Plastics and other fragile materials are not used in the tool for installing hinges and ufk-pro locks.
This tool is capable of installing any fittings, even those that have just appeared on the market. The work with it is so precise that it seems as if the fittings were installed at the factory.
Advantages of the ufk profi fitting template:
Built-in template vise, designed with two independent elements, support and clamping vise are adjustable independently of each other. This makes it possible:
The UVK-Profi universal carriage for inserting hinges is worth buying because it is recommended by all experienced specialists. They always use the best tools in their work.
Numerous positive reviews indicate that the UVK-Profi tool for installing locks and hinges has established itself as the best universal template, which has no analogues in the quality of insertion, ease of use and reliability. Customers note that door hardware is installed in a matter of minutes.
Compared to similar tools, the UVK-Profi carriage is much cheaper, but it is lighter, more functional and more convenient to use.
Website of the official manufacturer where you can buy a template for inserting hinges and locks: https://master-profy.ru/ Address: M.O. Balashikha microdistrict Kuchino st. South house 9. Opening hours: Weekdays from 10:00 to 20:00, weekends from 12:00 to 18:00.
Video review and instructions for working with the tool. Information taken from the official source of the manufacturer:
Virutex hinge template
One of the analogues with a factory insert. Unfortunately, it has a number of negative aspects:
In general, there are positive reviews. The result is a high-quality and even insert.
Template for inserting Gidmaster locks
Compared to the previous model, this jig for inserting locks is a fairly cheap option (around 12,000 rubles). But it is far from universal and is only useful when working with locks. Yes, and the insertion is only possible with a drill.
Before purchasing this model, it is important to consider that:
Templates for a router with inserts and copy sleeves
Templates for inserting hinges and locks with replaceable inserts are more suitable for amateur use. But the work will take a lot of time, because there are many configurations and sizes.
In this case, you will have to spend much more money than planned. Purchasing a minimum set that is suitable only for 5 types of hinges, locks, hidden hinges, latches and strike plates will cost 15,000 rubles. For a standard set in which you can embed 30% of the existing fittings, you will have to pay at least 25,000 rubles.
Today, the complete package of inserts includes over 200 pieces. The cost of each insert is 300-500 rubles. not counting the price of the base itself for inserts and copying sleeves, all this pleasure is estimated at over 65,000 thousand rubles.
The high cost of a kit with which you can work is not the main problem with templates for an insert-based router.
Insert templates have their disadvantages:
The number of required inserts is updated every month. Old inserts for fittings that are no longer in demand will need to be constantly updated and new ones purchased. In some video reviews, door installers said that they had 300 pieces. inserts with a total weight of 40 kg. And every year there are more and more of them.
The best inexpensive routers for home
Using the models presented in this section, furniture is repaired, original structures are assembled, and creative design projects are implemented. A good hand-held wood router performs its functions flawlessly. Such equipment is suitable for equipping a home workshop. It can be used to perform individual professional operations.
KRÜGER KR-1650
The Kruger KR-1650 manual electric router is used for processing edges, drilling holes, and cutting grooves. The tool has a fairly high power of 1650 W and a good speed of 160,000-30,000 rpm. A spindle lock is provided to simplify the replacement of equipment. There is a connection for connecting a vacuum cleaner, thanks to which you can keep your workplace clean. The Kruger router comes with 12 cutters, spare brushes for the motor and a ruler-copier for creating recesses of the same size. The manufacturer also has a model of the Kruger KR-2400 milling cutter with a power of 2400 W. It costs a little more, but has increased performance.
Advantages:
Kolner KER 1200V
With a maximum milling depth of 50 mm, the user can use the turret step-by-step mechanism to complete multiple passes correctly. To create identical recesses, a copy insert is useful. The spindle lock makes it easy to quickly replace the cutter. It is not difficult to take into account the characteristics of the material by adjusting the rotation speed in a wide range from 15,000 to 30,000 rpm. Timely removal of sawdust will ensure that the vacuum cleaner is connected through a special pipe.
Pros:
Minuses:
Hammer FRZ1200B
Attentiveness is a clear sign of good quality. Users note:
This inexpensive router is comparable in cost to the installation of one interior door. According to user reviews, similar actions can be performed independently, even without professional skills.
Pros:
Minuses:
Bort BOF-2100
The most powerful router in the review is suitable for professional use. This technique can be used to process materials that can be damaged by thermal deformation. The lower setting level (up to 8,000 rpm) eliminates overheating of the workpiece. The engine develops sufficient power with collets up to 12 mm. The soft start system prevents unnecessary loads and damage to workpieces, and extends the service life of the vertical router.
Pros:
Minuses:
Wert EVR 1450E
Rounding out the rating of budget devices is a multifunctional router that can fully replace cutters, jigsaws and drills. The Wert EVR 1450E model is lightweight (approximately 3 kg), which allows you to perform work without unnecessary stress. This technique is suitable for making furniture, processing construction parts, and creating decorative elements. The standard equipment includes spare brushes for the electric motor, two collets, a rip fence and a copy sleeve. This vertical router is prepared for immediate use without purchasing additional components and technological devices.
Pros:
Minuses:
Recommended Procedure
In order for the process of inserting loops to go without complications, you need to establish a procedure and follow it.
Masters advise to act according to the following plan:
- Prepare materials and tools.
- Decide on the direction of opening the door and the presence of suitable hinges.
- Make the correct markings. First - on the door leaf, retreating 20 cm from the top and bottom.
- Attach a loop and trace along the contour. Cut with a sharp knife and make a cut with a router or chisel and hammer.
- Place the hinge card into the recess and secure with self-tapping screws.
- Applying the canvas to the vertical beam, make markings on it, taking into account the upper gap of 3 mm.
- Make a selection for the hinges on the box in the same way.
- Deepen the hinges and secure with self-tapping screws.
Calculation principle
For example, there is a 16 mm straight cutter and a 30 mm diameter copy sleeve. It is required to make vertical holes for round bench stops with a diameter of 21 mm. Substituting the values into the formula, we find the size of the circle cut out in the template:
D = 21 + 30 – 16 = 35 (mm).
Mark the plywood and make a hole with a drill bit of the appropriate diameter.
Sand the edges and surfaces with sandpaper.
Use one piece of plywood for several templates at once. Just don’t forget to label the holes, indicating the caliber of the cutter used and the diameter of the circle being cut.
Inset
The hinges are cut in stages:
- Use a sharp knife to cut the outline. If the coating is laminate, then it is removed with a chisel inside the cut out contour. It turns out to be a small step. Then, when working with a chisel, the tool will not come off; it will be buried and rest against the step.
- If veneer is glued, then it is carefully removed from the area under the hinge. If you do not cut through it first, then when working with a chisel, you can unwittingly damage the veneer in adjacent areas and accidentally tear it off.
- In order to find out the depth of the future groove, place the loop card sideways to the end and draw a line with a pencil, noting the thickness. It is to the thickness of the metal that the recess will need to be made.
- The chisel is placed against the edge of the recess, resting it on the “step”. In this case, the short side of the working part is directed towards the material being produced. By hitting with a hammer, the material is sampled to the required depth.
- After making the sample, attach a map and use an awl to mark the locations of the screws. In this case, the center is slightly shifted in the direction opposite to the loop cylinder. Later, the screw with its head will move the loop towards this edge and the loop will fit most tightly.
- Use a thin drill to drill holes for the screws. It is not recommended to screw them directly into the door, as the door leaf may split.
- When placing a hinge in a gap, many craftsmen advise not to bury the card flush, but to leave a protrusion of the card of about 0.5 mm. This is done so that the door can be adjusted during installation by recessing the hinge a little deeper and leveling the gaps.