Many woodworkers dream of buying the perfect tenoning device for a router in order to quickly and accurately make straight or dovetail tenons. These factory fixtures can do much more than simple box tenons. One example is semi-blind spines (pictured on the right below). Such a device will perform any semi-blind dovetail connection. So what if
If you are familiar with how a conductor works, then you are on your way to mastering this technique. Using the proposed templates in the set, you can make any semi-blind connection and it works in much the same way as in a typical box - only with slight differences. But today, let's look at how to make a device with your own hands that will help you make simple box tenons.
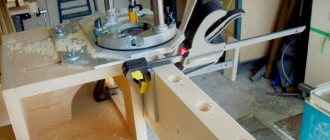
Tenoning attachment for a router with a constant size.
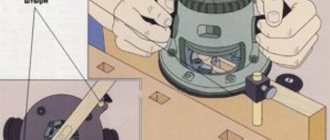
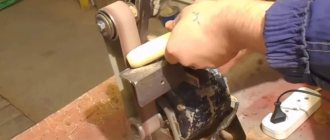
Every carpentry workshop simply needs to have a tenon-cutting device for the router for making tenons of different sizes. When making such a device, you need to understand that it, in this case, is made for one specific size of spikes. It's not difficult to make and it will work like a clock. The necessary parts are guides for making tenons; they are installed on opposite sides of the device body in a checkerboard pattern and at the same distance from each other. A cutter with a thrust bearing is inserted into the hand router, which follows the shape of the guides. If the guides are cut to the same size and evenly mounted into the body of the device, then the tenons will fit together perfectly. These studs measure 7/8″ wide and the stud height is 3/4″. Before making tenons, install the router and cutter on the router table. Note: A situation may arise when a cutter with a thrust bearing is not available, then a guide bushing for the router will correct the situation. Securely secure the device itself with clamps on a 15″ long board.
Tools used
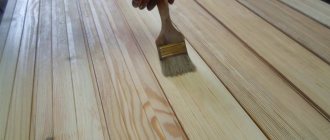
The creation of tenons and grooves, with the help of which the connection of two wooden blanks will be ensured, involves taking a sample of material on the side surface of a beam or board using a hand router. In this case, all geometric parameters of the elements of the future connection must be strictly maintained.
To perform this operation with a hand router, you can use tools with shanks with a diameter of both 8 and 12 mm. The most universal in this case is a groove cutter, the cutting part of which works as follows:
- the lateral surface forms the walls of the groove and the sides of the tenon;
- the end side processes the bottom of the groove and removes a layer of material of the required thickness from the base of the tenon.
Cutting a tenon with a mortise cutter
Thus, using a tool of this type, it is possible to form both a tenon and a groove on the side surface of a beam or board. Moreover, their sizes can be adjusted within a fairly wide range.
In cases where higher demands are placed on the reliability of the connection of wooden parts, the grooves and tenons are made not of a rectangular shape, but of a shape called “dovetail”. Grooves and tenons of this configuration are created using dovetail cutters. It is also possible to perform the procedure for forming grooves and tenons of this shape with a manual milling cutter, but for these purposes you should use devices of a different design.
Dovetail sampling using a template
So that the question of how to make a groove in a board or beam or a tenon on their side surface does not cause any particular difficulties, it is better to use a power tool equipped with comfortable side handles, a wide guide sole and the option of protecting the spindle from turning during the process of replacing the cutter. In addition, it is desirable that such equipment have a side stopper, due to which the overhang of the cutter used with it will always remain constant.
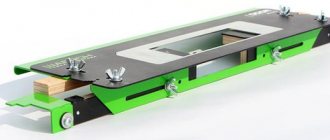
Adjustable tenoning jig for router.
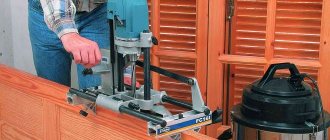
How to make grooves in the body of a device for a hand router at ideally equal distances from each other and the same size? We can say that this is a common operation in woodworking and a router is the ideal tool for the job. The grooves can be located widely, as in the example in the photo, or they can be located very close, like box tenons. It doesn’t matter for what purpose the grooves are located, the main thing is that the grooves are evenly spaced - parallel to each other, at the same distance and with the same width. To do this, you need to make a simple device consisting of a piece of MDF on which the router is attached. Such a jig can be made to fit one size or with the ability to adjust the distance between the grooves, as shown in the photo below.
Making complex corner joints
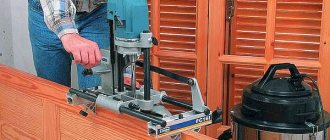
A comb-like metal plate with two clamps and a special routing device for cutting grooves is all the equipment needed to make corner joints on a straight open tenon or dovetail. Working with such a device is extremely simple: the cutter enters the part with such precision that even beginners can make tenons flawlessly.
Both types of tenons are cut out on the two parts to be joined in one step. The parts are secured with offset metal clamps on both sides.
The lateral edges of the parts are shifted by the width of one tenon to the left or right. If a corner connection is made on a straight open tenon, then both boards are installed vertically. To make a dovetail joint, one board is installed vertically, the other below. at right angles to the first board.
The cutter is guided along the metal template from left to right. It is necessary to ensure that the cutter teeth do not touch the template itself.
Using a milling device and a template, you can process two boards up to 28 cm wide in one go. The thickness of the board for making a corner connection to a straight open tenon should be from 16 to 20 mm.
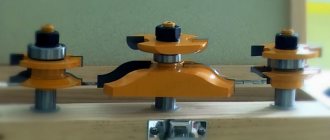
dovetail cutter
The metal plate serves as a template for processing parts with a milling cutter. Two side clamps securely secure the parts and template to the workbench.
The thickness of the tenons when connected to a straight open tenon is 10 mm. The spikes are distributed depending on the width of the board.
Both parts are secured offset along the side edge. Spikes are performed within one minute.
How to make templates with your own hands
The pattern is a flat part. Its dimensions are selected taking into account the difference in the radii of the cutter and the copy ring.
Ready drawings
There are many patterns posted on the Internet for different tasks and sizes of the copy sleeve. Most publications are provided with formulas into which you need to substitute the dimensions of your workpiece. All that remains is to calculate the dimensions of the template, draw it on graph paper and transfer it to sheet material.
Drawing of a copy sleeve.
Examples of drawings are shown below.
What you need
Stencils are made from the following materials:
- tool steel (the most durable option);
- duralumin;
- plastics;
- plywood;
- plexiglass.
Sheet thickness – from 2 to 10 mm.
Tools needed:
- drill with a set of drills;
- jigsaw or hacksaw;
- file;
- grinding wheel.
To make stencils you need a drill with a set of drills.
Manufacturing process
Proceed in this order:
- Draw the outer contour of the groove on the sheet stock.
- Calculate the difference between the diameters of the cutter and bushing and divide it by 2.
- From the drawn outline, retreat a distance equal to the number obtained in step 2 and draw a parallel line.
- Cut out a template using it.
- File and sand the edges of the product.
A curved template is cut in this way: first, a series of small holes are drilled along the contour, then the material between them is removed with wire cutters or another suitable tool.
Main types of nozzles
A cutter is a rotating part that is dotted with teeth over its entire surface. Such elements can be found in different configurations. Using a cutter, you can process not only wood, but also plastic or metal, but they are still usually used for wood.
There are the following types of products:
- End.
- Edges.
- Grooved.
It should be noted that it is worth periodically applying lubricant to the support bearing. Thus, the parts will last much longer.
End mills
This type of part works not only because of the use of axial load. Such cutters involve the use of side edges, which makes it possible to move the cutting element within the support area. The result is neat selections that are formed in the tree.
The number of cutting edges may vary and this will affect the cleanliness of the cut. Typically, this type of attachment has a monolithic design, but there are also crown attachments that are used for wood drilling. This option should be used in a situation where there is no router at hand.
This category has several varieties:
- Spiral.
- End
- Burrs.
- Conical.
- Profile.
- Spherical.
End ones are used to form grooves that have different configurations and sizes. They can be used not only for processing wood, but also to create a groove/tenon.
A profile cutter can perform certain tasks:
- End processing.
- Creation of grooves with a rather complex configuration.
- Decorative design of ornaments.
Wood edging
Edge cutters for hand routers represent the largest group and are most often used for hand tools. They are used to make edges on wood. This option is often preferred by home craftsmen, since even in the largest sets the bulk of the parts are edging attachments. It is much easier to purchase such a set of cutters than to select everything separately.
This variety includes:
- Profiles, which are used to create complex shapes of the edges of parts.
- Shaped or molded, which are indispensable for rounding and rounding edges.
- Conical, which are used to remove the corner chamfer.
- Disc-type, with the help of which grooves are formed in the edge parts.
- Rebated ones that remove quarters in the edge parts.
- Wood fillet cutter. Typically used to make grooves.
- Figirey, used to create panels.
Typically, edge cutters are equipped with a bearing. This way you can limit the stroke of the tool, and thereby prevent excessive penetration into the surface of the tree. It is worth noting that the cutting edge will not be placed at the same level as the bearing. Using the support platform, you can adjust the depth into which the cutter will plunge.
If the nozzle produces too large cuts, then the work must be done in stages, each time deepening the tool into the material until the desired configuration is achieved.
The figurine cutter has a large weight, as well as a diameter. With the help of such tools you can work on stationary structures.
Grooving equipment
Using a wood groove cutter for a hand router, grooves are created. There are several types of nozzles:
- Fillets, with the help of which semicircular grooves are made.
- Conical, thanks to which you can apply threads to a flat surface.
- T-shaped, creating a corresponding pattern.
- Shaped.
- Elements called “Dovetail”.
- Straight grooves, which are intended for cylindrical parts.
- Combined, with the help of which large-sized wooden panels are connected.