You can try to do this chemically rather than mechanically.
The problem with tempered glass is high stress in the surface layer of the glass. As soon as during the drilling process the stresses, mechanical stresses, in this layer exceed the threshold, the entire sheet immediately crumbles into small pieces. But glass can be dissolved in hydrofluoric acid - such removal of material does not cause additional mechanical stress, although the shape and size of the hole can no longer be guaranteed with the same accuracy as with mechanical drilling.
Of course, it is not a fact that this method will work. After all, it may well turn out that this surface layer absolutely does not care how its integrity is violated - with a drill or hydrofluoric acid. But it's interesting to try.
When the need arises to drill glass, most will most likely turn to specialists who will do this work for you, but not for free. In fact, the whole process of drilling at home is not as complicated as it might seem. In this article we will understand how to drill glass, as well as how and with what it can be done.
Preparing for work
- Before you drill glass at home, you need to prepare it for work: use turpentine or alcohol to degrease the entire surface, and then wipe it with a dry soft cloth;
- Do not allow the glass sheet to slide during operation.
- The sheet must be completely positioned on the base.
- The place where you decide to drill a hole should be marked with a marker or construction tape.
- If you do not have the skills to drill holes, we advise you to practice on small pieces so as not to spoil the main sheet.
- Drilling glass at home is not fast. The process will take quite a long time. While working, do not press too hard to speed up the work.
- The drill should be positioned at right angles to the plane. One hole should not be made at a time. From time to time you need to stop and let it cool a little.
- When you are in the final stage, i.e. When the hole is almost ready, you need to turn the glass sheet over and drill a hole on the other side. This operation allows you to avoid cracks or chips, and you will also get a hole of the correct shape.
- In order to get rid of small irregularities or roughness on the glass surface, take fine sandpaper and sand the sheet.
Benefits of using sand
When using a cutting tool, there is a high probability of surface damage. Using sand will help avoid this. You will need:
- Fine sand.
- Petrol.
- Gas-burner.
- A small amount of tin.
- A vessel made of metal.
Work order:
- The surface is degreased. To do this, you can use an alcohol solution.
- In the area where you need to get the required hole, a pile of sand is poured. It is slightly moistened.
- Using a sharp object, a small depression is created.
- Molten tin is poured into the created recess, after which you need to wait a little.
- A pile of sand is removed from the surface. After this, the tin is melted with a gas burner.
It is worth considering that it is quite difficult to obtain a high-quality hole in this way, so mechanical processing of the hole with a drill is additionally necessary.
Drill glass with a regular drill
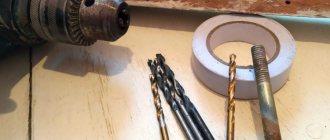
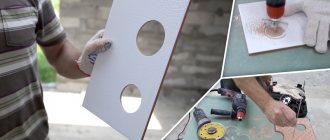
To drill holes in glass you will need the following:
- Drills designed for drilling ceramic or metal materials;
- Low-speed drill or screwdriver;
- Turpentine;
- Plasticine;
- Alcohol.
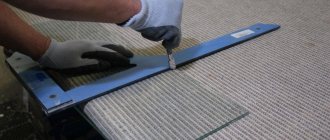
The sheet must be placed on a completely flat surface. There are some nuances here: the edges should not hang down, and it should not wobble.
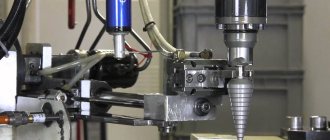
The drill or screwdriver must be set to the lowest rotation speed. Clamp the required drill bit into the chuck. After this you need to check the drilling. If there is increased runout, then it is advisable to change it. The lowest speed for drilling is 250 rpm, and the highest is 1000 rpm.
Glass characteristics and production features
Before drilling a hole in glass, you should understand the characteristics of this material. Its production process is quite complicated, as it involves the use of special tools:
- The main stage of production involves the creation of a melt, which includes certain components. This requires exposure to temperatures of about 2,500 degrees Celsius.
- To create a strong structure, the molten composition is sharply cooled. Due to this, the hardened alloy crystallizes.
It is the chemical composition of the alloy used that determines the basic performance qualities, as well as the likelihood that the structure will not crack during machining.
Depending on the chemical composition, the following glasses are distinguished:
- Sulfide.
- Oxide.
- Fluoride.
Different glass products must have different performance qualities.
Glasses are distinguished:
- Optical. There are various optical instruments, the main part of which can be called a combination of prisms and lenses. Special glass is used for their manufacture.
- Quartz. By melting quartzite, glass can be obtained, which is used in the manufacture of various dishes and decorative elements.
- With high protection against chemical attack. Some types of glass can withstand exposure to petroleum products and other chemicals. They are used in the manufacture of containers and protective structures.
- Industrial purpose. This group is widespread in industry and everyday life.
- Hardened material with higher strength. Glass can be tempered in various ways.
By area of application, the following materials are distinguished:
- For the manufacture of containers.
- For glazing window frames.
- Reducing radiation levels.
- In the production of fiberglass.
- Screen protection for mobile and other devices.
- For making dishes.
- For the manufacture of medical products.
- Protecting the surface of ovens and fireplace screens.
- For the manufacture of various light sources.
- For the manufacture of various optical devices.
It is worth considering that some glasses cannot be machined. This is due to the fact that their structure has a high fragility index. You can cut a round hole in a jar, on a glass plate and many other products.
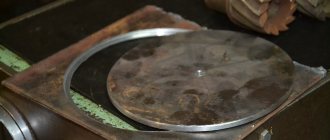
How to drill glass using sand
At a time when there were no drills and screwdrivers, glass drilling was done using this method. In order to make a hole using sand you will need the following things:
- Naturally sand.
- Petrol.
- Lead or tin.
- Gas-burner.
- A metal mug or other similar vessel.
The surface must be degreased with gasoline , and after that a pile of wet sand must be poured onto the future drilling site. Then, using some sharp object, you need to make a funnel of exactly the same diameter as the future hole should be.
A pre-molten mixture of lead or tin must be poured into this resulting form. After a few minutes, you need to remove the sand and remove the frozen part of the glass. It should come off the surface easily. The resulting hole will be perfectly smooth and will not require any additional processing.
To heat tin or lead, use a metal mug or other container and a gas burner. If you don’t have a burner, then a regular household gas stove will do.
Making a hole without a drill
Drills, drills and screwdrivers appeared relatively recently. What did the ancient craftsmen do when they needed to make a hole in the glass? There is one way, and in theory it should still work well.
For work we will need a simple set of tools and materials. We take lead - you can take it from an old battery or simply buy a fishing sinker, a metal container in which we will melt it, a burner, a degreaser, a dry rag and sand.
A fishing sinker will be used
Step 1 – melt the lead. We load lead into the dish, place it on a fireproof surface, turn on the burner and wait until the metal is completely melted. Lead has a higher melting point than glass.
Step 1 – melt the lead
Step 2 – degrease the glass. We apply alcohol to a rag, which acts as a degreaser, and wipe it over the surface of the glass in the intended location under the hole. If this is not done, the glass may crack upon contact with hot lead.
Degreasing glass
Step 3 – put sand on the glass. The sand must be wetted, after which we lay it out on a cleaned area and form a small slide.
Place sand on glass
Step 4 - deepening in the middle of the slide. Then we take a thin stick and use it to form something like a well inside the slide. You need to reach the glass so that the lead comes into contact with it when pouring.
Advice! The smoother the well, the smoother the hole will be. Therefore, you can do it a little differently. First we place a wooden, even chip on the glass, cover it with sand, and then remove it. Voila, you have a smooth vessel made of sand.
Recess in the middle of the slide
Step 5 – pour lead into the sand. We carefully take the container with lead and pour it into our makeshift vessel. Be careful not to let lead drip onto the outside of the glass, as it may crack. A high temperature will be established inside the well, which will remain there for a long time.
Pouring lead into the sand
Step 6 – clean the surface. After 1-2 minutes, clean the glass from sand. We carefully remove the lead rod and see that in its place a hole has formed with perfectly straight edges.
Cleaning the surface
Of course, this method of making a hole is very curious and interesting, and we even found a video where a master performs this, but in practice it is not always possible to do this, or rather, it is not clear what exactly affects the result. We found another video in which a natural scientist conducts the same experiment, constantly changing conditions, but at the same time, strictly following the technology that we described above, and nothing works out for him. We kindly ask you to watch both videos and share your thoughts on the situation in the comments. Well, we say goodbye to you, all the best!
Video - How to make a hole in glass so it doesn't crack
How to drill with a homemade drill
Drilling glass at home will require preparing a special drill, which consists of a diamond roller located in a regular glass cutter and a metal rod. It is necessary to make a cut in this rod into which this diamond roller will be placed so that it is stationary in relation to the rod.
Having prepared such a drill, fix it in a screwdriver or drill and start drilling a hole. It can be called a modification of conventional diamond-coated drills. Therefore, if you do not have the opportunity to purchase such a factory drill, then you can easily make it yourself.
There is another way to prepare a homemade drill. You need to take any ordinary drill, clamp it in pliers and hold it in the flame of a gas burner for several minutes. After the end of the drill turns white, you need to quickly cool it by dipping it into sealing wax. Once it has cooled, remove any remaining sealing wax if present. Through this simple operation you get a hardened tool that can be used to drill through hardened material.
What is used to drill glass?
A regular drill for drilling glass will not work; you need to use special tools.
You need to select a drill with specific parameters:
- its diameter must correspond to the diameter of the hole that needs to be made;
- the length must correspond to the thickness of the glass to be drilled;
- the shank should be round (if you plan to use a drill) or hexagonal (if you want to use a screwdriver).
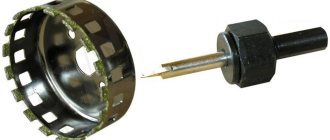
What types of glass drills exist:
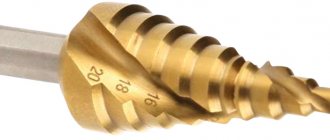
- "Feather". The working part of this drill is shaped like a feather and made of hard alloy. Perhaps this is the most budget-friendly tool that can be used to drill glass (as well as ceramics and tiles). This type of drill should be chosen if the diameter of the hole to be made is from 3 to 12 millimeters.
- "Crown" (tubular drill). It is designed for drilling larger holes (12-80 millimeters).
- Feather cutting drill. It is designed to make holes of even larger diameter. Its peculiarity is that the working surface has a central tip for the primary recess and teeth around the circumference.
- "Cylinder". In fact, this is an ordinary cylinder, one cutting edge of which is coated with diamond sputtering. They are used only with forced cooling.
Adviсe
- In order to prevent the appearance of splits and cracks on the surface, it is necessary to apply a little turpentine or honey to the place that needs to be drilled.
- The drill or screwdriver should not be pressed too hard from above.
- It is necessary to take breaks during the drilling process. Intervals should be between 5 and 10 seconds. Also, during a break, it is advisable to lower the drill into a container of water to cool it down. This is necessary in order to avoid melting.
- Do not rock the screwdriver or drill from side to side.
- If possible, it is better to use a screwdriver, because... it will work in a more gentle mode with its low speed.
- In order to treat the surface, you can use not only alcohol, but also acetone.
- When working with a drill, you should take care of safety precautions: use gloves and goggles.
- The drilling point for fragile glass should be no less than 1.5 mm from the edge of the sheet, and for ordinary glass no less than 2.5 cm.
- It is best to work with the material on a wooden surface.
Useful tips
- To avoid cracks and chips, it is recommended to apply a small amount of honey or turpentine to the area where the hole will be made.
- When drilling, take short breaks of 5-10 seconds. At the same time, dip the drill in cool water to enhance the effect, otherwise it may melt.
- Do not swing the instrument in different directions.
- Instead of alcohol, you can use acetone.
- When working, do not forget about safety precautions: use safety glasses and gloves.
- The hole should be located at least one and a half millimeters from the end of the glass sheet.
- It is advisable to work with glass on wood surfaces.
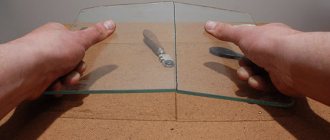
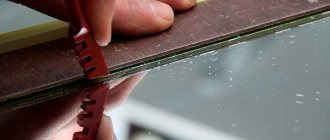
Working with a glass cutter
To fully cover the topic, it is worth learning how to drill glass at home using a glass cutter. It is perfect for creating unusual shapes or large sizes. In this case, the sequence of actions will be as follows.
1. Using a marker or felt-tip pen, create the necessary contours along which the processing will take place.
2. When working with a glass cutter, you should not make sudden movements. Pressure on the instrument should be uniform and smooth.
3. To make the cut part fall off, use the handle of a glass cutter to lightly tap the surface.
4. Use special tongs to remove excess.
5. Before starting work, you need to check the condition of the tool. The roller should be in the middle and rotate evenly and smoothly.
Features of the material
Any material has its own unique characteristics and features. Glass is no exception. Therefore, before giving advice on how to drill glass, you need to understand what kind of material it is.
As you know, glass is produced by melting various substances at a temperature of 2.5 thousand degrees. Depending on what chemical elements were the basis of the glass, oxide, sulfide and fluoride glass are distinguished.
Bottles for various drinks are made of oxide (to be more precise, silicate) glass. But this is a very general classification. If we take into account the characteristics of the material, we can distinguish ordinary quartz glass (obtained by melting quartzite), optical glass (used in optical instruments), resistant glass (with a high degree of resistance to aggressive environments), and industrial glass.
Considering that it is industrial glass that is used most often, the question of how to drill glass at home arises precisely in relation to it. Therefore, let's consider this category in more detail.
Glass for industrial use is also divided into several types:
- Sodium-calcium - it is the softest and is easy to melt and process.
- Potassium-calcium is more refractory and hard, but at the same time more shiny.
- Lead is relatively soft and easy to melt, but it is also heavy. It is characterized by high gloss and high refractive index.
- Borosilicate - refractory, resistant to aggressive environments and high temperatures).
We have studied the types of glass, and now let’s move on to the question of what glass is used to drill.
Unusual ways to drill a hole in glass
1. In order to drill through tempered glass, it is necessary to prepare a cooling liquid. It will be prepared as follows: aluminum alum must be dissolved in acetic acid. If you don’t have them, you can mix turpentine with camphor in a 1:1 ratio. Treat the glass with the resulting solution and then begin work.
2. If you do not have a drill, you can use copper wire, which must be clamped into the drill. In this case, the process will take place using a special solution: 2 parts turpentine and 1 part camphor, to which coarse sandpaper powder should be added. The mixture must be placed in the place where you need to drill a hole and get to work.
3. There is another method of using a similar solution. It is possible to work with a metal piece of pipe, which can also be inserted into the drill chuck. Make a plasticine ring 10 mm high and 50 mm in diameter on the glass surface. Pour a solution of camphor, turpentine and emery powder into the recess of the ring and drill.
Sometimes there is a need to drill into glass or a mirror, but most people don't know exactly how to do it. This business will definitely require certain skills, but anyone can master them. To learn how to drill glass, read our article. To work you will need:
- screwdriver;
- drill with speed controller;
- a tubular drill with diamond coating;
- water;
- a small piece of thick plastic;
- plasticine;
- scotch.
Tools
0 votes
+
Vote for!
—
Vote against!
If it is necessary to drill glass surfaces, many prefer to entrust this task to professionals, turn to special services, spend money, and most importantly, time. We’ll find out how to drill glass at home and what you can use to drill glass.
Table of contents:
- Types and features of glass
- Types of drill bits for drilling glass
- Preparing glass for the drilling process
- How to drill glass with a regular drill
- How to drill glass at home using sand
- How to drill glass with your own hands using a homemade drill
- Tips for drilling glass at home
- Working with glass using a glass cutter
- Unconventional methods of drilling glass
Types and features of glass
The formation of glass occurs during supercooling of a melt from several components, while the speed of this process is quite high and the crystallization process does not have time to complete.
Glass is a fragile material that is often used for human needs. Glass is formed at a fairly high temperature from 200 to 2500 degrees. Not all glasses are transparent; this property is not a general characteristic of this material.
In relation to the main material used during glass production, glasses are distinguished:
- oxide,
- sulfide,
- fluoride
Depending on the type of application, there are:
- quartz type glass - made by melting quartzite or rock crystal, this material can be natural, it is formed when lightning strikes the location of quartz deposits;
- optical glass is used to make lenses or prisms;
- Chemical type glass is characterized by high resistance to chemicals and temperature changes;
- Industrial glass is widely used in the manufacture of various things that people use.
Industrial glass is:
- potassium-sodium type - characterized by a low melting point, different shapes can be easily obtained from it, has a clean and light structure;
- potassium-calcium type - has high hardness and is difficult to melt, does not have a pronounced shine;
- lead type - similar to crystal, very fragile and shiny, more expensive, heavy, but at the same time quite soft;
- borosilicate type - resistant to temperature changes, exposure to foreign substances, quite expensive.
In relation to the area of use, glass is distinguished:
- window,
- containers,
- radiation resistant
- fiberglass,
- protective,
- dishes,
- crystal,
- thermometric,
- heat resistant,
- medical,
- heat resistant,
- electric bulbs,
- electrovacuum,
- optical,
- chemical,
- quartzoid.
Types of drill bits for drilling glass
The process of drilling glass requires a good, and, most importantly, suitable drill and material that will instantly cool the glass during the drilling process. Let's look at the main types of drills that are suitable for glass:
- drill in the form of a spear or feather - made of hard alloys, the diameter of such devices ranges from 3 to 12 mm, if you have the skills, drilling glass with such a drill is quite possible, but you cannot do without the formation of small chips;
- spear-shaped drills with diamond coating - characterized by softer drilling, no chips;
- tubular or round drills are used to cut circles or rings on glass surfaces; this process is most conveniently carried out using a drilling machine;
- brass type glass with diamond coating requires mandatory cooling through the supply of water or turpentine;
- A tubular diamond type drill is used to drill a hole in glass, it has the form of a crown with a shank, the end of the crown is diamond coated, and requires cooling.
Preparing glass for the drilling process
1. Before you start drilling glass, you should prepare the surface for this process.
2. Using alcohol or turpentine, be sure to degrease the surface and then wipe with a dry cloth.
3. The glass sheet is not allowed to slip or shrink on the surface.
4. The glass sheet must be placed on the base.
5. It is better to mark the drilling point using construction tape or a marker.
6. If you do not have the skills to work with glass drilling, it is better to practice on small fragments so as not to ultimately spoil the material.
7. Drilling glass takes a long time; do not press hard on it to speed up the procedure.
8. Hold the drill bit at a right angle to the glass surface. Do not drill one hole at a time; stop periodically to allow the glass to cool.
9. When drilling is completed, when the hole is almost ready, you should turn the glass over and drill a hole from the back side. This procedure will help avoid chips or cracks and make the hole the desired shape.
10. To remove small roughness or unevenness on the glass surface, use fine sandpaper.
How to drill glass with a regular drill
To complete this process, you must have:
- drill, which is used for drilling metal or ceramic surfaces;
- screwdriver or low-speed drill;
- plasticine,
- turpentine,
- alcohol solution.
The glass must lie on a completely flat surface. Pay attention to the placement of the glass; the edges should not hang over and the glass should not wobble.
Set the screwdriver or drill to the minimum rotation speed. Insert the glass and check whether the device breaks the glass; if there is significant runout, it is recommended to replace the drill.
Using cotton wool and alcohol, degrease the glass and make a recess out of plasticine in the place of the future hole. Pour turpentine into it and begin the drilling process. To avoid the appearance of cracks, you should not exert much force during this process. Hold the device lightly and without pressing over the glass.
The minimum rotation speed for drilling per minute is 250, and the maximum is 1000 cycles.
How to drill glass at home using sand
At a time when there were no screwdrivers and drills, this method of drilling glass was used. To drill glass using sand you will need:
- sand,
- gasoline,
- tin or lead,
- gas burner,
- metal vessel, preferably a mug.
Be sure to degrease the surface with gasoline, and pour a mound of wet sand onto the site where you intend to drill. Next, using a sharp object, you should make a funnel the size of the hole.
Pour a pre-prepared mixture of tin or lead into this form, after a few minutes, remove the sand and remove the frozen part of the glass, which should easily come off the surface.
To heat lead or tin, use a metal vessel and a gas burner. If there is no gas burner, replace it with an ordinary stove.
Such a hole is perfectly smooth and does not require additional processing effort.
How to drill glass with your own hands using a homemade drill
The drill used in the work process consists of a diamond roller, which is placed in the simplest glass cutter, and a metal rod.
You need to cut a special hole in the rod into which the diamond roller is placed. The roller is installed in such a way that it is stationary.
Attach the drill bit to a drill or screwdriver and start drilling.
This drill is a modification of conventional diamond-coated drills, so if you cannot buy such a drill, make it yourself.
Another option for making a drill involves drilling glass with a small hole diameter of up to 50 mm. Take any ordinary drill. Turn on the gas burner, clamp the drill with pliers and hold it over the flame for several minutes. When the tip of the drill turns white, cool it quickly by dipping it in sealing wax. After it has cooled, remove the drill and remove drops of sealing wax from the surface, if any. This glass has become tempered and is excellent for drilling glass.
Tips for drilling glass at home
1. A little honey or turpentine should be applied to the place where the hole will be drilled in order to prevent the appearance of cracks and splits.
2. Do not press the drill from above.
3. The interval between drilling is 5-10 seconds. It is advisable to dip the drill in a vessel with water during breaks to prevent the glass from melting.
4. You cannot rock the drill from one side to the other.
5. If possible, it is better to use a screwdriver; this item is more gentle, as it has low speed.
6. The cost of drilling glass in a professional setting starts from $10, so by using these tips you can save a lot of money.
7. Not only alcohol, but also acetone is perfect for degreasing the surface.
8. When working with a drill, do not forget to follow safety precautions, wear goggles and gloves
9. The distance between the edges of fragile glass should be at least 1.5 cm, for ordinary glass 2.5 cm.
10. The best surface for working with glass is wood.
Working with glass using a glass cutter
1. In order to make a hole in glass of large sizes or unusual shapes, a glass cutter is suitable.
2. Using a felt-tip pen or marker, make a marking along which the drilling will be carried out.
3. When working with a glass cutter, you should not make sudden movements; pressure should be smooth and have the same force.
4. Using the handle of a glass cutter, tap the glass so that the cut part falls out.
5. To remove excess glass, use special tongs.
6. Pay attention to the condition of the tool before starting work. The location of the roller should be central, it should rotate smoothly and evenly.
Unconventional methods of drilling glass
1. To drill through carbide type glass, you should prepare a cooling liquid. To do this, take acetic acid and dissolve aluminum alum in it. If they are not available, mix turpentine with camphor in a one to one ratio. Treat the glass with one of the solutions, and only then start drilling.
2. If there is no drill, use copper wire, which must be inserted into the drill. In this case, drilling occurs using a specially prepared solution. One part camphor and two parts turpentine, add coarse sandpaper type powder to this mixture. Place the mixture in the place where you want to drill a hole and start working.
3. There is another method using this solution. Use a piece of metal tubing that is inserted into the drill. Make a plasticine ring and attach it to the surface of the glass. The height of the ring is 10 mm, and the diameter is 50 mm. Apply a solution of turpentine, camphor and emery powder into the recess.
4. Take a tube made of aluminum, copper or duralumin, the length of which is about 5 cm. Drive a wooden plug into one end, and cut out the teeth with a hex file at the other end. Screw the self-tapping screw into the end on which the wooden plug is located, and saw off its head. Attach two circles pre-cut from cardboard, the diameter of which is the same as the diameter of the future hole, to the inner and outer parts of the glass. Place the glass on a rubber surface and sprinkle abrasive powder on it. Place the place where the self-tapping screw is attached, with the cut off head, in a drill or screwdriver; treat the back side of the so-called drill with turpentine solution. Drill the third part of the hole from one side, and then turn the glass over and finish the job.
How to drill glass video:
What should a drill be like?
A diamond-coated drill bit can cut a cylinder out of glass, and if handled correctly, its working capacity is determined by 100 linear millimeters of drilling. However, be careful, as sometimes you can buy a fake under the guise of such drills. Their appearance is practically no different from a high-quality drill, but immediately after the first drilling, diamond chips simply fall off. The tube itself, as well as the material from which it is made, is also important. If the drill is made of brass, then most likely it will bend when clamped in the chuck.
There is another type of drill that can be used to make holes in glass - conical ones. However, experts prefer to use tubular drills, since conical drills have limited thickness and turn all the glass drilled into dust. In addition, tubular drills can be purchased at almost any hardware store, and they are inexpensive. In addition, they have a fairly large selection of different diameters.
Making holes using a glass cutter
It is convenient to use a glass cutter as a tool for making holes in glass when the latter has a large diameter. Without an additional device, it is very difficult to describe a circle while holding a glass cutter with your hand. Therefore, a special compass has been developed, the moving part of which is the cutter itself, and the fixed part is made in the form of a suction cup, which is installed strictly in the center of the future hole. They are connected to each other by a rigid ruler.
If you don’t have such a compass, a simpler option is to use a cutter to outline a round template with the diameter of the required hole. The whole process of cutting a circle goes like this:
Types of glass cutters
- Degrease the working area of the glass with alcohol and wipe it dry;
- The template is glued to the glass using double-sided tape;
- Using a glass cutter, carefully cut along the template several times;
- The template is pasted onto the opposite surface of the glass and the previous point is repeated;
- The resulting internal diameter is cut with two perpendicular lines, dividing it into four equal segments;
- Gently tapping, squeeze out the cut element.
Marking and preparation
The usual method of marking the center of the hole with a cross will not work for marking. To drill glass, you need to draw a square that will describe the hole. Remember that a tubular drill cannot be centered, so you will need a stand that will allow you to guide the tool in a strict vertical line. If there is no such frame, then distortions may occur.
In addition, starting the drilling itself will be quite problematic. It is possible that the drill will slip and scratch the surface of the glass. In this case, you can use a piece of plastic or wood. They are pre-drilled and attached to the surface of the glass with tape, and then using the same drill, a hole is made in the glass itself. If you have enough experience, you can do without plastic. Then you need to make an approach with only one side of the drill, gradually bringing it to the normal.
Application of glass cutter
You can drill through a glass sheet not only with a tubular drill or a tool for processing ceramic tiles. A regular glass cutter is also used to create holes in this material. How to drill (cut) glass using such a tool? Simple rules should be followed: you cannot make sudden movements with the glass cutter, while gentle pressure is applied to it, and during the processing process, the cut being formed is tapped with the handle of the tool.
A compass is used to cut round holes of large diameter with a glass cutter.
Monitor the heating temperature
You need to know that both the glass itself and the diamond drill are afraid of overheating. To avoid this, the drilling site should be constantly watered with water to cool it. It is clear that in this case there is no need to pour water all the time without interruption. Just make sure there is a small puddle covering the hole where you drill. To prevent water from draining, the workpiece must be positioned strictly horizontally. Another way to keep water at the drilling site is to stick a plasticine ring around the future hole and pour water into it.
Drilling rules
Experienced glassmakers have formulated several rules for working with glass sheets:
- maintain the minimum possible speed of the screwdriver or drill;
- the pressure on the handle should be minimal; increased pressure will not speed up the process, but most likely lead to a crack;
- do not allow the drill to deviate from the direction perpendicular to the surface;
- take a break every 10-15 seconds to cool the tool and working area;
- moisten the drilling site and drill with water or a special cooling emulsion.
Features of glass drilling
Do not press on the tool while drilling. The drill should operate at medium speed, and the drill should be raised every 5 seconds. This is done so that water pours over the edges of the hole, thereby cooling it. If you notice that the water has boiled and steam is already coming out, then leave the glass to cool. Otherwise it will simply burst. If the glass is thick, then when drilling most of the thickness, go to the back side and drill from there along the same markings and with the same approach. This is necessary to ensure that cracks or chips do not appear at the exit of the hole. As you approach the end, release the pressure a little so that the glass shard is not torn out from the other side.
All of the above drilling technology can also be used for drilling tiles or porcelain stoneware. Quite often you need to drill through tiles that are already fixed to the wall. However, it is difficult to constantly cool the surface with water while drilling. Therefore, for this purpose, you can use a large wet rag, which periodically wipes the edges of the hole.
Special crowns and drills
Professional tools for drilling holes in glass are divided into two large groups:
- drills with a sharp tip, used for small diameters;
- drill bits for medium and large hole sizes.
A glass drill with a sharp tip is a pointed plate of carbide heat-resistant tool steel, soldered into a shank made of ordinary metal. The best drills for glass are diamond ones. Their diameter usually does not exceed 8-12 mm. This tool can also be used to drill glazed ceramics. When working, it is very important to keep the drill strictly perpendicular to the surface. Runout of the shank in the chuck is also unacceptable.
Drilling bits for glass are a tube or bowl made of tool alloys coated with diamond dust. Tubular diamond drills are used for small hole diameters; they provide greater productivity and less risk of chipping than pointed plate drills.
Coat the end of the bowl with a coating of small artificial diamonds. This is one of the few materials that is harder than glass. Crowns coated with other abrasive materials are also offered on the market. They can also drill into a glass sheet, but there is a higher risk of chips and cracks.
A bowl-shaped bit can drill a hole with a diameter of up to 150 mm. For larger sizes, use a compass with a glass cutter.
When working with a crown, you need to monitor the temperature of the tool. It is better to use special coolant
Preparing the workplace and tools
- The workplace for drilling glass should be comfortable and safe:
- special premises (preferably non-residential);
- a stable and level table (or workbench) with a non-slip surface;
- availability of free space around the table (or workbench).
- Ensuring worker safety:
- special safety glasses;
- gloves made of thick fabric.
- Tools and consumables:
- classic drills for metal and ceramics of the required length;
- drill (can be replaced with a screwdriver, but not recommended);
- liquid soap (or equivalent);
- hot water;
- foam sponge;
- turpentine for degreasing or other similar chemicals (alcohol, solvent, acetone, etc.);
- a piece of soft, dry flannel fabric.
Practical recommendations
How to drill glass correctly to get a high-quality result? To solve this problem, it is enough to adhere to the following recommendations:
- To minimize the risk of cracks and splits at the drilling site, the glass can be treated with honey and turpentine.
- The pressure exerted on the drill from above should be minimal.
- The drilling process itself must be performed for 5–10 seconds, after which it is necessary to cool the tool in a vessel with water.
- The drill should not be moved from side to side.
- The distance between the center of the hole and the edge of the workpiece must be at least 1.5 cm.
Naturally, before drilling the glass, you must degrease it and lay it on a flat surface, which is best used as a wooden base.
Drilling with a tube
Copper tube
Instead of a drill, you can use a tube made of aluminum, copper or duralumin:
- The tube should be cut to a size of 4 to 6 cm.
- Hammer a wooden plug into one end to a depth of 2-2.5 cm.
- On the other, use a file to cut out the teeth.
- A screw with a diameter of 5 mm should be screwed into the clogged plug so that its part protrudes about 1 cm.
- The screw head must be carefully cut off.
- Glue cardboard washers onto the glass at the site of future drilling on both sides and sprinkle the drilling point with an abrasive compound.
- We clamp the protruding section of the screw into a drill, and lubricate the teeth on the tube with turpentine.
- We drill a hole a third of the thickness of the glass, turn the material over and continue working.
Regular drill
Drilling with a regular drill
When using a regular drill for small holes, you must follow these recommendations:
- Harden the drill. To do this, the drill, clamped in the pliers, must be thoroughly heated over a gas burner.
- Then you should immediately place it in sealing wax (or machine oil) to cool. It should be kept until the wax mass stops melting and cools completely.
- The drill can be removed and any wax particles stuck to it can be removed. The tool has been hardened and work can begin.
Drilling in water
To drill holes in glass products of small shapes, work can be done in water, for which you need:
- Choose a container of convenient size and pour cold water into it.
- Place glass in water. In this case, the water should slightly cover the surface of the material.
Note!
The material in the container must not be able to move!
Types of glass
Before you take on the task, you should fully understand what material you are dealing with, how it reacts to certain influences, and find out its varieties. We know that glass is a very fragile material. This is not true for every type, for example, plexiglass is much stronger than regular glass, and it is more difficult to break.
Glass production
Interesting to know! Silicate glass is used to make bottles.
Holes from professional cutting
There is another division of glass into classes:
- optical glass – used for the production of prisms and lenses;
- quartz is a well-known rock crystal;
- chemically resistant;
- industrial – people most often ask about cutting this particular material.
Optical glass
We are gradually narrowing down the options to understand what we will have to face. Industrial glass, in turn, is divided into 4 more types, which have their own properties.
- This includes potassium-sodium glasses, which are used in the production of products with complex shapes. It has a very light and uniform structure. Drilling it is quite simple.
- Lead type - this glass resembles crystal, its internal structure is quite plastic, but the material is highly fragile.
- Calcium glass is a refractory material of high hardness and is quite difficult to drill.
- Borosilicate glass - this material is resistant to mechanical stress; making a hole in it will be the most difficult.
Colored industrial glass
Find out how to replace glass in a double-glazed unit, and also familiarize yourself with the process of self-dismantling and installation, in a special article on our portal.
Glass cutting sequence
To properly cut glass with a glass cutter, you need to carry out a set of preparatory measures:
- Finding a convenient place for cutting. A desk or other flat surface will do;
- Cleaning glass from dirt, dust and other foreign materials;
- Prepare protective equipment - gloves, goggles, and a waste box.
Carefully! During cutting, the glass should not oscillate or vibrate; its surface should be in close contact with the working area.
Cutting glass with a diamond glass cutter is reminiscent of an art lesson at school. It is enough to take a ruler or template, place it on the glass and draw the desired line along them with a working tool. After this, a shallow, barely noticeable mark will remain on the surface of the material. The process itself should be accompanied by the sound of a slight crackling sound.
To ensure that the work is done efficiently, you should follow some recommendations:
- At a distance of 3-5mm from the edge of the glass, it is necessary to reduce the pressure on the tool in order to preserve its edge;
- The cutting tool is extremely sharp, so you don't need to put too much pressure on it. This way you can get a deep cut with convex edges;
- The time for drawing the line should be minimal. A meter-long piece of glass is cut in 2 seconds;
- Under no circumstances should you make a new cut along the same line.
We recommend: DoorWood online door store
After drawing the line, you need to divide the solid sheet of glass into two parts. This is done by tapping the handle of the cutting tool along the line made. To do this, you first need to slide a piece of glass to the edge of the table, so that the line is at its end, and gently tap along its entire length. All you have to do is hold the second fragment of the glass sheet with your hand so that it does not fall.
Carefully! For those who will be cutting glass for the first time, it is recommended to “practice” on waste and other pieces in order to gain experience and feel the intricacies of working with the tool. In most cases, this is enough to avoid unforeseen situations and unwanted losses in the future.