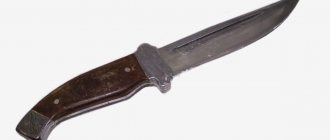
A clipper (or trimmer) is a compact tool with several attachments that can be used to trim short hair, style a beard and mustache, and even remove hair from the nose and ears. The blades are usually made of durable stainless steel, but over time (especially with frequent use) they still become dull. We'll tell you how to recognize when your blades need to be renewed, as well as how to properly sharpen your clipper.
Preparation for sharpening
- If the device is plugged in, turn it off.
- Separate the blade block from the main body.
- Unscrew the screws connecting the movable working blade to the fixed one.
- Clean the knives from dirt and hairs using a special brush that comes with the machine. Now you can start sharpening.
Removing and preparing the blades
Before restoring the instrument, the clipper blades should be removed and prepared. First, the tool body is disassembled. Then the screws holding and adjusting the upper knife are carefully unscrewed. The lower part is removed from the socket using tweezers.
The knives are dipped into the washing liquid - oil or gel. Then all stuck hairs and dirt are removed from them. Completely clean parts are wiped with a napkin made of natural fabric. Clean blades can be sharpened.
When cleaning and rinsing, do not use water or water-based products. They cause rust to form on the surface of parts. The moving part of the machine should be constantly cleaned and lubricated with oil.
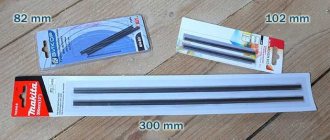
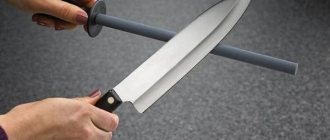
How to sharpen a clipper using sandpaper
The most inexpensive and safest way to sharpen at home. To do this, you will need sandpaper of two types of abrasiveness (coarse and fine-grained) and a container with water.
- Place the working knife on a sheet of coarse sandpaper, move parallel to the blades up and down, rinsing the knife in water from time to time.
- After cleaning the blade well, begin sanding with fine-grit sandpaper until it is as smooth as possible. After this, rinse the knife again, dry it thoroughly and lubricate it with oil.
Tool operation
The machine must be stored in a dry place. After each haircut, the working unit must be blown out and wiped with alcohol or vodka. Dry. The less dirt gets into the trimmer mechanism, the less often the blades need to be sharpened.
When the first signs of dullness occur, the tool should be disassembled, washed, lubricated and tested. If there is no one to cut your hair, experts advise trying to cut natural fur. An old coat collar and some skin scraps will do. If cleaning does not help, you need to disassemble the tool and sharpen the knives.
How to sharpen knives on a clipper using a sharpening stone
This method is similar to the previous one, but not a sheet of ordinary sandpaper is used, but a special double-sided sharpening stone.
- Place the stone with the coarse side up and secure the work blade.
- Smoothly move the working blade of the machine back and forth several times, maintaining an inclination angle of the cutting edge of 35-40°.
- Rinse the knife from abrasive particles and dry it.
- Turn the stone over, fine-grained side up, and polish the knife until it shines.
- Rinse, dry, lubricate the knife with oil.
Signs that your blades need sharpening
The clipper has stainless steel knives, often coated with titanium or diamond coating. Despite this, they become dull over time. The first signs of this are as follows:
- there are problems with trimming the contour of the hairstyle;
- irritation of the skin occurs more than usual, up to cuts;
- the blades crush or tear the hair rather than cutting it, which causes an unpleasant (painful) sensation.
Manufacturers recommend sharpening blades periodically. Regularity depends on the quality of the material of the cutting part and the intensity of use of the device. But usually these activities are postponed until the dullness becomes sufficiently strong. To return the blades to their former sharpness, you will need to sharpen them.
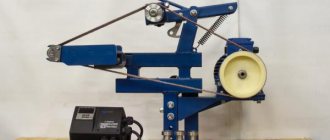
How to sharpen a clipper blade on a professional machine
This method is suitable for “advanced” users, for example, hairdressers. On a professional machine, sharpening is as accurate as possible.
- Lubricate the grinding disk of the machine with oil, then evenly distribute the abrasive paste over it.
- Secure the knife using the magnetic holder with the cutting edge pointing down.
- Turn on the machine and move the blade from the edge of the sanding disc to its center and back for a couple of minutes.
- Remove the magnetic holder and wash the knife to remove any abrasive particles.
Any sharpening algorithm ends with the obligatory treatment of the trimmer with oil. Apply a few drops to the surface of washed and dried blades, as well as to the base of the knife block, only then attach it to the body of the machine. It is better to lubricate after every three or four haircuts, and not just after sharpening - this will extend the life of the blades.
Blade lubrication
Immediately after sharpening, knives should be lubricated with oil. You can use both professional (sold in hairdressing stores) and regular silicone grease for electrical appliances. Do not lubricate knives with sunflower, olive or other edible oils. If you do not have a suitable lubricant at hand, it is better to abandon the treatment altogether, postponing it for later.
Popular manufacturers of clippers (for example, Moser or Oster) also produce oils for lubricating knives
To apply oil, prepare a container with a narrow spout (professional products are sold in such packages) or a syringe with a needle.
Lubrication of knives is carried out as follows:
- Remove the blade block and extend the blade.
- Using a brush, clean the knife block from dirt (hairs or dust after sharpening).
- Wipe the knives with a soft, dry cloth (for example, microfiber or glasses).
- Apply 3-4 drops of oil to the surface of the blades, as well as two drops on each side of the base of the knife block.
- Insert the blade block back into the machine.
- Turn on the machine for half a minute. The oil will be evenly distributed over the surface of the blades.
Lubrication is best done regularly, every two to three haircuts. This way the machine will serve you for a very long time - the oil protects the knives from rapid dulling, overheating and contamination.
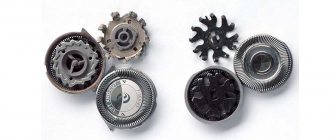
Features of the 8-tooth hay knife Husqvarna Grass 255-8T, 1
2 cells/hour).
Replacement unit or repair
The simplest solution to the problem of dull knives is to buy a replacement unit for the trimmer. But this is also the most expensive option.
For example, such a block together with a mesh from Remington costs 1-2 thousand rubles. For that kind of money, it’s easier and more profitable to buy a new device with more modern capabilities and functions.
But not all shaving machines are so easy to find and order replacement units. For small trimmers, this is only possible through online stores, and sometimes even exclusively on foreign websites.
If your beard trimmer is dear to you and you do not want to change it, then contacting a repair service will be your salvation. If you are the happy owner of an expensive and high-quality device, then only qualified and experienced specialists can extend its life and not damage the blades. The cost of such services is about 200 rubles.
Based on the price of replacement units and the difficulty in finding them, the repair option looks preferable.
Features of discs for mowers
Blade blades are made from plastic and metal and come in a variety of shapes to suit different tasks.
- Two-, three- and four-bladed knives with pronounced blades are used for mowing grass and overgrown trees. However, they are not suitable for haymaking because they shred the shoots by chopping them several times.
- Massive four-legged Disks are designed not only for clearing grass from the soil, but also for mowing hay. They prevent the shoots from being cut back again, making them suitable for winter harvesting.
- Perimeter cutting blades are useful for cut reeds and reeds. These knives are very heavy - a necessary quality for cutting thick stems.
- Professional discs, dental discs for brush cutters and mowers allow you to trim small trees and bushes.
Plastic knives are used as an alternative to metal blades. They do not need to be tightly installed in the head, but they rotate under the influence of centrifugal force. The durability of plastic knives is high, so their service life is quite long.
Sharpening knives and knife blocks
So, spring is coming into its own, and the most pressing issue is sharpening knife blocks and clipper knives.
Today, such machines are used not only by professional hairdressers, but also by groomers who work with animals, as well as simply by pet owners. On this page you will find the minimum required set of knowledge on the features of sharpening and maintenance of such machines. Some other, more specialized materials can be found in the articles in the “Practice” section. So, what should a car owner know?
First, a few points regarding the operation and care of the tool:
- The hair clipper is an electrical appliance and, naturally, requires appropriate precautions when handling. Do not use machines with a broken power cord, damaged housing, etc. It is not safe.
- Lubricate your knives regularly. For professional use in a hairdresser - at least once per shift. When grooming animals, preferably before each haircut.
- Use only special oil! As a last resort - sewing or spindle. Under no circumstances should you use vegetable oil - you will ruin the machine!
- Clean the machine regularly. This is especially important for inexpensive Moser models - 1440 and 1400; due to the clogging of hairs between the blades, such clippers cut hair worse. This can be determined by looking at the light between the knives.
- When cleaning a machine with removable knives on screws, do not forget to position the knives correctly - the upper (small) knife should not reach the tips of the teeth of the lower one by 0.5 - 1 mm.
- Do not wash knives with water. It is better to wipe with a dry cloth or gasoline like “Galosh”.
- For professional use, do not leave the machine in a disinfectant solution, undried or ungreased. Rust and cavities will ruin the knives.
- When cutting animals, especially dogs, be aware that dirt, soil and sand spoil the knives almost instantly(!) You may not have enough knives for one haircut.
- Do not try to sharpen knives yourself unless you are a 5-6 level toolmaker! There is no need to fantasize about “sandpaper on glass”, “sharpening stone”, etc. Such knives will be damaged. Restoring them later is more difficult and expensive, and the resource of the knife itself is intensively consumed.
- When choosing a machine, be guided by your goals and finances, but do not buy cheap Chinese crafts. Read more about this in the corresponding article “Choosing a hair clipper.”
Entrust your tool to a qualified technician. It is possible to sharpen knives “by hand”, without the use of special equipment, but this can only be done by a specialist with MANY YEARS of experience using his own hand. In a “basement” workshop, your knives will most likely be damaged. As everywhere else, the rule “the miser pays twice” applies here.
And a few more recommendations related to the operation of this tool:
- If the machine does not turn on or operates intermittently, the electrical cord or switch is most likely to blame. This repair can be done by any craftsman in a regular workshop or just a “hands-on” owner. The cost of a typical switch in a radio store is about 20-50 rubles. The cord can simply be cut, making it shorter at the break point.
- If the machine falls, the adjustment of the knives, the pressure adjustment may be lost, and the most unpleasant thing is that one or more teeth may break. In this case, the tool begins to “catch”, tug and cut unevenly. As a rule, if disassembling and reassembling and adjusting the knives does not help, sharpening them will help - and the machine will work as expected again.
- The machine may get warm. Moreover, the machine itself heats up - if it is not suitable for your tasks - it is too low-power (as a rule, a tool for grooming animals is characterized by increased power), or if there is a breakdown in the mechanism or winding. The knives themselves can get hot, and this also happens for several reasons: 1) poor-quality sharpening - when an inexperienced sharpener polishes the knives “in a mirror” and the oil does not stick to them; 2) unsuitable oil; 3) incorrectly adjusted pressure of the knives to each other. In any case, incorrect pressure or incorrectly selected lubricant is simply diagnosed - as a rule, in such cases, the machine cuts for 10-15 minutes, then stops, but after lying down and cooling down, it works again. The need for sharpening in this case is determined by the specialist on the spot.
Reasons for loss of cutting properties
In addition to active use, a common cause of premature loss of cutting properties by a trimmer is improper care.
It could be:
- washing with water and drying not very thoroughly;
- reuse of uncleaned instruments;
- use of low-quality oil for lubrication or lack of lubrication;
- storage at high humidity levels;
- mechanical damage.
You can save a dull trimmer. And you don’t have to buy a replacement unit for this, just sharpen it. But despite the opportunity to do this yourself, you need to be very careful not to damage the device.
Disk selection criteria
You need to choose a plastic or metal knife, taking into account the area of the area being processed, as well as the type of trimmer - electric or gasoline. The number of blades will depend on how much growth you want to remove with the tool. You can select the desired disk shape, number of blades and material of manufacture using the instructions for using the device. It usually prescribes which cutters are recommended to be used to solve certain problems.
Material
It is not recommended to use metal knives on electric scythes, as their design features make their use dangerous for the user. . This is due to the curved shape of the rod, the lack of stops on the handles, and the high rotation speed.
READ How much oil is in a 5 liter trimmer
For safety reasons, plastic blades should be used on the flexible trimmer bar. Their purpose is to mow soft grass and dead wood. While metal discs work well with tall, dense, tough shoots, shrubs and tree shoots.
With shoulder blades
The number of blades is important when solving various problems. Thus, two or three parts are enough to grind the herb. For mowing, the disc must have four to eight blades. To destroy small shoots of trees and bushes, instead of particles, the disks should have a large number of small teeth.
How to install a disc on a trimmer
It is very easy to install the knife on the trimmer. To do this, use a full key that disables the cutting tool and a pin that locks the gearbox. . The procedure is like this.
- First of all, you should unplug the electric trimmer; just turn off the gasoline. Remove and remove the protective cover on one side.
- Next, you need to connect the holes in the gearbox and shaft to insert the pin and lock the drive.
- If a line spool was used, it must be unscrewed clockwise.
- Then you need to find a nut to tighten the knife.
- The next step is to install the knives. Trimmers often ask which side to put the disc on. This should be done so that the numbers and letters are on top.
- Then you need to put the shoe on top, and above it - a fastening nut, which must be tightened tightly with a wrench.
- The last step is to install the protective cover.
As you can see, the procedure is very simple and the same for many brands, be it equipment from Stihl or Husqvarna.
When is the use of knives relevant?
When using braid in summer cottages, the most popular fastening is fishing line. It has a low price, suitable for various 3D heads, safe to use. The downside to using a line is that it is only suitable for low height mowing. In other situations, the cord gets clogged immediately, regardless of whether you are using a gas model or an electric trimmer. In addition, the plant is wound onto the spindle, which creates significant resistance on the shaft and leads to its destruction. It can also cause the piston system of hedge trimmers to fail or the motor to burn out in electric trimmers.
Therefore, when mowing tall or tough vegetation, use different attachments. Therefore, it is better to install and use the disc to collect tall and coarse grass, thin shoots of trees and shrubs. . This nozzle clogs much less frequently, which improves the wear resistance of the equipment.
READ How to properly thread line into a Patriot trimmer
Brush cutter knives with 36–40 teeth (and with Pobedit soldering)
Yes, from my experience, these discs are the best. They are positioned as disks with victorious soldering, but there it is so overwhelming that it all falls out in 3 days. And they continue to mow perfectly due to the huge number of teeth, diameter, and then lightness. Due to the small thickness and the huge number of perforations in the disc, even not very powerful brush cutters can pull it. And this is good. And me, after switching to this disc
, I almost never use fishing line, only in the most problematic areas.
So far, about 10 acres of strong, dry, long-lasting wood from burdocks, nettles, small growth, and all sorts of other nasty things have been mowed - I think it will not soon become dull (I don’t even put on fishing line).
I don’t make hay, but I mow willow, nettles and other growth 15-20 mm thick with a disc, 255 mm I think. It’s creepy, the monster accidentally didn’t notice the 25mm steel corner sticking out from the ground and sawed it to hell, the performance of the right knife almost didn’t drop. It cuts burdocks like slightly frozen butter.
And you shouldn’t be afraid of uneven surfaces with various molehills and other pleasures. The main thing is not to run into reinforcement or stone.
DIY trimmer knife
The easiest way to make a homemade knife is in the blade version. For this you will need:
- A piece of pipe (copper is better than steel) of a suitable diameter for making an adapter sleeve for the output part of the flexible shaft.
- A sheet of steel no more than 1 mm thick for the washer.
- A regular cotter pin in accordance with GOST 397-66, for attaching the base to the trimmer shaft.
- Stainless steel strips 1…1.2 mm thick, for making knife blades.
- Fasteners (it is better to use rivets rather than screws or a nut for a knife, even if it is included in the original kit).
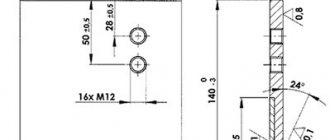
The general view of a homemade trimmer knife is shown in the figure.
The production of equipment is carried out in the following sequence. First, mark out the general dimensions of the device so as not to go beyond the protective casing. Then a sleeve is made from a piece of pipe. To improve the fit, the bushing is split and seated along the outer surface of the output part of the trimmer shaft. Since the diameter of the washer is determined solely by the dimensions of the available space, it can also be selected from the nearest standard sizes. The washer is welded to the bushing in such a way that the formed seam leg is minimal.
It is better to make blades on a milling machine, respecting the corners and sharp edges, and avoiding bending of the blades during their subsequent processing (sharpening). Fastening with rivets with a slight vertical play will allow for better cutting, especially of woody stems. During installation, it is worth carefully checking the presence of minimum (at least 1.5 mm) gaps between the pipe and the blades in order to prevent rubbing of the blades during their possible thermal expansion.
The final fixation of the device on the shaft is done with a cotter pin.
The trimmer is designed to keep the lawn or hedge in its original form, and this is why it is very important that each blade of the knife remains extremely sharp. But what if the blades become deformed due to the hardness of the grass or the removal of branches? You can, of course, purchase a new tool, but it is much more profitable and faster to sharpen the blades in a special salon. Sharpening a trimmer knife requires a special file, which easily restores the primary qualities of the metal surface of any tool. Such a special file cannot be purchased in a store, and it is highly not recommended to handle it without experience.
Sharpening trimmer blades on your own is extremely problematic and takes a very long time; this work is quite labor-intensive, which is why most trimmer owners try to sharpen knives using a sharpening wheel. It is strictly forbidden to do this, since a trimmer knife, when brought to a stone moving at high speed, simply cannot be held by a person without experience. The tool may fly out of your hands and deform your limbs. Sparks from metal blades and sharpeners can cause eye damage and even blindness.
Who can I contact?
That is why it is worth contacting our specialists, who have not only extensive experience behind them, but also high-tech equipment that will help sharpen the trimmer knife to extreme sharpness.
Trimmer blades - how to sharpen
, short properties, including knives for lawn mowers and knives for trimmers, purpose comparison, advantages and disadvantages, the right knife, also reviews of knives for trimmers
Summarize
Using one of the above methods, if you have some skill and patience, you can sharpen the blades yourself, which will extend their lifespan for a long time. The results of sharpening, carried out at home in compliance with all rules and recommendations, may not be inferior to the results after professional processing. Practice shows that when sharpening blades with GOI paste, they will work without failure for at least a year.
Source
If the trimmer disc is used regularly, it should be removed and sharpened or replaced with a new one from time to time. This part can be made of metal or plastic, have a different number of blades, but the replacement process remains the same. Moreover, this procedure is similar to the technology of different manufacturers, be it Carver or Huter, but there may be slight differences. Changing the blade on your trimmer is quite easy as long as you take precautions and know the correct procedure, which can be found in your owner's manual. This material will describe the entire replacement process step by step, as well as the method of self-sharpening knives.