Tools for wood carving must be carefully selected. Wood carving as a type of decorative and applied art has a long history and has provided humanity with real masterpieces. At home, you can also create works of art, and simply diversify the interior. Although some modern models with electric drive have appeared (for example, a wood carving drill), in general the tool preserves traditions and is intended mainly for painstaking manual labor.
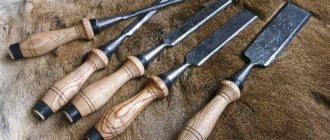
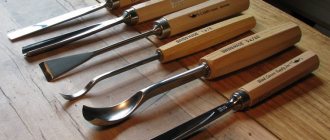
Different types of chisels for wood carving
The main tools of the carver
Wood carving is the processing of wood to give it a special shape or create a relief on it. The following main types of such operations can be distinguished:
- The through type of processing includes sawing and slotting wood carving. The sawing type is carried out with a jigsaw or file. The slotting type consists of punching through wood using a chisel or cutters when using a wood cutting machine. A pattern appears on a wooden product, which is why this type of carving is also called openwork.
An example of a box made with slotted carvings - The flat, creased type involves creating a pattern that is in-depth in relation to the main background. The following varieties of this type are noted: contour carving, staple carving, geometric carving and on a black background. The contour subtype is made in the form of grooves of various shapes using cutters, an angular or semicircular chisel, and a knife. Bracket carving is carried out with the same type of element in the form of a bracket using a semicircular chisel.
- The relief type is typical for carved panels, and the elements in it are raised in relation to the main background. The main tool is chisels of various shapes. Particularly notable is the Kudrinskaya carving, which is distinguished by its unique curls of flower garlands.
An example of making relief wood carving - The sculptural type of carving is distinguished by the creation of three-dimensional forms in the form of wooden sculptures. The entire arsenal of instruments is used in the creation of such works. Recently, a carving pantograph has often been used for this type of creativity.
- House carving is intended for decorating wooden houses and is always popular. In its implementation, almost all types of processing considered are used. The house variety provides for significant areas and large dimensions.
Templates for house carving
In order to do such work, a wood carving tool is used, both the main type and an auxiliary one, or even a carpenter's one.
About wood carving for beginners
To decorate the internal and external space, various types of carvings and techniques for realizing the plan can be used. If you are interested in this type of needlework, then you must understand that you need to master the methods and techniques of wood processing, acquire the necessary tools and improve carving skills.
In the modern world of smartphones and tablets, a wooden stand decorated with wood carvings looks very original.
Skillfully executed carvings in the form of simple and ornate patterns and ornaments seem to enliven the world and endow it with sophistication, charm, emphasizing the taste of the owner of luxury items and the talent of the craftsman.
Panel
Cutting boards
Wooden icons
The works of the best carvers decorate the temples. Pay attention to the photo of the iconostasis of the upper Church of the Holy Image of the Savior, which is located in Moscow, in the Church of the Intercession of the Blessed Virgin Mary in Fili.
Modern masters with delicate taste create real masterpieces.
And thanks to finishing technologies and protection of the finished product from the destructive effects of mold and insects, these wood carvings have served people for hundreds of years.
Pay attention to the magnificent carved pieces of furniture:
Stylish doors:
Delightful handmade figurines:
Very often, connoisseurs collect handmade carved items. Wonderful chess that is worthy of any collection.
Perhaps, over time, your wood carving masterpieces will be carefully preserved by collectors or decorate temples.
Types of wood carving
Of all the types of wood carving, openwork or through wood carving is very interesting, which is characterized by some transparency, in which only the image remains, without a background. An example is an applied carving - this is an ornament that is attached to a finished background after production by a craftsman.
Geometric wood is a type of carving in which a pattern is formed using a variety of simple geometric shapes (a rhombus is often used).
Oriental wood carving is distinguished by its whimsical forms. Egypt is the cradle of the oriental type of wood carving.
Relief wood carving. In this technique, the image is located above the background or at the same level with it. These are carved panels of various shapes with three-dimensional images.
Carving in the Baroque style is a flat-relief carving, but distinguished by an abundance of carved and molded decorations, various colors, curls, leaves, figures of people in unnatural poses, and fabulous fantastic animals.
Kudrinskaya carving originated in the village of Kudrino. Well-known products in this type of carving are boxes, vases, dishes, ladles, and home decor items. The main element is a floral ornament: rosettes, curls and twigs.
Three-dimensional (sculptural) carving is excellent for making sculptures, animal and human figures, and toys. Bogorodskaya carving is a subtype of three-dimensional carving. This is the main industry of the village of Bogorodskoye in the Moscow region. The famous Bogorodsk toys are figurines of animals and people made of linden and alder.
Scandinavian carvings were most often used to decorate wooden Scandinavian churches. Wood carvers decorated the inside and outside of church buildings with images of Gods and various animals.
Contour carving is the simplest and most unique type of carving. On a flat background, the master cuts out grooves - grooves, forming a pattern. Carved landscapes - images of landscapes on wood.
All these types of carvings are quite conventional. Each master chooses the most suitable one, taking into account work experience, quality of wood and creative inspiration.
What can be decorated with carvings?
The simplest staircase is transformed, decorated with carved balusters. Balusters are curly posts in the form of columns, a stylish and noble decoration of the staircase. Wooden balusters look organically with a spiral wooden staircase.
Bas-relief. Another name is "low relief". This is a sculptural image on a plane. Most often these are figures of people and animals .
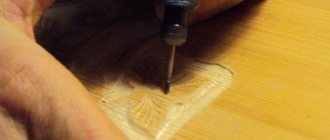
How to use the tool
When performing wood carving, the following work is carried out: drilling, sawing, cutting and gouging. To create a quality product, it is impossible to do without measuring tools.
During the work process, the need arises for auxiliary tools or devices that help fix the workpiece and limit the degree of impact.
The nature of the work determines the choice of the necessary tool. Historically, the best examples were made using hand tools, but the modern trend towards mechanization and automation of labor has not bypassed this area of activity.
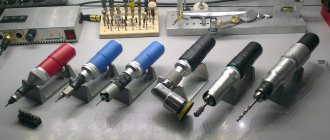
Set of various cutters for wood carving
There is a whole range of machines, mini-drills (drills), hand-held milling cutters, jigsaws, grinders, etc. on sale. Certain products can be made in automatic mode using copy-milling devices (pantograph).
sketches and drawings for beginners
Let's look at what flat-relief wood carving is, what types still exist and what is needed to make them. Products made from this material have long been part of human life (from toys to houses). And when creating wooden objects, they try to show their natural beauty. Carving is one of the first decorations that was applied to fences, dishes, boxes, furniture, etc. But different techniques were used to make each item.
Painting made with flat-relief carving
For example, incised or openwork carving was used to decorate a house, furniture or dishes, and sculptural carving was used to decorate a ship, carved balusters for a staircase, a souvenir or a toy.
Return to contents
Contents of the material
Material for work and types of thread
First, let's look at what types of wood can be used for this exciting activity. For beginners, it is better to choose soft breeds. The following types of wood exist:
- hard - beech, walnut, oak, ash;
- very hard - acacia, yew, hornbeam;
- soft - aspen, linden, pine.
In order to make a triangular notch thread, you must have:
The following types of thread exist:
- Flat-relief - assumes the location of the pattern and background in the same plane. Abramtsevo-Kudrinskaya carving and pargori are its types.
- Sawed - is considered a continuation of the previous one, since the image is cut out with a jigsaw and its decoration is a mesh.
An example of platbands made with sawn threads - Slotted - it is used for flat elements, and some areas of the background are removed.
Flat-relief has subtypes:
- A carving with an oval kennel - with an interesting play of chiaroscuro, which results from a combination of a steeper curve (from the side of the pattern) and a hollow one (from the background).
- With a cushion or matched background - almost the same as with an outline, but with the difference that the background is not flat, but is sometimes located below the ornament itself. The pattern seems to be superimposed on a plane. And in this case the background is made by embossing.
Return to contents
How to prepare the base and get started
Basically, wood carving for beginners is a complex job that requires certain skills and knowledge. In order to do everything correctly, you need to know how to use the tools. Processing the base begins with work on preparing wood for carving.
Example of a varnished kitchen board
First, it needs to be planed, and if the background is made of light wood, then this is done with a plane. And for a dark background of the composition, the workpiece is tinted. To obtain a shiny surface, the wood is varnished; in this case, black is used; after it dries, it is polished with a polish.
When using dyes such as tempera, ink, mordants, watercolors and other similar dyes, the surface remains matte or is covered with a light varnish and polished. To secure the workpiece, it is clamped in the workbench. To do this, use machine clamps or holders (plates that cover and hold the workpiece). Flat-relief carving allows you to create a plant pattern, bas-relief of an animal, bird or person.
When wood carving is done, designs are selected from special books, magazines or albums. To perform the ornament correctly, it is transferred using tracing paper or carbon paper. It is better to first use transparent paper, which is drawn into squares. Their size depends on the size of the original pattern. If it is necessary to increase it, then use a pantograph. The carving ornament may be increased by 2 or 4 times.
In order for the wood carving, the sketches of which are transferred to the workpiece, to be done correctly, select a quarter or half of the pattern, fold the tracing paper horizontally and, if necessary, also vertically. Afterwards, sketches of the ornament are transferred to it or an outline is outlined. On one side, half of the image is obtained, it is folded, and a whole image comes out.
Making a sketch of a pattern for flat-relief carving
It is transferred to a wooden blank using any of the existing methods. The main thing is that all parts free from slotted threads are placed in a place with a beautiful texture. And the rest contain framing elements. The contours of the pattern must coincide with the direction of the fiber.
Return to contents
Execution technique
The main tool - a knife - must be clamped in a fist, with the blade facing you. Having given some effort, they pass it along the ornament. The knife is located slightly inclined in relation to the board. This is how the cut is made. After this, trimming is done. To do this, the knife is held in the same position, but the hand is tilted in the other direction.
Having applied some force, they trim the already completed contour. In this case, a straw (triangular) comes out. Roundings are made with only one corner of the chisel. Moreover, the radius changes if necessary and depends on the width of the tool blade. They work well to separate the straws. It should immediately separate from the workpiece. Otherwise, you will need to do everything again, but you will have to cut deeper.
To cut a contour groove, the tool is held with both hands.
If necessary, circles are also cut out with a knife.
For curls, use a semicircular chisel. It is deepened 3 or 4 mm into the wood and the brush is turned, thereby scrolling everything around the axis. This is done until the lines are closed. This is a very exciting activity. The main thing is to figure out what’s what, and then everything will work out. Mainly artistic wood carving, photos of which can be found in magazines, books and other publications, an ancient and beautiful craft.
Today it is being revived and there are many good modern masters of this craft.
project-sam.ru
What types of knives are used?
One of the primary cutting tools used for artistic wood carving are wood carving knives of various designs and purposes. The following types of knives are distinguished:
- Cutter knife. It is considered the main tool of a carver and is used when carrying out any work. It can have different blade lengths, handles, and even have different shapes. The most important difference is that the cutting angle is 35º. Dimensions and angle of the blade of the cutter knife
- Knife-jamb. It is used in flat-relief and openwork carvings to create long straight lines, form an oval contour and process the sides of recesses. Main dimensions: cutting chamfer angle - 20º, blade bevel angle - 35-60º, blade length - 35-80 mm, blade width - 6-45 mm, handle length - 90-160 mm.
- Bogorodsky knife. Designed for sculptural carving. The length of its blade is in the range of 25-90 mm, and the width is 10-25 mm.
- Auxiliary knives are needed for certain jobs. There are knives that allow you to make curved finishing of a volumetric relief, others are designed for editing slotted threads.
Geometric carving technology
Geometric wood carving is considered the simplest and is perfect for beginners. To create the intended design, you need to have a small set of wood carving tools and clearly follow the design. In geometric wood carving, symmetry and repetition are of utmost importance. This achieves a wonderful play of light and shadow.
Cutting boards using this technique and wooden panels look wonderful in the kitchen.
Geometric carving consists of sequential cutting out of simple geometric shapes: rectangles, triangles, squares, rhombuses. But the result is a wonderful ornament that looks different in different lighting.
The sequence of performing any wood carving is as follows:
- First, a wooden blank is made (board, deck, blank).
- Next is rough leveling of the surface of the workpiece, during which all defects and roughness are removed.
- Then a decorative relief is formed using special cutters.
- After the main carving is completed, the finishing process is grinding, impregnation, painting, varnishing.
You cannot work with a workpiece on your knees! The master must have a table to work on.
Master class “Geometric wood carving on a cutting board”
Tools . You will need 2 knives for wood carving: a triangular jamb knife and a feather knife, a ruler, a compass, a pencil.
A triangle jamb knife is necessary for cutting triangular shapes of various configurations, as well as for cutting long straight lines. A pen knife is used to cut long lines such as a petal or groove. Carving knives should be sharp and comfortable.
First stage. We make a sketch of the pattern on the board. It can be applied using a compass and ruler. Or you can print out carving patterns taken from the Internet and use carbon paper to transfer them to a prepared cutting board.
Second phase . Cut out the petals. We use a pen knife.
While working, the thumb is pressed firmly against the board, and the index finger lightly touches the wood. This will help regulate the depth of the knife into the surface and the angle of inclination. And your thumb will help you move the blade smoothly. First, we cut in one direction at an angle, then we turn the board over and cut on the other side.
If the shavings curl like a rope, the knife is good and sharp. It must be periodically sharpened with a piece of leather with GOI paste.
Third stage . We cut out the triangles with a blunt knife. Using the heel, at an angle of 45 degrees, we cut the knife into the wood, not reaching the edges of the pattern on three sides. The slots should meet on all sides in the shape of a pyramid. The sliver falls out and forms a beautiful triangle.
Fourth stage. What we couldn’t cut, carefully clean it so that the edges are frequent and even. Using the same principle, we cut out grooves and triangles around the perimeter of the board.
Fifth stage . We sand everything with sandpaper and treat it with natural impregnation. All! The work is done. We decorate the kitchen with a useful and beautiful cutting board with wood carvings.
Original
What chisels are needed when working?
Of course, the main handmade tools are wood carving chisels. The most common types of chisels include the following tool:
- Straight type: used as an auxiliary tool.
- Semicircular type: the main type of chisel, which is necessary for any type of work. There are flat, medium and round options.
- Klukarzy. They have a curved working part; there are flat, angular and semicircular varieties. The process of carving with a crab cutter
- Cerasics. They look similar to the semicircular type, but are designed for cutting thin grooves - for this purpose the blade width is 2-3 mm.
- Thicknessers or corner chisels. Used for cutting V-shaped grooves and contour cutting. Such wood carving cutters have an angle between the working cutting knives of 55-75º.
- The graver has a mushroom-shaped handle, and the bend angle is 15º. The tool is designed for making various grooves. This is what wood carving pens of various sizes look like
- Rivets: sharpening of the working edge is made in the form of a sword or leaf, and is used to process the main background in areas where other chisels do not pass.
- Nail is a type of chisel-rivet with sharpening in the form of a nail, used for processing in hard-to-reach places, as well as when making staple carvings.
Materials for work
Each type of wood for carving has its pros and cons. Soft wood is easy to work with, but there can also be a lot of defects. These are aspen, linden, birch. This wood is best for beginners.
Oak, boxwood, mahogany are more expensive and complex wood. It is hard and durable, so it is difficult to carve from such wood. Very often there are troubles when working with such types of wood. Either the instrument or the craftsman may be harmed.
An experienced carver can easily work with a variety of woods, including juniper. Well, for beginners it is better to use inexpensive materials - spruce, pine, pear or birch.
Whatever tools are chosen for wood carving, safety precautions must be strictly observed!
What other tool can you use?
In addition to the main devices discussed, additional tools are used when carrying out work to carry out specific work.
The following additional tool is usually used for wood carving:
- Spoon knives or spoon knives: usually a sharpened ring welded to a steel bar that is inserted into the handle - are used for removing accumulated sawdust in recesses, as well as for grinding the inside walls of large recesses, for example, when cutting utensils.
- Embosses and punches: durable metal rods with a specific pattern on the end. Most common when creating the main background.
When carving wood over large areas, various auxiliary tools are also used:
- For drilling work: gimlets, rotators, hand drills.
- When sawing: hacksaw, hacksaw, jigsaw, two-handed saw.
- Auxiliary equipment: mallet, staple, miter box, clamps, vice, various clamps, hammer.
To carry out measurements and markings, the following tools are used: ruler, square, protractor, leveler, measuring rod, plumb line, leveler, level, calipers, vernier calipers, bore gauge, surface thicknesser, compass, tape measure.