A wood carving drill, equipped with various working attachments, is equipment with which you can apply not only various inscriptions and patterns, but also relief images to a wooden surface. To perform wood carving, you can use not only special engravers designed for working on this material, but also drills that are equipped in dental offices.
A carver may have several drills in his arsenal, used for different tasks.
Beginning craftsmen who find a wood engraver to be a complex piece of equipment should obtain the appropriate knowledge and master certain skills before starting work. There are many models of such devices on the modern market, which can cause certain difficulties when choosing, especially for those who are just planning to take up such an exciting activity as wood carving.
Types of drills
The variety of devices offered on the market comes down to three main types:
- drills for technical purposes;
- micromotors, or engravers for wood carving;
- mini-drills, or compact drills with a flexible drive.
They differ in purpose, size, power, and performance.
The design of both a powerful woodcarving drill and a micromotor is based on two main components: a high-speed electric motor and a replaceable tool mounted in a chuck.
Drills for technical purposes
Devices of this type are equipped with a fairly powerful engine and allow you to solve a wide range of problems. Structurally, they are divided into two blocks:
- Actually a drill. An electric motor is housed in a cylindrical housing. A collet or quick-release chuck is attached to its shaft.
- A power supply unit that houses a mains voltage converter of a transformer or pulse type.
- Power pedal. Allows you to free your hands for more precise holding of the device.
- Connecting cables.
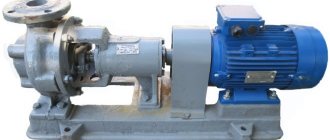
Wood drill for technical purposes
The advantage of such carving drills is the ability to perform various operations on wood:
- drilling;
- boring;
- grinding.
As a disadvantage, it should be noted that the speed is relatively low compared to a Dremel for wood carving.
The market offers models from both domestic and foreign manufacturers. Domestic ones are affordable, but they lack the ability to operate for a long time without overheating, especially under high loads. They are well suited for hobbies; for professional use with significant volumes of work, it is better to opt for imported equipment.
Micromotors
Wood carving drills or micromotors are particularly compact, low power and high speed (up to 30,000 rpm). The attachments are also fixed to the working shaft of the electric motor.
Micromotors
Limited power does not allow the devices to achieve high productivity, but the low weight and size do not tire the hand, and high speeds allow you to perform the most delicate and filigree carving details.
Mini drills or compact drills with flexible drive
This class of devices are the battleships of the world of drills. Structurally, they differ in that they allow the installation of an attachment with a flexible drive shaft in place of the cartridge. Thus, the heavy drive device with the motor remains lying on the table (or suspended), and in the hand of the master there remains only a collet (or quick-release) clamp with the tool installed in it.
Such systems have high power (up to 200 watts) and develop high speeds (up to 30 thousand rpm). They are equipped with a large number of different cutters and abrasive attachments and allow you to perform a wide range of operations.
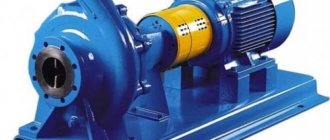
Hammer mini drill
The kit may also include a telescopic rod for attaching the device in a place convenient for the master.
Design Features
When deciding how to choose a drill or how to make it yourself (which is quite possible), you should understand the design and operating principles of this equipment. The main elements of any drill are:
- a tip on which working attachments are installed;
- electric motor, which can be brushed or brushless;
- a device that provides power to the drill motor.
Design of a corded drill
It is clear that a pneumatic drill, powered by compressed air energy, does not have an electric motor in its design. If a brushless electric motor is installed on the drill, it additionally contains a special control unit that ensures the creation of an alternating magnetic field between the stator and the rotor of the drive electric motor. A commutator drill, unlike a brushless one, can be connected directly to a DC source.
Power supply for simultaneous operation of two low-voltage drills
When comparing commutator and brushless type drills, you need to pay attention to the following points:
- Collector drills are easier to manufacture and, accordingly, cheaper. To ensure their operation, no expensive control unit is required.
- Brushless drills are more powerful and are capable of providing a rotation speed of the tool used in the range of 50–60 thousand rpm, while collector ones develop a speed not exceeding 45 thousand rpm.
- The presence in the design of commutator devices of an intensively rubbing unit (brushes and commutator surface) leads to their significant heating during operation, which requires ensuring effective ventilation of the electric motor of the drill.
- The presence of a rubbing unit in the design is also the reason for a significant loss of power in collector-type drills. Because of this, the efficiency of collector devices is only 60–70%, while for brushless devices this parameter is at the level of 90%.
- To increase the power and torque generated by brushed electric motors, it is necessary to increase the size of the device.
- The brush-commutator assembly itself is the reason for the large size of commutator devices when compared with brushless ones.
- Collector drills are also characterized by a higher noise level during operation.
- The service life of commutator drills is slightly shorter than that of brushless ones.
MicroNX brushless drill with reverse and continuously adjustable rotation speed up to 60,000 rpm
In general, to summarize all of the above, we can say that in terms of the ratio of the most significant parameters, collector drills are the most preferable option in most cases, which is confirmed by the high popularity of devices of this particular type. Brushless drills are more expensive and difficult to operate and maintain when you often have to process very hard materials.
How to choose the right drill
The main criteria to consider when choosing a wood carving drill are as follows:
- engine power;
- revolutions;
- torque;
- weight;
- ergonomics.
Sadly, none of the devices on the market can simultaneously operate for a long time at high speeds and withstand high loads. Therefore, the best choice would be to purchase two drills:
- high-speed, low-power Dremel for making fine thread parts;
- powerful mini-drill for rough processing and sampling of large volumes of image background.
Many craftsmen also note that 30 thousand revolutions is a large reserve, and most operations are performed perfectly well at 10-20 thousand rpm.
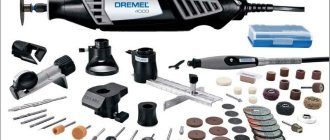
When choosing, you should also pay attention to the set of attachments that will be offered in the kit.
How to choose equipment for woodworking
Knowing the basic criteria that should be followed when choosing a wood engraver, purchasing the right model is not so difficult. Such criteria, in particular, are the power of the drive motor and the number of revolutions it can produce, as well as the torque it develops.
None of the modern models of drills, unfortunately, combines two important characteristics: the ability to work for a long time at high speeds and resistance to increased loads arising during the treatment process. In this regard, craftsmen who are going to purchase wood drills have to make a choice between powerful, load-resistant and high-speed devices. The best option in such cases is to purchase two engraver models with different technical capabilities.
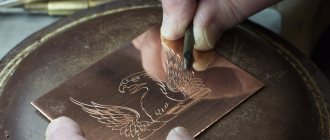
It is more convenient to cut a shallow pattern with a thin cutter clamped in the chuck of a light engraver
If you are going to devote yourself to wood carving and immediately purchase technical equipment for these purposes, it is better to opt for such equipment as:
- a powerful drill, the working tip of which has a reinforced design;
- micromotor of compact size, capable of operating at high speeds.
For auxiliary operations, for example, grinding large surfaces, it is more advisable to trust a powerful device
You can save on purchasing an engraver for wood carving by making such a device yourself. To make your engraver, you must prepare:
- an electric motor from an old washing machine or other household appliance (its power must be sufficient for the device being manufactured);
- elements of a belt drive, with the help of which rotation from the electric motor shaft will be transmitted to the arm of the drill;
- the sleeve itself (flexible shaft) of the device;
- a nozzle in which the working tool used will be fixed.
Homemade engraving machine based on an old sharpener
If the electric motor and belt drive mechanism can be selected from old household appliances, then the flexible shaft and nozzle will have to be purchased additionally. Naturally, to make a drill with your own hands you will need at least minimal technical knowledge and skills, as well as a set of plumbing tools.
You can make an engraver for wood carving yourself in an even simpler way. To do this, you need to purchase a flexible shaft that can be installed on a conventional electric drill or screwdriver. Using such a shaft with an attachment eliminates the need to think about how to connect the drive motor to the drill arm.
How to use a hand drill
Every home master wants to get a high-quality and clear image. To do this, you need to follow simple recommendations:
- Make a stencil from thick paper or thin cardboard.
- Using carbon paper, transfer the outline of the design onto the workpiece.
- Draw the contours of the design using needle cutters or small drills.
- Select background areas using large cutters.
- Apply the base, rubbing in the paint or stain.
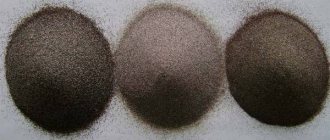
- Sprinkle the product with bronze powder. Excess powder should be blown off or wiped off with a soft cloth.
Using a stencil can significantly simplify the engraving operation, especially in the case of a repeating pattern. You need to carefully work with the tool near the stencil so as not to damage it and be able to reuse it on other areas of the part.
Wood carving with a flexible shaft drill
For beginner engravers, it is better to use devices with a flexible shaft. A true professional who has gained considerable experience can successfully handle any tool.
Drill - advice from the pros.
Vladimir Lipatov, head of the design bureau of NPK AVERON
Every day more and more drills from different manufacturers appear on the market. They all have different technical characteristics, also expressed in different units of measurement. Buyers' heads are spinning! As a result, technicians determine 1-2 parameters for themselves, not always correctly assessing their significance, and judge the quality of the entire product by these parameters. Let's look again at the main mistakes that are made when choosing a drill.
Collector and brushless
First, a little about the structure of the drill and its varieties.
The engine of any drill consists of a moving part - the rotor, to which the collet with the tool is attached, and a stationary part - the stator. Rotation occurs due to electricity supplied to the motor windings: electrical energy is converted into magnetic field energy, and the interaction of the magnetic fields of the stator and rotor creates torque.
A magnetic field can be created in two ways: mechanically (collector drills) and electronically (brushless drills).
In a commutator drill, the magnetic field is changed by an armature and brushes sliding along the commutator. The commutator is a set of plates located on the rotor, the brushes are sliding contacts pressed against the commutator. The stator is made of permanent magnets that create a constant magnetic field that passes through the rotor.
The collector drill can be connected to a constant voltage source (for example, to a car battery), and it will work.
In a brushless drill, the rotor is made of a magnet, and the stator is made of a winding. An alternating magnetic field is created by an external source - the control unit.
The control unit contains semiconductor devices that turn on or off the current through the stator in
right time. Semiconductor devices are traditionally called gates, so a brushless machine is often called a gate machine.
Collector drills:
* easier to manufacture, therefore significantly cheaper; brushless ones require a more expensive and complex control unit;
* less powerful, do not allow a rotation speed of more than 45 thousand rpm. (how important this is - a little later), for brushless ones the rotation speed can reach 50-60 thousand rpm;
* the power of the micromotor is limited by losses from friction of the brushes on the commutator - there is a need to ventilate the micromotor;
* large currents cannot be passed through the collector, therefore, it is impossible to obtain a large torque without increasing the size of the collector;
* shorter service life;
* more noisy;
* dimensions are larger due to the brush-collector unit;
* Efficiency – 60-70% versus 90% for brushless ones.
In terms of the most important parameters, such as: price-quality ratio, acceptable power, well-established manufacturing technology, simplicity of the electronic controller, brushed micromotors are still ahead of brushless micromotors and are used in most dental operations. Therefore, in the future we will only talk about collector drills.
The only advantage of brushless ones is that they are more often used for intensive processing of hard alloys such as KHS and large volumes of gypsum. All this can also be done using collectors, but it will take more time.
Speed
The main indicators by which technicians usually choose a drill are:
* speed (number of revolutions);
* power;
* force (torque).
For some reason, many people believe that the main indicator of a good drill is the number of revolutions: the higher it is, the better, and a tool with the inscription “50,000 rpm.” seems to be the limit of perfection. However, any experienced technician will confirm that 50,000 rpm is excessive speed . Firms use an inflated figure as a marketing ploy, diverting consumer attention from other parameters in which they are losing. In fact, 35-40 thousand revolutions are quite enough to perform almost all dental work. For example, carbide burs and cutters are designed for speeds of up to 15 thousand rpm, and diamond burs for processing ceramics are designed for speeds of up to 35-40 thousand rpm.
A similar marketing technique was once used by many camera companies - they focused on the number of megapixels. But Sony has proven that using Zeiss optics and a large matrix, you can achieve higher quality images with lower resolution.
Accelerating the drill to high speeds is not a problem - you just need to take a power supply with a higher voltage, but will the bearings withstand such a speed and how long will they be able to maintain it under load and without? Will the windings of the tip burn out if the load is greater than it is designed for?
In practice, a much more important parameter is the engine rotation torque (or it is also called torque). This is the value that determines the power of the drill. The larger it is, the more comfortable it is for the equipment to work. For simplicity, let's use an analogy with a car:
You can write 1500 km/h on the speedometer, but no one will ever accelerate to that speed, and it’s not needed. But the power with which the car accelerates is a more important characteristic. When climbing a hill, a low-power engine will slow down, and when accelerating from a standstill, it will take a long time to gain momentum. If the car has a powerful engine, the driver will not even feel the hill, but will move away easily and quickly.
The same thing happens with the drill motor. The revolutions on the car's tachometer are the revolutions of the drill. The rotational torque affects the result of the drill's processing as the dynamics of the car: when working under load (for example, with hard material), a motor with high speeds but insufficient rotational torque will slow down, the rotation speed of the tool will decrease, and in the worst case, the drill will simply stop. A motor with a high torque will not slow down, but will continue to work confidently. Therefore, serious manufacturers pay attention to the constantly high value
torque, and not at all the number of revolutions.
The golden rule of mechanics: while we gain in torque (strength), we lose in rotational speed (rpm).
By the way, too high rotation speeds of the drill can be simply dangerous: this often breaks the cutter, and there is a high probability of injury to the technician. That is why, for example, AVERON micromotors have a speed limit and do not accelerate to 50 thousand (the “smart” control unit does not allow them).
Torque, power, speed, voltage - how it’s all connected in a drill
Another important characteristic of a drill is power consumption, but you need to know what exactly the manufacturer indicated in this case:
1. What is the power? The fact is that the power can be mechanical, electrical, on the shaft and... it is not known what else the manufacturer will declare under this name in order to attract the buyer with the largest possible figure.
2. How was it measured? Sometimes, for advertising purposes , manufacturers indicate the maximum torque when the drill has almost stopped and the speed when nothing acts on the shaft (the drill is idling) . And then they are multiplied... The result is unreal power! Power output of the drill. In reality, this is the same as specifying a car's maximum speed (measured on a flat road) and maximum traction (measured in first gear). But! Nobody drives in first gear at top speed.
In fact, this is the picture.
The rotation speed of the drill (rpm) is related to the mechanical power by a simple ratio:
Mechanical ≈ 0.1×M×n
P – power,
M – torque,
n is the number of revolutions per minute (rotation speed).
Those. the greater the power of the drill P, the greater the torque M or the greater the speed
available.
Go ahead. For example, the micromotor indicates 350 gsm and 50,000 rpm. This means that it must have mechanical power (see formula above):
Pmechanical = 0.1×0.0350×50000=175 W
Mechanical rotational power is obtained by converting electrical power that is supplied from the power source. It is known from the physics course that this transformation occurs with loss - half of the electrical energy goes into heat (with an efficiency of 50%).
This means that at 350 gsm and 50,000 rpm, the drill should consume 2 times more from the network - 175 W × 2 = 350 W. Half of them (175 W) will be converted into mechanical power and will spin the micromotor, the other half (another 175 W) will go into parasitic heat, warming up the drill .
Have you ever held a 100-watt light bulb with your bare hand? What will happen to a micromotor heated to the same temperature? It will burn out quickly. And it is impossible to hold it in your hand. Therefore, you can only turn on the drill at maximum load for a short time. The rest of the time it must operate at medium speeds in order to last the period promised by the manufacturer. Therefore, “350 gsm, 50,000 rpm” is an almost ideal, not a performance characteristic .
And please note that we considered the operation of the micromotor at medium load. With further load, the tip slows down even more, the rotation speed drops, while the efficiency decreases even more, and even more energy is lost into heat.
In reality, with a constant input power and an increase in load, the speed drops.
With a decrease in the input power and a constant load, the speed also drops, and with an increase in load it will drop even more.
We sorted out the tip. Now about the control unit.
Control block
The control unit is designed to dose the electrical power of the micromotor and convert it into a form suitable for the micromotor. The real power of the drill is determined precisely by the power of the control unit: the same instrument can be equipped with a unit of 15 W, 30 W or 60 W and in each case it will work differently.
In advertising campaigns, they often indicate the power of the handpiece , without particularly caring about indicating the power of the control unit , so the figure turns out to be many times overestimated. Very often there are cases when the micromotor is 350 gsm, 30,000 rpm. is equipped with a control unit, which contains a 10-20 W transformer, but at the same time the maximum parameters of the tip are declared.
However, the power of the control unit is not everything. The same case may contain completely different electronic fillings , and it is this that determines the “intelligence” of the device.
In the simplest case, this is a primitive set of on/off and power adjustment. In many, especially inexpensive drills, this is the case. Whereas a “smart” control unit is complex electronics that allows you to control many important functions:
* smooth acceleration and fast but smooth stop of tool rotation;
* smooth regulation of rotation speed;
* protection against power surges in the network;
* pedal connection;
* reverse (reverse);
* control of power consumption.
The more protective and control functions in the power supply (blocking the spontaneous start of the engine when changing modes, protection against overheating of the tip and control electronics, etc.), the more difficult and expensive it is to manufacture. But thanks to the protection system, a drill with a “smart” control unit lasts much longer . And saving on “intelligence” can lead to the fact that you will have to buy a new one too quickly.
Naturally, all serious manufacturers provide their micromotors with high-quality electronics. But our company went even further in this matter, proposing the concept of an environmentally friendly drill BM ECO, where the control unit provides, in addition to the listed functions, the following:
1. Automatic switching on of the hood when the micromotor starts . Why this is important: If the technician forgets to turn on the hood, the table and area around it will instantly become covered in a layer of plaster dust. And this is not only dirt and defects in work, but also harm to health.
2. Automatic hood shutdown . Thanks to automatic shutdown, idle operation and, consequently, wear and tear on equipment, as well as unnecessary energy costs, are prevented. Saves working time
(try to count how many times a day you would need to turn the hood on/off).
3. Convenience and ergonomics . The control unit easily adapts to any table with a built-in hood. It can be placed on a special bracket under the tabletop, freeing the workplace from unnecessary elements and wires. It is turned on in two ways - with the encoder button on the desktop control panel and with the pedal. Optionally equipped with a universal knee switch. The switch is mounted under the tabletop and is activated by a slight movement of the knee. When using it, the equipment’s foot is not overstrained, extra wires and the pedal do not interfere with work and cleaning the room, and the pedal is not lost.
4. Stable work , because Provides overload protection, soft start and soft stop. In general, the indicator of speed stability when processing solid materials at BM ECO is one of the best.
5. Control of power consumption . When we increase the load at a given speed, the power take-off from the source increases. To prevent it from switching off due to overload, when the torque increases, the speed is automatically reduced, thereby maintaining a constant power without reducing the torque.
6. Control of idle operation . If you accidentally turn on the drill and it spins at idle speed without load, the control unit will automatically turn it off after 10 minutes, protecting it from accidental injuries, micromotor wear and unnecessary energy consumption.
About units of measurement
Sometimes technicians have problems due to confusion between the units of speed and force. Everything is more or less clear with speed; it is usually measured in revolutions per minute (rpm in English). A little more difficult with effort. Some manufacturers indicate the force of their drills in grams per centimeter, others in gf-Cm, and others in newtons.
The ratio is as follows:
1 newton per centimeter (Ncm) = 101.97 grams per centimeter (gsm). For convenience, you can
Carving Tips
As a material for carving wood with a drill, it is better to choose wood species with a dense, uniform structure, such as:
- Linden;
- beech;
- alder;
- pear.
Species such as oak, spruce, pine and ash are less suitable; they reflect the texture of the design much worse.
The first step is to transfer the outlines of the drawing to the board and cover the background to be removed with shading. The contour of the selected area is outlined with a small round drill with a star-shaped cross section. Next, the entire background area is selected. If it has a large area, you can take a larger drill to speed up the process.
Be sure to use a cutting depth limiter. The cutting depth should be adjusted and practiced on a rough piece of wood. After cutting through the background, it needs to be sanded with sandpaper. Next, you can start cutting out the details of the image itself.
Wood carving
Upon completion of the entire drawing, it is sanded and covered with stain. After drying, you need to go over it with sandpaper so as to wipe off the stained layer from the protruding areas and leave it on the background.
Types and purpose of cutters and attachments
Drill attachments come in the following types:
- Abrasive attachments: cutting discs, cones, reverse cones and other rotating bodies. Designed for grinding thread parts.
- Wire brushes for roughing material.
- Steel cutters of different shapes. To perform basic operations - cutting out contours and sampling the background.
- Serrated blades. For processing thin relief details.
- Drill. For drilling through or blind holes.
- Balls for polishing and grinding thread parts.
- Felt circles. Serve for final polishing.
The cutters are made of high-strength and wear-resistant tool steel. Abrasive attachments are made mainly based on corundum. Abrasive attachments coated with diamond chips are particularly wear-resistant and precise.
Wood carving cutters
The collet clamp allows you to accurately secure and center the replacement tool. However, with strong lateral loads, its tightening must be checked periodically. The quick-release clamp does not have this drawback, but only tool shanks specially designed for it are suitable for it.
Final finishing of products
To finish the wood surface, felt and felt circles are used. They are fixed in a drill and lubricated with polishing paste, which makes it possible to achieve an almost mirror-like state of the wood surface. After completing all stages of mechanical processing, soft wood varieties are coated with transparent varnishes in one or several layers. This coating will protect the product from moisture and significantly increase its durability.
After the varnish has dried, the surface is polished again to achieve perfect smoothness and a mirror shine. Hard types of wood are not varnished, emphasizing the original texture of the material. Sometimes they are slightly tinted.