Very often, when making a relief image on a wooden surface, craftsmen, in order to make the task easier, use special drills with various attachments. This equipment can be used as a dental bur or special hand engravers for a certain type of material (glass, wood, metal). Wood carving using a conventional engraver, especially for beginners, requires certain skills and presents some difficulties.
The very first problem that you will have to face is choosing a drill from the huge variety of options presented on the modern market.
Learn wood carving with an engraver for beginners with your own hands
How to choose the right drill?
Despite the great variety of drills on the market, choosing the right one, knowing the necessary technical characteristics, is not so difficult. The main selection criteria are engine power, which determines the number of revolutions of the drill per minute, and torque.
When choosing a drill, you will always have to make a choice between the ability to withstand heavy loads and the ability to work for a long time at high speeds, because not a single machine, unfortunately, combines these two important qualities. It is for this reason that the best option is to purchase two drills with different technical characteristics.
The best option for wood carving would be:
- Powerful drill with reinforced tip.
- Compact micromotor capable of operating at high speeds.
If you really like to save money and also get along well with technical equipment, then you can assemble your first drill yourself: to do this, you need to take a motor from a washing machine or any other motor of sufficient power and, using a belt drive, connect it to the sleeve from the drill. All this action requires dexterity and some skills, besides, the sleeve and tip itself will still have to be purchased.
Russian production produces quite powerful sleeveless drills “Profile” with a pedal - This model is very reliable and allows you to perform an incredibly wide range of technical operations: drilling, grinding and much more, despite the low speed.
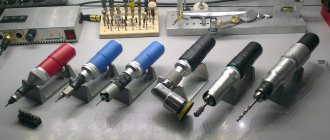
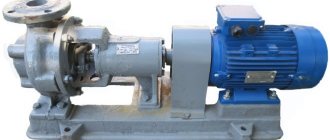
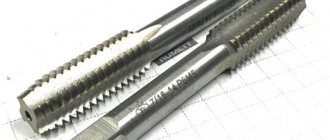
For years, the drill machine from Foredom SR from the USA has gained its authority in the market (you can see this device in the photo below). Very reliable in operation, even under high loads. All spare parts can be purchased at almost any store that sells tools for jewelers. The choice of attachments is very large and varied: from power collet attachments to convenient quick-release attachments.
Micromotors These are unique mini drills - they are more compact and do without a flexible shaft. Their motor is mounted directly behind the tip. Such machines are very convenient to use for the most delicate work; it is for these purposes that they are very convenient.
Among the Russian ones, the DPM 25-2 drill with a specialized medical handpiece should be highlighted. It fits very comfortably in the hand, the burs can be changed easily and quickly, and the price for a machine with such characteristics is not at all high. But it should still be noted that the medical handpiece is not designed for heavy loads, and therefore, if used too often, it can quickly fail. The micromotor cannot be repaired, since the carbon brushes, which wear out over time, cannot be replaced. Thus, from time to time you will have to change the engine or purchase a new drill entirely. Otherwise, this is a very good, budget and convenient option. You can also look for good analogues from Korea.
The following drills are attractive for their functionality and reliability, but in Russia Marathon or Strong drills are quite expensive. They have very high speeds and power - up to 30,000 rpm and a power of 65W. For a micromotor, these figures are very respectable. The best masters work with just such drills.
It should be noted that the above micromotors are only suitable for small burs and small bur cutters. Using large cutters on them, you will significantly reduce the resource of the tool and its service life. It is for this reason that it is necessary to have at least two types of drills in your arsenal.
Usually the drill is equipped with a flexible shaft. It is convenient to use when performing small parts in the thread. However, when using a flexible shaft, the drill loses half its power.
Tips for carving.
So, carving is best done on wood species with a monolithic structure: linden, beech, alder, pear. Pine, ash and oak are less suitable for this purpose.
The first step is to transfer the sketch to the board and shade the background that you will remove.
The picture around the office should be outlined with a small drill with a round star-shaped section. After which the entire background is hammered with the same drill, albeit of a larger diameter, to complete the job faster.
In order to select a large amount of background, it is convenient to use the limiter attachment that comes with the drill.
The cutting depth must first be adjusted and practiced on an extra piece of wood.
After the background is completely cut through, it is sanded with sandpaper.
After this, the details are cut out in the drawing itself.
After completing the work, you should sand the entire picture and cover it with stain, then go over it with sandpaper so that the stain remains only in those places where the background is lower.
Components
In one form or another, different models and types of dental drills contain several basic design elements that ensure the operation of the entire device and increase its functionality.
- Nozzle .
A direct working tool used for processing fabrics or performing other manipulations. Most often it is a bur, which is used to remove tissue by cutting. Additionally, grinding attachments, discs, etc. with different sizes and other parameters can be used as attachments for the drill. - Tip .
Serves to secure the nozzle, that is, it is an intermediate link for transmitting torque. In dental practice, both straight and bent tips are used. The choice of a specific type depends on the convenience of manipulation, that is, the location of the area requiring treatment, and the characteristics of the clinical picture. - Drive unit .
The most important part of the device, which directly transmits torque to the tools, is a micromotor or turbine, which operate on different principles. It is by the type of drive used that different types of drills will differ. - Shlens .
This part serves to connect the device with the main part - the control unit or a separate dental unit. Its presence allows, if necessary, to place the main part of the structure in a separate room in order to minimize the level of noise generated.
Engraver's choice
When buying your first drill, you should adhere to the rule of the golden mean. That is, there is no need to chase the price and buy a tool that is obviously problematic. And buying the most expensive one will not bring much contribution to the skill, and a fair amount of money will be spent. In order to make the right choice, you must follow the following criteria:
- For the first tool, the price of the kit will be about 3-6 thousand rubles.
- The power of the tool is usually from 35 to 300 W. In this case, it is advisable to take an engraver with a power of at least 100 W.
- Tool speed is from 3500 to 35000 rpm. The electric motor must be able to adjust them to process different types of wood.
Thus, wood carving with a drill is not the most expensive hobby. In Moscow, as in any other city, you can easily buy the necessary tool or order it from China.
If you are not ready to shell out about 5 thousand for a new engraver, then you can make it yourself. But in this case, you will still have to buy nozzles and a flexible shaft. On the other hand, a used wood carving drill may be suitable for you. But at the same time, you need to pay attention to its condition, check that nothing is loose, and try to process the material with it.
Engraving pen
Manual engraving at home requires: - A graver - A metal workpiece - Something solid to hold the metal workpiece, possibly a vice
For beginners, we recommend using a softer metal, such as copper or aluminum, as a workpiece.
A shtikhel is a rod, usually 120 -130 millimeters in size. The tip of the gravel is cut at a certain angle and sharpened. The second tip is inserted into the handle, usually wooden. Engraving pens come in various shapes and differ in the width of the working surface. If you don’t have this tool, you can easily make it yourself if you have the right materials. To make a graver you need tool steel. The metal used in ball bearings and springs is excellent here. To make a cutting surface, you need to use a cutter, a needle file, a file, cutting it into thin strips. The best material to make an engraving pen is P18 steel. You can also make a graver from circular saw blades. Then we sharpen the workpiece at an angle, which will allow us to make a notch of the required width. If we talk about the handle of a wooden pen, then it must be made of hardwood, with a width convenient for the master to hold in his hand. The mushroom shape is, in our opinion, the best option.
Read also: Attachments for a hammer drill for removing tiles
Additional accessories
To make working with a mini drill easier, various items are required. Some of them are usually included in the kit. These include a flexible shaft with a handle and a limiter attachment. A flexible shaft with a handle is needed to facilitate work when processing small parts. It is connected to the engraver itself, and the work is no longer done with the device itself, which weighs about one kilogram, but with a handle connected through a shaft. It is simpler and more convenient, and its weight is only 200-300 grams.
The limiter attachment is used to level out a blank background. This is a part of the material being removed that has one level. The attachment is put on the engraver itself, then the desired milling depth is set. This position is fixed with a bolt and you can start working.
Some devices may not be included in the kit; you will have to buy them yourself or make them yourself. Such a device, for example, is a tripod. With its help, the engraver is suspended, and work is done with a handle with attachments through a flexible shaft. This is necessary, because if the engraver is simply placed on the table, then vibrations will cause it to move along it, thereby interfering with work, or it will simply fall, which can lead to its breakage.
Some models are equipped with a foot pedal, but their use is not always convenient, especially when there are several devices.
Cutters and attachments
Grinding and carving with a wood drill is carried out using special cutters, wheels, rollers, etc. Cutters can have different shapes, grain sizes and purposes. Coarse-grained ones are intended for rough processing of large surfaces, and fine-grained ones are intended for detailed elaboration of the relief.
Drills are used to drill holes of various diameters, and rollers and wheels with sandpaper are used for grinding. Most of the necessary attachments are included with the tool. They are suitable for working with both wood and metal. But still, for full-fledged woodworking, specific cutters are required. For example, to create semicircular recesses, special cutters are used - the so-called “hedgehogs”.
Metal engraving using various equipment
If you look into history, you can see that hand engraving on metal has been known to mankind for about five thousand years.
Above we discussed the general technology and methods by which you can do engraving yourself.
Let's see what equipment can be used for this.
[Laser engraving] on metal is distinguished by its durability. In this case, a paste is used, which is applied to the object before processing. In this case, the paste is applied to the uncoated material.
The technology is as follows: the equipment directs a laser at an object, which, under the influence of temperature, melts a little, changes color and evaporates.
Using a laser, you can make designs of varying complexity and not only on metal. The price of laser engraved jewelry is high.
Diamond engraving allows the product to “play” in the light due to the formation of tetrahedral pits.
Diamond engraving is performed using a special cutter, which removes the top layer of metal, forming those very pits.
Diamond engraving is considered durable and is widely used in jewelry and souvenirs. The price for such products is not fixed; most often, it is negotiated individually.
You can apply a design to metal using a milling engraving machine, which you can not only buy, but also make yourself.
Milling in the form of such a machine is necessary in the case of small-scale production (your own business). Otherwise, it will be unnecessary expenses. The machine allows you to make an accurate drawing due to the rigidity of the entire structure.
This machine is suitable for various products: souvenirs, keys, key rings, etc.
In addition to metal, the engraving machine allows you to process wood, glass, MDF and other materials.
If we talk about small production, then such a machine will be simply irreplaceable; it is easy to use, the cutters move quickly and accurately. The human factor is excluded.
Engraving using this machine is accurate and durable.
Anyone who has been in a dentist's chair at least once in their life is familiar with such a technical device as a drill. Meanwhile, the dental office is not the only place where a pneumatic or electric drill is actively used as the main working equipment. Using such devices equipped with various types of attachments, professional specialists and home craftsmen perform the finest processing of parts from various materials, produce decorative products, and also successfully solve a whole list of other tasks.
The main purpose of the drill is high-precision processing of small objects
Precautions and workspace arrangement
Before starting the device for the first time, you must carefully study the instructions. In order for wood carving with a drill to be comfortable, it is necessary to equip the workplace. First of all, you should make a hood. You can use a regular vacuum cleaner for this. Extraction is necessary because fine wood dust gets into the lungs, which can lead to health problems.
If exhaust hood equipment is not possible, then you can protect the respiratory tract with a medical mask or gauze bandage, but this is not very convenient, especially during prolonged work. You should also not forget about eye protection. It is better to use construction or carpentry safety glasses.
Where to begin?
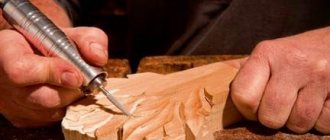
Wood carving lessons with a drill should start with simple things. To do this, take an unnecessary piece of board or block. Using a simple pencil, write any word on the wood. There is no need to make it too thin and small. You need to learn the basics of handling the tool.
Choose from a set of cutters that are suitable, with a round head and fine grit. When working, the pressure on the tool should not be too strong, otherwise chips, severe irregularities, and burrs may result. Wood carving is carried out using a drill using smooth hand movements. The photo clearly shows the process of milling a simple inscription.
After this, you can experiment with different cutters, making different depths of the selected design or pattern.
Relief creation
When working with a more complex pattern, which has many levels and relief elements, it is necessary, first of all, to choose the right material. Species whose wood does not have pronounced coarse fibers are suitable for this. These, for example, include beech, alder, linden, birch, and aspen. But oak, pine, and larch have coarse fibers, and their processing can be fraught with some difficulties.
Read also: Parameters for laser cutting of plywood
After the sketch of the future product is ready, it must be transferred to the tree. The sketch can be redrawn by hand or using tracing paper. Next, wood carving with a drill is carried out in several stages:
- Firstly, the boundaries of the pattern are set using thin cutters.
- Secondly, if there is a dull background, it is removed using a limiter attachment.
- Thirdly, the sampling of a large volume of wood at a large depth of relief is carried out with coarse-grained nozzles.
- Fourth, larger elements are cut first, then smaller ones, and detailing of the larger ones is done.
- Fifthly, after carving wood with a drill is completed, it is necessary to eliminate traces of cutters and minor defects using fine-grained sandpaper, and use a zero to bring everything smooth.
Drawing conclusions
Everything will not work out the first time, so be patient, wood and tools. Practice while creating some small souvenirs or crafts. In the process of mastering the craft, an understanding will come of what needs to be done, how to do it correctly, and what other devices are needed for this.
A wood carving drill, equipped with various working attachments, is equipment with which you can apply not only various inscriptions and patterns, but also relief images to a wooden surface. To perform wood carving, you can use not only special engravers designed for working on this material, but also drills that are equipped in dental offices.
A carver may have several drills in his arsenal, used for different tasks.
Beginning craftsmen who find a wood engraver to be a complex piece of equipment should obtain the appropriate knowledge and master certain skills before starting work. There are many models of such devices on the modern market, which can cause certain difficulties when choosing, especially for those who are just planning to take up such an exciting activity as wood carving.
Engraving at home. Methods
The general technology for applying a pattern to a metal surface was presented above.
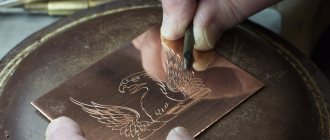
Engraving on metal at home can be done with any sharp object. Let's consider several ways.
Application is carried out using a special device
To create a high-quality drawing, it is better to use a tool called an engraver. You can purchase a whole set for creating lines of different thicknesses (see photo).
Drawings on the surface of an object must be done using the following technology:
- You can make a pattern on an object yourself using a pencil or marker, or you can use a copy sheet;
- The next step is to apply the design with an engraver to the surface of the object. The cutters should be moved in one direction in good lighting;
- The resulting result is fixed with a thin layer of wax or colorless varnish.
Drawing using a set of materials at hand
What does the set include:
- nail polish;
- toothpick (match);
- salt;
- phone charger;
- glass and nail polish remover.
The price of such a set is minimal; no cutters are needed.
The item is coated with a thick layer of varnish. Use a toothpick (match) to scratch the pattern. You need to put 2 tbsp in a glass. l. salt, add water and stir.
Charging from the phone is applied to the object with a plus, and with a minus - to any second metal object.
The second item is placed in a glass of water, and the device is plugged into an outlet.
This should be done for five minutes (a little less, depending on the desired etching depth). Upon completion of work, it is necessary to wipe off the varnish.
This method is good because it does not use cutters, paste or other tools, only what is at hand and the price will be low. Thus, at home you can make personalized spoons, forks, decorative sets, etc., all with your own hands.
Engraving can be done with a drill
This instrument works on the same principle as the machine in the dentist's office.
The price of the device is about 5,000 rubles, so the machine is purchased when the products are planned to be made more than once.
In addition to the device itself, you need to purchase a set of attachments; the average price of one attachment is about 50 rubles.
It should be noted that to operate a metal drill with your own hands, you need a milling set, and its price is also impressive.
The tool and machine are first tested to achieve good results.
How to choose equipment for woodworking
Knowing the basic criteria that should be followed when choosing a wood engraver, purchasing the right model is not so difficult. Such criteria, in particular, are the power of the drive motor and the number of revolutions it can produce, as well as the torque it develops.
None of the modern models of drills, unfortunately, combines two important characteristics: the ability to work for a long time at high speeds and resistance to increased loads arising during the treatment process. In this regard, craftsmen who are going to purchase wood drills have to make a choice between powerful, load-resistant and high-speed devices. The best option in such cases is to purchase two engraver models with different technical capabilities.
It is more convenient to cut a shallow pattern with a thin cutter clamped in the chuck of a light engraver
If you are going to devote yourself to wood carving and immediately purchase technical equipment for these purposes, it is better to opt for such equipment as:
- a powerful drill, the working tip of which has a reinforced design;
- micromotor of compact size, capable of operating at high speeds.
For auxiliary operations, for example, grinding large surfaces, it is more advisable to trust a powerful device
You can save on purchasing an engraver for wood carving by making such a device yourself. To make your engraver, you must prepare:
- an electric motor from an old washing machine or other household appliance (its power must be sufficient for the device being manufactured);
- elements of a belt drive, with the help of which rotation from the electric motor shaft will be transmitted to the arm of the drill;
- the sleeve itself (flexible shaft) of the device;
- a nozzle in which the working tool used will be fixed.
Homemade engraving machine based on an old sharpener
If the electric motor and belt drive mechanism can be selected from old household appliances, then the flexible shaft and nozzle will have to be purchased additionally. Naturally, to make a drill with your own hands you will need at least minimal technical knowledge and skills, as well as a set of plumbing tools.
You can make an engraver for wood carving yourself in an even simpler way. To do this, you need to purchase a flexible shaft that can be installed on a conventional electric drill or screwdriver. Using such a shaft with an attachment eliminates the need to think about how to connect the drive motor to the drill arm.
The structure of the drill - the purpose of the main components
For those who plan to construct such a unit on their own, you should know the general diagram of its structure. The main parts include the power supply, electric motor and handpiece. The unit not only powers the entire system, but also controls its operation. There can be two types of block: collector and collectorless. Its type depends on the tip, which can be brushed or brushless. The first transmits power to the rotor through a rubbing brush-commutator assembly, the second does not have such an element. A commutator motor is easier to manufacture and operate, therefore cheaper, but has a limit on the number of revolutions; the maximum limit, although not small, still exists.
Types and manufacturers of drills
The domestic market offers a wide variety of drills and engravers that can be successfully used for wood carving. When choosing such equipment, you need to know for what tasks it will be used and in conjunction with which tool.
Drills for technical purposes
Drills in this category are distinguished by sufficiently high power, which makes it possible to effectively use such equipment to solve various technical problems. It is also represented by products of the Russian brand “Profile”, which produces sleeveless drills equipped with a pedal, which makes working with them more convenient and comfortable. Using technical drills produced under this brand, you can perform various technological operations - drilling, boring, grinding, etc. Meanwhile, when choosing such equipment, you should keep in mind that it operates at low speeds.
The Profile-B-04 drill chuck is designed for attachments with a shank diameter of up to 6.5 mm
Powerful, reliable and functional drills for technical purposes are produced by the American company Foredom SR. They can be equipped with power collet and quick-release attachments, which allows you to successfully use various types of working tools. It is also important that purchasing spare parts and components for drills from this manufacturer on the domestic market does not present any particular problems.
Micromotors
Micromotors are compact drills or engravers that can be used for wood carving. Their design features include the absence of a flexible shaft and the location of the drive motor at the rear of the working nozzle itself. It is very convenient to use such engravers for making fine wood carvings.
Read also: How to cut out of plywood with an engraver
Among similar products produced by domestic manufacturers, we should highlight the micromotor model DPM 25-2, which is equipped with a specialized medical tip. Despite its relatively low cost, this micromotor has decent technical characteristics, it is easy to use and can be used in conjunction with various types of working tools. However, it should be borne in mind that the medical handpiece with which such a micromotor is equipped is not intended for intense loads, so it is advisable to use such equipment only for simple work and fine wood carving. If the operating conditions are not observed, the micromotor of this model may have a motor failure that cannot be repaired, but can only be replaced with a new one. However, all the above-described disadvantages of the DPM 25-2 micromotor are compensated by its low price.
To make a mini-engraver, it is enough to equip a microelectric motor from the DPM series with a collet chuck
Micromotors produced under the Marathon and Strong brands are much more reliable and functional, but also more expensive. Along with high power (65 W), such micromotors are capable of providing high rotation speed of the tool used for carving (up to 30,000 rpm). Many experienced woodcarvers, already well versed in the equipment available on the domestic market, choose micromotors from these brands to equip their workshops.
Micromotors, regardless of their modification, are not intended for use in conjunction with large tools, which can quickly render them unusable.
Mini drills or compact drills with flexible drive
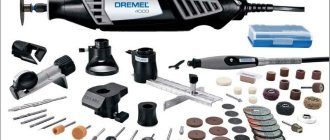
Mini-drills or engravers for woodworking, equipped with a compact drive, a sleeve and a convenient working attachment, are presented on the domestic market with products from different manufacturers. You can consider the capabilities of such equipment using the example of a Chinese-made Hammer MD 135A drill, which is popular among those involved in wood carving. At a low cost, the mini-drill of this model has decent characteristics and comes in a good package, which includes:
- compact drive unit;
- flexible shaft;
- telescopic rod designed for attaching the device;
- a set of 40 working tools.
Hammer MD 135A kit, consisting of the essentials needed to start using the drill
If we talk about the main technical characteristics of the drill of this model, they are impressive: the rotation speed of the tool is 10,000–32,000 rpm, the power of the device is 135 W. It should be noted the high build quality of this drill, as well as the ergonomic shape of its body and flexible shaft attachment, which are convenient to hold in your hands during processing. When turned on, the Hammer MD 135A wood carving engraver does not make much noise or vibrate.
To expand the functionality of the Hammer MD 135A drill, it is enough to purchase an additional set of working tools of various types. During the process of running in a drill of this model, performed at idle speed, you can notice that the speed of the device “floats”. When the Hammer MD 135A mini drill is running under load, no such problems are detected.
The engraver body inspires confidence - high-quality plastic without sagging or burrs
The working tools included in the standard set of a drill of this brand can be divided into several categories:
- cylindrical tools with an abrasive working surface, which are used to perform grinding work;
- milling cutters, which are used to select and grind the surface being processed;
- rollers with an abrasive coating applied to the head.
If we analyze the reviews of those who have worked with the Hammer MD 135A drill for some time, we can draw the following conclusions about its most significant advantages and disadvantages.
- The reliability and functionality of the mini-drill are at a fairly high level.
- The Hammer MD 135A drill can be successfully used both for making shallow grooves and for grinding surfaces with complex configurations.
- The price of this mini-drill is low for equipment of this level.
- The collet clamp of the drill, although highly reliable, is not very convenient to use.
- There are not many attachments that come standard with the equipment, and their quality and durability leave much to be desired.
To perform complex and voluminous work on wood and processing hardwood, you should choose more powerful drills equipped with cam rather than collet clamping mechanisms, and also use high-quality tools.
What does the price depend on?
You can trace the dependence of the price of a dental drill on a wide variety of factors , some of which are related only to the general laws of the market.
Among them:
- fluctuations in foreign currency exchange rates;
- choice of domestic or foreign manufacturer (an inevitable increase in cost due to transport costs);
- seller’s pricing policy (markups, discounts, promotions, etc.);
- buying a new or used device;
- the region in which the purchase is made, and much more.
The main factor influencing the cost is the specific type of installation being purchased. At the same time, among the same type of machine there may also be different prices, which in this case reflect differences in characteristics - power, additional functions, and so on.
Speaking about a specific numerical expression of price, we can give the average cost for individual types of drills :
- pneumatic - about 28-32 thousand rubles;
- electromechanical – 23-25 thousand;
- combined devices - 55-60 thousand;
- laser - more than 1 million rubles;
- portable - about 7-10 thousand.
Let's find out whether it hurts to remove a wisdom tooth, how necessary is this procedure?
In the next publication we will tell you what drugs are used for conduction anesthesia in dentistry.
Here https://www.vash-dentist.ru/lechenie/zubyi/emal/giperesteziya-simptomyi-raznovidnosti-terapiya.html we will talk about the features of the manifestation of hyperesthesia of dental enamel.
Below is the estimated price at which you can buy some models from different manufacturers.
- Selena-2000 (portable, electric) – about 24 thousand.
- RESTAR-03 (portable electric) – 17 thousand.
- Marathon N7 (portable electric) – 9,500 rubles;
- BPS 300/40-TECH (pneumatic, stationary on a stand) depending on additional equipment - from 17 to 25 thousand.
- BPK-01M (BPK-02/01) (pneumatic, stationary, has a built-in compressor) - 32-35 thousand.
- Mobilico MBD-110 (portable, combined) – 67-70 thousand.
- Waterlase C-100 Biolase (hydrokinetic laser for hard and soft tissues) – 1.2 million rubles.
Many people hate and fear going to the dentist. By learning more about one of the most important tools in dental practice, the drill, they can get rid of this aversion.
And regular preventive visits to the doctor will help prevent many problems with the teeth and the entire oral cavity.
If you find an error, please select a piece of text and press Ctrl+Enter.
Tags: treatment, operations in dentistry
Did you like the article? stay tuned
Previous article
What are dental consumables?
Next article
Why is it necessary to install a gum former?
How to carve wood using a drill
In order for wood carving with a drill to achieve the desired result, you should not only study the theoretical material, but also watch a training video. During the procedure itself, you should adhere to the following recommendations.
- The sketch of the drawing to be completed is transferred to the board, while the areas of the workpiece from which the layer of wood will be removed are shaded.
- The contour of the future pattern is processed with a small round drill, the working part of which is made in the shape of an asterisk (in cross section).
- The background part of the future pattern is hammered with a drill of the same type, but of a larger diameter. This will significantly speed up the further processing process.
- The limiter attachment allows you to quickly and efficiently select the background part of the future pattern from the surface of the board.
- After selecting the background part, they begin to make the drawing itself, carefully cutting out all its details.
You can get a more detailed understanding of all the operations described above using training videos that are easy to find on the Internet.
Wood carving with an engraver or drill will bring even more pleasure if the type of wood is chosen correctly. Alder, beech, linden and pear, which have a monolithic internal structure, are best suited for processing using the carving method.