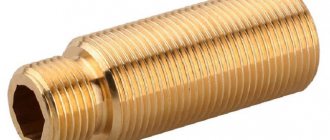
There are situations when a reliable connection cannot be made using a welding machine. In such cases, threaded connections are used. It allows you to assemble and disassemble metal structures without deformation. However, to create a connection you need to know how to properly cut a thread with a tap.
Thread taps
Types of instruments
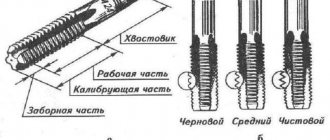
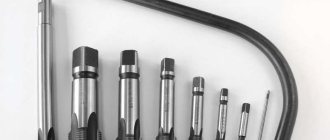
The tool that is used to create threads is called a tap. These are cylindrical metal rods, on the edges of which there are sharp incisors located in a certain sequence. Taps are divided according to several factors:
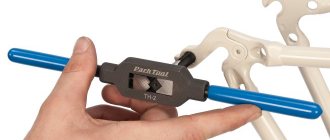
- Method of use. A special wrench for carrying out the work is supplied with hand tools. Tooling for machine tools is fixed in the chuck thanks to a cylindrical shank.
- According to the type of holes processed. Devices are divided into two groups. Some are used for processing through holes, others for blind holes.
- For cutting internal, metric and pipe threads.
The shape of the taps can be either cylindrical or conical.
Drilling holes and pre-processing bars
From the last observation we can conclude that the outer diameter of the thread is slightly larger than the original diameter of the rod on which it is cut. Likewise, the axial distance between the tips of the internal threads will be slightly less than the hole.
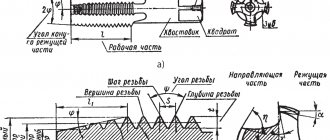
If you look at any drawing depicting a metric thread, you can note a number of key dimensions:
- Inner and outer diameter. These values change names depending on whether the thread is internal or external.
- Thread pitch is the distance between the tops of adjacent teeth.
- Shape and dimensions of the nominal profile, angles of inclination.
So: the diameter of the rod or thread hole is not equal to either the external or internal diameter of the thread. The easiest way to determine the hole size for an internal thread is to subtract the pitch distance from the outer diameter. For external threads, the same value must be added to the diameter of the rod.
However, real professionals always use tables of standard metric threads, where the recommended diameters also take into account the type of thread, the characteristics of metals and their alloys. So the main problem is finding the right rod or drill.
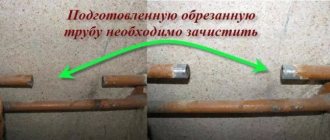
You set the basis for high-quality cutting at the stage of drilling or preparing the rod. The hole must be drilled strictly perpendicularly; among the ways to control the right angle, you can suggest combining the drill with the reflection in a placed mirror or placing a credit card nearby.
Rust should be removed from the rod and the side surface should be checked for evenness with a metal ruler. The best way to prepare the rod is to clamp it into the drill chuck and give the edge a good file. When rounding, it is allowed to grind the rod down a couple of tenths if this is necessary for alignment, which in practice is more important than the completeness of the cutting.
This is of little use when working with fixed rods. You have to select the thread diameter according to the diameter of the rod, choosing a value less than the recommended one. For a more convenient approach at the end, you need to remove the chamfer and perform the cutting especially carefully and accurately. Do not forget to generously apply machine oil to the area to be treated.
Design features of the tool
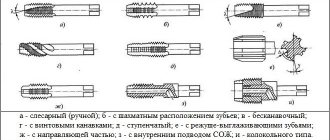
If you need to cut a thread, before doing this you need to understand what types of taps can be found in a hardware store:
- Straight and screw devices are distinguished. A separate group are cylindrical rods, on which special grooves are cut to remove metal shavings from the hole.
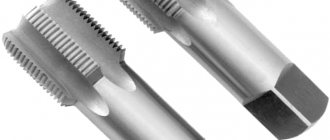
- Another division by design is universal, complete tools. The first option consists of taps, the working part of which is divided into three zones. They are needed for sequential coarse, medium, and finishing processing of the inside of the hole. The second option consists of sets of metal cylinders, each of which is responsible for its own type of thread cutting.
To obtain a better connection, you need to choose a set of taps. Separate devices allow you to process metal more accurately and are less vulnerable to high force. They are distinguished by reliability, durability, and high accuracy.
One-pass method
Single-start thread cutting is typical for mechanized devices. A single-cut tap has one wide or three thin grooves on the shank, or may have none at all. Other differences between machine taps: a short lead, a shank thinner than the nominal diameter, and a full thread profile.
You can cut through threads in thin (2–4 mm) sheet materials in one go. Machine taps are also very common for cutting blind holes. More precisely, they widen the trace from the leading part of taps #1 and #2, adding another 1.5–2 turns to the thread. If the third number has a long lead, you can cut it off completely and use this tap only for full threading in blind holes.
Single-start taps are no more difficult to work with than dies. There is difficulty in setting the correct position, but the technique is the same. By the way, most dies are also designed for single-pass operation.
How to cut a thread with a tap?
Tapping internal threads is a precise technological process that is carried out in a certain sequence.
Preparation
Initially, you need to prepare tools and additional devices for the work:
- Small vice.
- Electric drill with speed controller, metal drills.
- Set of taps.
- Metal brush.
- Core with a hammer.
Thread cutting with a tap is carried out manually at low speeds of the power tool.
Tapping internal threads
Slicing process
Step-by-step thread cutting instructions:
- Drill the hole with a core and a hammer.
- Drill a hole with an electric drill. Hold the equipment exactly perpendicular to the surface being processed. Additionally, lubricate the drill with special oil.
- Chamfer 1 mm in depth. To do this, use a drill of a larger diameter.
- Secure the equipment in the collar. Perform two movements forward, one movement back. This way the metal shavings will come out of the hole and there will be no problems with cutting. Movements should be smooth.
During manual cutting, you must not apply pressure or continue to rotate the tool after it gets stuck. If it breaks, you need to drill out the tap using a drill or various metal drills. Another option for removing the fragment is to grind the area around the hole using a grinding machine. Then you need to remove it with pliers.
To create threaded connections, you need to buy the appropriate documents and learn how to work with them. By carrying out the work carefully, without haste, you can get a reliable connection in a short period of time.
Thread cutting. What is the minimum wall thickness of a steel pipe?
I work at work designing structures and modeling models
I work at work designing structures and modeling models
Essentially a designer (mechanical engineer)
non-standard equipment, Pneumo-Hydro Systems
Essentially a designer (mechanical engineer)
Thanks to all. The question has been removed. Stainless steel pipe with a wall thickness of 5-6mm it is almost impossible to find, maximum 4mm. This is not enough for thread cutting. Therefore, the fastening to the pipe will be through, using a metric rod.
P.S. There will be virtually no shear load on the bolt. The load will be on pulling out.
Source of the article: https://forum.dwg.ru/showthread.php?t=102941
Sheet metal thread
Plastic drilling and threading in thin-walled metal structures
From the history
Back in 1923, Jean-Claude de Vallières, in a small barn in France, made an unusual tool, with the help of which it became possible to make holes in thin steel sheets using frictional heat, and not by drilling as before. Numerous experiments were mostly successful, but it was impossible to establish its industrial use for a number of reasons due to the lack of: - hard metal necessary for the tool, - knowledge about the correct geometry of the tool, - diamond grinding wheels for processing hard materials, - machines for grinding complex profiles. Therefore, it took another 60 years before all these problems were solved and the use of extrusion drills became possible and profitable. Thus, new non-cutting extrusion drills appeared in the industry. Extrusion drills are polygonally ground carbide tools. At a sufficiently high number of revolutions and axial force of drills on thin-walled metal products, the metal is plasticized under the action of frictional heat, and the drill passes freely through the workpiece. Simultaneously with the formation of the hole, a sleeve is formed from the heated material that has shifted downwards. The length of the sleeve is several times greater than the previous thickness of the material. The thickness of the metal can be from 1 mm to 10 mm depending on the diameter of the hole. A variety of tools are available to produce hardened threads in thin-walled batches to produce large surface support sections. This drilling method has been successfully used for several decades in various industrial processes. To achieve optimal results, the user must be thoroughly familiar with the technology, the extrusion drilling options, and the machine requirements.
Extrusion drilling process
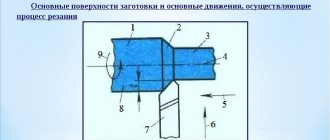
In this description of the extrusion drilling process, we assume the use of a standard extrusion drill. The part of the drill that is subject to friction has a conical shape (Fig. 1). The cone of the working part transforms into a cylinder. The conical and cylindrical parts together form the working core. Above them there is an edge for forming a tight edge of the hole and a cylindrical shank for attaching the drill to the collet. Both the conical and cylindrical parts have a polygonal cross-section, which is of decisive importance in the extrusion drilling process. The starting material for the production of extrusion drills is a hard metal alloy specially developed for this process, resistant to abrasion and changes in thermal conditions. • Start-up phase To start the process, a sufficiently high axial force and a high number of revolutions are required to generate the necessary frictional heat between the extrusion drill and the workpiece. In this case, the temperature of the drill increases to 650–750 °C, and the workpiece – to approximately 600 °C. The speed should be as low as possible to reduce downtime due to drill heating. The choice of speed depends primarily on the diameter of the thread hole; it is also determined by the thickness and type of material. High alloy and stainless steels require lower speeds and therefore will result in less tool downtime. For soft, non-ferrous materials, the speed should be higher. In general, it should be noted: the softer the material, the higher the number of revolutions you need to choose. The feed force increases until the tip of the drill passes through the material. • Drilling process The extruded material first flows against the feed direction and then, when the extrusion drill tip passes through the material, flows down in the feed direction of the drill. The feed force decreases slowly while the feed speed increases. • Shaping phase The working core of the drill pushes out the material. The feed force is reduced to zero. The edge of the extrusion drill forms an edge in the form of an O-ring from the material extruded against the direction of feed. The final width and geometric shape of the sleeve made in this way depends on the selected diameter of the thread hole and the ratio of the conical and cylindrical parts of the drill. In Fig. Figure 2 shows the extrusion drilling process.
Types of FLOWDRILL drills
• FLOWDRILL type “long” A long polygonal cylindrical part is also adjacent to the polygonal friction cone of the extrusion drill (Fig. 3a). Extrusion molded bushings are cylindrical in shape. At the end of the working process, the material, displaced in the opposite direction to the feed direction by means of a smooth edge, is formed into a kind of sealing edge. • FLOWDRILL type “short” This type has been developed specifically for FLOWTAP connecting thread forms in thin materials and has a clearly smaller polygonal cylindrical part (Fig. 3c) than the type “long”. Bushings made in this way are predominantly conical in shape, the hole decreases in diameter, and the thickness of the bushing walls decreases. This shape affects the uniformity of deformation for FLOWTAP threads, and as a result the tool produces fully formed threads with high strength. For larger material thicknesses, it is necessary to use the “long” type for threading. • FLOWDRILL type “flat” This type can be combined with both types described above – “short” and “long” (Fig. 3b and 3d). Along the edge of the drill there is a ground cutting edge, which removes the material displaced against the direction of feed. As a result of drilling, an even workpiece is obtained. The manufacturer can grind this edge for fitting only once during its entire service life. • FLOWDRILL special shapes In some cases the workpiece is too flat or the cross-section of the pipe is not sufficient for standard length extrusion drills. Then especially short extrusion drills with a large apex angle are used. • FLOWDRILL type “REM” In this type, in the conical part of the drill, both edges of the cutting edge are ground, which begin at the tip of the drill (Fig. 4). These designs can be used in hand drills, because due to grinding of the cutting edge, the feed force is reduced by about 1/3. This type is used on surfaces being machined or galvanized. By eliminating the surface layer, the lubricating effects of fusible substances can be avoided. The “REM” design can be combined with all the above mentioned types. However, the use of this type of drill on low-alloy steels and non-ferrous metals, as well as on materials with a maximum wall thickness of 2 mm, should be limited.
Tips and tricks
When cutting threads, never skimp on lubricant. The presence of oil on the working body helps prevent overheating and associated thread breaks. In addition, this way the friction force is greatly reduced and the tap can be felt perfectly with your hands. Add a couple of drops of oil every 4-5 turns.
Do not apply excessive pressure, threads up to 6 mm can be cut only with your fingers, up to 14 mm - with one hand. The tool may get stuck due to poor chip removal. In this case, it must be turned in both directions, gradually expanding the range of free play.
Don't use cheap, low-quality tools. Most cheap taps are very fragile. It's not a big deal to break one; it's much more of a hassle to have a piece in a hole that can't be re-drilled. In this case, the tap needs to be “warmed” a little with a hammer through the center punch, and then pulled back with thin-nose pliers or tweezers and gradually unscrewed. In sheet materials, it is easier to knock out a fragment and cut a thread of a larger diameter by pre-drilling a hole.
A tap is a tool that can be used to quickly and accurately cut a thread in a prepared hole. This is a rod divided into a working part and a shank. The shank is used for fixation in the driver or chuck of the machine. Chip removal is provided by longitudinal or helical grooves located on the cutting part. For the manufacture of this tool, carbon or high-speed steels are used. To cut internal threads efficiently, you need to know how to choose the right tap and prepare the hole.
Cutting in several passes
Threads are usually made in several passes, using taps with different profile completeness. The main difficulty lies in the starting, setting pass. It is made with a tap with one thin groove on the shank. The tool must be inserted freely into the hole and, pressing it with a little force, turn it a couple of turns. In this case, the perpendicularity of the insertion is controlled by a credit card; small deviations of 5–7° are quite acceptable.
In 5–6 turns, the lead-in part is completely inserted into the hole and the tap confidently begins to move. Now the tool must be rotated without pressing force. It would be a mistake to correct minor deviations from perpendicularity at this stage - the tap is not to blame for this, it goes strictly along the hole. After every 1.5–2 feed turns, you need to unscrew the tool half a turn.
After the starting pass, when the thread profile is 50–60% ready, it should be formed with medium (#2) and finishing (#3) taps with the corresponding number of grooves on the shank. Here it is only important to check that the tap fits correctly onto the existing thread; the rest is a matter of technique.
There are practically no special features of working with the die; the greatest difficulty is working on the lead-in part. The die is short, only 2.5–2 turns, so it is recommended to hold the tool with both hands.
Probably many of the transaction workers, whether at a construction site or at a factory, working on machines, wanted to complete their work as quickly as possible and be free. At least in order to make a conditional coil on a lathe or milling machine for the miracle of the device and, at a minimum, not to delay and not postpone the plan (and, accordingly, the bonus) to the next day, month and quarter...
Approximately the following still life could be seen at one time at some industrial enterprises during the lunch break - someone is cutting into dominoes, and someone is finishing a simple concoction, potato lard and tsybul, but if you look closely, almost all the toolmakers had no lard skins.
The remaining fat on the skin went to work - they extended the life of the tapping
yes to
drills
, which are always in short supply. Lubrication made it possible to spend less time on regrinding and save time for readjustment. And in the best case scenario, there were remnants of coatings such as titanium nitride on the instrument back then. Today, to process various materials, all sorts of zirconium and mixtures of lunar soil are applied to tools, and the processing speeds are now different.
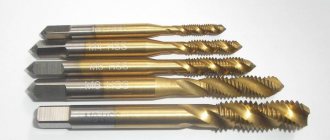
Modern cutting tool
For thread cutting, of course, you also need good coolant and skillful hands, but about the conclusions at the end of the review.
Now we are talking about cutting internal threads
…
Cutting a threaded line, no matter what it is (internal or external), on the one hand, is a difficult surface treatment process, as it might seem at first glance. Not all “old-fashioned” methods are well known to specialists, but each of them has its own advantages and disadvantages.
Tapping _
:
The most common method of thread cutting can be done by hand or by machine. The only conditional practical restrictions are the size of the hole (up to 30 mm) and the size of the wallet. Although taps with a much larger size are found in nature, this is (looking ahead) for those who do not know that there are thread cutters and other universal tools.
To obtain a thread with a tap you need:
1) rigidly fix the part in a vice; an angle of 90˚ should be formed relative to the cutting tool (there is a risk of getting a “rough” or “torn” cut);
2) to avoid “torn” threads, we use coolant (if you are having lunch, you can simply spread it with lard);
3) using slow circular movements, ensure its movement “deeper” into the hole, thereby cutting the thread.
For blind holes, taps with a helical groove are used. A characteristic feature is the shank, the cutting and calibrating parts of which are made in the form of a intake cone.
Thread rolling without chipping (rolling) taps:
A process in which plastic deformation of metal occurs when a chipless tap with the required thread profile is screwed into a pre-machined hole.
The cross section of the tool is made in the form of backing. The threaded thread in the working cavity is extruded along the circumference not 100%, but at certain intervals. Thus, deformation loads influence the metal cyclically.
Using one such element, up to 100,000 knurled holes can be machined. For steel this is a normal result, but coolant should be used and the cutting conditions should be well adjusted.
The cost of a high-quality rolling tap or without a chip tap is approximately 3-4 times more than a standard one.
Thread cutting using cutters with replaceable or brazed inserts:
This method is the most accurate, but also economically expensive. To obtain threads in holes of large diameters, cutters with replaceable or brazed plates are used. The shape of the incisors can be straight or bent, or the most perverted.
Work to improve shape, strength and durability is ongoing. The machining process is accompanied by a constant supply of coolant and removal of chips from the cutting cavity.
The disadvantage of this method is the limitation on the minimum hole size. This is due to the overall dimensions of the cutters and the equipment used.
Thread milling machines
:
Thread milling machines today are the optimal solution for processing parts.
One such tool can produce almost any thread size. Carbide thread milling cutter
with one step it is possible to produce both external and internal threads. Limitations: reach depth and equipment capabilities.
Another advantage of their use is the possibility of regrinding. Up to 3 times more regrinding than taps. And of course the quality and precision of the threads. And if there is a way to re-coat, the durability and quantity of threads cut will justify this particular method many times over.
The HORN and HAHN+KOLB catalogs contain tools for all of the above thread formation methods, as well as for their control.