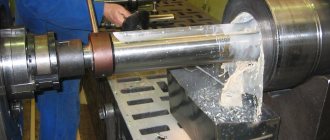
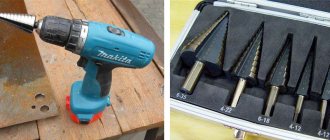
Square-shaped holes in workpieces or products made of metal and other materials can be produced using a cutting tool called a square hole drill. It has another name - Watts drill. Square holes are obtained with slight roundings in the corners, which are almost invisible. They are drilled, reamed and drilled into ferrous and non-ferrous metal with a thickness of no more than 16 mm, wood, plywood and other materials, including substances of composite origin. The operation is performed using a drill, hammer drill, or on lathes or broaching machines. They are used in industry, agriculture and everyday life in the manufacture of products, repairs and DIY crafts.
About Watts drill and Reuleaux triangle
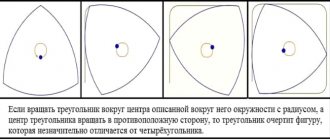
In order to understand how the Watts drill works, you need to take a short excursion into geometry. Back in the 15th century, mathematicians became interested in the interesting properties of flat figures with equal thickness. The most famous such figure is the circle. Another simple shape from this series is a rounded triangle.
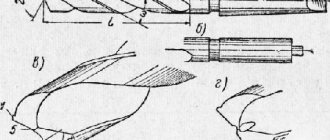
This figure turns out like this. An equilateral triangle is taken as a basis. Then a circle with a radius equal to the side of the triangle is drawn from each vertex of the triangle. The result will be a new shape with arched sides (see picture below).
A little later, the scientist L. Euler drew attention to the interesting trajectory of rotation of a rounded triangle. Then the engineer Reuleaux saw that with a certain way of rotating the figure, the trajectory of its vertices describes a shape very close to a square. To do this, it is necessary to rotate with some eccentricity. With this movement, minor roundings are formed only in the inner corners of the resulting square. Such a triangle is today known as the Reuleaux triangle.
At the beginning of the 20th century, the English scientist Watts was able to invent and patent a technical solution that would ensure such movement of a metal-cutting tool that it would ultimately result in a square hole in the workpiece. The resulting tool became known as the Watts drill.
Classification of drills for square holes
In modern metalworking, almost all cutting tools that are used to produce square holes work on the principle of rotation of the Reuleaux triangle. A Watts drill (or as it is sometimes called a Reuleaux drill) allows you to make square holes of various sizes in metal parts of various thicknesses. This tool is classified according to its size, material of manufacture, and shank design.
A Watts metal drill must be made of high-speed steel. This tool is marked HSS (High Speed Steel). For domestically produced tools, tool steel U10 or alloy steels X12 and X12MF are used. The hardness of the tool should be between 52 and 60 HRC. A square drill can have different diameters depending on the size of the side of the square.
Note that buying a Watts drill is quite difficult. Don't expect it to be available in every hardware store. You may have to purchase it to order from a large tool store or buy it from an online store.
Features of drilling square holes in wood
In furniture production, parts are often connected using a tongue-and-groove system. This connection assumes the presence of square grooves in the supplied parts. To make holes in wood, use a special square wood drill. It is a set of slotting tools. It consists of an internal wood drill and a chisel that fits onto it. Typically, the drill diameter ranges from 6 to 18 millimeters. The shank usually has a diameter of 19 millimeters. Such kits can be installed on slotting and drilling machines.
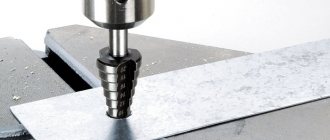
What is a wood crown?
A spray-coated attachment for processing plywood, chipboard, plastic, metal - a well-known device called a crown for drilling wood and other materials. It looks like a bowl with teeth located along the edge of the rim. It is put on a special drill chuck and rotates thanks to the power tool. The depth of the hole can vary, from a few millimeters to several centimeters. The number of teeth on it depends on the diameter of the cutter: the larger the wood crown, the greater the number of teeth on it. A typical set of ring nozzle is equipped with the following elements:
- head with cutting teeth;
- shank;
- central drill.
Why do you need a wood crown?
A ring attachment for a drill, with which you can easily drill a hole of any diameter, is widely used in repair work. A well-sharpened professional wood crown for socket boxes allows you to get neat recesses in walls, drywall, and wooden structures of the required size. A clean cut with a smooth inner surface without chips or burrs can be made using this attachment. There is no need to center the surface before drilling; sawing occurs quickly and quietly.
Is it possible to drill into metal with a wood crown?
A core drill does an excellent job of its main task - drilling holes. Experts confirm that it can be used to process not only wood. A crown for holes in wood, made of special grades of coated steel, is capable of processing more durable materials. With its help it is easy and simple to make a hole in non-ferrous metals of any hardness. When planning to work with complex materials, you should choose a drill with HCS markings; such a crown for hard wood and metal can easily cope with any task.
https://youtube.com/watch?v=ofHypLFxXE8
The principle of operation and design of the Watts drill
Drilling square holes using a Watts drill is based on the principle of rotational movement of the Reuleaux triangle along a specific eccentric trajectory.
The shape of the drill does not exactly follow the rounded triangle, but its cutting edges fit into its shape.
The drill has such a shape of cutouts in order to remove chips from the working area, as well as to minimize the moment of inertia of the tool. In addition, reducing the weight of the tool helps reduce the load on the spindle of the metal-cutting machine, and sharpened edges increase the cutting capabilities of the drill.
In addition to the Watts drill, the work will definitely require an adapter spindle, which will provide an alternating displacement of the center of the tool and set the trajectory required for the work.
It consists of an adapter for connection to the machine spindle, a ring gear, a drive gear and an engagement gear, as well as oscillating bushings. To use a square drill with household power tools, manufacturers produce special attachment templates with a cardan drive.
Geometric parameters
The main geometric parameters include the following indicators:
- diameter indicated in mm;
- total length, mm;
- length of the working part, mm;
- sharpening angle in degrees.
In addition, when choosing a square drill, pay attention to the shank, which must match the tool spindle or a set of devices for fastening it. Drilling square holes must be done after preliminary marking and punching the center of the future hole. It is recommended to start drilling at low rotation speeds, and then switch to the speed indicated in the data sheet of the machine or tool.
Operating principle and design of the Reuleaux triangle
The Reuleaux triangle is a flat geometric figure. It is formed by connecting the vertices of an equilateral triangle with circular arcs drawn from each vertex of the same triangle.
The peculiarity of the Reuleaux triangle is that when performing a rocking motion, its vertices describe the trajectory of an almost perfect square.
The only drawback of this rotation of the Reuleaux triangle is that small roundings remain in the corners of the square.
If it is necessary to obtain a square hole with internal angles of 90 degrees, it will have to be modified. This can be done manually using files and rasps or on a slotting machine.
Equipment and accessories for drilling
A tool for drilling holes has been developed for each stage. At the preparatory stage, the following tools are used to accurately mark the location of the future hole. To do this, use: a core, a special template or a jig. The core is a well-sharpened rod made of durable tool steel. With its help, a depression is made on the surface of the workpiece, at the point where it is planned to drill. Once in this recess, the drill does not slip on the surface and accurate drilling is performed.
To increase productivity, mass production plants make special templates. They allow you to mark the locations of future holes in workpieces of the same type. Special templates are used for drilling on cylindrical surfaces. They are made from a steel strip bent at a right angle. A small hole is drilled on one of the surfaces, which will later allow a core to make a mark on the cylindrical surface.
To obtain increased marking accuracy, maintain the vertical position of the drill and maintain the specified distance, a tool called a jig is used between the holes. In addition, it is used when drilling thin-walled products for which strong mechanical impact is not possible (for example, hitting a core with a hammer).
In addition to these products, tools and devices are used that allow drilling with a drill with its rigid fixation. For this purpose I use:
- guide clamp;
- holding stand;
- jig to direct the movement of the drill.
The first two devices are made for a specific electric drill design. The jig allows you to accurately guide the drill to the location of the future hole. It is successfully used for sizes not exceeding 20 millimeters. Therefore, when making large-diameter holes using a jig, preliminary drilling is performed.
All these problems are easily solved by using drilling or lathes. Drilling machines are divided into three categories:
- universal;
- specialized;
- special.
They are classified according to the following criteria:
- table design;
- level of automation;
- number of available spindles;
- degree of accuracy;
- availability of additional features.
The first category of machines allows you to solve almost the entire range of problems in the production of holes. A serious limitation is the permissible distance over which the chuck with a fixed drill can move. This circumstance does not allow drilling to great depths. In this case, specialized machines are used. To increase labor productivity and increase the number of similar parts produced, special units are designed. They are able to perform a list of necessary operations with high accuracy and speed.
By design, such machines are available with one or more spindles. The design of the table is varied: regular, floating, lifting and others. The level of automation is determined by the way drilling operations are performed. The simplest machines are manual and mechanical. Automatic and numerically controlled machines are more advanced.
In addition to drilling machines, various lathes are used to solve these problems.
On lathes you can perform the entire list of operations related to making holes: drilling itself, drilling followed by reaming or countersinking.
Alternative options for making a square hole
Although the Watts drill is the most productive and accurate tool for making square holes, there is more to be said about how to drill a square hole using other methods.
There are several good methods for this. When working with square drills, the resulting hole in the workpiece will have small radius roundings, which then need to be eliminated by other operations. In addition, there is no possibility of working with parts of significant thickness.
Let's take a closer look at these methods:
- In production conditions, the most accurate finishing method for cutting a square hole is laser cutting. But for this it is necessary to have expensive complex CNC machines in the equipment park.
- Another method is to drill a round hole in the part with the diameter of a circle circumscribed by a square. Then the corners of the hole are welded with the template inserted. This method requires a welding machine and appropriate skills.
- In mass production conditions, when working with sheet and thin-walled metal, square holes are produced by sheet stamping. In single production this is not relevant, since it requires the manufacture of cutting or punching dies.
- When working at home, if you need a square hole that is not very small in size, then you can drill it in the following way. A round hole with the diameter of a circle inscribed in a square is made in the part using an ordinary metal drill. Then the imaginary corners and edges of the square are straightened using a file and chisel.
- For working with thin metal, special square punches are also available. Their maximum size is 70 by 70 millimeters.
How to cut round holes
Using Boolean logical operations
We have already discussed this method of cutting a hole in an object in great detail in this lesson. The method is really good in its simplicity, but the mesh after manipulation with the Boolean may turn out to be “curve”. Sometimes using ProBoolean can help solve mesh problems.
Using ProCutter
This tool allows you to make holes in much the same way as Boolean. We create an object in which we will cut holes, and an object, or several, that we will cut out. I have two cylinders.
Now select the large cylinder and apply ProCutter to it. Click Create – Compound – ProCutter.
We select the large cylinder, enter the settings as in my screenshot, then, with the Pick Stock Object button pressed, select the objects that we will subtract.
We get perfectly round holes.
"Manual" method
This method allows you to more accurately fit the circle into the 3-D model grid, but you will have to spend much more time. Create a sphere using Standard Primitives and convert it to Editable Poly.
Let's switch to Vertex mode and check the box next to Ignore BackFacing, this way we won't accidentally catch points on the other side of the sphere.
Mark any grid square, select its three vertices (as indicated in the screenshot) and connect them with a diagonal using Connect. We create two diagonals using this method.
Select a point at the intersection of the diagonals and press the Champfer button, enter the radius.
Go to the Edge level and select two opposing grid lines, then click the Connect button, set 4 segments.
We do this with all the edges adjacent to the circle.
Let's switch to the Vertex points mode; we should have selected points belonging to the future circle. Add the Spherify modifier.
We get a round hole. Now we can convert the object, for example, to Editable Poly, in order to manipulate it.
Using Loop Regularizer
Another way is to use the free Loop Regularizer script, which you can . Download it, then drag the saved file into the open 3D Max window.
I’ll tell you how to use the script with an example. Create a rectangle, give it two segments in height and width. Convert it to Editable Poly. Go to the Edge editing level and double-click to select all the edges dividing the rectangle in half in the vertical plane.
Press the Chamfer button, set the number of segments (the more, the more rounded the hole will be), set the distance.
Now we will do the same for horizontal edges.
Go to the Polygon level and select all the polygons in the center on both sides of the rectangle.
Right-click on the screen and select the Regularize line that appears after installing the script.
The square has transformed into a circle. As I already said, it would have been smoother if we had specified more Chamfer segments.
Now press the Bridge button and get a through hole.