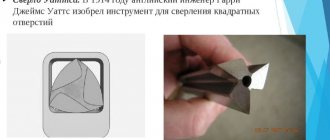
Square-shaped holes in workpieces or products made of metal and other materials can be produced using a cutting tool called a square hole drill. It has another name - Watts drill. Square holes are obtained with slight roundings in the corners, which are almost invisible. They are drilled, reamed and drilled into ferrous and non-ferrous metal with a thickness of no more than 16 mm, wood, plywood and other materials, including substances of composite origin. The operation is performed using a drill, hammer drill, or on lathes or broaching machines. They are used in industry, agriculture and everyday life in the manufacture of products, repairs and DIY crafts.
Operating principles and design
In order to drill a square hole, a Watts drill is usually used, the design of which is based on a geometric figure such as the Reuleaux triangle. One of the most important features of such a figure, which represents the area of intersection of three equal circles, is the following: if a pair of parallel reference lines are drawn to such a triangle, then the distance between them will always be constant. Thus, if you move the center of the Reuleaux triangle along a trajectory described by four ellipsoidal arcs, its vertices will draw an almost perfect square, with only slightly rounded vertices.
Property of the Reuleaux triangle
The unique properties of the Reuleaux triangle made it possible to create drills for square holes. The peculiarity of using such a tool is that the axis of its rotation should not remain in place, but move along the trajectory described above. Naturally, this movement should not be hindered by the equipment cartridge. When using such a drill and the appropriate equipment, a square hole is obtained with perfectly straight and parallel sides, but with slightly rounded corners. The area of such corners not processed with tools is only 2% of the area of the entire square.
History of the instrument
The design of the Watts drill is based on the Reuleaux triangle. To obtain such a figure, you need to draw an equilateral triangle and three circles. Their centers are located at the corners of the triangle, and the radius is equal to its side. The result is a triangle with rounded sides. An engineer from Germany, F. Relo, noticed that with certain methods of rotation, the new figure’s trajectory is as close as possible to a square.
Reuleaux triangle:
In 1916, Watts filed a patent for a special device. His technical development ensured that the drill moved in such a way as to guarantee square-shaped holes.
Watts drill:
Operating principles and design
In order to drill a square hole, a Watts drill is usually used, the design of which is based on a geometric figure such as the Reuleaux triangle. One of the most important features of such a figure, which represents the area of intersection of three equal circles, is the following: if a pair of parallel reference lines are drawn to such a triangle, then the distance between them will always be constant. Thus, if you move the center of the Reuleaux triangle along a trajectory described by four ellipsoidal arcs, its vertices will draw an almost perfect square, with only slightly rounded vertices.
Property of the Reuleaux triangle
The unique properties of the Reuleaux triangle made it possible to create drills for square holes. The peculiarity of using such a tool is that the axis of its rotation should not remain in place, but move along the trajectory described above. Naturally, this movement should not be hindered by the equipment cartridge. When using such a drill and the appropriate equipment, a square hole is obtained with perfectly straight and parallel sides, but with slightly rounded corners. The area of such corners not processed with tools is only 2% of the area of the entire square.
Is it possible to accurately cut holes in metal with plasma?
Plasma can make long cuts, this is confirmed by professionals and is not a new thing. Difficulties arise when making holes using plasma cutting in electrically conductive metals to connect parts with bolts. At the same time, quality raises big questions. Let's consider recommendations that can improve the quality of work and make it easier.
- Plasma height control.
During the cutting process, it is very important to maintain a certain distance between the metal surface and the cutter. It affects the quality of the product and the service life of consumables.
The plasma height must be carefully selected. When cutting, the distance between the cutter and the material being processed must be made slightly larger. General advice: when using plasma, the piercing height should be 50-100% higher than recommended. Let's look at an example: the recommended cutting height is 2-2.5 mm, while a professional will work at a distance of 4-5 mm. It must be remembered that an excessively small distance leads to accelerated wear of the equipment.
- Find a place to burn.
Precisely localizing the initial piercing will help prevent arc oscillation, stretching, and other problems. Firstly, the arc will stabilize before it reaches the edge of the hole. Both energy and pressure must be increased gradually. Secondly, vibrations of the plasma arc, which arise due to the presence of scale on the metal, can be almost completely eliminated by determining the place for punching directly near the center. For combined straight line cutting methods, the same rules apply.
- Control of arc height and voltage.
The low cutting speed inherent in automatic systems affects changes in arc height during the production of holes with a diameter of less than 25 mm. To prevent this, the plasma arc voltage controller is turned off before cutting.
Geometric parameters
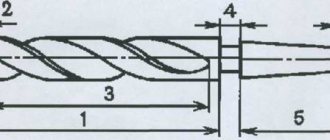
The main geometric parameters include the following indicators:
- diameter indicated in mm;
- total length, mm;
- length of the working part, mm;
- sharpening angle in degrees.
In addition, when choosing a square drill, pay attention to the shank, which must match the tool spindle or a set of devices for fastening it. Drilling square holes must be done after preliminary marking and punching the center of the future hole. It is recommended to start drilling at low rotation speeds, and then switch to the speed indicated in the data sheet of the machine or tool.
How to cut round holes
Using Boolean logical operations
We have already discussed this method of cutting a hole in an object in great detail in this lesson. The method is really good in its simplicity, but the mesh after manipulation with the Boolean may turn out to be “curve”. Sometimes using ProBoolean can help solve mesh problems.
Using ProCutter
This tool allows you to make holes in much the same way as Boolean. We create an object in which we will cut holes, and an object, or several, that we will cut out. I have two cylinders.
Now select the large cylinder and apply ProCutter to it. Click Create – Compound – ProCutter.
We select the large cylinder, enter the settings as in my screenshot, then, with the Pick Stock Object button pressed, select the objects that we will subtract.
We get perfectly round holes.
"Manual" method
This method allows you to more accurately fit the circle into the 3-D model grid, but you will have to spend much more time. Create a sphere using Standard Primitives and convert it to Editable Poly.
Let's switch to Vertex mode and check the box next to Ignore BackFacing, this way we won't accidentally catch points on the other side of the sphere.
Mark any grid square, select its three vertices (as indicated in the screenshot) and connect them with a diagonal using Connect. We create two diagonals using this method.
Select a point at the intersection of the diagonals and press the Champfer button, enter the radius.
Go to the Edge level and select two opposing grid lines, then click the Connect button, set 4 segments.
We do this with all the edges adjacent to the circle.
Let's switch to the Vertex points mode; we should have selected points belonging to the future circle. Add the Spherify modifier.
We get a round hole. Now we can convert the object, for example, to Editable Poly, in order to manipulate it.
Using Loop Regularizer
Another way is to use the free Loop Regularizer script, which you can . Download it, then drag the saved file into the open 3D Max window.
I’ll tell you how to use the script with an example. Create a rectangle, give it two segments in height and width. Convert it to Editable Poly. Go to the Edge editing level and double-click to select all the edges dividing the rectangle in half in the vertical plane.
Press the Chamfer button, set the number of segments (the more, the more rounded the hole will be), set the distance.
Now we will do the same for horizontal edges.
Go to the Polygon level and select all the polygons in the center on both sides of the rectangle.
Right-click on the screen and select the Regularize line that appears after installing the script.
The square has transformed into a circle. As I already said, it would have been smoother if we had specified more Chamfer segments.
Now press the Bridge button and get a through hole.
Is it possible to cut a hole in metal with a grinder?
The methods described above related to industrial methods of metal cutting. The grinder is not suitable for use in industrial enterprises. This tool is most applicable in small-scale production, at home, when minor repairs or construction are necessary. The precision with which cutting is performed is low. However, it is not required.
Let's look at an example. To do this, we use channel 12 and a 2 mm sheet of metal.
To begin with, we draw cores and mark two circles using a caliper, but not a measuring caliper, but a special or ordinary metal compass, since it is undesirable to simply draw on a metal surface. However, if you have no other choice, you can mark them with it - it won’t be erased. The main task is to cut a round workpiece from a sheet of metal; at the base of a channel 0.5 cm thick it is necessary to make a round hole.
The cutting process is preceded by preparatory measures: selection and installation of a worn disk of the smallest diameter on the grinder.
We mark the sheet of metal and the channel. Then we make a barely noticeable shallow cut with the installed disc. The grinder must be driven evenly, without changing speed, and constantly rotated in a circle.
Next, we completely cut off a piece of metal with a marked circle. Then, with several cuts, we make a complete cut from the outer border of the piece to the circumference. In the channel we do everything in reverse order. We cut the window in the center of the circle, after which we go full cuts to the circle. This is how segments are obtained. When working with thick metal, you need to make more cuts for segments to make their removal more convenient.
Square Hole Drilling Tool
To drill square holes, special Watts drills are used. They differ from conventional tools in having working parts that have a special design. It is based on the Reuleaux triangle.
Image No. 1: Reuleaux triangle and its properties
This figure represents the intersection of three equal circles. The most important property of the Reuleaux triangle is that if you draw a pair of parallel reference lines to such a triangle, then the distance between them will always be constant. As you can see in the figure above, if you rotate the Reuleaux triangle along a trajectory described by 4 ellipsoidal arcs, you get a square with slight roundings at the corners.
Reuleaux's developments were used by the English engineer G. Watts. It was he who created the drill for square holes, named after him - the Watts drill. The working part has this profile.
Image No. 2: Watts drill and the profile of its working part
Classification of drills for square holes
In modern metalworking, almost all cutting tools that are used to produce square holes work on the principle of rotation of the Reuleaux triangle. A Watts drill (or as it is sometimes called a Reuleaux drill) allows you to make square holes of various sizes in metal parts of various thicknesses. This tool is classified according to its size, material of manufacture, and shank design.
A Watts metal drill must be made of high-speed steel. This tool is marked HSS (High Speed Steel). For domestically produced tools, tool steel U10 or alloy steels X12 and X12MF are used. The hardness of the tool should be between 52 and 60 HRC. A square drill can have different diameters depending on the size of the side of the square.
Note that buying a Watts drill is quite difficult. Don't expect it to be available in every hardware store. You may have to purchase it to order from a large tool store or buy it from an online store.
How to drill a square hole without a special drill
To drill a square-shaped opening in the material, it is not at all necessary to use a special drill for this. Before special attachments appeared, craftsmen used a simple, proven method. This method involves using regular drills for metal or wood (depending on what material needs to be processed). If there is a need to drill a square hole, but there is no special drill, then the process can be implemented in the following way:
- Initially, you need to mark the future square on the surface of the material
- After this, at the corners of the marking with a core, mark the points along which round holes are drilled
- After drilling through holes around the perimeter of the marking, it is necessary to use a drill of such a diameter to remove the inner part by drilling
- Next, all that remains is to work with a file to align the corners of the resulting square
This procedure is not at all difficult, but it takes a lot of time.
However, it is an excellent alternative to square drills, after which you also need to use a file to straighten the corners. This method of creating square openings is very popular and is used even today. If you need to quickly make a square hole in a workpiece, then you need to drill an initially round hole, and then use a file to sharpen the edges and obtain the desired shape. This is interesting! The advantage of this method is that in this way you can get square openings of different sizes. To drill square openings of different sizes with special drills, you will need to have attachments of the appropriate parameters at your disposal.
Work order
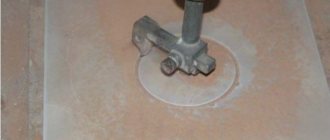
Large square hole
Many have already guessed what the approximate list of work will be as soon as they found out the tool required for the job.
1 The idea is as follows. A rectangular cut is formed longitudinally in the workpiece, the width corresponding to the size of the side of the square being drilled. The depth is selected taking into account the dimensions of the workpiece so that the center of the future square coincides with the axis of the cylindrical workpiece.
2 Then a metal jumper is installed over the cut, which will need to be scalded.
3 To give the product a marketable appearance, it should be processed after welding on a lathe.
So, let's start practicing.
Step No. 1 - shaping the cut
Make a cut with the width of the side of the square
1 For cutting, it is better to use a cutting disc. This will speed up the work significantly. Don't forget about oil.
The cut is milled
2 We change the disk to a milling one, since the correct geometry of the square hole is needed.
Step No. 2 - forming a jumper
Trying on a jumper
1 Place a square rod in the cut you made. We put a metal jumper on top. For the latter we use a segment of a similar rod.
Fixing the workpiece in a vice
2 Using a vice, fix the workpiece prepared for welding.
Step No. 3 - welding and primary processing
Welding work is completed
1 We grab the jumper at a couple of points and remove it from the vice. We thoroughly boil the structure.
Welding needs to be annealed
2 So as not to think, we anneal the welding seams.
Step No. 4 - machining on a lathe
Processing of the first part
1 A VK-8 cutter was used for processing. We expose the workpiece. To do this, I had to process it a little with a file.
We expose and trim
2 Turn the product over. We expose and trim the workpiece.
Clamp and process
3 Clamp and process for finishing.
Choosing a cutter for drilling square openings
What difficulties may arise when choosing a drill for a square hole? It would seem that no difficulties would arise at all. You just need to come to the store and tell the seller the size and shape of the opening that you want to get in the end. When purchasing a slotting cutter, you will need to pay attention to the following technical parameters:
- Manufacturer - the devices in question are manufactured by all modern companies, not only domestic, but also foreign. The prices of such drills differ depending on who the manufacturer is. The high cost of a product does not always indicate its quality, so you need to choose depending on how often you plan to use the nozzle. If often, then it is better to give preference to products from the manufacturer Rapid. Chinese nozzles are cheaper, so they are not designed for long-term use
- The length of the drill depends on how deep the opening needs to be in the end. The most common options for cutters in length from 160 to 225 mm
- The size of the square hole - it all depends on the task at hand. Depending on the size of the mandrel, the nozzles have corresponding parameters. You need to understand that this is one of the main parameters. The nozzle bit always has a smaller diameter than the mandrel size
- Shank type - it is important to pay attention to this parameter, since it will not be possible to secure a drill with a tapered shank in a drill chuck
- Purpose - depending on what material is planned to be processed - steel or wood. For steel workpieces, products made of high-alloy and high-speed steel are used, and for wood, nozzles made of carbon steel are produced
| Drill size | d, mm | B, mm | L, mm | C, mm | D, mm | E, mm |
| 6x6 | 4 | 45 | 160 | 115 | 6 | 19 |
| 8x8 | 5,7 | 50 | 205 | 135 | 8 | 19 |
| 10x10 | 6,8 | 50 | 205 | 140 | 10 | 19 |
| 12x12 | 9,5 | 70 | 210 | 140 | 12 | 19 |
Based on the above parameters, you should select drills for square openings.
First, decide on the size of the required hole, as well as its width. This is interesting! To drill square holes in metal workpieces, it is recommended to use specialized equipment. You can drill a hole in a wooden part with a drill, but you must use a holder.
Making holes in metal by drilling
The correct choice of equipment and competent preparatory work will help you drill high-quality holes in metal. In addition, the reliability of the equipment and drills used is of great importance for cutting efficiency.
Below are the main types of holes, as well as methods for obtaining them:
- Through .
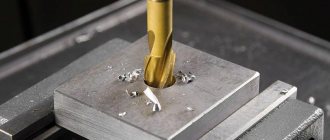
This type is made by completely passing (through) the workpiece. The main feature of this cutting method is a significant reduction in the resistance of the material after the drill exits the wrong side of the product. If there is insufficient control, the device may drop sharply and the drill will rest against the workbench, which sometimes leads to equipment failure or jamming. To prevent this, use protective coverings for the tabletop (workbench): a wooden (metal) multilayer lining or a simple block with a hole made through it. If cutting occurs on a machine, then professionals advise switching to manual feeding before finishing the work. When cutting thin-walled products, feather drills are used, since ordinary spiral ones can damage their edges. - Deaf .
The peculiarities of using this cutting method are in controlling the drill penetration depth. Modern equipment has a special system that controls its supply. In this way, holes in metal are cut to a given depth and without additional tools. If there is no controlled drill feed system, then an adjustable or bushing stop is used. In addition, you can use a depth gauge or a simple ruler. However, this is inconvenient and slows down the work greatly, since it requires removing the drill from the hole, cleaning out the chips, and then measuring the depth. - Complex form .
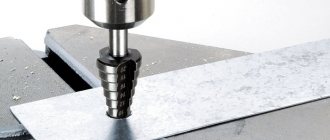
An example of a complicated form is a hole located at the edge of the product. To cut it, two workpieces of the same size are used simultaneously, they are folded and placed in a vice. The material of the second workpiece should be similar to the first, the reason lies in the peculiarities of cutting holes at the edges of the metal - the drill will shift towards the softer material. Making holes on cylindrical metal surfaces is also a complex type of cutting. Before starting such work, it is necessary to lay a lining made of wood or cork. - With ledges . A feature of this cutting method is the use of two techniques at once: reducing the diameter and drilling. And if in the latter case different drills are used, gradually increasing their diameter from smaller to larger, then when the diameter is reduced, a larger drill is used first, and then, as it goes deeper into the metal, its size is reduced.
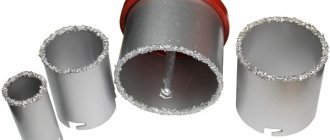
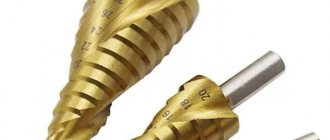
- Larger diameter . This technology is considered the most labor-intensive. When cutting holes in a workpiece no more than 0.8–1.0 cm thick, so-called cone-step drills are used. The diameter of the passage of such devices is 0.4-0.5 cm. In industrial production conditions, bimetallic crowns are often used, which make it possible to make holes no larger than 10 cm in size. Ring drilling technology is considered less labor-intensive. It is done at low speeds.
Making a punch
On the reinforcing rod, one of the sides (round) is marked in the form of an “inscribed” square of the required dimensions. Next, the reinforcement is clamped in a vice parallel to its “jaws” and, using a grinder, is ground on 4 sides to the required size. To obtain maximum accuracy, a caliper is used, which makes it possible to check the current size of the part.
Having made a square-type workpiece on a piece of reinforcing bar, it will be necessary to “sharpen” it in a special way, using a very small grinder circle and a round file. It will be necessary to vertically fix the part in a vice, and gradually create a semicircle between the adjacent vertices of the square. A round depression should form in the center of the end part of the product.
After the tops of the square (the end part of the part) have become sharp “spires”, it will be necessary to fix the part horizontally in a vice, and harden the part using a regular propane torch, with which the square part of the product is heated until reddened, and then cooled with water.
After such processing, the square part of the part (punch) becomes stronger and more rigid.
A little history with geometry
Back in the 15th century, the legendary Leonardo da Vinci, while studying the properties of geometric figures, drew attention to the so-called geometric objects with equal thickness. There are an infinite number of such figures, but the simplest - besides a circle - is a rounded triangle, which can be formed as follows. An equilateral triangle is drawn, each of the corners of which is connected by an arc of a circle drawn from the center of the opposite side. The peculiarity of such a triangle will be that all its sides will have a constant width, which is equal to the length of the side of the original equilateral triangle.
L. Euler drew practical benefit from this fact, who three centuries later demonstrated the rotation of such a rounded triangle: first around its own axis, and then with some eccentricity, since the cardan mechanism was already known to science and technology of that time.
Features of drilling square holes in wood
In furniture production, parts are often connected using a tongue-and-groove system. This connection assumes the presence of square grooves in the supplied parts. To make holes in wood, use a special square wood drill. It is a set of slotting tools. It consists of an internal wood drill and a chisel that fits onto it. Typically, the drill diameter ranges from 6 to 18 millimeters. The shank usually has a diameter of 19 millimeters. Such kits can be installed on slotting and drilling machines.
Operating principle and design of the Reuleaux triangle
The Reuleaux triangle is a flat geometric figure. It is formed by connecting the vertices of an equilateral triangle with circular arcs drawn from each vertex of the same triangle.
The peculiarity of the Reuleaux triangle is that when performing a rocking motion, its vertices describe the trajectory of an almost perfect square.
The only drawback of this rotation of the Reuleaux triangle is that small roundings remain in the corners of the square.
If it is necessary to obtain a square hole with internal angles of 90 degrees, it will have to be modified. This can be done manually using files and rasps or on a slotting machine.
Electronics for everyone
I think each of you made a case for your electronic craft. And when making a body, one nasty problem often arises - making a hole with a shape other than a circle. For example, square, under an LED indicator.
I used to suffer for a long time, drilling along the contour, then grinding these teeth, cursing about the fact that I sanded off too much or messed up the parallelism. In general, I have my hands full on everything related to the machining of materials. And there is nothing to be done about it. But where the hands cannot, the head must work. And we came up with a simple and effective solution.
So. You need to make a square hole in the plastic case. First, let's mark the hole. It is better to do this using a paper template - you need to mark the corners as clearly as possible. We do this on the outside, front side! Then the corners are drilled through with a thin drill. Here it is important to take a thinner drill. The thinner the hole, the more accurate our hole will be.
Take a ruler and a sharp scalpel. You can use a utility knife or whatever you have on hand. The main requirement is that it must be very sharp, rigid and not loose. I make things like this with an X-Acto
.
Using a ruler from hole to hole, exactly according to the size of our hole (no more, no less, exactly the same!) we make cuts. The deeper the better, but without fanaticism. Because The deeper you cut, the greater the chance that the blade will break off and we will scratch the outer surface, but this is no longer the same - it’s ugly. The holes here also rule because the tip of the scalpel falls into them and the edge of the cut does not go further than the hole. Marking is the most important stage
. It depends on him whether everything will turn out perfect the first time or whether it will have to be trimmed.
I cut it, now I need to shred the inner surface of the hole into 4 parts, under the St. Andrew's flag. This is already anything. I usually don’t stand on ceremony - I take a dull drill, which is no longer a pity. I stick it in and, like a milling cutter at high speeds, I gnaw through the side of the plastic from corner to corner.
That's it, we got four pieces inside. Now you need to pick them up from the center and break them inward
!
The cut we made will give us a weak point at which the plastic will burst and break. And the holes at the edges will prevent the crack from going further than it should.
Do you see how clear and even the break is?
One two three four - we got an exact rectangular hole that does not need to be leveled or polished. Well, maybe a little bit, if I messed up with the markup - like I did now :(.
It took me no more than 10 minutes to pick this hole. This includes cleaning up trash and being distracted by taking photographs and searching for a scalpel or a drill.
Z.Y.
I made this hole here purely for the sake of photos, on an unnecessary body, so don’t look at the fact that its “horizon is blocked” and the markings are crooked - I didn’t try 
How to make a rectangular hole in a sheet of metal
I'll show you how to make a rectangular hole in a sheet of metal using a hammer and chisel. You will also need a drill and a vice. Large rectangular holes can be cut with a grinder, and small ones with a chisel.
My channel libral1973: https://www.youtube.com/user/libral1973 Machine for sawing wood: https://www.youtube.com/watch?v=hHvT7. Plow tests: https://www.youtube.com/watch?v=SuDZH. Installing a hydraulic pump: https://www.youtube.com/watch?v=0jtL_. Harvesting potatoes with a mini tractor: https://www.youtube.com/watch?v=KdzR4. Planting potatoes with a mini tractor: https://www.youtube.com/watch?v=47vg9. Planting tool: https://www.youtube.com/watch?v=uC_-B. DIY cultivator: https://www.youtube.com/watch?v=frfW6. How to adjust valve clearances: https://www.youtube.com/watch?v=5hPSX. How to shorten a hydraulic cylinder: https://www.youtube.com/watch?v=niH5W. DIY cultivator: https://www.youtube.com/watch?v=frfW6. Do-it-yourself chain-link mesh: https://www.youtube.com/watch?v=oRdGi. Wood lathe: https://www.youtube.com/watch?v=m_kNg. ———————————————————How to send an e-mail: https://My blog: https://
Result of work
Result of work
The end result was a completely usable product. Dimensions are correct, appearance is satisfactory. The result was worthy.
Quality Control Department accepted the product
In conclusion, it is worth noting that it is possible to make a similar product without using a lathe, replacing it with a conventional angle grinder. The result, of course, will not be of such quality, and the labor costs will be much greater. But what to do if there is nothing else at hand, and you need a square hole here and now.