Manufacturing Features
The production is based on the principle of mixing finely crushed glass with special binders. The latter is polyester resin, which reliably glues the smallest particles of material.
Polyester resin is one of the main components in the production of tiles
Broken glass is obtained from waste that remains at large industrial enterprises after the production of other products.
Tiles made of glass not only have an attractive appearance, but also have other properties:
- environmentally friendly material;
- strong and reliable foundation;
- hygiene;
- fire safety;
- waterproof;
- large color palette.
In reality, making tiles from broken glass is not difficult to do yourself. The initial investment will be small, however, the output will be excellent. The process does not require additional firing or glazing of the material, since the polyester binder reliably holds all the particles together.
In industrial enterprises, manufacturing technology involves a fully automated process in which broken glass is further broken down to fractions of the required size.
In self-production, waste from cullet is used, which is purchased at a low cost.
A little history
The truly ancient Sumerians were the first to reveal their mosaic patterns to the world. They laid out ornaments from baked clay pyramids on an unfired clay base.
Their initiative was intercepted by the ancient Greeks: they invented smalt - dense and viscous glass that could be chipped in a frozen form without cracking. The Greeks laid out their mosaics from its fragments, sintering multi-colored fragments around the perimeter and into layers along the thickness.
As for the name, the Romans gave it to the mosaic, having adopted the art of folding fragments from their Greek neighbors. It was they who gave the glass masterpieces the name “opus musivum,” which translated means “a work dedicated to all the muses at once.”
Then Byzantium took over the baton of development of mosaic art. Its masters made a significant addition to the layout technique: the background and large images began to be designed with intersecting arcs. At the same time, the drawing lost its “pixel quality” if you looked at it from a certain distance, and became similar to an ordinary one, only more voluminous and “live” a picture.
During the Renaissance, mosaics began to be actively studied again in Italy. And the craftsmen of this country achieved the highest results in its production. In Florence, a new installation technique was invented, thanks to which mosaic images gained perspective. And here a unique binder was developed that holds the mosaic parts incredibly tightly.
During the Rococo period, mosaics became Frenchized. And it was the French who began to lay out panels of shells, beads (porcelain, earthenware), beads, using the “reverse laying” technique, in which the elements were first placed on wax paper and only then transferred to the prepared base. The works “a la francaise” turned out soft, precise, with tints of halftones. Using this technique, it was possible to decorate curved and/or small surfaces with mosaics.
In Islamic countries, masters who laid mosaics could not depict something living in their works (like artists working in other techniques), but they brought mosaic patterns to perfection and began to use new materials to create them: ceramics (tiles), eggshells, etc.
As for the “Russian mosaic”, it is inextricably linked with the name of the great scientist M.V. Lomonosov (although many experts are confident in the existence of ancient Russian mosaics, destroyed during the Mongol-Tatar yoke). Mikhail Vasilyevich was not only a brilliant scientist, but also an extraordinary artist. He was seriously interested in mosaics: he developed new technologies for smalt smelting and founded a mosaic manufactory.
Materials and equipment
Before you begin the process of producing glass tiles, it is important to prepare all the necessary components of this procedure. This includes a special binding resin, paint, a tool for crushing large particles of material, the glass itself and molds for casting tiles. Experts include the following materials as components of the working composition:
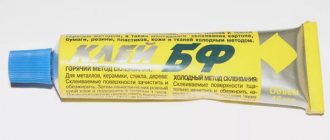
- Resin - polyester material is necessary for strong adhesion of broken glass pieces to each other. It is thanks to this component that the manufacturer will not have to burn the finished product - the entire fastening procedure will be performed by the resin. The cladding production technology must be under constant control: it is not recommended to allow the formation of bubbles during casting. Polyester resin has a low cost - 300 rubles per 1 liter. For home production you do not need a large amount of the substance.
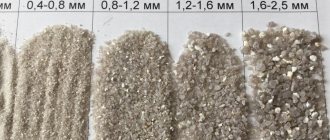
- Dyes - compositions with a high level of adhesion are selected. When mixing paint with polyester and the glass itself, it is important to achieve the desired color: the finer the details of the material, the greater the chance of painting it more thoroughly. The production of glass tiles in industrial enterprises often involves the use of glass powder, which, when mixed with dyes, evenly acquires color. At home, it is difficult to achieve such a fine dispersion, so it is worth making sure that the filler covers all the particles.
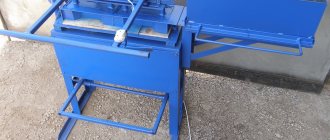
- Glass crusher - a special unit is used in production, into which glass cullet is placed, after which the internal crushing elements rotate and the glass is crushed. Making tiles at home does not require such an industrial apparatus, so it is worth considering the option of constructing such a tool yourself. In addition, you should purchase a household shredder. It is made on the basis of a hammer mechanism.
- Cullet - getting this material is not difficult. To do this, you need to contact factories and workshops for the production of windows, glassware or other products. Manufacturing waste can be given away free of charge or for a nominal fee. An option that involves breaking glass with your own hands, for example, from used bottles, will not bring quick results.
- Casting molds - made independently or ready-made solutions made of plaster or plastic are taken. There is no need to worry about the material of the containers, because casting occurs in a cold way, therefore, there will be no heating and the mold will not react with binders.
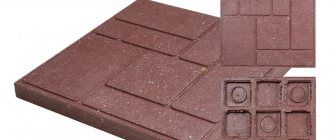
Glass tile mold
The listed tools and raw materials are affordable. You should not purchase materials in large quantities for the start - it is better to experiment on a single sample of facing tiles, and after developing a technique, proceed to a larger scale.
Production of facing tiles from glass waste
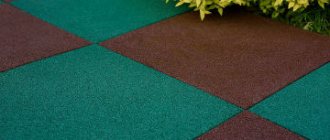
What are the advantages of glass tiles over other types of coatings?
Advantages of walls lined with glass tiles:
- A small room seems bigger
- A darkened room appears brighter
- A room where a low ceiling will seem higher
- Due to the waterproofness of the tiles, the room is not afraid of dampness
- Walls covered with glass tiles can be washed with cleaning solutions containing chemical and alkaline substances
- Walls where glass tiles are glued are durable and not afraid of sunlight
Disadvantages of glass tiles:
- A wall with glass tiles cannot be cleaned with abrasive powders.
- Glass tiles are quite fragile and should not be hit with sharp objects.
- Glass tiles are quite heavy, so when gluing them you need a high-quality frame
Advantages of handmade glass tiles:
- Environmentally friendly - you know what you're putting in it
- Durable
- Large selection of colors
- You can pour the shape you like and the size
DIY glass tile kitchen apron
Self-production technology
Making tiles from broken glass will not be difficult once you have the right ingredients. This manufacturing technology is considered easy compared to conventional tile production, where the material is cast in large sheet molds and cut into small segments.
The process can be divided into the following stages:
- Processing of broken glass - at this stage it is necessary to place the existing broken glass into the machine, or, in the case of a small amount of material, break it manually with a hammer. Don't forget: the finer the glass powder, the easier it is to color.
- Mixing components - when producing glass tiles yourself, it is important to maintain the correct proportions. Experienced craftsmen recommend adding about 50–70 grams of resin to 1 kg of glass. In addition, at this stage, dye is added and everything is thoroughly mixed.
- Placing the mass into molds - the finished mixture of glass and adhesive component is poured into clean tile molds. Glass tiles cure over a certain amount of time, depending on the manufacturer of the polyester resin.
Sequence of work
Having prepared everything you need and selected a glass object to apply the image, you can get to work. First of all, you need to measure the stencil and mark its future location (for example, using masking tape or a washable felt-tip pen). After all, when glue is applied to the film, it will be much more difficult to proportionally place the design on the glass.
Having marked the surface, it should be wiped dry and treated with alcohol.
After degreasing, fingerprints must not be left on the glass surface. This will result in defects appearing on the decorated surface or distortion of the matte design.
At the next stage, the stencil is placed face down on a clean sheet of paper and covered with glue. If the stencil has a self-adhesive base, then this procedure should not be performed.
The glue is applied in a thin layer - in accordance with the instructions. Then the stencil is placed on a pre-marked area of the glass surface, covered with a clean sheet of paper and carefully smoothed with a napkin or rag. The paper will help maintain the integrity of the stencil and ensure its reusability.
The key point of the presented sequence is the application of matting paste to the stencil.
Once on the glass surface, the matting paste instantly enters into a chemical reaction with it.
Therefore, it is important to protect from small drops those areas of the glass that are not covered with a stencil.
The paste is applied to the drawing in a continuous and even layer. The thickness of the layer is not particularly important, but, as a rule, it is 4...5 mm.
The duration of matting should correspond to the recommendations of the matting paste manufacturer (usually the process lasts 15 minutes). After waiting the recommended time, you can begin removing the stencil. The action is carried out in several stages:
- We collect excess paste from the surface of the stencil back into the container. Considering that the paste is reusable, you will still need them.
- Wipe off the remaining paste with a dry cloth.
- Without removing the stencil, wash off the remaining matting composition with plenty of water. The most effective way to wash off the remaining paste is with a stream of running water, but in extreme cases, a filled five-liter bottle will do.
That's all. You can remove the stencil. After completing the above steps, the image will be permanently imprinted on the surface of the glass.
Recommendations
An important procedure is the removal of bubbles. In production workshops, this process is carried out using a special vacuum installation, in which the mixed composition is placed before it is cast into molds.
Vacuum installation is necessary in the production process of glass tiles
The device gradually blows in the formed cavities with air, the mixture becomes smooth. At home, experts advise doing without this unit. Technological subtleties for removing bubbles are solved using slow heating of the mixture and slight vibration.
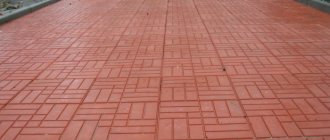
Cladding tiles made from glass waste are beautiful and original. It can be used to finish many surfaces, and depending on the strength indicators of the finished sample, it is determined whether it will be used for internal or external work.
Grouting joints
The design of mosaic seams requires step-by-step work, since the durability of the decorative grout directly depends on the depth of the installation layer:
- make a mixture of liquid consistency from the adhesive solution used during the installation process and water;
- treat all gaps and joints with the solution using a rubber spatula;
- after the surface has dried, apply decorative grout with the desired color pigment;
- after 2-3 hours, carefully remove excess material from the cladding with a damp sponge.
Tile mortar
A solution for working with ceramic and tiles is available in every hardware store. Give preference to light shades - this makes it easier to evaluate preliminary results.
For cullet, use a light or transparent solution; it will be visible under the fragments. In some cases, a little foil is placed under each piece of colored glass to make the mosaic sparkle like precious stones.
The finished solution is applied to the wall with a small spatula from a corner or central area, where it is more convenient to lay out the panels. Each fragment is pressed a little into the solution so that it adheres well.
Design options with “glass”
Since there are no restrictions on the flight of fancy when creating a glass picture, using transparent film you can come up with and bring to life a huge number of ideas.
Color spectrum
Different shades are suitable for “broken glass” manicure. It looks good on both pastel colors and dark and bright nails. The use of light shades allows you to create a delicate look that can be recommended to brides. Dark colors look good in the cooler months, while bright colors are suitable for summer.
Photo gallery: “broken glass” on different backgrounds
Dark shades highlight the “shards” especially clearly. The combination of “cat’s eye” and “broken glass” looks original and attractive. In the summer, bright shades look harmonious. On light shades of varnish, “broken glass” looks gentle
Combination of different colors
For those for whom one shade is not enough, experts offer a combination of different colors on one hand or even on one nail. These can be related tones or, on the contrary, openly contrasting (for example, black and white).
Photo gallery: using several colors in “broken glass” manicure
The combination of cold and warm shades is also used in glass manicure. For those who like to attract attention, you can use sharp color contrasts. The use of several colors on nails emphasizes the originality of “broken glass.”
Geometric designs
If a woman prefers correct shapes, then for the “broken glass” design it is recommended to use pieces of film of a certain geometric configuration. You can cut triangles, squares, and diamonds yourself, or you can buy them ready-made.
Gallery: geometric nail art options with “broken glass”
You can create the most bizarre geometric patterns on your nails You can decorate only part of the nail plate with a transparent film You can lay out regular geometric shapes from the “shards”
Lunar manicure and French manicure have held their leading positions among designs for many years. For lovers of this type of nail art, masters offer to decorate a smile line or nail hole by applying “broken fragments.”
Safety precautions when working with homemade mosaics
Ceramic shards are very sharp and can cause injury, so safety precautions are the first thing you need to think about when starting to work with mosaics. To prevent pieces of tile from scattering in all directions, split it inside a large cardboard box.
Another proven method is to wrap the tiles in scrap fabric and hit them with a hammer several times. The tile should be held with your free hand.
After finishing work, you need to thoroughly vacuum the room to remove microscopic debris and dust.
By the way, dry mixtures are very dusty.
.
If you work with them, a protective mask will be useful. Before laying the mosaic, soak the tiles in water for several hours. Otherwise, the dry pieces will very quickly draw out all the moisture from the solution, making the adhesion fragile.
Crafts from broken glass
Let's consider two types of products: photo frame and panel.
To create a frame, prepare a fiberboard sheet of the required size, broken glass, paints (gouache/acrylic/ink), and glue. Prepare the background by painting the fiberboard, and once dry, insert it into the frame. Then draw the outline of the future design on the frame and stick the fragments along it.
A glass panel is made with your own hands in the same way as a mosaic. You also need to prepare a template and base, prepare the pieces of glass and stick them on as planned.
Using a similar technique you can decorate mirrors, boxes, tabletops, etc. The main thing is to carefully calculate the number of fragments needed.
Glass cullet processing lines
The simplest, from the point of view of the technological cycle, is a mini-plant for the production of cullet. This is the best option if you have a limited budget. The mini-plant consists of the following units:
Operating principle of the cullet line
- station for placement and temporary storage of broken glass and defective products:
- loading and unloading machines;
- conveyor belt for transportation;
- electronic equipment for sorting raw materials by color;
- water installations for cleaning the culls from contaminants;
- electromagnetic equipment for determining metal particles in broken glass;
- crushers for grinding broken glass into a fine powder;
- packaging machines.
The cost of equipment for processing cullet produced domestically starts at 300 thousand rubles. Any set of equipment can be supplemented with elements that help expand the range of products, increase productivity and reduce the share of manual labor. Accordingly, along with the improvement, the cost will also increase.
On average, a mini-processing plant can process up to 500 tons of raw materials per hour. It is noteworthy that this is a waste-free production - absolutely the entire volume of raw materials is processed into powder. This is another advantage of such an enterprise.
Room
This production requires an autonomous building or separate premises. About 60% of the total space will be used to equip the warehouse, where a supply of glass waste, components for the production of raw materials and sets of used molds will be stored. Regarding the production workshop itself, its square footage directly depends on the expected production capacity, and, accordingly, the dimensions of the equipment used.
The room for working equipment must have an area of at least 30m2, preferably 40m2. This is taking into account the fact that 3-4 people will work on making the tiles. For a larger staff, you will have to find a room of at least 50m2.
Note! The premises must have communications: water supply, heating system and electrical network. For industrial-scale equipment, a voltage of 380 V will be required.
Business registration
Running an unregistered business is a serious violation. The reason is that when making tiles from cullet, the raw materials are recycled, which means you need to have a license from the Ministry of Environment. It is usually issued for the entire life of the enterprise.
According to practice, it can take from 1 to 4 months to collect the necessary documents. You can get around these restrictions by a simple method - seek help from agencies specializing in this area.
Choice of legal form
In most cases, entrepreneurs form an LLC or individual entrepreneur. If you have a free amount of money to create production, then the best option would be to open an individual entrepreneur. When opening it, the costs will be significantly lower. You will need to pay a state fee - 800 rubles, and also have a personal stamp made to order - about 1,500 rubles.
When there are few “start-up” funds, it is better to open an LLC. The process of its creation is somewhat more complicated than that of an individual entrepreneur, but there is a plus - you can attract investors from outside.
OKVED codes
Regarding this type of business, such as the production of glass tiles, only two OKVED codes can be applied:
- OKVED code 38.11 - permission to collect glass waste.
- OKVED code 23.19.2 – production of pressed and shaped glass products permitted for use in construction.
Required documents
So, before you start making glass tiles, you need to collect a package of documents required for this. They will allow you to carry out your activities legally.
The following documentation will be needed (for both LLC and individual entrepreneur):
- Premises rental agreement.
- Certificate confirming the quality of manufacturing equipment.
- Permission from government services, such as the SES and the fire department, to carry out work that may cause harm to human health.