Many craftsmen are faced with the need to cut material at a certain angle. A manual or automatic miter box makes the work much easier; without rulers or templates, you can use it to complete the task. There are several types of this tool.
What is a miter box?
Accurate sawing of materials at various angles is a common task faced by specialists working with wood and other materials. A miter box is a device that helps to perfectly cut any workpiece according to a template. When carrying out construction work, during repairs, the most common need is for cuts in the horizontal and vertical plane at angles: 90°, 60°, 45°.
What does a miter box look like?
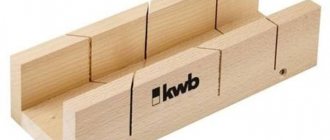
The simplest carpentry device, the miter box, is considered to be a tray with high sides in which cuts are made for installing a saw. The material from which it is made must meet certain characteristics. There are several types of devices based on size:
- Small, with which you can cut a workpiece measuring 35x35 cm. The length of such a miter box is 212 mm, width – 44 mm, and height – 41 mm.
- Medium devices are designed to work with materials measuring 65x40 cm; the dimensions of such a miter box are 290x85x50 mm
- A large miter box 320x125x70 mm is most suitable for sawing workpieces measuring 90x55 mm.
Rules for using the device
To cut a workpiece at a certain angle you need:
- Secure the part by pressing it to the working platform with clamps or clamps that are present on the base.
- Set the angle at which you want to cut. To do this, use a side graduated scale. The bracket with a hacksaw is moved and secured at the desired angle.
- Sawing the part.
When working, you need to be careful: often inexperienced craftsmen make mistakes when calculating angles, as a result of which the workpieces have to be thrown away.
Expert opinion Dmitry Konstantinovich Levin To saw ceramic elements, you will need to buy a special string. They are made from hard alloys with a special coating.
How to cut material
When cutting, it is extremely important not to mix up the sides. In order to correctly cut the material using a miter box at an angle of 90 or 45 degrees, it is secured in the body and then rested against the end wall
And only then the material is sawed. If the tool is professional, then you can adjust the size down to the millimeter.
A template should be made for each section, taking into account a margin of 50 mm. Since the walls in rooms are not always smooth, before cutting the material you should check how they fit together.
The cut should be carried out as follows:
- mark the cut line with a pencil;
- place your product in the miter box body with the front side so that the cutting line mark looks like a continuation of the slot in the tool;
- Press the workpiece from the end of the body wall, insert a hacksaw into the slot, then cut the material according to the mark;
- insert the second blank with the other side into the slot;
- We clean out any unevenness using fine sandpaper.
How to cut an arbitrary angle
Sometimes the walls are not connected to each other at right angles, then the sawing will need to be adjusted. This is done in two ways:
- Using thick paper or a homemade cardboard template. If the plinth is hollow from the inside, it is unlikely to stay vertical. In this case, you will need a homemade corner in which the product is placed, just like in a miter box. The corner is placed on a pre-prepared stencil so that it matches the template, then the product is cut according to the marks.
- Make marks on the material using a pencil. Cut two products at an angle of 90 degrees, then attach them to the wall and mark the junction line. Find the point of contact between the skirting boards, then transfer the markings to the material and make a cut.
Sawing off corners of floor plinths (internal and external)
The rules for sawing off the inner corner of a floor plinth are as follows:
- the miter box must be placed on the table parallel to itself;
- press the product to the side opposite to you;
- place the right plinth on the right, and the left one on the left, respectively, cut from the opposite side;
- align both parts of the plinth, you will end up with an internal corner, the top of which is located away from you.
As for sawing off the outer corner, you must adhere to the following rules:
- We place the miter box on the table parallel to ourselves, as in the previous case;
- press the baseboard on your side;
- we install the right product on the right, the left one - on the contrary, we bring it to a diagonally located line, sawing is carried out from the bottom up;
- Connect the parts, we get an outer corner with the vertex towards you.
What is a miter box for?
Plastic pipes, slats, baseboards, and decorative items may need to be joined together by cutting at an angle. A narrow miter box for skirting boards is used to form an ideal angle; it is convenient to use for cutting baguettes and glazing beads. Using a miter box, you can saw wood, plastic and metal products. It is believed that the device is used for the following work:
- forming a rectangular cut relative to the horizontal or vertical;
- manufacturing various corner elements according to a template.
For what purposes is it used?
To cut a piece of plinth or tile at a certain angle, you can not use any devices, but mark them with a pencil or scriber, but the accuracy will leave much to be desired. It is difficult to join parts if the cut is made incorrectly. Therefore, the craftsmen came up with a miter box that helps fix the workpiece relative to the hacksaw blade at a certain angle. This is especially important if you need to cook many identical elements.
What materials are sawed in a miter box:
- Ceramics.
- Wood.
- Steel blanks.
- Plastic parts.
Expert opinion
Levin Dmitry Konstantinovich
You can also cut with a grinder with special cutting wheels, but it is quite difficult to accurately maintain the required angle.
Types of miter box
Like any tools, the miter box differs in appearance between improved and ordinary models. The design and material used for sawing workpieces vary. The most common are products made of wood and plastic. Miter box miter saws are classified according to the complexity of the mechanism into types:
- simple;
- rotary;
- electric.
Simple miter box
The most popular type of tool for sawing workpieces is a simple miter box, which is used by home craftsmen for repair work. It looks like a box with holes located at certain angles into which a hacksaw is inserted. Templates can be added independently, but the presence of angles of 45 and 90° is considered mandatory for any miter box. The advantages of such a device are its budget cost, accessible to any specialist, but the disadvantages of the tool are considered to be:
- limitation of the width of workpieces;
- imperfection of the cut;
- limited number of templates;
- Getting a quality cut requires skill.
Rotary miter box
For work that requires high measurement accuracy, specialists use a rotary tool, which is also called a precision miter box; its mechanism allows you to cut the material at different angles, the value of which can range from 15 to 135°. The device consists of a stable stand, a bed and a locking saw. Notches are made at the bottom of the platform to accurately set the cutting angle. The cost of a rotary miter box is higher than simple models; its features include:
- convenient base, suitable for any materials - wood, metal and plastic;
- cutting accuracy;
- large blade travel;
- regulation of cutting depth and other parameters;
- high quality cut.
Tools
0 votes
+
Vote for!
—
Vote against!
A miter box is one of the tools that is practical to use and can be useful for construction and repair work. This article will talk about the features of the device, the scope of its use, and also describe the improvised manufacturing method.
Table of contents:
- What is a miter box and what is it used for?
- Advantages of a homemade miter box
- List of necessary materials and tools for work
- Choosing a saw or hacksaw for a miter box
- Preparing the side walls for the miter box
- How to properly mark for miter box cuts
- Making a miter box: the last stage
- Useful tips
- Rules for using the miter box
What is a miter box and what is it used for?
A miter box, as a rule, is an additional tool that is used when working with different materials, where you need to cut an object at a specific angle. There are different types of tools:
- standard;
- turning;
- electric.
So, let's look at the characteristics of each type.
The simple-shaped tool is a tray with grooves at the ends for a saw. This design helps to accurately cut the installed area at a specific angle. In the standard form, the miter box is designated 45 degrees and 60, which is most often used in construction.
There are other variations of the miter box that are intended for professional work. One of the variations is a rotary miter box. This shape helps to cut an object with maximum accuracy and minimal deviation. Such a miter box has a stable base and a rotating part fixed on it, which is a guide element for the saw. This part can be fixed up to 1 degree, which helps to cut the object accurately and accurately.
One of the most expensive and complex variations is the electric miter box. In its form, it consists of two parts: an electric saw and a rotary miter box. Expensive and professional examples are marked with laser markings. This type of miter box helps to make an extremely precise cut of objects in a minimum amount of time.
In fact, it can be identified that this tool is used in carpentry work. Its shape represents a certain template, which is intended for cutting material at a certain angle. The most popular method of application is a miter box for baseboards, as well as floor and ceiling ones. With the help of the tool, the worker can confidently spray elements made of plastic, wood, plastic, and cable ducts.
The process of using a miter box in practice is not that complicated. First of all, you need to place the object in the middle of the tool and carefully cut it with a hacksaw at the required angle. But still, in any work there are nuances and features. Before starting sawing, you need to decide on the angle of the cut: internal or external. Of course, every worker or builder is capable of making such a tool himself. The process of making a miter box is simple and does not take much time or materials.
Advantages of a homemade miter box
Anyone can purchase such a tool in a store for a small price. But, a homemade design has its advantages and features:
- the ability to create a multifunctional tool with different angle appearances;
- strong material is used in production, which helps the product last for many years;
- fast manufacturing method;
- minimum number of consumables;
- making the tool will cost free if you have old boards from a previous renovation at home.
The only unique feature of a homemade tool is to make the correct calculation for marking the angles.
List of necessary materials and tools for work
Making a miter box with your own hands is not that difficult if you follow the recommendations of experts. First, make sure that the materials prepared for work are sanded. To make a miter box, it is important to choose wood that must be dried, without dents, and have a smooth surface without any defects. You should not choose plastic as the starting material, because it is not strong and therefore can easily be damaged during work. The boards made for the tool should be about 2 centimeters thick.
Before starting work, you should prepare the following devices:
- Ruler and pencil;
- fine-grained skin;
- hacksaw for metal;
- vice;
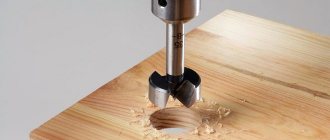
- drill with a different set of drills;
- European screws (confirmed);
- a hacksaw with small teeth, designed for sawing skirting boards.
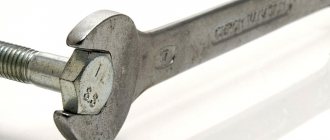
All of the above tools should be sufficient to carry out the work. Among the additional accessories, a hex wrench may be useful, with which it will be easier to tighten the confirmations. Also, before starting work, it is worth preparing individual elements for a homemade tool. Before we begin describing the instructions: how to make a miter box with your own hands, let’s pay attention to a detailed inspection of the manufacture of parts for the device.
Choosing a saw or hacksaw for a miter box
First of all, before starting work, you should choose a hacksaw for the job in order to make a miter box. Actually, choose a miter box for the hacksaw, and not in the reverse order. A good and high-quality saw should have the following characteristics:
- have a thin blade;
- small teeth;
- good cruelty.
The presence of small teeth makes sawing wood neat and without flaws. The thin blade adds confidence that the material will be cut exactly along the line. Blades that are too elastic for a hacksaw are a significant drawback. It can be eliminated with a butt - a special rib of strength and rigidity. Miter box hacksaw - the photo shows all the features of this blade for the tool.
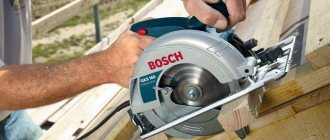
For sawing skirting boards and polyurethane, it is recommended to choose a metal saw. Such a tool has a perfectly smooth and thin blade, as well as the necessary rigidity, which is obtained by tensioning the blade. Also, a hacksaw for metal may be suitable for spraying template cuts, and in the beginning of the work of making the device.
Preparing the side walls for the miter box
Parts of plywood or scraps from boards are used to make side parts for the miter box. To ensure a high-quality tool, you should adhere to precise measurements and recommendations:
- the approximate dimensions of the side walls should be 10 millimeters for plywood and 20 mm for boards;
- their height is selected from 30 to 50 millimeters, depending on the purpose of the tool (30 mm is recommended for ceiling plinths, and about 50 mm for wooden ones);
- The length of the side walls of the miter box should be 250 mm or more, but it is not recommended to lengthen it too much, since it will be inconvenient to perform the work. As an exception, a longer miter box length can be used, but this is only for massive objects.
After measuring the side parts of the boards, we cut out two absolutely even and identical elements. This is very important for further cutting of boards and marking them with tools. In the prepared instruments we make notations at the bottom for confirmations.
How to properly mark for miter box cuts
Answering the question: how to make a miter box? – it is important to first determine the markings for the cuts, after which you can begin the last stage of work. So, the process of making markings is as follows:
1. Place two manufactured side walls together.
2. We check all the edges, which must coincide exactly with each other.
3. Using a vice, we connect two workpieces.
4. Find a point in the middle of the line and mark it with a pencil or marker.
5. Then we measure an angle of 45 and 90 degrees on opposite edges.
6. Let’s start making diagonal cuts using a hacksaw. This device has small teeth, which will ensure an even and neat cut.
7. For direct spraying, the cutting depth must be significant so that you can continue working with a carpenter's hacksaw. We make the cut only to the base of the miter box, but not deeper.
8. Using the same method, we make another slot perpendicular to this one, which is important for smooth cutting of the edges of the plinth.
9. After everything, use sanding paper or a file to clean the cuts from debris.
Making a miter box: the last stage
At the last stage of work, it is necessary to connect all the workpieces:
1. We will attach the side parts of the blanks to the base so that the end area of the guide boards can be connected to the side ones.
2. Using a drill, we drill holes according to the previously formed marks. It is better to use drills with different diameters for the drilling process rather than using one stepped drill designed for confirmations. Using larger diameter drills, we first form an area for confirmation, and using a sharper drill with a specific thread, we make a hole of the required length at the base of the end.
3. Using confirmations, we tighten all the details. For better convenience, you can make a hole in the middle of the tool and connect it to a table or other flat surface.
4. It is recommended to make the tool dismountable, so it is not necessary to use glue.
5. You can make cuts at the base of the device, which are used as marks for convenience during work.
Useful tips
Definitely, almost anyone can make a corner miter box, but in any case it is worth taking into account the nuances and features of the work. For example, if you want to make the instrument collapsible, then it is enough to secure it with confirmations, and the use of glue is not necessary. For professional and stationary work, it is better to attach the tool to a surface, such as a desktop.
When the work load is high, it is worth attaching a piece of material, for example, rubber, to the back of the working surface, which will not allow the tool to move. During the manufacturing process of the tool, it is worth correctly calculating the width of the base. Typically, this depends on the size of the materials being processed.
Rules for using the miter box
To learn how to use a miter box at work, you do not need any specific skills or abilities. Learning the option of sawing corners is not that difficult, and all the knowledge will be useful to you in repair work around the house.
Making a miter box is only one part of the job. To learn how to accurately spray parts, it is important to use the tool correctly in your work. Those who are dealing with cutting corners for the first time need to learn how to measure corners. To improve your skills, you can first practice on samples made of wooden and polyurethane skirting boards.
Attention: When using a miter box, you need to remember some details and operating features. After all, it is worth considering that the plinths that are connected must have two sides - right and left:
- the right side is accordingly placed on the right side of the plinth, and the corner to be sawn off is on the left;
- The left side of the plinth is placed in the tool on the left side, and the corner for sawing is on the right side.
This rule is intended mostly for beginners, but still you should not ignore it in your work.
The second rule is to apply pressure to the sides of the miter box, that is, it is necessary to determine whether the object being cut will be placed closer or further from the master. This adjustment should be considered using examples and mistakes made by employees.
There are four main mistakes that workers make when using a miter box with a hacksaw incorrectly.
1. The first mistake is inaccurate alignment of the baseboard. In most cases, this leads to the fact that the cut corners of the skirting boards are uneven among themselves. To avoid this mistake, it is worth dividing the plinth into certain parts, and adjusting them along the periphery, and not at the corners, taking into account straight inserts.
2. The second error arises as a result of confusion in the definition of external or internal angles. For nala, it is important to mark the object, with marks applied at the appropriate corners. After that, you need to connect the marks with the grooves on the tool, secure the baseboard and spray it.
3. The next mistake is the incorrect cut of the skirting boards for the ceiling. They are opposite to the floor skirting boards, and therefore it is necessary to saw them in reverse.
4. The last mistake is that after cutting the skirting boards at the exact angle, they do not match. Thus, it is worth securing the object in the instrument in the same way as it is located on the ceiling.
When working with a rotary miter box, you must follow the same instructions and recommendations, regardless of the angle set.
Using our tips and recommendations, you can easily make a homemade miter box without any extra effort. We hope that the instructions and explanations we provide will help make your work smoother and will be useful to you in practice.
Electric miter box
Models equipped with an electric motor have rotating mechanisms similar in type to those installed in precision models. Understanding that this is an industrial-type miter box, specialists will have no questions about what type of tool to choose. A power saw that complements the metal platform can reduce work time and achieve a good quality cut. A laser pointer guarantees accurate marking on many models. Devices require compliance with safety precautions when working with them. The advantages of such miter boxes are recognized:
- high precision cutting of workpieces;
- speed of work.
What is the miter box made of?
Manufacturers use a variety of materials to make carpentry fixtures. A hand miter box is a simple tool made from durable, shock- and damage-resistant materials. Box-shaped universal models, which can be found in any construction supermarkets, are made of:
- wood;
- plastic;
- metal
Wooden miter box
The simplest design of a miter box is made of hard wood. Beech is most suitable for the parameters of the device; this type of wood is highly durable. A mechanical miter box made of wood is a rigid structure that guarantees precise sawing of the material. At home, you can use plywood to make it yourself, but such a tool will not be of high quality and durable. The main advantage of such a tool is its low cost.
Plastic miter box
Devices made of plastic are of low quality. Even expensive, durable synthetic material loses its properties under the influence of saw teeth. The grooves quickly wear off on such a tool, and the miter box breaks down after a few uses, and the quality of sawing becomes worse. Even an extra millimeter can ruin the finished result. Fragility is the main drawback of the device for cutting plastic workpieces. Its advantages are light weight and mobility.
Metal miter box
Tools for sawing workpieces made of light but durable metal are considered the most popular on the market. An aluminum miter box is a reliable and durable tool that will faithfully serve the home craftsman for a long time. The simplest device has the form of a U-shaped profile, in which slots are made at certain angles; adjustment is not provided for in such models. Lightweight budget models of miter boxes can be carried in a work bag and confidently used for a long time.
How to choose a miter box?
When working with wooden baseboards, boards, and other workpieces, it may be necessary to make a cut at a certain angle; for such purposes, it is convenient to have a miter box on hand. Electric and manual carpentry tools are sold in specialized stores, and it is necessary to understand the parameters for choosing this device, simple at first glance. When purchasing, the master should consider several points:
- It is necessary to decide for what purpose the tool is intended to be used. For one-time, simple work, a simple miter box will be useful; for frequent cutting, it is better to purchase a high-quality electric device.
- It is important to understand what sizes of workpieces will be cut. Depending on these parameters, the width of the working blade of the tool and the depth of cut are selected.
- Some models of miter boxes are equipped with a saw; its movement should be easy and free.
- It is worth checking whether it is convenient to secure the workpiece, count the number of clamps included with the tool.
Rating of miter boxes
Well-known manufacturers produce high-quality and time-tested models of miter boxes. Among the best rotary tools for sawing materials, the following models have proven themselves well:
- The Gross 22759 miter box
is a rotary model of the tool, which is equipped with a removable cutting blade made of high-quality steel. A comfortable handle, a base made of durable synthetic material, a scale for setting the angle, stop stops are the indisputable advantages of the device. - Matrix 22750
is a precision miter box, which differs from other models in the ability to tilt the cutting blade. Experts note the excellent performance of the tool with any materials. The rigid design securely secures the workpiece, ensuring cutting accuracy. The miter box can be mounted on a table or workbench using special holes in the legs. - Domestic miter saws
have proven themselves well in the market of tools for carpenters. The “Expert” series are rotary tools that have a number of advantages, including an aluminum body, a convenient scale, a rubber handle, the ability to quickly replace the blade, and a long service life. - NOBEX Champion 180
is a premium miter box model made from a bow saw. The high-precision scale helps you cut the correct angle, and the extension makes it easy to work with long parts. - FIT Profi 41321
is a miter box with a hacksaw 60 cm long. Reliable fixation of the material is guaranteed by special clamps, and high-quality materials ensure a long service life of the tool.
Device and characteristics
The simplest miter box is a tray, the sides of which have cuts for the saw blade, made at common angles relative to the base.
Professional models include a rotary tool that allows you to cut workpieces at any angle with an accuracy of 1 degree.
The structure consists of a base and a rotating part. A guide element is provided for fixing the hacksaw.
Material
In the production of tools, materials with sufficient rigidity are used.
In a hardware store, a buyer most often encounters the following options:
• Wooden – it is rigid and ensures cutting accuracy.
The most common product is made from beech, since this wood has high strength indicators.
The cost starts at 500 rubles.
A homemade tool for infrequent use can be made from plywood within an hour, but it will not last very long.
• Plastic - a common option due to the low cost of 100 - 200 rubles.
The hollow structure of the plastic miter box has a wall thickness of about 1 mm.
The strength of the material is low, which means that the grooves are quickly ground down under the action of the saw teeth.
• Metal.
A characteristic feature is the presence of quick-release clamps for holding workpieces.
There are mainly aluminum miter boxes on the market, which are distinguished by their reliability and durability.
Dimensions and weight of the miter box
Depending on the material and size, the average weight of a classic tool in the form of a tray is from 0.1 to 0.6 kg.
Rotary options weigh 2 – 4 kg.
Average dimensions (LxWxH) of a U-shaped miter box:
• Small: 212x44x42 mm. WxH cut – 35x35mm.
• Average: 290x85x50 mm. WxH cut – 65x40 mm.
• Large: 320x125x70 mm. WxH cut – 90x55 mm.
Dimensions given are approximate only.
The length of most models of classical instruments is in the range of 290 – 310 mm.
There are also tall miter boxes, in which the height is slightly greater than the width.
In this case, to increase stability, manufacturers make the base wider than the tray itself, and predominantly aluminum is used in manufacturing.
How to use a miter box?
Anyone can learn to work with a miter box if they wish. The joints of baseboards and cable ducts may need to be connected to each other. You can guarantee the least amount of defects by using a special miter box for cutting corners. The frequent step of the hacksaws helps to make the cut smooth, without burrs or chips. The rules for working with a miter box are simple:
- Before work, experts recommend adjusting the materials and marking the cutting angle with a pencil.
- It is necessary to firmly fix the workpiece in the tool body, placing emphasis on the end wall.
- Place the saw blade in the appropriate groove if the miter box is manual, or set the required angle on the rotating mechanism.
- Sawing the workpiece using uniform, confident movements.
Tips for cutting corners using a miter box
Let's supplement the instructions on how to use a miter box with a few simple rules, the implementation of which allows you to correctly cut the corner of the baseboard.
- When starting work, you should not panic if after the first cuts the ends do not fit together perfectly. You need to be prepared for the fact that you will have to adjust the first strips of the plinth more than once.
- Beginners often get confused about the sizes of corner strips. To prevent this from happening, the measurement is done as follows: the length of the fillet for the internal corner starts directly from the adjacent wall, for the external corner - from the edge of the corner plus the width of the baseboard, since the upper corner will protrude into the room.
- Before placing fillets on glue, even if you are absolutely sure of the correct cut, you need to check how accurate the joint is. To do this, attach the touching ends to each other directly in the corner.
- Builders have not yet learned how to make an angle exactly 90
o. Therefore, there will always be small gaps. They can be sealed with gypsum putty or sealant.
- If the walls are not blocked (they stand vertically), the moldings can be adjusted at the bottom, even if the angle is acute or obtuse.
DIY miter box
The simplest miter box can be made independently; it will not last long, but such a tool will be enough for renovations in an apartment. To understand how to make a miter box with your own hands, you should imagine a box consisting of three sides - one bottom and two sides. In order to make it, you will need a set of materials:
- board 1 m long, 15–20 cm thick, width corresponding to the size of the workpiece;
- saw with parameters suitable for the workpiece material;
- pencil;
- ruler;
- square;
- self-tapping screws;
- wood glue;
- rubber;
- emery cloth.
Manufacturing
- The board must be cut into three equal parts.
- Sand each part with sandpaper.
- Connect the parts in the shape of the letter “P” using self-tapping screws and glue, leave until completely dry.
- Use a square to mark the sides of the miter box, checking the lines; the accuracy of further cuts depends on this step.
- Use a hacksaw to make cuts on both sides of the miter box at once.
- Using coarse sandpaper, widen the resulting grooves.
- The finished miter box can be painted, and rubber pads can be attached to the bottom part so that the tool does not slide on the table while working.
Owner reviews
Maxim: “My wife and I started renovating a children’s room and needed to replace all the baseboards. A friend advised me to buy a miter box to properly cut the baseboards. I bought it complete with a hacksaw and used it to quickly cut floor and ceiling plinths. Then, with his help, I made new photo frames. I have never regretted purchasing this instrument.”
Ruslan: “I’m renovating apartments. This means you can’t do without a miter box. At first I had a cheap model with a plastic tray and a dull hacksaw, but it quickly became unusable. After studying the reviews, I decided to purchase a rotary miter box with a hacksaw of the Russian brand “Zubr”. After two years of intensive use, it still looks like new and cuts cleanly. I recommend purchasing!”
Igor: “I work as a craftsman making wooden products. Most often I make custom frames for paintings and photographs. Previously, I drew markings on the workpiece with a pencil and sawed with a saw, hoping that the parts would form the required angle in the assembly. But it didn’t always work out well. Then I decided to buy a rotary miter box and now I regret that I didn’t buy it earlier. Making frames has become easier and faster. The right tool for the job!”