The car body is constantly exposed to the destructive effects of moisture, dirt, and chemicals that are sprinkled on the roads in winter. The problem is aggravated by vibration loads. Therefore, even with careful care, the appearance of cracks and holes eaten by corrosion is inevitable. There is only one way out - welding the car. However, this does not mean that you need to go to a car repair shop. Minor damage can be repaired by welding the car body yourself.
Features of car body welding
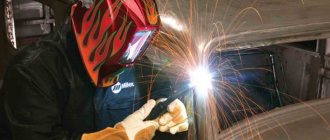
For car body repairs, you will need high-quality welding equipment. The work is carried out in a room where it is possible to connect energy-intensive equipment to the electrical network. A highly qualified performer is required, as welding of thin metal will be required. A universal method for repairing a car body has not yet been invented, therefore, depending on the location and nature of the damage, different technologies are used. Connections are made by gas, manual, semi-automatic welding.
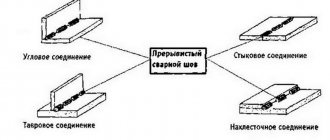
Wings and sills are most often repaired by spot welding. The lap joint is used to restore the integrity of the load-bearing elements. Butt welding is used when replacing damaged elements.
Spot welding of thresholds
Spot welding of thresholds is performed using a spotter. This is a device with a reverse hammer, which is welded with a lance to the surface of the metal. By hitting the return hammer, the concave part of the threshold is pulled out. Spot welding is suitable for removing dents, straightening when the car drove onto a high curb and received damage in the lower side of the body.
Note! It will not be possible to weld large holes in the threshold or replace part of the body with such equipment. I recommend purchasing it only for straightening.
Sergey Shevtsov
Welder and demo room specialist
Features of working with thresholds using a spotter:
- There are no consumables here. A copper-tipped lance is an electrode that clings to the surface when an electric current passes.
- To pull out a dent, you may need to put up to 30-40 points.
- Then the place is cleaned and painted.
- If there is a concavity in the threshold with sharp edges, then the place is first softened with a carbon electrode installed in the spotter holder.
- There are spotters with welding pliers, which can be used to pinpoint a part of the threshold or the entire outer trim, but you will still have to scald it with other devices.
TOP 5 spotters for welding car thresholds
Straightening and pulling out dents on thresholds, as well as spot tack, can be conveniently done using the following spotters:
- Fubag TS 2600 is a budget solution with a simplified setup system, the ability to work with a graphite electrode for heating and a controlled ignition function with a pistol trigger.
- TECNA 7630 (220V) is an Italian spotter with a reverse hammer and a magnetic electrode for welding rivets. It stands out for its compact dimensions of a single housing with a built-in current source.
- Blueweld Digital plus 5500 (220V) is a professional model operating from 220 V. Equipped with a multifunctional distribution panel and automatic parameter settings based on the thickness of the body metal.
- Blueweld Aluplus 6100 is a compact spotter that delivers a welding current of 2500 A. Thanks to this, the time for the copper electrode to stick to the surface is reduced, possible thermal deformation is reduced, and productivity increases.
- Telwin DIGITAL SPOTTER 9000 AQUA is the professional version for the body repair welding shop. It has pneumatic welding pliers in its arsenal. Automatically detects which tool is currently connected and selects welding parameters after one touch of the welder control panel.
Which welding method is better to weld a car body?
If you have a simple welding machine, repairs are done manually using ordinary electrodes. However, the applied seams are rough and there is a high probability of burning through thin metal. Therefore, this method is recommended to carry out repairs in places not visible from the outside. For example, under the wings, in the trunk, underbody.
High-quality welding of the car body is performed semi-automatically. With its help, even a beginner can join metal 0.8 mm thick without the risk of burning. If carbon dioxide is replaced with argon, welding of stainless steel and aluminum will be available. Therefore, when thinking about which device to choose, preference should be given to a semi-automatic device.
WHAT IS THE BEST BREW: RECOMMENDATIONS
Most often, welding is performed with electrodes, since this type of welding is considered the fastest and easiest. But it is not recommended to use this method for welding the body, because the seam will be rough and the car will take on an unaesthetic appearance.
The electrode welding machine is very large, which will create some inconvenience when working in hard-to-reach areas. In addition, such work must comply with safety regulations. In this regard, electrode welding can be used in some cases, for example, if you need to weld a damaged frame.
Today, when carrying out welding work, they mainly use an inverter or a semi-automatic device.
Each of these options has its own advantages and disadvantages. When using such welding, you must have special skills and experience and take precautions into account.
Preparatory work
Before welding, dirt and dust are removed from the surface and cleaned of corrosion. You can use a gas torch to clean hard-to-reach places. It is impossible to reliably weld rusty metal.
When preparing a semi-automatic machine, you need to make sure that the guide channel corresponds to the diameter of the selected wire. Depending on its size, the required welding tip is installed. There should be no metal splashes in the device nozzle. If they are detected, they are cleaned with sandpaper.
Before repairs using a welding inverter, you must check:
- Is the electrode securely fastened?
- is there any damaged insulation on the cable and holder;
- cable fastening strength;
- proper grounding of the device.
Repair of thresholds using RDS
Working with manual arc welding is quite difficult. Indeed, in this case, it becomes necessary to correctly adjust the current strength. The result should be a high-quality weld without any burn-through. As for productivity, it is extremely low.
At the end of the work, the weld has to be further processed. In principle, with the help of RDS it is possible to carry out local repairs of auto thresholds or completely replace them. However, this will require spending a lot of time on such work. Therefore, this option is not suitable for everyone.
Any equipment for welding work today can be easily purchased in an online store. You just need to first decide on the main purpose of the welding machine. As a result, you will be able to repair car sills and even make money from it.
Share on social networks
How to weld a car body with a semi-automatic machine
To weld a body with a semi-automatic machine, you need to prepare a wire with a diameter of 1 mm, coated with copper, coarse-grained sandpaper, a pressure-reducing reducer, and a 20-liter carbon dioxide cylinder. The work is performed in the following sequence:
- The repaired areas, cleaned with sandpaper, are pressed tightly against each other. It is possible to use clamps, bolted connections, and self-tapping screws.
- On the front panel of the machine, switches set the welding current value and wire feed speed.
- A reducer is installed on the gas cylinder and connected with a hose to the burner.
- The nozzle is unscrewed from the burner with pliers, and the tip is removed.
- A spool of wire is inserted into the apparatus. Its end is inserted 15 - 20 cm into the supply channel.
- A tip is put on the wire and a nozzle is installed.
- Switches set the polarity of the current so that the holder is connected to the plus and the burner to the minus. For uncoated wire, the polarity is reversed.
- After connecting the device to the power supply, the holder with the burner is brought to the place to be repaired. When you press the button on the holder, the supply of wire and carbon dioxide is turned on.
- To weld a long seam and not overheat the joint, the parts are first tacked in 3 - 4 places. Then, at intervals of 7 - 10 cm, stitches 2 - 4 cm long are applied.
- After a five-minute break, when the seams have cooled, the gaps between them are boiled.
Why is corrosion dangerous?
At the initial stage, corrosion can easily be eliminated using special means, followed by painting the element.
But there is one rather serious problem - rust usually appears in hidden places (bottom, sills, wheel arches) and it is difficult to detect it in a timely manner.
On visible parts of the body, traces of corrosion appear when the processes of metal destruction have developed and it is no longer possible to eliminate them by chemical treatment.
In general, corrosion primarily damages the load-bearing elements that provide rigidity to the body.
If no measures are taken at all, then in a relatively short period of time the load-bearing part of the car will lose the ability to withstand loads, which will lead to distortions and “sinking” of the body.
In addition, the car will lose its presentability - a brown coating on visible elements and holes clearly do not make the car visually beautiful.
Welding a car body with an electrode
Welding of body elements (bodywork) with electrodes is chosen when there are no high demands on the aesthetics of the seams. To create a strong connection, it is necessary to correctly select the type of electrodes in accordance with the grade of steel. It is better to use an inverter for welding, as it has no problems with igniting and maintaining the arc. Therefore, the quality of seams depends little on the level of skill.
To avoid temperature deformations, you need to cook the car body in stages:
- first tack;
- then overlay stitches 2 cm long at intervals of 6 cm;
- final welding of the perimeter.
Between stages, breaks are taken, waiting for complete cooling. When welding thick metal, it may take several hours. Forced cooling is unacceptable, as it causes metal deformation.
Manual arc welding of thresholds
The most extreme repair method is welding the thresholds with an RDS inverter. This is less attractive than other methods because it is difficult to adjust the amperage to produce good penetration without causing burns. The work speed is very slow. Subsequent bumps on the seam require lengthy mechanical processing. Theoretically, in this way it is possible to carry out both local repair of car thresholds by welding and a complete replacement, but in practice this will take a lot of time. Since small semi-automatic machines are not much more expensive than inverters, you shouldn’t save money and ruin your nerves.
Weld thresholds using arc welding with a short arc in a vertical position of the part. Lay a horizontal seam, holding the electrode at an angle of 45 degrees relative to the surface of the body. Set the current to a minimum of 20-30 A. An intermittent arc will help reduce burn-through and the amount of deposited metal.
Sergey Shevtsov
Welder and demo room specialist
TOP 3 inverters for welding car thresholds
If welding thresholds is not the main type of work, but a one-time job, and then the inverter will be used for other tasks, buy one of the following models:
- PTK Master ARC 180 D18 is a domestic budget inverter with a current of 180 A, a display, and protective covers on the case. Safe due to the presence of the VRD function, which reduces idling. It will be a great helper in the garage.
- Svarog PRO ARC 180 (Z208S) is an improved inverter that operates at a reduced voltage of 180 V. It weighs only 4.7 kg, so it’s easy to run around the car with it. “Anti-stick” will not allow the electrode to linger when welding thresholds at low current. The model has a 5-year warranty.
- KEMPPI Minarc 150 is a functional baby produced in Europe. It has a shock-resistant body, cooks at outdoor temperatures of -20...+40 degrees, the regulators are equipped with protective caps. With it, threshold repairs are possible even in the field using a 5 kW generator.
How to treat the body after welding
After completing the repair, it is necessary to clean the welding seams from slag, since the metal underneath quickly oxidizes. In areas hidden from view, a metal brush is sufficient. In open areas, the body is processed after welding using a grinder with a grinding wheel or a flap attachment. To clean hard-to-reach seams, use a grinding machine with a burr.
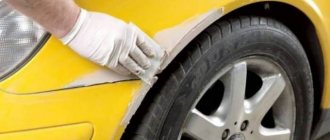
Cleaned surfaces are degreased with acetone or gasoline, then treated with an anti-corrosion compound or acid primer. Epoxy putty is used to protect against corrosion. Thanks to its dense structure, it reliably protects the metal surface from contact with moisture and air and is used as a leveling layer.
After applying a thin first layer, it is left to dry for a day. You cannot use a hairdryer to speed it up, because after the top layer dries, the putty inside will remain damp, since the moisture has nowhere to evaporate. Scores are then applied to roughen the surface using 120-grit sandpaper. After applying 2 - 3 layers, preparations for painting are made.
Automotive seam sealant is used to protect seams that are invisible from the outside in easily accessible areas. If necessary, it is smoothed with a spatula and painted. The sealant is applied to hard-to-reach places using a pneumatic sprayer through a plastic tube.
After welding work, it is necessary to treat the body against corrosion
The inevitability of body rusting processes
Automakers are constantly improving the quality of their products. Cars are equipped with power plants and transmissions that can operate for a significant period without major repairs.
But there are also components that, even with the most modern technologies, can get damaged very quickly. These parts include the body.
The load-bearing part of the car is constantly exposed to negative environmental influences. Moisture, chemicals, and sudden temperature changes cause corrosion processes that, if no measures are taken, can cause significant damage to the body and make it practically unusable.
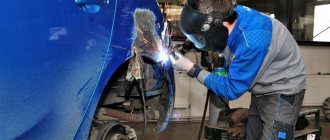
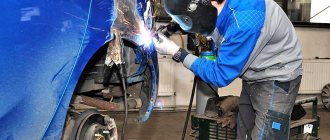
Method of welding body metal with an inverter
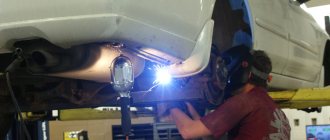
Figure 3. When performing welding work, special attention must be paid to safety precautions.
The main advantage of this method is its high speed, thanks to which you can complete all the work in the shortest possible time. The inverter has been used to create welds on car bodies since Soviet times. It is used mainly for the domestic UAZ-469 SUV, the body of which is not so demanding in terms of aesthetic appearance. For a domestic SUV, the first place is the reliability and strength of all components, which includes the body.
Today, owners of such SUVs most often turn to car repair shops to create additional frames, bull bars, rear and front winches, as well as fog lights located on the roof of the vehicle.
To increase the speed of work and increase the reliability of fastening with an inverter, it is these parts that need to be welded.
Inverter welding relies on the creation of high-frequency electric current. Most often, equipment of this type is quite bulky, but more expensive devices boast portability and small dimensions (Fig. 2). At the same time, the quality of welds created by inverter machines practically does not depend on the person. Such equipment can be easily mastered in a few hours. But this type of welding has its disadvantages:
- high price;
- inability to create welds on metal with a thickness of more than 3 mm;
- malfunctions due to moisture and dust entering the housing.
Experts recommend purchasing a device with a medium to high cost, since the cheapest models are considered unreliable. Another advantage of inverter welding is the ability to operate at low voltage in the electrical network. It should be remembered that when working with welding equipment of this type, it is necessary to follow safety rules (Fig. 3).
Preparing to replace the threshold
- You need to lift the car and level it. It is better that the body is supported evenly at several points to avoid body distortion.
- When completely replacing the threshold, it is better to remove the doors. This will give good access and prevent damage to the doors during welding. When removing doors, it is better to leave the hinges on the body so that their position does not change. In most cases, it is also necessary to remove the front fender. Removing the front fender may require additional disassembly. So, for example, you will have to remove the front bumper and headlight.
- If the threshold is being replaced due to its corrosion, then it is necessary to clean the area around the rusty areas with a reserve in order to determine the boundaries of the rust. This way you can understand which areas of the threshold can be left and which need to be cut out.
- To replace the thresholds, it is necessary to dismantle some interior parts, such as plastic cladding, seats, and rubber seals. Carpeting can be rolled up.
- Protect your car's paintwork, glass and interior from sparks from welding and grinders.
- Before welding, you need to disconnect and insulate the battery terminals.
Body preparation
A very important stage in restoring the body is the preparatory work. First of all, it is necessary to correctly assess the condition of the body parts.
And to do this you will have to disassemble the car:
- Dismantle the interior, completely (remove the seats, upholstery, dashboard, you may have to dismantle the doors);
- Remove the wings;
- Remove everything from the trunk;
- Remove old traces of bodywork.
As already noted, the first spots of corrosion appear on the bottom, sills and wheel arches. These are the ones you need to pay attention to first.
As for the thresholds, very often the rust is located inside them, so to assess their condition you will have to cut off the boxes (if there is corrosion on them, then this will have to be done in any case).
The second important point in the preparatory work is determining the boundaries of areas that require replacement.
If, for example, there are holes in the bottom, then you need to cut out an area with fairly good indentations, since the metal near the hole is already “infected” with corrosion.
However, you should not cut out anything that has traces of rust on the surface. In many areas, corrosion is only superficial and to eliminate it, it is enough to treat it with chemicals followed by anti-corrosion treatment.
In general, only those elements that have already rotted or that corrosion has greatly changed the structure of the metal should be replaced (they will soon rot).
It is not difficult to identify such areas; just use a screwdriver to pick at the surface and assess their condition.
After cutting out all problem areas, we prepare replacement material.
If these are external elements, then you will have to purchase the required body elements (fenders, sill boxes, and the sills themselves) from the car market.
For the bottom, if the cut out parts are small, almost any metal of the required thickness will do, but it is still better to use body metal. In the case of overall parts, it is better to purchase a new bottom.
Repair cost
If you need to replace thresholds on a car, then it is worth considering that the price of work at a service station starts from 10,000 rubles. A comprehensive restoration of arches and wings will cost at least 25,000 rubles. The high cost is fully justified by the labor required by the craftsman and the cost of components. A common belief is that repairing body parts is a simple job and can take no more than an hour of time, rather than a marketing ploy.
You can save tenfold on repairs if you carry out the welding yourself in the garage. This is justified when the driver has minimal welding skills, knows the design of body elements, and understands what material needs to be used in what sequence. You won’t be able to save time; independent work, even with an assistant, rarely fits into 3 days; you need to be prepared to spend a week.
Stages of work for complete replacement
Replacing a threshold is a labor-intensive and complex process, but this type of repair remains the most productive and reliable. During the repair process, all main parts of the body are checked: the bottom, fenders, wheel arches. If the elements have traces of rust, dents, etc., then drivers can immediately carry out reconstruction and preserve the body for at least another 5 years. A complete replacement of the threshold takes place in stages:
- interior dismantling;
- cutting out an old threshold;
- preparation of the seat;
- welding of a new threshold;
- painting.
How to digest rapids
Do-it-yourself welding of car thresholds takes place according to the following algorithm:
- An inverter is the simplest method of semi-automatic welding; it is recommended not to buy the device, but to rent it.
- Check the garage electrical network for load capacity and stable voltage supply without surges.
- Charge the welding machine with wire, connect the phases, check the electric welding for functionality.
- Before welding work, the threshold is grabbed onto points and the geometry of the body and the tightness of the door are checked.
- It is recommended to weld not with a continuous seam, but in increments: 2 cm seam, 5 cm gap.
- They start cooking from the central counter, first under the front door, then under the back.
- After welding, the seam must be carefully cleaned without completely removing the beads, this reduces the rigidity of the structure.