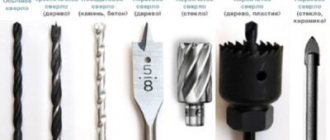
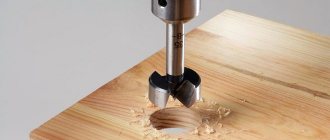
Feather drills are consumable tools designed for drilling in wood, plastic, drywall, ceramics, and glass.
The feather drill has its own original appearance, which cannot be confused with any other type of drill. By design, it is a metal rod, one edge of which has a hexagonal end, and on the other side there is a working part of the drill called a feather. The feather itself has a spatula-shaped appearance, with an incisor emanating from it.
Application area
The tool is used when working with all types of wood, as well as its derivatives (MDF, chipboard, plywood). It is equally widely used for repairs, in the manufacture of furniture, doors, window frames, and in other areas of industrial production. There are two main types of drilling in which it is used:
- For non-through holes of small diameter. For example, the production of fastening sockets for door jambs, furniture production.
- For through holes. For example, sockets for installing studs and other fasteners.
Important! Spade wood drill bits are recommended for shallow drilling. You also need to remember about the thin tip. It goes deeper into the wood than the main head.
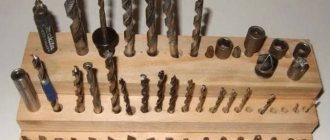
Storing feather drills
We try to select original, aesthetic and convenient solutions for storing power tools and consumables. Now we propose to make a stand for pen-type drills.
It will be beautiful, convenient and portable, because you often have to mix both the drill and its attachments.
First you need to figure out what size the stand will be. We suggest leaving a gap of 1.2 cm between the feathers, 2 cm on each edge, and as a result, the width of the product is 3 cm and the height is 6 cm.- For the base, plywood is used, the thickness of which is 1.2 cm, and for the front insert with holes for the size of the feathers, plywood 0.4 cm thick is used. For the frame, you need to cut plywood on a circular saw, and its width should be 2.2 cm. Next, we make blanks of the required size on the trim.
- The 0.4 cm plywood has a length of 30 cm and a height of 5 cm, because the widest feather makes a hole whose diameter is 4 cm. The result is a whole set of parts.
The most boring part is creating the markings for the holes and then drilling them. First, you should measure the width of the largest feather from the edge, this is 4 cm, and then mark the middle at these 4 cm; Then we make an indent of 1.2 cm and proceed to create the next hole for the pen. Through holes should be made on one part, and drilled 0.5 cm on the second
- To begin with, use the 5th drill, and then widen the holes with the 8th, exactly to the diameter of the feather shanks.
- Afterwards you need to sand the surface well.
- In through holes we grind like this - screw the sandpaper onto the drill, fix it on the screwdriver and grind.
- Next, you can start gluing everything together, while clamping all the parts as tightly as possible, because you can only use PVA glue.
- The frame is ready. Now let's move on to creating a beautiful facade. It is worth transferring to it all the same markings that were made for the previous parts, and using each drill, make a hole for each replacement model.
- Next, you need to bring everything into perfection using sandpaper, don’t forget to sand the holes, and then glue everything to the frame.
- From the remnants of plywood scraps with a thickness of 1.2 cm, you can make legs, which should be screwed with self-tapping screws to the almost finished product.
- All that remains is to cover everything with oil for beauty.
- Ready!
Design features
The uniqueness and efficiency of feather drills lies in their design simplicity. They consist of two parts:
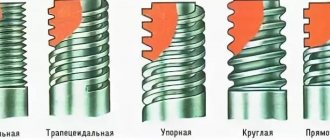
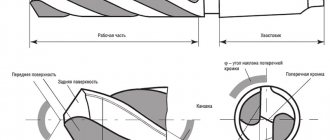
- The working part is the main part of the tool that comes into contact with the wood being processed. The shape resembles a shovel with a sharp tip. He is responsible for the exact position of the blade and cuts out the main part of the wood. On the sides of the working surface there are blades and cutting edges. If you look at the longitudinal section, they are sharpened to the right side.
Feather drills for wood are made according to strictly verified patterns. The proportional ratio of the width and thickness of the working part is strictly observed:
| Width (diameter) | Thickness |
| Up to 1 cm | Up to 2 mm |
| Up to 2 cm | Up to 4 mm |
| Over 2 cm | Up to 8mm |
- tail - a steel rod in the shape of a hexagon. The multi-faceted configuration allows you to securely attach it to the drill chuck, as well as use adapters to increase the working depth.
Classification of drills and their design features
The product structurally consists of a working part, which has the shape of a shank and a feather, and it is used to clamp equipment or tools in a chuck. The pen, equipped with a centering tip, has cutting edges (2 or 4 pieces), which are located at a certain angle.
The design of the pen can be one-piece, namely when the pen itself and the shank are made of the same grade of metal, or it can be made in the form of a prefabricated structure. If we talk about the last option, then plates of a certain shape are attached to a special holder or using a boring bar. For this purpose, a hole is provided in the feather structure.
By the way, a feather instrument can be classified according to the following criteria:
Manufacturing method (composite or solid).- Material of manufacture (varies by grade of high-speed steel).
- Designs (double-sided and single-sided).
- Accuracy class (increased or normal).
- Shank type (conical or cylindrical).
- The method of attaching the pen to a prefabricated product (boring bar or holder).
- Diameter in cm (from 1 to 13).
- Length (short, standard and long).
The most commonly used are flat metal drills that have replaceable cutting inserts. This makes it possible to attach plates of different sizes to one mandrel. The plate and shank must be produced in standardized sizes in accordance with the requirements of TU 2-035-741-81.
Certain manufacturers produce pen-type drills with the possibility of supplying coolant, or rather with special grooves that make it possible to cool the tool during operation.
The material for the manufacture of holders is high-strength steel U10, U12, 30 KhG, 25 KhGT and 18 KhGT. The plates are made of high-speed steel, containing tungsten, molybdenum and other wear-resistant elements of the grades P9, P9K5, P18, R6M5K and R6M5. The angle of the cutter for pen type drills will largely depend on the shape of the drill, and also on the material in which the drilling will be performed.
Characteristic
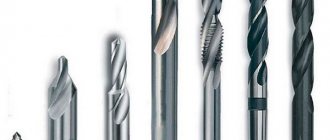
The most complete idea of the technical characteristics can be obtained in comparison with other types of attachments. There are three types of wood drill bits that seem to perform the same task. This is not entirely true:
- Spiral - designed for through drilling. It will not be possible to make a mounting socket using it. It is possible to obtain deep through holes of small diameter with smooth edges.
- Forstner drill - used to make shallow, large diameter holes. It is characterized by high cost. The shank is short, which limits the scope of application. The edges of the hole are smooth, without flaws.
- Feather - inexpensive, with a wide range of working diameters. There is an extension option. Convenient, easy to use. Suitable for all types of wood. With a drilling diameter of more than 60 millimeters, creases and torn edges are possible.
Feather drills for wood outperform their competitors in many ways. The only drawback is uneven edges with a large drilling diameter, but this is not worth paying attention to. You need to know that high-quality large-diameter holes are drilled with crowns.
Feather drill for wood: dimensions
A wide range of different devices used for drilling holes is presented to the consumer's attention. Feather drills are designed for working with wood.
These products are used by both carpenters and professional furniture assemblers, as well as home craftsmen. Information about the design features, technical characteristics and sizes of pen drills for wood is contained in this article.
Selection rules
Finding a high-quality nozzle at an affordable price is not so difficult. If we are talking about trusted companies, such as Bosch, Hitachi, then with a high degree of probability the product is of high quality and reliable. To determine the quality of drills from lesser-known brands, there are several rules that can be easily checked by visual inspection:
- Geometric dimensions. The cutting edges must be symmetrical to each other and be the same size.
- Quality of sharpening of cutting edges. It is checked by touching it with your finger, similar to checking the sharpness of the blade of a kitchen knife.
- The quality of the nozzle. Any irregularities in the working or tail part should alert you. Reliable products have an almost perfect sheen.
- Metal color. An important parameter to pay attention to first is:
Gray steel is highly likely to be completely untreated.
Black - the metal is calcined with steam. This treatment increases the strength and wear resistance of the nozzle.
Golden – internal stress has been removed from the metal. This significantly increases strength.
Bright golden – the drill is coated with a thin layer of titanium nitride. It will last a long time and will cope with the toughest wood.
Types of holes in metal and how to make them
There are these types of holes:
- Through.
- Deaf.
- Deep.
- Half (incomplete).
- For internal thread.
- With a large diameter.
Threaded holes require determination of diameters with tolerances, which are established in GOST 16093-2004.
End-to-end
Through-type holes begin to fully penetrate the workpiece and create a passage inside it. A special feature of the process will be to protect the surface of the tabletop or workbench from the drill going beyond the workpiece, and this can damage the drill itself and provide the workpiece with such “good” as a burr. To prevent this from happening, you will need to adhere to the following methods:
- Use a workbench with a hole in your work.
- Place a gasket made of wood or a special “sandwich” under the part, that is, wood-metal-wood.
- Place a metal block with a hole for free entry of the drill under the part.
- Reduce the feed speed at the last stage.
By the way, the last method is definitely needed if you are drilling holes “in place” so as not to damage parts or surfaces that are located closely. Holes in thin sheets of metal should be cut with spade bits because twist drills can damage the edges of the workpiece.
Deaf
Such holes will be made at a certain depth, and will not penetrate the workpiece through. The depth must be measured, and this can be done in one of two ways to choose from:
- Limit the length of the drill using a stop sleeve.
- Limit the length of the drill using a chuck that is equipped with an adjustable stop.
- Using a ruler that is attached to the wall.
- Combining several methods at once.
Not all, but some machines are equipped with an automatic feeding system to a certain depth, and after that the mechanism simply stops. When drilling, you may need to leave the work a couple of times to remove the chips.
Complex shapes
Making a hole in metal is not so difficult, but if we are talking about complex shapes, you will have to try. Those holes that are located on the edge of the workpiece (that is, half holes) can be made by connecting the edges and clamping both workpieces or the gasket and the workpiece with a vice, and then drilling a full hole. The spacer must be made of the same material as the workpiece being processed, because otherwise the drill will begin to move towards the minimum resistance. A through hole in a corner (that is, in a rolled metal profile) is made by fixing the workpiece in disks using a wooden lining.
It will be much more difficult to drill a cylindrical workpiece tangentially. Such a process will be divided into two main operations - preparing a perpendicular guide to the hole of the platform (countersinking or milling), and then directly drilling. Creating holes in surfaces that are placed at an angle also begins with preparing the site, and then inserting a wooden lining between the planes, creating a triangle and making a hole through the corner. Hollow parts should be drilled so that the cavity is filled with wood plug.
Holes with ledges will be obtained by applying two methods simultaneously:
- Drilling - for this you need to drill a hole to the full depth using a small-diameter drill, and then drill to a given depth using drills with a diameter from smaller to larger. The advantage of this method is that the hole is perfectly centered.
- Reduce the diameter. To do this, you will need to drill a hole with a maximum diameter to a given depth, and then the drill must be changed with a consistent reduction in diameter and deepening of the holes. With this method it will be much easier to control the depth of all steps.
Let's consider another way.
Large diameter and annular drilling
Obtaining a hole with a large diameter in a massive workpiece with a thickness of up to 0.6 cm will be a costly and labor-intensive task. A relatively small diameter - up to 3 cm (maximum 4 cm) - can be obtained using conical, and ideally stepped-conical drills. For holes with large diameters (up to 10 cm), hollow bimetallic core bits or even core bits with hard alloy teeth and a center drill will be required. In this case, craftsmen usually recommend German BOSCH, and especially for hard metal, for example, steel.
This ring drilling method will be less energy-consuming, but it may be more expensive financially. In addition to drills, the power of an electric drill is very important, and it should also be able to work at low speeds. Moreover, the thicker the material being processed, the more you will want to make a hole on the machine, and if there are a large number of holes in a sheet with a thickness of more than 1.2 cm, you should immediately find such an opportunity. In a thin sheet workpiece, a large diameter hole is obtained using narrow-toothed crowns/cutters, which are mounted on an angle grinder, but in the latter case the edges leave much to be desired.
Features of operation
- Before starting work, the drilling area is carefully marked and clear boundaries are drawn. If there are many of them, then the depth of each is indicated.
- It is recommended to use a drill with variable speed control. This will make the job easier.
- The drill rotation range does not exceed 600 rpm. The golden rule is that the larger the hole diameter, the lower the head rotation speed and vice versa.
- An adapter is used to increase the drilling depth. One end of it is inserted into the cartridge, and the other into the tail section.
- The angle between the drill and the wooden surface is always 900. Otherwise, the tip may break and the workpiece may deteriorate.
- The main thing in work is the smooth increase in speed.
- Wood shavings are removed periodically.
Every craftsman should have feather drills for wood. They are easy to use. They are durable, productive, and easy to sharpen. The low price allows you to have several models of different sizes in stock.
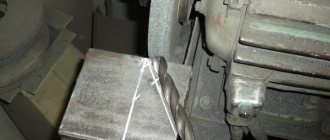
Sharpening feather drills
Depending on the design, the tip drill is sharpened either in 2 or 4 planes, while the sharpening angles specified in the instrument’s passport data are maintained, and the tip of the centering tip (nose) must also be sharpened.
It must be remembered that in this case the tool loses its diameter and sometimes its thickness. Sharpening is carried out on a sharpener, a diamond wheel and using a fine-grained abrasive substance. At the same time, the feather drill should not overheat during the sharpening process, as this leads to a deterioration in its strength properties. To do this, it is necessary to periodically wet it in coolant. The video clearly shows how to make a large diameter hole with a feather drill:
We ask those who have worked with such a cutting tool to share their experience in the comments to the text, and also tell us what equipment and tools were used when performing the drilling operation.
Tips for choosing a drill
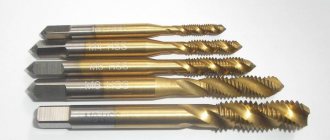
The first point to consider when purchasing a drill is its appearance. Both for wood and for other materials, drills must have the correct shape with well-sharpened cutting edges and evenly colored edges. There should be no defects such as scratches, dents or chips. Next, you need to pay attention to the color of the drill. It will give information about what extreme processing the cutting tool was subjected to. According to the color scheme, drills can be divided into:
- Steel grey. This color indicates that no processing was performed.
- Black. Treated with superheated steam to increase strength.
- Golden. A specially treated type of drill with the internal pressure of the material relieved.
- Bright gold. An indicator that the instrument is coated with a titanium nitride ball. This property of the drill makes it much stronger and significantly extends its service life.
When choosing a drill, it is also important to pay attention to the manufacturer's company. It is safer to buy products from well-known brands, which will help not only to purchase a quality product, but also to preserve the integrity of your money.