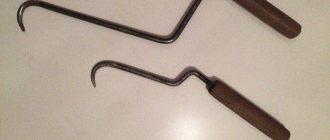
The Fokina flat cutter is a universal device that is suitable for most work in the garden and summer cottage. The device requires minimal effort to operate. With the help of a Fokin flat cutter, you can significantly reduce labor costs and improve soil fertility.
This tool allows you to spend the time spent on the site with benefit and pleasure. With the help of a flat cutter you can perform 20 types of earthworks while remaining in good physical shape. In addition to the main advantages, the device has an affordable price .
Interesting! The flat cutter was invented by Vladimir Fokin after he suffered a heart attack and was no longer able to do heavy physical work. The man created a light and strong tool that became his reliable assistant in his summer cottage.
How to sharpen, straighten and store a Fokina flat cutter
There are many different tools on sale that are similar to Fokin’s flat cutter: “Strong”, “Powerful”, “Hydra”, “Bee”, “Guardian”, large and small canvases, a large modernized flat cutter and others.
But Vladimir Vasilievich Fokin created only two types: large and small. You can sharpen the Fokin flat cutter using:
- emery;
- drills with a special attachment;
- a regular abrasive stone or sandpaper wrapped around a wooden block.
The Fokin flat cutter is sharpened along three edges (two sides of the knife and the tip) plus a bend that goes from the handle to the blade. It is also the cutting working part of the tool. The bevels are on the outside, they are ground, the sharpening angle is 40–50 ° to the inner surface.
Sharpening of the Fokin flat cutter is carried out from the outside along three edges, including a bend, a block or a circle; only the chamfers and bevels need to be ground
When sharpening on a rotating sanding wheel, the pressure should be minimal to prevent heating of the cutting edge. Otherwise, it will lose its original hardness, become brittle and will not be able to withstand the same loads.
When sharpening on an emery wheel, the pressure should be minimal
After sharpening on an emery wheel, the blade needs to be corrected - to remove the resulting nicks and burrs. To do this, use a block or file with flat edges.
The flat cutter is adjusted with a block, gets rid of burrs, and aligns the blades
It is easy to work only with a sharp flat cutter, and in order for it to remain that way, it will have to be adjusted frequently between sharpenings. Constantly monitor the condition of the cutting edges. If small nicks have formed, walk with a block, holding it at the recommended angle of 40–50°. When straightening no longer helps to align the blades, sharpen the flat cutter as described above.
What kind of instrument is this
The disassembled device consists of a curved bracket with a blade and two bolts (the handle, as a rule, must be purchased separately). Before assembling the tool, you should carefully read the instructions and familiarize yourself with the drawings and photos presented in the article.
The tool is easy to assemble. The flat cutter itself is mounted on a flat handle with a rectangular cross-section with rounded edges, making it convenient to hold in any position. The handle should be long so that you don’t have to bend too low. Its most suitable length is 110-130 cm; for a tall person you can use up to 160 cm.
Advantages of the Fokin flat cutter:
- constant use of the tool significantly improves soil fertility, leaving the soil sufficiently moist, allowing air and nutrients to better saturate it;
- It is very convenient to use the tool on a plot of land, it is easy to work with, and there is no back pain or discomfort when working with a flat cutter;
- The flat cutter is universal; it can be used to perform up to 20 different operations by changing the angle of inclination;
- with a small tool you can process the most difficult to reach areas;
- The tool requires minimal maintenance; its sharp edges must be sharpened periodically.
How to make a flat cutter with your own hands
A flat cutter made by your own hands can be called by your name, and not Fokina, since patented items cannot be produced, stored, used, sold, etc. That is why flat cutters are produced that differ from the original in size, shape, location of cutting edges, mounting holes, etc. etc.
How to make an analogue of the large Fokin flat cutter:
- Find a metal plate that is at least 40 cm long and at least 4 cm wide. 65G steel with a thickness of 3–4 mm is recommended.
- According to the drawing, use scissors or a hacksaw to cut a blank from the plate and make markings on it. Cut the nose, designed for breaking lumps and cutting furrows, at an angle of 45 °.
It’s not difficult to make an analogue of the Fokin flat cutter yourself if you have the necessary tools and skills - In the places indicated in the figure, use a drill with an appropriate drill bit to drill holes for bolts with a diameter of 8 mm, 6 mm is also allowed.
- Apply fold lines to the workpiece, clamp it in a vice and, tapping with a hammer, bend it along the marks. You can preheat the plate at this point with a blowtorch. The angle of the first bend is about 90–105°, the second and third – 110–130°.
To give the plate the shape of a flat cutter, it needs to be bent along the three lines shown in the diagram - Sharpen the tool as described above. You can make cutting edges on all sides, as on the Fokin flat cutter, or only on two, as in the diagram. Some sharpen from the inside, not the outside. Depends on the work you perform - make a tool for yourself.
A small flat cutter is made using exactly the same principle. Only the dimensions change: width - 2.5 cm, length of the knife - 10–12 cm. Only two holes are drilled for the bolts.
The design of a small flat cutter is proportionally reduced compared to a large one
Ice peach tea
And the last fruit tea that we recommend you prepare is a refreshing iced tea with peaches, which ideally quenches your thirst in the hot summer, and is also very pleasing to the taste buds. To prepare a large jug of the drink, you will need:
- tea – 3 bags;
- 1.5 liters of clean drinking water;
- 225 g sugar;
- 470 ml water (for syrup);
- 3 fresh peaches.
It is recommended to take black tea, then you will get something very similar to everyone’s favorite but harmful store-bought iced tea like Lipton. But if you wish, you can take your favorite tea - green, white, combined, etc.
You will see a detailed recipe for making this drink in the following video:
About the device
In the fields, cultivation is carried out using special equipment with the necessary equipment, but as for small farms and plots, for their cultivation you can use light motorized equipment, such as cultivators such as an electric cultivator for a summer residence, a mini cultivator, Loplosh or manual cultivators.
If we talk about a homemade manual cultivator for the garden with your own hands, it is quite possible to make it.
It can be made without the use of any special materials or tools, and this can be done in a day or a couple of hours, depending on what exactly the future product will be - a simple hedgehog with a handle, or a modification of an old bicycle.
But you will definitely get benefits from such a product. It will be a well-kept garden, where a variety of crops bear fruit equally well, free of weeds, with soil that is easy to cultivate.
All mechanical parts are extremely reliable due to their simplicity, and if they break down, it will be very easy to replace anything - you just need to make a new part from existing materials.
Also, the manufacture of homemade hand cultivators requires virtually no design or engineering experience, since they consist mainly of just a few movable joints.
Product benefits
With regular use of this flat cutter, the fertility of the soil will be maintained, the soil will remain moderately moist, nutritious and saturated with oxygen.
You will forget about back pain and other discomfort associated with working on the site. Growing vegetables and fruits will truly bring you real pleasure.
Without regret, you can say goodbye to most of your garden equipment and make room in your pantry for something worthwhile and useful. The product is so versatile that you will rarely need to resort to other garden tools.
So, we told you about the Fokin flat cutter. How to use it was also described in detail. As you can see, everything ingenious is simple! The engineer’s ingenuity and idea worked to the benefit of all summer residents!
Where to buy a Fokina flat cutter? Nowadays, it is not at all difficult to find such a device on sale. Its popularity is growing every year. Any specialty store, markets, online auctions and many other places will offer such goods. Make a useful activity truly enjoyable and easy!
https://agronomu.com/bok/1755-samostoyatelnoe-izgotovlenie-ploskoreza-fokina.html
https://www.kakprosto.ru/kak-952468-kak-sdelat-ploskorez-fokina-svoimi-rukami
https://tyfermer.ru/ploskorez-fokina-svoimi-rukami/
https://fb.ru/article/144408/ploskorez-fokina—kak-polzovatsya-instruktsiya-pravilnogo-primeneniya
Necessary materials
In order to be able to independently produce various types of products useful for cultivating the garden, it is advisable to have the most necessary and frequently used materials on hand. Materials that should be in any workshop are, first of all, steel.
The more profiles, strips, rods and steel pipes there are on the farm, the easier it will be to carry out various works, carry out repairs and produce useful equipment.
Also, you definitely need a welding machine, with which you can quickly and reliably connect all metal parts.
This can also be done using metal screws, but their scope of application and reliability are not comparable to welding.
Disc rotary cultivator
You can also make a rotary cultivator with your own hands, which can be used to harrow, break up large clods of earth and level the surface of the garden. The diagram of this model is shown in the figure and it is called a disc cultivator.
Homemade disc cultivator: 1 - disk, 2 - axle. 3 - sleeve, 4 - large bracket, 5 - small bracket, 6 - rod, 7 - pipe, 8 - handle
The working body of the cultivator is spherical convex disks. They are welded to bushings, which, in turn, are put on the axles. The axial ends are secured in brackets using cotter pins.
A pipe with handles at the end and a crossbar passes through a special ledge made in a large bracket. A rod 250mm long and 24x2mm in diameter is welded to the small bracket. A 16mm thick rod is screwed into it, part of which protrudes above the crossbar.
Manufacturing steel disks can be a little difficult. They must be spherical, and it is quite difficult to give such a shape to ordinary metal plates 4 mm thick. It is necessary to use a hammer, “knocking out” the bowl in the center of the workpiece with strong blows.
Wing nuts on the crossbar allow you to adjust the installation angle of the spherical discs in relation to the direction of movement of the cultivator. When the nut is rotated clockwise, the rod rises up. At the same time, the large bracket will bend and the angle of the discs will change.
Additional tips and tricks
During any work in the workshop, all safety measures must be observed. First of all, it is necessary to protect your eyes, especially when working with welding, regardless of its type.
In arc welding, it is not only the intensity of light resulting from the burning of the arc that is dangerous, but also the scale that appears at the site of the frozen weld. Moreover, it can break off spontaneously while the metal is cooling, flying to a great height.
Hitting hot viburnum with a hammer towards you is also a bad idea, since it can get not only into your eyes, but also into exposed skin, behind your collar, and into your hair. Therefore, they must be closed first.
When working with gas welding, heating metal with it for processing or cutting, you must use gloves and face shields - the work is carried out at high temperatures. Also, remember that oxygen creates an explosive mixture when it comes into contact with oil - a spark is not needed to detonate this mixture.
Weeder named after Mittleider and its feathered analogue
With such a system for growing garden crops, it is impossible to do without a weed weed, and therefore Jacob Mittleider developed a special weed weed in the shape of a bracket. Having 2 cutting edges, it is capable of biting into the ground with both of them during forward and backward movement of the tool. Thus, this weeder, named after Mittleider, is capable of weeding a fairly wide strip with just 2 passes, cutting off weeds at the point of their growth or cutting off the roots at a depth of 1-2 centimeters. However, the design, which resembles a stirrup, that is, closed on both sides of the cutting edge by arched rods attached to the handle, does not allow the fight against large weeds. This is where weeder Strizh comes to the rescue.
Weeder "Strizh" for the vegetable garden
He has a very indirect relationship with the bird of the same name. Several models of flat cutters are produced under this brand, the usual frame Mitlider and a leaf-shaped one, with an elongated loop of the working blade, a contour reminiscent of a curved beak. They can cut plants, making a lateral movement like a hockey stick, while the lower knife plunges into the ground, and the upper one simply cuts the stems. There are many different photos of this instrument. There is also a model that is very reminiscent of a frame, with two arched holders, which at the same time has the shape not of a stirrup, but of a slightly curved heart. All these bends allow you to work even with thick stems.


