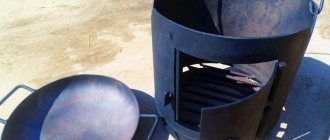
When looking for alternative solutions for heating rooms, many people pay attention to a car rim stove. Proper arrangement of such a design allows you to heat about 15-16 square meters of area, so it can be called a good solution for a home bath or a good cooking appliance.
The main advantage of the product is the availability of the main material used for creation. We are talking about thick, resistant steel with increased strength. It is no secret that boiler steel of sheet and profile type is highly expensive, and ordinary structural steel in a furnace structure quickly deforms and burns out.
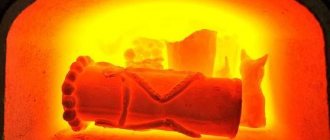
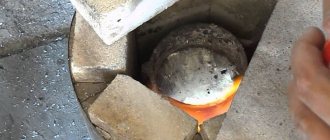
Making a stove from car rims with your own hands is quite simple. To do this, you should use two pieces of metal of the same size and weight: one simple steel, and the second from a wheel rim , and then heat these elements to the appropriate temperature. You can do this in the kitchen on gas. The first part will immediately begin to smell like hot iron, and the second part can be heated to an orange color (this happens at a temperature of about 900 degrees).
At the same time, there will be no unpleasant burning smell in the air. Stoves made from car wheels are popular due to the fact that they practically do not dry out the air and do not release dangerous toxins into the environment. This is explained by the fact that the rims are made of special steels that have a corrosion-resistant surface. The heat resistance of such products, of course, is not standardized, however, the permissible margin of resistance is quite enough for arranging a wood-coal stove.
Important Disc Features
To successfully build a stove from car wheels at home, it is not enough to simply learn the benefits of such products . It is also important to pay attention to the shortcomings of the feedstock, as well as a number of design features of the furnaces. One of the disadvantages of special steel is the lack of standardization for welding properties. Today there are several different technologies for the production of wheel rims , but in most cases welding activities are limited to subsequent thermal tempering (annealing), as well as flaw detection of the seam. Therefore, none of the disc manufacturers even realizes that in the future their products will be weldable.
Based on this feature, you cannot neglect safety rules and make a long-burning furnace using waste from disks. The same applies to pyrolysis furnaces, which can crack at one moment and cause dangerous, boiling substances to enter the room. But localizing the source of fire will not be easy , because it must burn out completely. Only solid fuel stoves can be created on the basis of such wheel rims.
Important feature: Welding seams for special operating conditions that have not passed the appropriate quality certification are considered an unreliable solution .
Making a slipway
The frame is assembled by welding. That is, skills in working with a welding machine are required.
Stages of work:
- First of all, a rectangle is assembled from a metal profile of the estimated length and width; exactly in the middle it needs to be reinforced with an additional profile. The frame is assembled as the future owner of the slipway deems necessary. He may want to further strengthen the longitudinal sides of the frame, perhaps the transverse ones. There is no definite principled position on this issue.
- To increase the stability of the car on the slipway, it is necessary to weld heights in its corners that will prevent the car from possibly sliding off.
- The next stage is installing fasteners on the longitudinal sides of the frame. Fasteners are clamps with jaws that are required to securely fix the vehicle frame when loads are applied to it. There cannot be a strict location for fixing the fasteners; they must be able to move along the entire length of the frame. Making clamps with your own hands is also possible, but if they are on sale, then there is little point in this, since a homemade clamp will cost about the same as a factory one.
Creation Rules
In any case, if you follow some important rules, creating a solid fuel stove from car disks will be possible and successful. You can use this design in small non-residential premises , such as a country house, workshop, etc. It is important to carefully study the following features:
- It is important that the weld remains of high quality from a visual point of view. Avoid the appearance of visible defects in the form of cracks, splashes, shells, bubbles and other irregularities.
- Two mating workpieces are welded at a time. Cooking the entire structure is strictly prohibited.
- After successful completion of each seam, the welded parts are left for some time to resolve residual internal stresses. For every kilogram of mass it takes three minutes.
- After leaving the finished stove for a day to absorb the same stresses, it is additionally run through (if we are talking about a stationary stove, then this action takes about three hours. Portable outdoor ones need an hour run).
During this period, the furnace is also annealed. If minor welding defects, no more than two seams, appear during processing, they can be eliminated after a day, after which the run is repeated.
Key Ring Forming Machine
Description This key ring forming machine is composed of a forming section and a pressing section. The combination of these two sections ensures high efficiency in the automatic production of flat key rings.
Main Features 1. The key ring forming machine can operate in automatic mode.
2. The machine gears are made of 40Cr. They are tempered and hardened, after which their hardness reaches HRC 52-55. 3. To produce high quality products, the drive shaft is made of 45 grade hardened steel. 4. The feed, straightening and forming rolls are made of high quality steel alloy. After heat treatment, the hardness of the rolls reaches HRC 58-62. Technical Parameters of Key Ring Forming Machine
| Options | Specifications |
| Suitable material | Carbon steel, stainless steel |
| Diameter of suitable wire | 1.0-3.0mm |
| Diameter of finished key ring | 15-40mm |
| Production speed | 35-45pcs/min |
| Main drive motor power | 1.5kW (only for bending machine) |
| Eccentric press force | 25t |
Finished product image
What you need to know about ovens
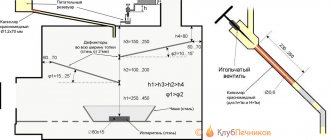
If you intend to make a stove from wheel disks for a cauldron or heating a non-residential premises, be prepared to pay attention to one more feature. Based on the rules for the construction of solid fuel combustion furnaces, there should be about 40-50 centimeters from the floor of the firebox or grate, i.e., the place where the fuel product is placed, to the first vertical obstacle to the flow of flue gases. This option is necessary when using conditioned fuel . If it is damp or waste, the distance is increased to 60-80 centimeters. In this case, the heating time of the furnace increases rapidly. Therefore, it is not advisable to use such fuel for disk furnaces.
It is no secret that hot pyrolysis gases can be released from solid fuel products, which significantly affect heat generation. If they come into contact with a less heated surface, they will most likely not be able to burn out, causing soot to fall out. Further use of such a stove leads to its coking , and dense carbon deposits appear on the roof of the firebox and in the chimney. It significantly reduces thermal efficiency, but is a fire hazard.
A stove made from disks is often filled with waste fuel, including:
- rotten dry wood;
- damp trimmings;
- and other products.
True, there may simply not be enough unsuitable disks for a stove with a decent height, or the optimal design scheme will prevent the possibility of creating a high firebox . In this case, to prepare the furnace, you will have to use a non-standard grate made of durable steel sheet with a diameter of 6 millimeters and reinforcing rods of 10 millimeters. There is no need to worry that the allowable air will not be enough for combustion: through a hole with a diameter of 10 centimeters, with a chimney 1.5 meters high, there will be enough air for 18 kW of power for wood and 30 kW for coal.
Closed/Open Ring Forming Machine
Description of Closed/Open Ring Forming Machine This machine is specially designed to produce various closed rings or small hole rings.
Open rings have a smooth surface. Main Specifications of Closed/Open Key Ring Forming Machine
| Options | Specifications |
| Model | QZ-5 |
| Suitable wire | Plain steel wire, galvanized steel wire |
| Diameter of suitable wire | 1.6-6.0mm |
| Finished ring diameter | 20-76mm |
| Production speed | 50-70pcs/min |
| Main drive motor power | 1.1kW |
| Machine size | About 1180×760×1200mm |
| Machine weight | About 500kg |
Which type to choose for yourself
Taking into account the above-mentioned features, it is necessary to correctly select the appropriate type of disk furnace. The need to independently construct a furnace from car rims occurs in the following cases:
- If you need to heat small non-residential premises, for example, a country house or a workshop. The use of high-quality rims will allow you to achieve maximum quality of the furnace, and will also significantly simplify production.
- If you need to equip the main “fire” part of the furnace structure without using expensive heat-resistant steel.
- If you are going to use the stove for cooking. In this case, you will have to make a stove for the cauldron from car wheels.
Most often, car wheels are used to create mobile (portable) outdoor and garden cooking stoves, as well as for arranging fire pits. The simplest version of a disk hearth stove involves the use of a large mass and side height, which significantly improves heat transfer rates and provides reliable protection from the effects of wind.
Materials that were useful to me
To make a sustainable stove, I used the following list of equipment and materials:
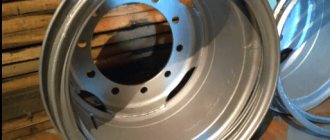
- car wheels with a diameter of 13 inches;
- metal plates and pipes (chose sufficient thickness so that they do not quickly collapse at high temperatures);
- Bulgarian;
- welding machine;
- electrodes.
Source livemaster.ru
Stove for cauldron
It's no secret that the best way to use car wheels is for cauldron stoves. In this case, it is customary to place the structure on a special stand. Due to its round shape, the container heats up evenly, which cannot be achieved in conventional brick ovens. In addition, in the latter case there is a risk of soot settling. Disc structures distribute heat evenly and prevent unnecessary consumption of firewood, which is very important when using waste fuel.
Wood chips collected on site are not able to provide the required amount of heat for cooking pilaf or beshbarmak, and damp and rotten solutions in a massive firebox simply cannot cope with the task of heating the cooking utensils to a certain temperature level. A stove under a cauldron made from car wheels eliminates this phenomenon only if it is made exactly in accordance with the established rules .
Flue gases move along the path of least resistance. If you need to weld two separate disks and cut a combustion hole in the side, then hot gases will flow through the technological holes in the disk hub, since their total area is much larger than the mounting and axial holes.
If you reach the maximum heating temperature, then perhaps a tongue of flame will form in the axial hole, but a cauldron placed on the burner will cause the heat to go sideways.
This version of a disk stove is especially in demand for cooking various types of food by simmering over coals , however, few people use this method these days.
To properly manufacture a stove for a cauldron, it is necessary to equip it with a tightly closing door on the loading opening. Also, the cauldron should fit tightly to the cutout of the burner, periodically closing the technological holes.
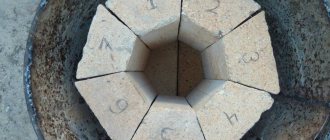
To successfully achieve such results, it is enough to cut out the middle of the hub using a screwdriver. The remaining elements will not be thrown away, because they can be used as a good grate.
Step-by-step construction instructions
The construction of any home-made structures begins with the design stage. You need to make a slipway that is convenient to use. It is important that it does not take up too much space, blocking free movement.
The second point is always the creation of the structure's frame. The last point is to install fasteners and tightening devices yourself.
Drawings and dimensions
First you need to make suitable drawings. Ready-made options can be found below. The markings are made according to the dimensions of the vehicle. Afterwards the stage of preparation and selection of tools and materials begins. We will also need to make a mounting system large enough to fit our vehicle. It would be nice to cook it with the ability to change the height.
- Once all the drawings are ready and the materials have been selected, you can start working. First you will have to remove moisture from the materials and coat them with a primer. You can paint them right away, or you can leave this step for last.
- Now weld the metal corners to the base profile.
- Weld the profile (this will be the stand). It is secured with bolts.
- Now the chains, hooks and retractable devices are welded.
Frame making
The frame is responsible for fixing the car. Therefore, you need to be careful when creating it.
- Before creating the frame, you need to create the outer frame. It is to this that the frame will be mounted.
- A metal profile is suitable as a material. A stand and grips are attached to it (they are needed to fix the car threshold).
- Now the thresholds are being made. They are created from metal corners.
- Thresholds are installed on beams and secured with bolts.
- After installation, all elements will have to be secured by welding.
Fastening the body to the slipway
Clamps are required for fastening. If you can't buy them, make your own. You will need railway platforms (what the rails are attached to the sleepers). Each of the platforms is cut in half, and metal is welded onto the inside. It is cut into diamonds using a grinder.
You don't need to do anything to the outside. A plate 4 millimeters thick is also welded to the inside. It is important that the clamping device fixes the threshold and does not bend during use.
Installation of rack and pulling devices
Factory hydraulic attachments are suitable for racks and devices. If they cannot be purchased, a homemade mechanism will do. The power of the device should be from 1 to 2 tons. To attach the pulling devices, you need a pad. It is made from a channel and installed in the frame of the slipway. To place the tightening mechanism and chains in any place, it is necessary to make holes in the frame along the entire slipway.
If the stand is made independently, it is recommended to use a tower device. It is heavy, but the restoration of the car will be uniform.
Making a slipway is not that difficult. If you have basic knowledge of construction, you can easily do everything yourself. The main thing is to choose the right material and make the right drawings.
Types of crushers
The easiest way to make a finger crusher is a manual crusher. All elements are purchased at the nearest metal receptacle.
However, the disk version will be more effective and of high quality. Making it yourself is quite difficult, but only it will ensure high-quality grinding.
If the grain is not used for livestock, this is a very important point. You can familiarize yourself with the drawings of grain crushers now.
Homemade brick crusher
According to the degree of grinding (in other words, by fraction), threshers can be created small, medium and large . In the first case, the brick is crushed to fragments of 5–25 mm, in the 2nd – 26–100 mm, in the 3rd – 101–300 mm. One of the most necessary options for brick crushers are jaw crushers ; they are based on the action of two sharp plates, jaws. These cheeks put pressure on the raw material, which causes it to bend and become deformed in every possible way.
There are also shaft threshers: two cylindrical shafts rotate at equal speed towards each other.
In the end, they get down to business with a grinder with a hammer mechanism - the brick is destroyed with a hammer.
Let us list the design aspects of a homemade brick thresher.
- The most common system, for sure, will be a chopper with one movable jaw. A fixed one can be created from a metal sheet installed on a rigid base with an angle. The tilt is needed to make the upper hole where the material will flow. As the angle of inclination is adjusted, the crushing gap is also adjusted.
- The movable cheek can be an iron shaft, certainly of enormous diameter. It will be started by an electric motor using a belt drive. This is necessary to reduce the number of revolutions and increase the load properties of the motor. If overloads occur, the belt drive will prevent jamming.
- The shaft should rotate towards the brick filling . The crushing characteristics will change when the lower point of the cheek that will be motionless is displaced.
- It is better to place the entire mechanism in one housing , on top of which create a loading hopper.
Taking into account these fundamental points, you can create a thresher with your own hands. This is a container with a shaft on bearings, on legs. A cone-shaped thresher could be a candidate: these are two huge cones located opposite each other.
The thresher starts, and the cones begin to destroy the material one by one.
How to cook with your own hands
So let's get started.
Side surfaces
The first task is to roll a cylinder from a sheet.
There are two ways, without using rollers:
- By welding the edge of the sheet to a mandrel of the required diameter, heating it and tapping it with a hammer according to the shape of the mandrel, achieve a cylindrical shape.
- Having set the sheet to bend at a small angle, then move the sheet a little and, holding it again, bend it to a small angle. Continue until you get a cylinder.
The width of the workpiece is the circumference (P=πd – where d is the diameter for the cauldron) plus 8-10 cm on both edges.
For the door, make a cutout approximately 30x20 cm. The cutout for the door is made at the very bottom, without indentation.
On the opposite side, but at the top, stepping back 5-10 cm from the top edge, make a cutout for a pipe, either round with a diameter of 100-150 mm, or square with a diameter of at least 100x100 mm.
Important! Select the size of the cutout for the chimney to match the pipe
Bottom sheet
We recommend taking the blank for the bottom sheet with a reserve, and then trimming it to the desired shape.
In front, the bottom sheet should protrude 10-15 cm.
Top sheet
For a cylindrical oven with the diameter of a cauldron, we may not make the top sheet.
But if you feel able to make an even hole for a cauldron (with a diameter of more than 350 mm), then you can make a stove that is rectangular in plan and cylindrical with a diameter larger than the cauldron.
The top sheet is welded as symmetrically as possible, and then cut to the size of the stove and cleaned along the seam.
Small parts
At the bottom of the door, make a row of 5-7 holes with a diameter of 15-20 mm.
The door will need hinges and a latch.
Hinges can be made from nuts and bolts, pieces of reinforcement, and scraps of sheet steel.
An example of a latch can be seen in the photo.
To carry the stove, it is convenient to make a pair of handles from a 10 mm rod.
It is good to make the legs from a corner and bolt them to the bottom sheet of the stove. If necessary, they can be removed from the cooled oven.
Chimney
There is no point in making the chimney height more than 1.5 m. In our case, the pipe is only needed to remove smoke from the cooking area.
There is no need to make a fungus or elbow on top of the chimney. Such parts are installed to protect the furnace from precipitation (which is irrelevant for this type of furnace), and the draft is reduced.
And yet, if you use the stove permanently, it is enough to make a cover on the chimney or remove the pipe from the stove.
To attach the pipe to the oven, a 10-15 cm glass, the size of the pipe, is welded.
Finishing
Assemble the stove and check: is everything okay? If not, correct it.
Jagged edges and sharp edges must be removed.
We will complete the work on the stove with painting.
Before painting, clean the outside of the stove from rust and paint it with a compound for metal stoves.
Shredder system for branches and grass
The purpose of the unit is to quickly and safely crush plant debris. The main function is performed by the cutting unit. The knives are driven directly by the engine or by means of a belt drive. The units are installed on a stable frame. The moving elements are covered with a casing. Two compartments are made for feeding branches and unloading chips.
Iron frame
A homemade shredder with a massive electronic or gasoline engine needs a stable, strong frame with space to install the engine and a rectangular support for the cutting unit.
For the production of the shredder frame the following is used:
- profile pipe 25;
- corner at 30;
- channel.
- ears for the engine,
- nuts,
- hairpins.
Engine
Full autonomy, work anywhere in the garden, independence from the outlet - the advantages of a gasoline engine. A homemade shredder for processing branches, tomato tops, and weed is equipped with a motor from a motorized cultivator or walk-behind tractor with a capacity of 6 liters. With. It is moved from one unit to another.
Electricity costs are lower than gasoline costs, because if there is a network on the site, an electric motor is installed on the unit. To chop branches 2-3 cm wide, a 3-phase electric motor of 2200-3500 W is enough. When making a low-power grass cutter, they take engines from household devices. They are removed from washing machines and vacuum cleaners.
The thickness of the branches processed by the shredder depends on the design of the cutting unit. In homemade systems, several options are implemented:
- to grind branches with a diameter of 7-8 cm, several cutters are installed on the shaft;
- hammer-type cutting block for grinding thin rods;
- a universal cutting mechanism is made of 15-30 circular saws mounted on a shaft;
- knives from factory garden equipment - brush cutters, lawn mowers;
- chop the grass - trimmer line;
- stump grinder from a plane;
- two shafts with 3-4 iron knives for cutting branches of bushes and trees.
Protective case
To prevent chips from flying around, you need a protective case. It is made from sheet steel with a width of at least 1.5 mm. Tin is not suitable for this purpose. During active use of the shredder, it rapidly deforms from powerful impacts of chips.
Container for receiving sawdust
Old shopping bags, boxes, buckets, and bins are used to collect small garbage. For massive units, the bunker is welded from iron sheets and riveted from galvanized steel.
Electronic wires and start/stop button
To turn on and off a homemade unit, use a push-button station designed for the appropriate current. Its purpose:
- turning off and turning on electrical equipment;
- changing the direction of rotation (reverse).
To connect the engine to a three-phase network, you need a five-core flexible copper cable in double insulation; for a single-phase household network, a three-core cable is sufficient.