Heating to high temperatures is a necessary component of many technologies that are used in home creativity, commercial activities and industrial production. Factory heating devices are highly efficient and, accordingly, have a price that not everyone can afford. A do-it-yourself muffle furnace for hardening metal can be assembled at minimal cost with excellent performance characteristics. To achieve the desired result, you should familiarize yourself with the device, operating principle and possible options for assembling a 1000 degree oven with your own hands.
Classification of muffle furnaces
Based on the type of heating elements, muffle furnaces are divided into:
- electrical;
- gas.
By purpose they are divided into:
- for metal melting;
- for firing ceramics;
- for melting glass;
- for hardening metal;
There are also industrial and homemade muffle furnaces.
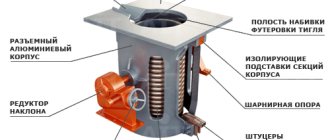
Industrial muffle furnace with automation
But it is impossible to make gas-powered stoves at home, although gas is cheaper than electricity, since such experiments are prohibited by law. Electric oven control provides convenient temperature control.
According to their design type, muffle furnaces are divided into:
- horizontal (the simplest);
- vertical or potted type;
- bell-shaped;
- tubular.
Heating can be carried out in air, in a vacuum or in a gas environment. At home, it is only possible to design a furnace with heat treatment of products in an air environment.
When you make a muffle furnace yourself, you can give it the desired shape and volume, and decorate it in a style suitable for the interior.
Main parts of the structure
- The outer part of the furnace, the shell (body). It is convenient to use a disused gas stove, or rather an oven from it or an electric stove, as a body for a future muffle furnace. To use them, all plastic parts are dismantled. In cases where it is not possible to use such housing options, it is welded from sheet metal (thickness of at least two millimeters).
- Thermal insulation layer. This part of the design is extremely important. The efficiency of the furnace and the heat loss it will incur depend on its quality. The inner layer of thermal insulation is a fireproof (fireclay) brick that can withstand temperatures up to one thousand degrees.
- The outer layer, which reduces heat loss to the surrounding space, is laid from perlite or basalt wool. Asbestos is unsafe to use; when it is heated, carcinogenic substances are released into the atmosphere.
- Elements that directly heat the workspace. The heating elements inside the muffle furnace are spirals twisted from nichrome or fechral wire. Thickness 1 mm. Nichrome (nickel-chrome) wire is very ductile and resistant to corrosion.
- Fechral (aluminium, chrome, iron) wire is somewhat cheaper due to the absence of aluminum in the composition and also has the necessary properties for its use in a muffle furnace.
List of materials and tools for assembling the structure
- grinder (machine for grinding and cutting materials) with cutting wheels for metal;
- welding machine;
- sheet steel >2mm thick;
- metal corners;
- fireclay fire-resistant brick;
- fireproof mixture;
- heat-resistant silicone;
- basalt thermal insulator (cotton wool, density 200 kg/m3) or perlite;
- safety glasses and respirator;
- nichrome (fechral) wire with a cross section of 1 mm;
- wire cutters or metal scissors.
Manufacturing of the device
In this case, we will tell you how to make a vertical muffle furnace for firing ceramics with your own hands.
To do this you will need the following tools:
- angle grinder (grinder) and 1-2 wheels;
- electric arc welding and electrodes;
- metalworking tools, including wire cutters;
- 2mm nichrome wire.
and materials:
- 2.5 mm steel sheet or used oven body;
- corner;
- fittings;
- basalt wool;
- refractory fireclay brick;
- fireproof mortar;
- silicone sealant.
Recipes
| Ingredients | Process | Result |
| Gold bar, Silver bar | 22 | |
| Energy: 1,600 | ||
| Time: 5 sec | ||
| Voltage: 16 / |
| Energy: 2,400 |
| Time: 7 sec |
| Voltage: 16 / |
| Energy: 1,600 |
| Time: 5 sec |
| Voltage: 16 / |
| Energy: 3,200 |
| Time: 10 sec |
| Voltage: 16 / |
| Time: 10 sec |
| Voltage: 1 / |
| Time: 10 sec |
| Voltage: 1 / |
| Time: 10 sec |
| Voltage: 1 / |
| Time: 10 sec |
| Voltage: 1 / |
| Time: 10 sec |
| Voltage: 1 / |
| Time: 10 sec |
| Voltage: 1 / |
| Time: 10 sec |
| Voltage: 1 / |
| Time: 10 sec |
| Voltage: 1 / |
| Time: 10 sec |
| Voltage: 1 / |
| Time: 10 sec |
| Voltage: 1 / |
| Time: 10 sec |
| Voltage: 1 / |
| Time: 10 sec |
| Voltage: 1 / |
| Time: 10 sec |
| Voltage: 1 / |
| Time: 10 sec |
| Voltage: 1 / |
| Time: 10 sec |
| Voltage: 1 / |
| Time: 10 sec |
| Voltage: 1 / |
| Time: 10 sec |
| Voltage: 1 / |
| Time: 10 sec |
| Voltage: 1 / |
DIY Tips
- Separating fireclay bricks and drilling holes to install the heating element.
When created from fireclay bricks, any pottery tempering requires the use of a heating element. And if there is a need to place an appropriate solution, then it will be necessary to make cuts and technical cavities in the ceramic material. It is best to first mark the entire location of the element and only then resort to making cuts. All this can be done at home using simple power tools.
You should start by sawing the seams using a cutting machine with a special diamond wheel. And then it will be necessary to remove the resulting areas of ceramics. And here it is best to use a hammer drill. Since this will avoid cracking and damage to the material and each of the elements. You should not use a hammer and chisel, because when hit, cracks may form, which will subsequently lead to the unusability of each of the elements.
- Choice of small or large muffle furnace.
Homemade stoves selected and created must be obtained with an understanding of the technical processes in which they will take part. And here a logical question arises: to create a larger oven or to implement a more miniature solution. If jewelry is melted down, a minimal amount of internal space will suffice. This will allow for more practical use of the products and will not require additional space.
But in the case of blacksmithing, it will be necessary to create more significant design solutions that will allow melting and hardening of metal.
Watch the video in which the user demonstrates in detail the structure of a self-made muffle furnace:
Operating rules
Electric or gas furnaces for melting materials or hardening parts are high-risk devices.
Before starting work, be sure to check the reliability of the connection to the gas network or the insulation of the wires and the condition of the spirals. A reliable ventilation system must be provided in the room.
We install the stove on a heat-insulating stand. It is better to take several fireclay bricks and glue them together with heat-resistant glue.
We do not recommend working in clothes like those in the photo:
Only special clothing can protect you from burns when working with molten metal. Only split-leaf gloves comply with labor protection regulations. Clothes made of thick material. All areas of the body must be covered, shoes made of thick leather or a substitute. No slippers or flip flops.
Do-it-yourself muffle furnace: manufacturing instructions
Stage one. The inside of the cylinder is lined with basalt wool.
High temperature mats
Fastening basalt wool to the body with ceramic buttons
Stage two. Thermal insulation is being constructed, for which, as mentioned earlier, you only need to take fireclay bricks. The procedure is as follows: seven bricks must be joined in the body so that they form a pipe. In the future it will serve as a working chamber.
Marking the refractory of a muffle furnace
The bricks are laid out in a row, and marks are made on each of them at which they will be cut. Next comes the actual cutting, after which the bricks must be of such a shape that they can be connected into one hollow pipe. To simplify the procedure, the bricks can be numbered. At the end of cutting, the pipe is assembled, tied with wire, and the symmetry of the shape is checked. If necessary, adjustments are made.
DIY muffle furnace
Stage three. Nichrome wire is twisted into a ø6 mm spiral by winding it onto a base (used electrode, pencil, etc.). The brick is then removed from the body and placed back in a row.
Laying the heating coil
Stage four. A spiral is applied to the bricks and future grooves are marked. The correctness of the lines is measured by the building level. As a result, the laid spiral should lead from the bottom to the top of the pipe. Contact of the turns is not allowed, as this may cause a short circuit.
Stage five. To bring out the ends of the spiral and connect them to the machine with a stabilizer, three strips cut from ceramic tiles with polypropylene channels for the wire are inserted between a pair of bricks. These channels will greatly simplify future repair work.
Stage six. The finished structure is placed in a steel case. In this case, one brick is placed on the bottom of the body, pre-coated with fire-resistant glue. To remove the ceramic channels, holes are made in the housing in appropriate places.
The finished structure is placed in a steel case
Stage seven. The same sheet steel is used to make the lid. A circle is cut to the size of the structure, and for more reliable fixation, fireclay bricks (1 pc.) are attached to it on top. Then the handles, canopy and metal latch are welded. The edges of the lid in contact with the walls of the oven are covered with a layer of fire-resistant silicone. Silicone is applied only to a previously degreased surface.
d43a33c3a7afd155c436c14ef42ac831.jpeOven cover
Oven cover
Oven cover
Stage seven. Test run. To allow the structure to dry completely, place it in a warm, well-ventilated place. The use of any heating devices is prohibited as this may lead to cracking of the masonry. After drying, the coils are connected to a machine with a stabilizer, and the heating power and operating temperature are adjusted.
When operating the oven, the lid must be tightly closed.
Adhesive connection
How rational is it to use glue for lining work? To construct small-sized household and laboratory ovens, a special oven adhesive composition is often used. Its fluid texture allows you to smooth out irregularities and obtain a thin and even seam that does not protrude above the surface of the blocks.
When using basalt cardboard, horizontal sections can be coated with glue diluted with water 12 hours before starting work. Its amount should not exceed 15% of the total mass of the composition
Rules for applying glue to bricks or slabs for lining furnaces:
- The surface is pre-moistened.
- The adhesive solution is applied in a layer up to 3 mm thick.
- Approximately 1-4 kg of glue is consumed per 1 square meter. It all depends on the source material.
- Hardening time: 24 hours at a temperature of 25 degrees or more, 6 hours - from 90°C and above.
If several layers of coating are required, the solution is applied at intervals of 15 minutes.
Areas of application
The layout used must allow the required amount of material to be placed for processing.
It is worth dividing all furnaces into types of application for working with the material:
- hardening of metal and Kremlin products;
- firing and bringing the material to a certain structure, imparting strength;
- tempering, imparting plasticity to the material to make the corresponding products;
- blacksmithing, for splitting metal for subsequent processing and creating more acceptable sizes and workpieces;
- laboratory studies to study the effect of temperature treatment on metals and alloys of various formulas.
This division allows you to determine the types of temperature conditions and the total volume of the furnace, creating all the necessary design solutions and formulas for independent design of a muffle furnace.
Varieties and distinctive features
In order to be able to create a high-quality stove with your own hands, it is worth understanding what types it is divided into, taking into account the fuel and energy consumed, namely:
- gas;
- electric.
This separation allows the use of various energy sources, which allow heating the space inside the created structure. At the same time, a stove with installed elements for electric heating is more popular. This allows you to control the temperature inside the structure if it is necessary to process certain raw materials.
A modern muffle furnace has its own characteristics in design and resulting production capabilities, namely:
- in the resulting design and volumes of internal space;
- methods and methods of heating the internal space of the furnace;
- use of special protective formulas and functions;
- operating temperature parameters.
Depending on the temperature obtained, all furnaces are divided into three types:
- moderate temperature ovens, with parameters of 100-500 degrees Celsius;
- medium ovens, with temperatures of 400-800 degrees Celsius;
- high-temperature oven, with parameters 400-1400 degrees Celsius;
- ultra-high temperature stoves, they heat up to 2000 degrees Celsius.
Automation with temperature-time tasks
There are three types of automation for hardening furnaces. The cost of organizing furnace control increases along with the comfort of use. The simplest option is a simple thermostat with a thermocouple as a temperature sensor. This device will simply maintain the set temperature with a hysteresis of about 30–50 °C. The holding time is controlled manually, as is the moment the temperature point is reached.
More advanced automation is being developed specifically for electric ovens. Thermal controllers of the Autonics TCN4 type have a proportional power control function, providing adjustable hysteresis up to 1 °C. The device is also equipped with additional functions, such as an alarm when the set temperature is reached. If desired, the alarm channel can be used to activate a time delay relay installed in series with the thermostat.
The most advanced in this regard are automation devices for Profile-M type furnaces. They differ not only in built-in power relays, but also in the possibility of more flexible configuration. Such controllers have a preset timer, and also have the ability to configure heat treatment with a complex temperature profile, sequentially setting the duration of time periods during which a certain temperature should be maintained.
rmnt.ru
Useful video
Watch the video, which shows how to start making a muffle furnace: what materials and tools are required, what needs to be done first, and what actions are not recommended.
1ba8d3678997cd1220be3ef58cf59f99.jpe ce84308707c136bdb783c4f4656f6cf0.jpeMaking the lid
- Cut a circle out of steel, identical in diameter to the already fully assembled structure.
- Place fireclay bricks on top of the glue - it will provide sufficient sealing.
Weld handles on the sides to make it convenient to lift and remove the lid, and a latch for closing.
Cover the edges with fireproof silicone; before doing this, be sure to degrease the surface (even White Spirit will do).
Let us remind you that when the oven is operating, it must be closed. Excessive air ingress will lead to rapid wear of nichrome.
Disadvantages of homemade design
Each device is not without certain shortcomings, and a homemade device also multiplies them. Given the set goal, you can sacrifice some requirements for the sake of fulfilling others. However, everyone should know the list of negative consequences.
A homemade design is deprived of all guarantees, including safety guarantees. Evaporation of metal from the heater coil can lead to it being contained in the form of impurities in the composition of the precious metal being processed. Homemade thermal insulation will not provide full concentration of heat in the firebox, so the body of a homemade stove is very hot and requires careful handling. By the way, this is also a disadvantage of some factory models. Failure to properly monitor and regulate temperature may result in the oven not being able to perform a particular heat treatment task. https://www.youtube.com/watch?v=ABWK3hD9f1E
Ready-made factory-made ovens are designed to perform a fairly narrow range of tasks, but this is more an indicator of professionalism than a disadvantage. The main parameters and scope of application of a particular device are indicated in its passport.
The leaders in the production of compact and stationary muffle furnaces are such companies as TSMP Ltd (England), SNOL-TERM (Russia), CZYLOK (Poland), Daihan (South Korea). The presented list reflects the top list of companies for evaluating suppliers of high-temperature equipment to the Russian market.
Possible difficulties and problems when creating a furnace
When manufacturing a device, difficulties arise with the selection of material and installation of a temperature control system. Incorrectly selected materials lead to rapid destruction of the muffle. Thus, some craftsmen, to save money, use low-quality bricks and clay-sand mortar instead of fireclay. This leads to cracks in the muffle and heat loss.
The cracked muffle is temporarily sealed with a solution of fireclay clay. The camera needs to be removed and replaced with a new one.
If the furnace is connected to the network without a thermostat, the temperature in the muffle is not controlled. This leads to damage to products that require firing at a given temperature. To solve the problem, you should purchase a thermostat and electrical equipment, assemble a control unit and connect it to the heating elements of the muffle.
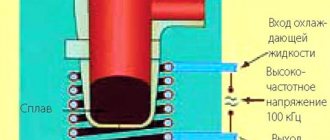
Equipment cooling
When creating an induction furnace with your own hands, the biggest problem that arises is cooling. This is due to the following points:
- During operation, not only the molten metal is heated, but also some elements of the equipment. That is why effective cooling is required for long-term operation.
- The method based on the use of air flow is characterized by low efficiency. In addition, it is not recommended to install fans near the stove. This is due to the fact that metal elements can influence the eddy currents generated.
Typically, cooling is carried out by supplying water. Creating a water cooling circuit at home is not only difficult, but also economically unprofitable. Industrial versions of the furnace already have a built-in circuit, to which it is enough to connect cold water.
Creating a muffle furnace body
You can create the muffle furnace body yourself or use blanks. As a workpiece, you can use an old oven, an electric or direct heating oven, a refrigerator, or a washing machine. It is also worth considering that it is necessary to remove all plastic parts, since they are not adapted to high temperatures.
You can create the case yourself. Sheet metal is suitable for this. You should choose a material whose thickness is more than two millimeters. A rectangular box should be made from it using a welding machine.
Sheet metal is suitable for creating the body
If you want to construct a cylindrical muffle furnace, you should bend the metal into a radius and weld the seam.
To protect the metal from corrosion, it is advisable to cover the stove with special fire-resistant paint. A special thermal insulation layer will improve the properties of the oven. It serves to reduce heat loss, thereby increasing the heat in the chamber. For the thermal insulation layer, you can use basalt wool, as well as perlite.
Heating the muffle with gas
A homemade muffle furnace can operate not only from electricity, but also under the influence of a gas burner. You can purchase such a heating element or make it yourself.
To create a gas burner, you need a metal pipe 10-15 centimeters long. The diameter of the pipe should not exceed a few centimeters. First, you should make a through hole near the edge for connecting the gas tube. It is also necessary to make several one-sided holes perpendicular to it. They are necessary to ignite the device.
For a gas burner you will need a metal pipe 10-15 centimeters long
The gas tube is made of copper, its diameter does not exceed 0.8 centimeters. Threads are required at both ends of the tube. In the middle of the device you need to make a small blind hole for the gas to escape. One hole must be closed with a plug, and a gas cylinder must be connected to the other. When combining elements of the device, be sure to install a valve between the hose and the burner, as it will protect the structure from fire.
Preparing fire bricks
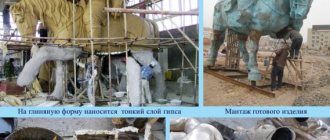
The main and very first step towards creating a muffle furnace is preparing refractory bricks with chamfers in the right place for better fit of the joints during assembly. To do this, take a solution of fireclay clay and pour it into special molds.
It is important to note that:
- Six or seven (optional) refractory brick blanks must be very carefully adjusted at the joints to ensure a muffle without cracks. Next, you need to press all the bricks together with chamfers and fix them in this position with a special tie. It can be made from a metal tape 2-3 cm wide. At the ends of the tie it is necessary to provide devices that tension the tape. After assembly, you will get a six or seven-sided muffle design.
- Then, you need to make several transverse cuts in each refractory brick blank. They will house a heating element in the form of a spiral. The grooves are made with an abrasive saw. In one workpiece the grooves are made with an inclination, and in the rest - horizontal. The distance between the grooves is at least 2 cm, and the configuration must match the diameter of the electric spiral placed in them.
Assembling and pouring the frame
Having assembled the muffle into one whole, you can begin to manufacture the frame (casing). To do this, you need to select a metal pipe of the required diameter. In this case, there must be a gap of at least 150 mm between the bricks and the frame for better insulation and reduction of heat loss from the electric furnace. If there is no ready-made pipe, the casing can be made independently from galvanized sheet steel.
The assembly of the muffle and the furnace casing must be performed in the following order:
- Place the fireproof structure on a level surface.
- In two boards made of plank, thick plywood or chipboard, cut holes corresponding to the diameter of the stove casing.
- Insert the lower part of the casing into one shield, and the upper end of the pipe into the second.
- The shields must be fastened so that they do not slide along the smooth metal surface. This will prevent deformation of the sheet metal and accidental movement from its place during further work.
- Then a solution of heat-resistant and heat-insulating material is carefully poured into the space between the muffle brick and the casing.
Assembling and checking the oven
Assembly begins with the manufacture of the muffle furnace bottom, which can be made as a separate structure. This will make it easier to transport the stove in parts to the place of its use.
- A cylinder with a diameter equal to the dimensions of the casing and a height of 25-30 cm is made from a galvanized sheet. Legs made of a pipe or profile metal with a cross-section of 2 cm are attached to it to eliminate fire hazards.
- You need to make holes at the bottom end of the workpiece and weave a wire mesh through them. It will be a holding element for the poured and hardened solution made of heat-resistant material. The lid of the muffle furnace is made in the same way, in which it is necessary to provide a technological hole for ventilation.
- In the grooves of the muffle, lay a spiral of the required diameter, length and cross-section of the wire, so that the turns do not touch. Exit the ends of the wire through ceramic tubes. All that remains is to connect the electrical wires and test the resulting structure.
That's all for now, see you in the next lesson.
How to make a heating element?
Wire is used as a heating element. You can use nichrome or fechral. Nichrome wire can withstand up to 1100 degrees. But nichrome can burn from the slightest contact with air. Fechral can withstand temperatures up to 1300 degrees, and the wire does not deteriorate from the air. The minimum wire size that needs to be used is 1 millimeter. Depending on the type of muffle chamber, the methods of attaching the heating element are different.
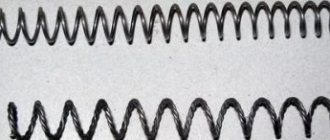
A ceramic muffle is wrapped with wire
The heating element is fixed to the casing using clay, the distance between each turn should be about 2 millimeters. The bonding layer should also be dried for several days and fired in a coal oven.
It is necessary to install a heating coil in the fireclay muffle. You can make it yourself from nichrome or fechral wire. To do this, you need to wind the wire evenly around a cylindrical object. A pencil, thin metal rod or welding electrode will do. The diameter of the spiral should be 6 mm.
It is imperative to ensure that the turns do not touch each other, otherwise a short circuit will occur. The spiral must be placed in special recesses made in fireclay bricks. Be sure to secure the coils. This can be done using wire or making putty. You can use clay for putty. Holes are drilled in the body through which the ends of the wire must be brought out. To connect the spiral to the network you need to use a cable.
Necessary materials
Directly for the manufacture of the furnace you will need the following materials:
- fireclay brick
- one and a half kW spiral
- heat-resistant clay or mortar
After its manufacture, it is placed in a casing. It can be welded from 2 or 3 mm steel sheets. Its dimensions are taken based on the size of the oven. You can also use an old gas or electric oven as a casing, after first removing all plastic parts and elements from it. The space between the furnace and the casing is filled with insulating material such as mineral wool.
Vertical loading kilns are better suited for ceramic firing. In furnaces where work will mainly be carried out with melting, hardening or other processing of metals, the heating process of the product should be controlled by using a temperature sensor; workpieces are loaded into such chambers horizontally.
Let's look at a step-by-step example of a muffle furnace
In this case, an old iron rectangular tank is used for the casing. It needs a little tweaking and it will be fully suitable for its role. Using a grinder, I cut off the edge of the tank, which has a round hole, 5-10 cm wide. Along the edges we drill holes for fastening the door to the body on the curtains.
The work should begin with planning: Assemble the oven dry from brick, make markings on it from the inside, in those places where the spiral will need to be laid. In the brick, according to the markings made earlier, using a drill, using a Pobedit drill, you should make indentations. In the illustration below, the drill is placed at an angle to the groove, this is how the desired result can be optimally achieved.
We put the prepared brick into the oven; an external frame for it should be made from the corner. We put a spiral into the grooves. We coat the entire structure with a solution of mortar and water. All cracks should be sealed.
Next, you should make an electronic unit that will control the heating of the coil. Moreover, heating the oven will not be easy, but it will be a stepwise heating. For this, a step thermostat is used. A stand should be made for the muffle furnace to avoid losses below. The frame from the corner is cut out and welded at the corners, legs are welded on the sides, also from the corners. A row of plates is welded on top.
We use special fiberglass heat shrink. It serves to protect a thermocouple, the characteristics of which are as follows: chromel-alumel (TCA) diameter 0.5 mm, length 1 m. We also use a ceramic tube with two holes for a thermocouple. You will also need thick heat shrink to power the spiral. We put a heat-resistant fiberglass casing on the thermocouple, and insert its end into a ceramic tube. At the top of the stove, a hole is made with an ordinary drill and a thermocouple must be inserted there and covered with a lethal solution. Let it dry.
To connect, you will need a special heat-resistant wire for electric ovens. The coated stove is hidden in a casing; its thermal insulation will be provided by basalt wool. At the top of the casing body you need to make a hole for the output of power wires and a thermocouple to control it. Before final packaging in cotton wool, a test connection of the oven should be made.
The device itself is installed on an asbestos sheet. The placement of cotton wool should be carried out wearing medical gloves. Control unit for the furnace. Next, we proceed to the manufacture of the furnace control unit.
The set of components consists of:
- housing (taken from a small electrical panel)
- electromagnetic contactor (in this case also “Soviet”)
- terminal blocks (one ceramic one for connecting the nichrome spiral from the muffle furnace to the power wires, and more made of fire-resistant plastic for the main switching)
- 16A automatic; bolts, nuts, engravers; thick wire and plug
- thermostat Profile-M-1K multi-stage single-channel
The thermostat can heat according to a complex schedule; you can set the heating time and temperature during this interval.
This is what the finished device looks like: