In this tutorial I will tell you how I used bricks to create a melting furnace for heat treating knives.
I recently started delving into knife making and part of the process involved heat treating the metal. I looked at various instructions on how to make a smelter, where they used a drill with a bat to drill holes, but I decided to make everything simpler and less expensive.
To create the hole I used a hacksaw, a flat head screwdriver and a rasp. I used kiln cement to join the bricks together. I further realized that this was not absolutely necessary, but for me it was worth the money spent.
About this article
Savings for a blacksmith: making a muffle furnace for hardening metal with your own hands
Co-author(s): wikiHow staff editor
This article was produced by our experienced team of editors and researchers, who reviewed it for accuracy and comprehensiveness. wikiHow carefully monitors the work of its editors to ensure that every article meets our high quality standards. This article has had 60,135 views.
Categories: House
English:Build a Metal Melting Furnace for Casting
Español:construir un horno de fundición de metal para fundición
Português:Construir um Forno para Fundir Metais
Français:construire un fourneau pour fondre du métal
العربية:بناء فرن صهر المعادن من أجل تشكيلها
Seal
Features of melting some metals
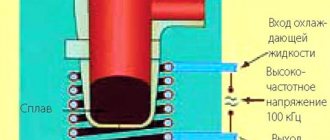
In order to melt metal at home, this element must be placed in a small cup or crucible. The cup with the material is inserted into the oven. Then its melting begins. To melt the precious elements, they are placed in a glass ampoule. In order to make an alloy from several components, follow these instructions:
- First, a refractory element - copper or iron - is placed in the melting cup.
- Then a more fusible component is placed - tin, aluminum.
Melting aluminum in a homemade furnace
Steel is a refractory material. Its melting point is one thousand four hundred degrees Celsius. Therefore, to melt steel at home, you must follow the following instructions:
- To melt steel at home, introduce additional regenerators. If the furnace runs on electricity, then electricity is used.
- During induction heating, slags are added. They increase the speed of melting.
- Constantly monitor instrument readings. If necessary, lower the melting temperature by switching to a more moderate mode.
- It is always correct to determine whether the steel is ready for work or melting. Follow all the above steps. Only then will the resulting metal be of high quality.
Metal smelting
To melt iron at home, the furnace must be preheated. First, a large piece is placed, and then small ones. Iron must be turned over in time. A properly molten metal will have a spherical shape.
If you are going to make bronze, you must first place copper in the melting hole. Since this component is more refractory. When the copper is melted, tin is added.
And when melting aluminum, tin or iron, you must be careful. Rivet slowly and should be done with a small hammer. Heat the material frequently until reddened and cool in cold water. Only then will you get the perfect alloy at the end.
Differences between homemade and factory units
To understand the difference, you need to take the purpose of using the equipment as a starting point. Home-assembled units are usually needed for periodic use (breaks can be significant), so the minimum cost, the ability to perform simple manipulations, and low maintenance requirements come to the fore.
Read also: Homemade band saw do it yourself drawings
If the results of smelting are used to earn money, it is more advisable to purchase a factory induction model - such equipment promotes accurate work, helps to accurately observe measurements, and reduces to zero the likelihood of unwanted impurities. The same equipment is difficult to do with your own hands - assembling an inductor, choosing a crucible , screen arrangement requires specialized skills. Not everyone can create a capacitor bank and generator.
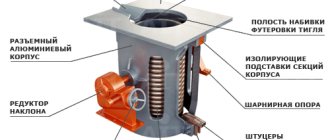
DIY crucible furnace
The ergonomic characteristics of stoves should not be overlooked. In artisanal preparations, they are given a minimum of resources; as a rule, such variations are inconvenient to use and are often dangerous due to the use of improvised materials. In the factory lines, proven technologies are used to ensure comfortable work, in particular, this concerns the configuration and rotating mechanism of the crucible. It is important that they create conditions to prevent injuries.
Concept of temperature scale
Some non-metallic objects also have similar properties. The most common is water. A temperature scale was developed regarding the properties of the liquid that occupies a dominant position on Earth. The reference points are the temperature of changes in the aggregative states of water:
- Transformations from liquid to solid and vice versa are taken to be zero degrees.
- Boiling (vapor formation inside a liquid) at normal atmospheric pressure (760 mm Hg) is taken to be 100 ⁰C.
Attention! In addition to the Celsius scale, in practice temperature is measured in degrees Fahrenheit and on the absolute Kelvin scale. But when studying the properties of metal objects, other scales are used quite rarely.
DIY forge for melting aluminum
Aluminum is used in the production of parts in blacksmithing. The peculiarity of such an alloy is that it has low weight, a high degree of ductility, and good conductivity of heat and electricity.
With all these qualities, the alloy in question can be called a low-melting material, which significantly increases its popularity. To carry out work on creating parts from aluminum by bringing the alloy to a plastic state, a forge is used.
For many years, people have considered the question of how to make a forge for melting aluminum and the result of a huge number of attempts has become structures that you can create with your own hands.
Homemade forge for melting aluminum
Purpose and classification
A metal smelting forge is a furnace that has been used in blacksmithing for many years. However, the small efficiency indicator determined that it was not used in the production of products from the alloy in question in industry. There is the following classification:
- By type of housing: open and closed. Open has a completely open top. The closed version has a closed top.
- At the installation location: stationary and personal forging.
Closed type forge Open type forge
To remove gaseous combustion products, a special pipe is created if the work is carried out indoors. The open type does not have a pipe, since combustion products escape without being drained.
General operating principle
With your own hands, using scrap materials, you can create an effective system that will allow you to carry out forging work. There are a huge number of types of designs that you create with your own hands. A professional forge has the following elements:
- the table is made of fire-resistant material;
- there is a firebox with a grate;
- air chamber to improve fuel combustion efficiency;
- air drainage with supply air duct;
- valve for regulating air supply;
- tent;
- window for feeding workpieces;
- umbrella;
- chimney;
- crucible;
- hardening bath;
- gas-air chamber.
An example of a furnace design for aluminum smelting
The type of forging equipment in question can be called a classic forge, which is used in blacksmithing. It is quite difficult to create it with your own hands, but you can create a simpler design for melting aluminum.
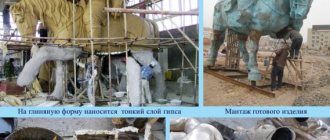
It is better to make it yourself using scrap materials. A mini forge made of 6 bricks is suitable for obtaining various parts that are used to decorate metal objects, buckets or other parts. The creation process can be divided into the following stages:
We create the body from fireclay bricks. Such a brick can withstand exposure to high temperatures for a long time
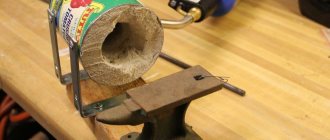
When choosing a brick, you should pay attention to the fact that it should not have damage or defects. This is because cracks will lead to heat loss. We create grate grate shelves from scraps of steel pipes
Steel pipes should be of small diameter. Fusible material options cannot be used. The grate is made from steel strips, the thickness of which is 4-6 millimeters. We twist the grate at an angle with a screw. The fuel can be coal or coke. Ignition is usually carried out using a blowtorch. You can also use a gas burner. A window under the nozzle must be created when using a blowtorch. This is because the forge emits a lot of heat, which can cause the lamp tank to explode.
This type of design, which you can quickly create with your own hands, should be used exclusively outdoors, since there is no umbrella with a chimney. During smelting, a large amount of combustion products is released.
When considering the question of how to make a forge for melting aluminum, we note the possibility of creating portable versions. An example is a portable version of the track, which with additional elements are installed on a common base. The lining is represented by fireclay marl with fireclay sand. Another design element can be called an air supply system to the track, for which you can use, for example, a manual siren. It can run on coke or charcoal.
, please select a piece of text and press Ctrl+Enter.
A simple coal forge A forge for heating and melting metals in a couple of hours.
- 3 Pages
- 1
- 2
- 3
- →
- You cannot create a new topic
- You can't reply to the topic
#1 romka10.06
Inventor
- Group: Users
- Posts: 270
- Registration: 27 May 11
While cleaning up the yard after renovating the house, I collected two dozen red bricks, and I had a desire to try to make a forge, especially since I have long dreamed of mastering aluminum casting, and now I need to put the old brick somewhere. We have earth - just dig and the clay will go, well, I dug, dug out a lump of clay, kneaded it in a basin with some water, stacked two bricks in length, two more bricks in parallel at a distance of 100 mm, it turned out like a corridor, put a thick layer of clay on top and pressed across the corridor there are 6 thick nails with a gap of 5 mm, and the grate is ready! There were four more bricks in the well for this entire structure, it turned out to be a firebox, one end of the corridor (now it has become a ashpit and part-time ash pit) was covered with half a brick, the other with a cooler from a burnt computer power supply. I took an old battery from UPS, connected the cooler, threw in coal that is sold for barbecue, a piece of newspaper under the bottom and set it on fire. It will hum and flare up! I built up the well with four more bricks, and covered one on top like a lid, everything inside heated up to a light yellow glow. I threw an aluminum spoon there, it didn’t last even 30 seconds, it quickly shrunk and flowed away! I haven’t felt such delight for a long time. In an hour, such a cool thing came out of all the trash. Unfortunately, I couldn’t take a photo; my hands were always covered in clay or soot. This inspired me to build a more solid structure, yesterday I went to the nearest building materials store, bought 10 pieces of stove bricks, 10 fireclay bricks, fireproof clay and a cast iron grate, for only 600 rubles. I put a new forge on a piece of flat slate, took an old fan, asked a friend for a bucket of coal (wood is expensive and melts quickly, right before our eyes) and lit the whole thing, well, of course it’s burning, where should it go. I spent two hours on everything about everything, including going to the store. Here is the fan, it’s too small, I plugged the gap on the side with a piece of paper to seal it
I took a piece of an old car shock absorber, the one with the bottom, stuffed it with aluminum wire, aluminum radiators from a computer power supply (where I got the fan from) and shoved it inside, covering the sides with the remains of a brick.
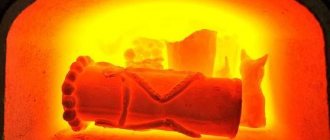
When the whole thing melted and shone with a bright yellow light (it warmed up for about 10 minutes), I dug a hole in the wet clay with my finger. Of course, I understand that this is not the right thing to do, you need to cook aluminum with fluxes, and the crucible should be sterile inside and coated with liquid glass and chalk. , and the form should be dried and heated to at least 200 degrees. Just in case, I put on an old jacket, thick mittens, glasses (liquid metal + wet clay = flying metal splashes, I did this on lead as a child), and poured it at arm’s length the contents of the improvised crucible into the hole.
To my surprise, the pouring took place without any ejection of metal, it boiled a little and everything froze, so I waited a minute and let’s pick it out with a nail - Figurines, everything froze on the outside, and when I tried to lift the casting, it slid off the nail in a nasty wrinkled lump. Well, I cooled the matter and rather, use an angle grinder - a cut to see where they are, these difficult-to-remove casting pores with which lovers of aluminum casting unsuccessfully struggle. I didn’t see anything particularly scary with the naked eye; the metal was quite suitable for my needs! https://rutube.ru/tracks/5729089.html
Now I will try to cast something worthwhile, maybe a cylinder for a steam engine. Once done I will post pictures.
So, I recommend to all DIYers living in the private sector or at the dacha to build a forge, there are no costs, but the benefits can be considerable, how often do you need to cast a body, or forge a knife - harden, anneal the hardened steel. And how much pleasure there is in the process itself, there’s nothing to say here!
A forge is equipment that allows you to heat metal to a temperature of 1200 degrees. Its dimensions vary widely. Some are large and stationary, others are small and portable.
Read also: DIY wire feed mechanism for a semi-automatic machine
You can make a forge with your own hands of any design, which will work on both solid and gaseous fuel.
Creation[edit | ]
Maximum and minimum smelter size
To create, you will need the following blocks: a baked brick, a smelter controller, a fired tank, a foundry tap, a smelter drain and a foundry table or foundry tank underneath. To create baked brick, you need to make cement; it is done in two ways (see screenshots). When using the first method you will receive two units of cement, with the second eight. Next, the cement must be melted in a conventional furnace. After melting the cement, you will get burnt brick. From four baked bricks, a block of baked brick is made, used in the construction of a smelter. The controller is crafted from 8 baked bricks (similar to the chest recipe).
History[edit | edit code]
| Official release of Java Edition | ||
| 1.14 | 18w44a | Added smelting furnaces. Only available in the Creative Inventory. The melting furnace interface is only available in Observation mode. |
| 18w48a | Melting furnaces appear in villages located on the plains. | |
| 18w50a | Melting Furnaces are now fully functional and can be crafted. | |
| 19w03a | Added sounds for the smelting furnace. | |
| 19w11a | Now residents use it as a workplace. | |
| Official release of Bedrock Edition | ||
| 1.9 | beta 1.9.0.2 | Added smelting furnaces to experimental gameplay. |
| 1.10 | beta 1.10.0.3 | Added a recipe for crafting a smelting furnace. |
| Melting furnaces are now generated in new houses of village armorers. | ||
| 1.11 | beta 1.11.0.1 | Melting furnaces are now fully functional. |
| PlayStation 4 Edition | ||
| 1.91 | The Melting Furnace has been added to the game. |
Basic structural elements and materials for assembly
The main element is, of course, the heater. It is best to choose an electric one. Its greatest advantage is that it is very easy to operate. In addition, there are such details as a heating chamber and a special heat accumulator. In order to successfully melt aluminum, heat control must be in place. This will help make the process continuous.
If you have to melt several different materials, then the aluminum itself should be subjected to the process not just once, but several times. In this mode of operation, it is necessary to ensure that the heat accumulator also functions as a regulator. This is necessary in order to maintain the desired temperature of the aluminum after melting.
In order to make a stove for melting aluminum, you need to prepare the following materials:
- grinder, wire and metal bucket;
- seven bricks;
- construction-type safety glasses, a few unnecessary pieces of metal;
- hammer and other standard tools.
Direct stationary burners 1/2″ and 3/4″
This burner, in addition to being intended for stationary use, cannot be operated separately from the stove. When working separately, the flame may go out (it is blown off at a pressure greater than a certain value and the flame jumps inward to the nozzle itself at a pressure less than a certain value). This is explained by the fact that it does not use a flame divider, which ensures stable operation. Instead, there is a small bell, but you can do without it, with a straight pipe. Just be sure to insert the pipe or socket into the inlet neck of the furnace. This gives greater combustion stability.
The inlet neck of the furnace should be 1.2-2 times larger in diameter than the diameter of the burner pipe.
If the diameters are still equal, then the cut of the socket should not reach the cut of the stove neck by approx. 1 cm. But in any case, you should first experimentally determine the position of the burner in which the most stable combustion of the torch is achieved, and only then think about mounting. All burner parts are made from standard components, so it won’t cost you much. I have stainless steel pipes, you can use regular water pipes. Transitions cast iron. Standard plugs from a plumbing store. I decided to adjust the air supply in this way. Simply turn the plug, which acts as a flap.
It should be noted that it is easier to light the burner in a different way than I did with manual ones. First, we enrich the mixture by turning the plug until the through holes are closed. Then we set it on fire. Then you can open the holes slightly. This is clearly visible in the video. Subsequently, the plug can be removed altogether. The selected nozzle hole diameter is about 0.5 mm. Approximate thermal power at gas pressure 2 kg/cm2 - 5 kW.
This 3/4″ burner is similar to the previous one. The difference is in size and, accordingly, in power. The selected nozzle hole diameter is about 0.8 mm. Approximate power at gas pressure 2 kg/cm2 - 9 kW. In all burners, power depends on the amount of gas leaving the nozzle, and this in turn depends on the diameter of the nozzle and the gas pressure. Only the efficiency of burning this gas depends on the geometry of the burner itself. I changed my mind about drilling the large burner plug. I want to pair it with a blower later
Please note that sealing the connections is necessary when supplying gas to the nozzle. The remaining connections do not need to be sealed.
On both direct burners, the nozzle manufacturing is somewhat different from the previous ones. A tube plugged at one end is inserted across a large pipe and grabbed. And only then the hole is drilled on the machine. This ensures alignment of the nozzle hole and the pipe. The video shows how to ignite the burner, having previously enriched the mixture by closing the damper.
Waste oil furnace
Considering that petroleum products are expensive, it is beneficial to use a forge using waste oil. To make the forge during mining, parts that have served their useful life are used. After processing the furnaces, a significant drawback emerged - the spent mixture did not ignite well. To eliminate this problem, an additional compartment was built into the mining forge. Here the oil is preheated with coal or wood. To improve combustion, waste fuel passes through filters and diesel fuel or gasoline is added to it.
As a result, the mining forge has the advantages of a yellow flame and stable temperature.
You can make it yourself:
- It is made from fireclay bricks, dimensions: 85×48×40 cm.
- The vault is made in the form of an arch to maintain temperature.
- The body is completely covered with sheets of iron. A thickness of 1.5 mm is used on the sides, and the top and bottom are lined with 2 mm sheets.
- The supports are made from angles based on the weight of the structure.
Read also: Laser engraving machine for wood
Air is pumped into the chamber by a fan. A waste tank is installed on a hill. From it, the oil enters the chamber through a pipeline, where it is picked up by air, which moves under a pressure of 2 atm. The waste is broken up and fed into the nozzle.
Scheme of the furnace during development:
Receipt[edit | edit code]
The smelting furnace can only be mined with a pickaxe. Otherwise, the block will not fall out.
| Block | Melting furnace |
| Strength | 3.5 |
| Tool | |
| Time of destruction | |
| Hand | 5.25 |
| Wooden | 2.65 |
| Stone | 1.35 |
| Iron | 0.9 |
| Diamond | 0.7 |
| Netherite | 0.6 |
| Golden | 0.45 |
- ↑Time for unenchanted tools in seconds.
Natural appearance[edit | edit code]
The smelting furnace appears in the armorer's houses in villages.
Craft[edit | edit code]
| Ingredients | Crafting recipes |
| Iron Ingot + Furnace + Smooth Stone |
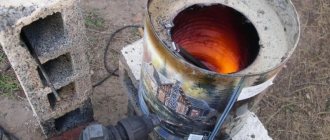
Metal tank oven
It is not necessary for the stove to be sunk into the ground. It’s easy to make a portable oven with your own hands. Any cylindrical tank made of heat-resistant metal is suitable for this, for example, a tank from an old top-loading washing machine. From the inside, the diameter of the tank is reduced due to bricks and clay. Thus, the thickness of our oven will be 10-15 centimeters. Don't forget to install an inflation pipe at the bottom of the housing. Air can be supplied into it in any convenient way. The crucible with aluminum raw materials is hung inside the furnace. As you can see, there are no fundamental differences from the previous version. It’s just as easy to make it yourself, the only differences are in the necessary tools and parts.
Control block
In the control unit, the lower and upper covers are equipped with grilles for cooling the heater terminals. Still, the diameter of the leads is 3 mm. In addition, heat radiation through the bottom of the melting pot is also present. There is no need to cool the regulator - 10 watts in total. At the same time, let’s cool the cold ends of the thermocouple. Control unit with temperature controller Termodat-10K2. At the top right is the power switch. At the top left is a crucible lift lever with a lift rod (stainless steel electrode Ф3mm).
Why did I choose Termodat as the regulator? I dealt with Aries, but after one winter in an unheated room, its firmware crashed. The thermodata has already withstood several winters and retained not only the firmware, but also the settings. In addition, the body is metal, indestructible. (We should at least take a bottle from Perm residents for advertising
Gas-powered forges
Gas furnaces are brought to the design mode much easier, and this is their advantage over solid fuel heating devices. The typical design of such a forge is as follows:
- A chamber made of fire-resistant material and lined on the outside with thick-sheet heat-resistant steel.
- Front flap, opening by means of hinges or a counterweight, and equipped with an inspection window.
- Under, made of heat-resistant fireclay bricks.
- Burner. The type of burner is determined by the calorific value of the gas used. For example, for a propane-butane mixture, diffusion combustion burners are effective, in which mixing of air and gas occurs only after the gas and air leave the device, and mixing of the components occurs due to diffusion processes. Such burners provide the most uniform heating of workpieces (especially long ones), and minimal metal waste is achieved due to the fact that there is always a protective layer above its surface.
- Mixing reducer, providing mixing of air and gas (included in the structure of the liquefied gas cylinder).
- A nozzle, the configuration of which is determined by the shape of the workpieces heated in the forge.
- Grate designed to improve draft and collect scale.
- A fan that provides air injection in the required volume and its subsequent supply to the burner operating area.
To operate such forges, a stationary source of electricity is required. It is advisable to use gas forges for heating parts of long workpieces for forging: heating occurs much faster, and therefore, scaling is less.
When using a gas forge, the following safety requirements must be strictly observed:
- Thoroughly ventilate the forge room. Avoiding stagnant zones where flammable gas can accumulate;
- Do not use oxygen or oxygen-containing mixtures that are prone to spontaneous combustion and self-ignition near the operating device;
- Provide for complete afterburning of gas in the working space of the hearth (determined by a gas analyzer, which is required during a test run of the gas hearth);
- Thoroughly clean the grate after turning off the gas supply to the device.
In order to reduce scale formation, induction furnaces and electric resistance heaters are also used to heat workpieces for forging, but such devices can be called “forges” at a stretch.
Purpose of the equipment
In any forge, the forge is used for a number of important operations - to heat the metal immediately before forging, to cement it, or to engage in other heat treatment operations. Even outside the production workshop, it allows you to get temperatures reaching up to 1200 degrees. The most amazing thing is that you can make such equipment yourself - in its simplified version, it can be assembled in about thirty minutes, using only six fireclay bricks and a few pieces of steel. At the same time, both the temperature and quality indicators of the heating process itself will meet the requirements for fine artistic forging and even smelting.
Horns are divided into open and closed. In the first version, the source is heated in a special space-chamber.
For the second type, fuel will be poured directly onto the grate itself, and air will be supplied from below (it is convenient to work with large workpieces).
How will homemade equipment work? The operation of any (both industrial and domestic) similar equipment is based on the principle of the chemical reaction produced by the combustion of carbon. This element is capable of literally “greedily” wanting to reunite with oxygen (which was taken into account in metallurgy). Ores of iron and other metals are oxides and their compounds. When heated, oxygen goes to carbon, and the metal begins to be released in free form.
READ Is it possible to decorate a bathroom with PVC panels
However, you need to make sure that the metal itself does not burn - if it is overexposed, it will simply become overdried (this is, for example, cast iron).
That is why it is important to regulate the flow of air into the furnace. And this cannot be done without a properly constructed structure.