Do-it-yourself sawmill from a chainsaw: video instructions and drawings
Having the drawings available and having studied the video instructions, it is quite simple to independently make a structure for processing logs, boards and slats. Before starting work, you must select a suitable location. You can install a sawmill using a chainsaw in an old barn, garage, hangar, or even just under a shed. If the room for the unit is closed, then you should take care of the hood.
Chainsaw sawmill - option No. 1
To make the structure, in addition to a chainsaw, you will need:
- two channels 8 meters long and 140-180 millimeters high;
- two rails;
- corners 50x100 mm and 40x40 mm;
- 25 cm sections of water pipe as ties;
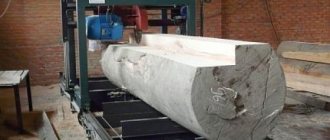
- steel plate 4-6 cm thick and 60 cm long;
- movable hoses;
- pipes with a diameter of 35-40 mm.
Making your own sawmill should begin with assembling the base
from rails and corners 50x100 mm turned upside down. They must be installed strictly parallel to the floor, so you need to use a building level.
- Along the length of the base, according to the drawing, holes are drilled in increments of 1-1.5 meters and with a diameter of 14-16 mm.
- Then, according to the number of holes, ties are taken and connected with bolts.
- Stands are made from metal squares and the base is placed on them. The distance between the outer posts and the base should be about 100 cm.
- To make the structure more rigid, braces between the posts can be welded.
After the base is completed and installed, you need to make a movable cart with your own hands. To do this, a corner is welded to the bottom of the steel plate.
40x40 mm and the product is placed on rollers or bearings. Two corners are welded on top of the plate, to which a chainsaw is attached.
At the last stage of the work on making a homemade sawmill, it is necessary to make a structure for fixing the logs. To do this, movable hoses and pipes should be positioned at the required height and secured.
The first version of a homemade sawmill using a chainsaw is ready. There is another way to make a wood processing unit with your own hands. The tools and drawing for it will need the same, however, the design itself is more refined.
Do-it-yourself sawmill from a chainsaw - option No. 2
The structure consists of four main components:
- Driven saws.
- A mechanism for regulating the thickness of the board being produced.
- A mechanism for moving the saw part of the structure.
- Devices for fixing logs.
Since a chainsaw with a working engine and cutting teeth is already available, you will only need to make both mechanisms and a device for fixing logs with your own hands.
Mechanism for adjusting the thickness of the boards.
Logs are sawed by raising or lowering the base, which must be welded to the plate using four nuts with bent edges. Lock nuts must be installed at the top of this device
, which need to be tightened after the unit is adjusted to the desired thickness of the material being processed.
Mechanism for moving the saw.
The saw in the structure moves along the frame along guide angles, the distance between which should be 50 cm. Two rollers or bearings must be welded
by 20 mm. The lower roller should keep the sawmill from lifting, and the upper one should rest on the guide angle.
Device for fixing logs.
On such a unit, logs are secured using two ridges
– stationary and moving by means of a screw. After the material to be processed has been installed, the moving comb is secured with screws in a stationary state. Now you can safely begin to operate a homemade sawmill made from a chainsaw.
The sawmill is an impressively sized unit that is quite dangerous to operate.
, therefore, before you begin assembling it, you should carefully consider the place where it will be used. It should be well lit, ventilated and have free space. The nearby warehouse for finished boards will greatly facilitate the process of processing the material.
For a sawmill with an electric motor, you should very carefully install the necessary switches and automatic machines, as well as install the wiring.
Since the most dangerous elements of the unit are all its cutting and moving parts, when assembling the structure they should be given special attention. Before starting to operate the assembled equipment, it is necessary to check all fastenings and components, as well as the stability of the structure. Before using the assembled equipment, it is necessary to check all fastenings and components, as well as the stability of the structure.
Before starting to operate the assembled equipment, it is necessary to check all fastenings and components, as well as the stability of the structure.
Correct installation of aerators
The air valve on the riser is installed in the attic, since it will not work if frozen. But the smell should not be felt in the room. If the house has several auxiliary risers and the main one is on the roof, then a sewer aerator 110 can be installed on the others. This will significantly reduce costs. The device can also be used when a riser is not provided or it cannot be brought to the roof, ensuring that the SNiP requirements for the distance to structural elements are met. When choosing a device, it is necessary to take into account that sometimes manual adjustment may be required. The aerator is installed above the top drain point in the system, and it must be accessible for inspection and repair.
The aerator only works if assembled correctly! The pipe and socket cannot be swapped,
Sewer aerator 50 can serve no more than two plumbing fixtures. Install the device no closer than a meter from the drain point. The aerator in the internal sewer must be at the end of the network distribution, after the outermost device. The minimum distance from the floor during installation should be 35 cm. The device is mounted vertically.
A properly installed aerator will last a long time, but periodic checking of the valve condition is required.
Why do you need a sewer vacuum valve - video
1. 2. 3. 4. 5. 6.
Any residential premises, be it an apartment or a private house, necessarily produces one or another amount of household waste. Current standards set the amount of wastewater per person per day, which reaches 180 liters. To drain such a quantity of wastewater, it is necessary to use gravity sewer systems, to which plumbing fixtures are connected.
From local horizontally installed pipelines, wastewater flows to a vertical sewer riser connected to the central sewerage system. Plumbing, horizontal drainage and a vertical riser are combined into an in-house sewerage system. According to the standard design, the riser usually goes out onto the roof and is not closed with plugs.
Rules of use and safety precautions
After manufacturing and setting up, you can use the sawmill for work, observing certain rules and safety precautions.
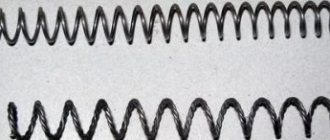
It must be remembered that the canvas can tear, burst or come off. Therefore, if you have doubts about the reliability of the fastening, it is better to stay at some distance from the equipment.
There are the following rules for operating an electric saw:
- The size of the saw teeth is directly dependent on the workpiece. The larger the part, the larger the teeth of the blade.
- It is most practical to use universal tapes. Then, when changing the material being processed, there will be no need to change the blade frequently.
- You need to select the installation location of the device in advance. There must be an outlet nearby and the place itself must be well ventilated.
- Before work, check the tension of the cutting belt.
- It is not recommended to turn on saws for more than two hours at a time. After such intensive work, the tape is removed from the pulley and left to “rest” for twenty-four hours.
- The machine needs regular lubrication.
- The teeth on the saw must be set correctly.
As a result of proper assembly, the tool you need on the farm will appear, assembled according to the drawings of a band sawmill with your own hands. With a little skill, working with it is convenient and easy. The original cutting material is transported by trolley. Saw material is placed on the bed, fixed, and the log or other material is processed using a saw.
A homemade band saw needs care and regular checks. If fasteners fail or become loose, it is better to stop work and correct any deficiencies noticed. When operating the device, you must be careful and careful.
Drilling machine using asynchronous motor
If there is no drill on the farm or it is not desirable to use it in the machine, you can make a design based on an asynchronous motor, for example, from an old washing machine. The design and manufacturing process of such a machine are quite complex, so it is best to make it by a craftsman with sufficient experience in turning and milling work, and assembling electrical circuits.
Evaluate the complexity of the work from the drawings we provide in this article.
The device of a drilling machine with a motor from household appliances
To familiarize yourself with the design, we provide assembly drawings and detailing, as well as the characteristics of assembly units in the specifications.
Parts and materials for manufacturing the machine are shown in the table:
Pos.DetailCharacteristicDescription
1Bed Textolite plate, 300×175 mm, δ 16 mm 2HeelSteel circle, Ø 80 mmCan be welded3Main standSteel circle, Ø 28 mm, L = 430 mmOne end is turned to a length of 20 mm and has an M124 thread cut into it4SpringL = 100–120 mm 5Bushing steel circle, Ø 45 mm 6 Locking screw M6 with plastic head 7 Lead screw Тr16х2, L = 200 mm From the clamp 8 Matrix nut Тr16х2 9 Drive console Steel sheet, δ 5 mm 10 Lead screw bracket Duralumin sheet, δ 10 mm 11 Special nut М12 12 Travel flywheel screwsPlastic 13Washers 14Four-ribbed block of drive pulleys of the V-belt driveDuralumin circle, Ø 69 mmChange spindle rotation speed is performed by moving the drive belt from one groove to another 15 Electric motor 16 Capacitor block 17 Driven pulley block Duralumin circle, Ø 98 mm 18 Return spring limit rod M5 screw with plastic mushroom 19 Spindle return spring L = 86, 8 turns, Ø 25, wire Ø1.2 20 Split clampDuralumin circle, Ø 76 mm 21 Spindle head, see below 22 Spindle head console Duralumin sheet, δ 10 mm 23 Drive belt Profile 0 Drive V-belt with “zero” profile, so the pulley block runners have the same profile 24 Switch 25 Power cable with plug 26 Tool feed lever Steel sheet, δ 4 mm 27 Removable lever handleSteel pipe , Ø 12 mm 28ChuckTool chuck No. 2 29M6 screw with washer
Main types of sawmill
Today there are several types of sawmills. Each option has its pros and cons.
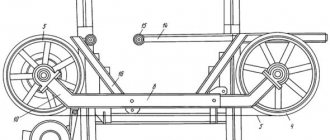
Band sawmill
The mechanism is based on the block principle. The device can function with both cheap and expensive components. The sawmill consists of a frame, a mechanism for tensioning the saw, a motor, a clamp, a wheel, and a belt drive. Sawing of the log occurs using a band saw. And to ensure proper operation, retaining rollers are provided. This is a very convenient device, but it has its drawbacks.
- A wave effect is possible when sawing logs.
- Equipment operating skills required.
- Before sawing, you need to adjust the machine.
Disc corner sawmill
By far the most popular model. Also used in wood processing enterprises. The design of the equipment is very simple. It consists of a support on which a shaft with a disk is located.
When sawing, the disc moves along the log. This allows you to achieve accurate results.
Tire frame saw
The equipment is easy to make yourself. The structure consists of a carriage, trolley, support, saw, motor and tire. Suitable for cutting long logs. It has small dimensions. The device is easy to transport. Operates from the electrical network or from a fuel generator. This equipment is not suitable for working with large quantities of wood. Typically used by private individuals.
Frame sawmill
The rarest type of device. During operation, the mechanism remains motionless. Capable of sawing large quantities of wood at once. The main disadvantages of the device:
- Large amount of waste.
- Large-sized design.
- Large cutting element thickness.
Main advantages:
- Ease of maintenance.
- Reliable design.
- Durability.
Electrical
Electrically driven chamfer removers operate from appropriate networks. The main advantage is that electrical networks are ubiquitous, finding a power source and connecting the unit is easy and simple. As a disadvantage, it should be noted that it is necessary to comply with safety precautions, otherwise the performer risks receiving an electric shock.
RIDGID (video)
This model can work with both pipes and sheet metal.
GTW-2100
GTW-2100 is an electric beveling tool for pipes and flat surfaces, suitable for working with steel, stainless steel, non-ferrous metals and other materials.
- The maximum chamfering angle is 90°.
- The maximum chamfer width is 22 mm.
- The maximum chamfer depth is 15 mm.
- The minimum pipe diameter is 101.6 mm.
- Power - 1700 W.
- The weight of the unit is 6.5 kg.
- Three cutting inserts.
K1755
K1755 is an electric chamfer for metal pipes with an outer diameter of 28-42 mm.
- Power - 1200 W.
- Frequency - 50 Hz.
- Supply voltage - 220 V.
- Axial movement of the cutter is 15 mm.
- The rotation speed does not exceed 200 rpm.
- The weight of the device is no more than 11 kg.
FS-22M
Bevel remover FS-22M is an electric device for processing the edges of sheet materials.
Specifications:
- Engine power - 1100 W.
- Supply voltage - 220 V.
- Rotation speed - 3000 rpm.
- The weight of the device without equipment is 20 kg.
- Processing speed - 1 m/min.
FS-22
FS-22 chamfer is designed for processing sheets and pipes made of the following materials: steel, stainless steel and light alloys. Multifunctionality makes this unit popular, so you should familiarize yourself with its technical characteristics.
- Motor power - 100 W.
- The maximum chamfer width is 22 mm.
- The chamfer depth is 11.5.
- The chamfer angle is 15-60°.
- Rotation speed - 3000 rpm.
- Weight - 20 kg.
- Processing speed - 1 m/min.
What is needed to carry out the work of creating a homemade sawmill?
In order for the sawmill from a chainsaw to be made correctly with your own hands, you should download or create drawings yourself, which reflect the main linear dimensions and the correct location of all elements. Before doing this work, you should decide where the equipment will be installed. A chainsaw sawmill can have different overall dimensions, which allows installation in almost any room. It is also necessary to provide for the possibility of attaching the structure to the base. During cutting, quite a lot of dust can be generated. Therefore, when working indoors, you should ensure that you have a special hood.
When considering how to make a sawmill from a chainsaw yourself, you should pay attention to the following list of necessary parts:
Channels 8 meters long and 150 millimeters high, 2 pieces
It is worth paying attention to the fact that the channels will take the entire load, which can be quite significant. Two rails. They will become the upper part of the sawmill, as well as a kind of guides for the moving element
The rails must be extremely straight and free from defects. Corners, calm, the dimensions of which are 50 by 100 and 40 by 40 millimeters. Sections of water pipes 25 centimeters long are used as ties. A steel plate about 60 centimeters long and at least 4 centimeters thick. A mechanism of movable hoses that act as protection for electrical wiring. Pipes with a diameter of 35-40 millimeters. Hand chainsaw. The choice of saw should be taken seriously. It should be taken into account that the characteristics of the wood being cut will depend on its indicators.
Pneumatic
Pneumatically driven edgers are an excellent option if there is no electricity or there is a danger of damage to wires. The main disadvantage is that the contractor will need additional equipment - a source of compressed air, for example, a compressor.
IMPORTANT! Sometimes edge processing must be carried out in conditions where the use of electricity is prohibited. Here pneumatics will be indispensable.
TT-80
The TT-80 chamfer is a pneumatic edge cutter designed for internal and external chamfering of pipes. Fastening to the product is carried out using three self-centering cams.
- The internal diameter of the pipes is 28-76 mm.
- The outer diameter of the pipes is 32-80 mm.
- The maximum pipe wall thickness is 15 mm.
- The cutter stroke is 35 mm.
- Rotation speed - 55 rpm.
- Pneumatic drive - 960 l./min.
- Voltage - 220 V.
- The weight of the unit is 16 kg.
NT1738M
The NT1738M chamfer remover is equipped with a pneumatic drive and is used for processing the edges of pipes with an internal diameter of 60-102 mm.
The device is fastened from the inside of the product.
- Motor power - 200 W.
- Axial movement of the cutter is 15 mm.
- Rotation speed - 220 rpm.
- Equipment weight - 12 kg.
Video (FUJI)
A short video review of equipment from the manufacturer FUJI.
DIY corner sawmill
A corner circular sawmill, the self-made drawings of which are available in large numbers on the Internet, is an indispensable device for those who want to start building a house or connect their life with woodworking.
Buying a corner sawmill is an expensive business. Therefore, for personal needs, it is more advisable to make it yourself, especially considering that a drawing of a corner sawmill is not difficult to find on specialized sites. However, you can independently draw up such a drawing, design the device and assemble the structure.
Important steps in assembling a homemade circular sawmill:
you need to create a strong metal frame, for example, from any metal pipes or guides so that the pipes are connected in the most reliable way; it is better to weld them as guides; experts advise using high-quality rails without external flaws, otherwise the wheels of the carriage will jump off all the time and the carriage may get stuck assembled from metal parts, when creating a sawmill, be sure to pay attention to the fact that the geometric shape of the frame with built-in rollers or wheels must fully correspond to the distance between the finished rails. Thus, the carriage will move smoothly and freely. Any gasoline engine can be used as a motor.
The power unit must have high power to avoid the possibility of engine overheating; it is worth replacing the chain drive with a more reliable and durable analogue. After this, the machine will become safer and its service life will increase.
Materials, tools and equipment necessary for assembling the sawmill
Drawing of a band sawmill with dimensions.
Making a homemade cutting device will require the following components:
- pulleys (diameter - at least 30 cm);
- half-inch pipes;
- metal corner (size 50 mm);
- profile pipe (size 25x25 mm);
- channel.
A high-quality band sawmill can be made using tools and equipment such as:
- welding machine;
- milling machine;
- electric drill;
- “grinder” with a set of cutting discs;
- hammer;
- pliers;
- clamp;
- hacksaw for metal;
- Screwdriver Set;
- set of wrenches;
- control and measuring devices (ruler, square, measuring tape);
- fasteners (bolts, nuts, screws, washers).
Sawmill made from a hand-held circular saw
The fastest way to make a sawmill is to use a standard hand-held circular saw, which can be purchased at any hardware or hardware store. It is fixed in the same way as a grinder at the bottom of the table top, a slot is made for the disk and a ruler for the stop. The machine is ready for use.
This device has one advantage over a grinder machine. The standard model of a hand-held circular saw provides an inclination of the cutting tool from 0 to 70 degrees, which allows you to make cuts at different angles. This is necessary when making, for example, triangular skirting boards or shaped slats. In the production of wooden window frames, a special angle saw (angle saw) is often needed, for which hand-held circular saws are precisely suited.
Operating principle and main components of the drilling machine
A drilling machine is a well-structured product. Firstly, the bed. As a rule, this is a steel plate (but for small devices it can be made of light alloy) on which the entire product is mounted. A stand is installed vertically on the edge of the bed farthest from the master. The working part, consisting of a motor, a working head with a cartridge and, if there is one, a transmission, moves up and down along it and turns left and right. The head on the stand is fixed in the required position by a locking mechanism. And precise positioning of the height of the spindle with the chuck and drill is performed with a special handle.
The motor and work spindle can be located on both sides of the stand. In this case, a belt drive is organized on several pairs of pulleys between the motor shaft and the working spindle. By throwing the belt from one pair to another, they set different speeds of rotation of the working body - the drill.
Another option is to mount the cartridge on the motor shaft. The design is simpler, but the speed of rotation of the drill must be adjusted by changing the speed of rotation of the motor, and this requires an electrical or electronic circuit.
The working tool is a drill. Drills are classified by size and purpose. In the practice of home-made workers, diameters from 0.5 mm to 12 - 18 mm are used. Drills are selected for work on wood, plastic, hard and soft metal, and concrete. They will differ in the sharpening geometry of the working end and the presence or absence of hard surfacing at the end.
PHOTO: tg-alterra.ru Drill
The machine works this way. The motor turns the working spindle, at the lower end of which the chuck sits. There is a drill clamped in it. With rapid rotation and pressure on the surface from top to bottom, the drill cuts into the material with its cutting edges.
Operating principle of the device
The installation can operate both indoors and outdoors. The use of the unit allows you to obtain a smooth cutting surface. If a corner sawmill is used in the process, then sawing of the forest can be carried out in two planes simultaneously: both along and across the longitudinal axis of the log. This is achieved due to the fact that the working elements are located in two perpendicular planes. This type of installation can work with any wood.
Drawing of a sawmill with dimensions.
If a double-disc sawmill is used for sawing, then it is possible to saw logs whose diameter exceeds 70 mm in two perpendicular planes. The cutting width can be no more than 1 mm.
Transverse and longitudinal sawing of logs on such installations can be carried out simultaneously in both directions when moving along rails that guide the portal with saws installed on it. The portal and carriages move using a drive equipped with an electric motor. The speed of movement of the unit is adjusted in steps by using a chain transmission.
Installation does not require installation on a special platform or foundation. The main thing is that all electrical components of the structure must have reliable protection from precipitation. When setting up equipment, an electronic ruler is often used, which allows you to easily adjust cutting parameters automatically.
Application area
Here are just a few examples of the use of check valves in private and municipal water supply, heating and sewerage systems:
- It happens that due to pressure surges in the water supply (including from the pump), hot water is squeezed through cold water. That is, when you open a cold water tap, hot water flows for some time. In this case, installation of a check valve on the cold supply pipe is indicated.
- The device installed before the water pump will prevent water from draining into the well, and will also protect the equipment from damage in the event of reverse spinning of the working blades.
- In front of the water meter. The water pressure and vibration that is created can harm devices and distort meter readings. Vibration does not spread after the shut-off valves.
- Double-circuit gas (solid fuel or other boilers) must also be equipped with an appropriate valve to prevent the return of already heated water.
- Solar collector. Here, circulation disturbances may be associated with a small difference in the temperature of the liquid at the inlet and outlet, or a slight difference in height (if the water heater is small). It would be a good idea to equip the solar water heater inlet pipe with anti-reverse protection.
- Drainage pumps begin their work by filling the device with water. Many owners find this procedure tedious and come up with ways to avoid it. To prevent water from pouring out of the unit, a valve is placed on the suction hose.
- Where groundwater rises strongly, it is important to install a check valve on the pipe connecting the drainage pit and the house so that when the liquid level rises, it does not flow back.
In some of the listed cases, installing a valve is desirable, while in others (such as with a boiler) it is mandatory and is specified in the accompanying documentation.
Types of sawmills
Depending on the design features of the cutting tool, do-it-yourself sawmills at home can be divided into three types:
- Disc sawmills are most often found among homemade structures. They gained their popularity due to their ease of assembly and wide versatility in operation. The basis of such a self-made sawmill is a circular saw, which is rotated by an electric or gasoline engine.
- Band sawmills are most often used when harvesting various wood materials in large volumes at industrial enterprises.
Almost all DIY band sawmills in home workshops are based on factory-made drawings and designs. The advantage of such equipment is the ability to quickly and efficiently saw large logs weighing up to three hundred kilograms. View gallery - Busbar structures, the main task of which is the longitudinal cutting of wood into boards, as well as the production of slats and high-quality veneer, are used mainly in small industries. In a homemade sawmill, made with your own hands, the cutting tool is a chainsaw blade of the appropriate size.
The choice of type of sawmill depends entirely on the preferences and financial capabilities of the owner of the suburban area.
Models
Review of some devices.
North 550
The corner sawmill with a rotating disk is presented in the segment of inexpensive and reliable equipment for sawing wood. Used in small plants and private forestry enterprises. It is possible to choose a scheme for radial cutting of large logs.
Altai 3
This circular sawmill works with all types of lumber: its saw blades are equipped with Pobedit tips. Main advantages: ease of control, high performance.
Forester
It is equipped with rail segments, which, when joined, allow you to select the required cutting length. The machine is equipped with automatic and manual feeding of the carriage with saw blades, and a special device for electronically adjusting the thickness of the finished lumber.
Drawing and material
Depending on the design, drawings of a circular sawmill of varying complexity are drawn up. In custom development, certain requirements must be taken into account.
- Using log feed on a carriage, the width of the platform is taken equal to the width of the guide rails. This will ensure stability under load. The rail is taken P50, the rollers are selected accordingly;
- on the platform, provide clamps for a tree trunk, convenient, reliable fixation of various sizes of workpieces;
- It is advisable not to combine an electric motor and a saw on a rigid drive. It should be protected by a belt (chain) drive. This will improve the air cooling of the windings and remove them from the zone of intense wood dust formation. Before creating a drawing with your own hands, you need to measure the dimensions of the engine; with the same characteristics, the manufacturer gives its size according to the overall dimensions;
- calculate the working area for a saw Ø 500 – 700 mm;
- The frame, depending on the dimensions of the installation, should be welded or dismountable (moving to a new place of work). Channel No. 4, No. 6 are placed in the main harness. Additional stiffening elements are made from steel corners and pipes (if necessary).
Read also: Build a hot smoked smokehouse with your own hands
Grinder feed cutter
Feed cutter from an angle grinder
You can make a simple, but at the same time very productive and convenient feed cutter from an angle grinder (grinder) using the following technology:
- The frame of an old 40-50 liter aquarium is thoroughly cleaned of rust and welded if necessary.
- A pyramidal receptacle for crushed feed with a hole in the lower part (has a truncated top) is welded into one of the ends of the frame.
- A plate is cut out of thick metal according to the dimensions of the end part, and a hole is made in the center of it for the grinder gear shaft. Also, to load raw materials, a window is made in the plate, to which a funnel-shaped hopper or large diameter pipe (80-100 mm) is welded.
- A trapezoidal knife is made from tool steel.
- The grinder shaft is inserted into the hole in the plate, and the knife is secured to it using the lower support washer and a locking nut.
- The platinum is fixed at the end of the frame with 4-6 bolts.
- The body of the angle grinder is attached to the plate using a bracket.
When working on such a feed cutter, raw materials - various vegetables, fruits, grains - are placed in a funnel-shaped hopper and, under the influence of gravity, gradually fall onto a knife rotating at high speed, which chops them.
The finished feed enters the pyramidal receptacle and is poured through its truncated top into a container placed under the feed chopper.
Important! The finer and better the food is crushed, the better it will be eaten by a domestic animal (cow, pigs, rabbits) or poultry (chickens, ducks).
Review of popular units
The Taiga sawmill is characterized by a wide variety of models.
Sawmill Taiga
Taiga T-1 is a modification of the sawmill with manual movement of the saw carriage in the vertical direction; manipulation allows it to be used in conditions of power problems. The compactness of the machine allows it to be transported by a UAZ vehicle.
Taiga T-2 was put into production in 2002; many consumers transport the unit by Gazelle vehicle. In the transport position, the machine can be easily disassembled; this feature allows two workers to handle loading and unloading operations. It is not a problem to use in a private area or in the event of power outages.
Taiga T-2M or an analogue of the Rainbow band sawmill has a high cost, the device is highly attractive in terms of price and quality. A lightweight modification that does not lose performance, but makes transportation easier due to its low weight.
Technical characteristics of the Taiga T-3 sawmill
The Taiga T-3 sawmill is used for sawing logs in the longitudinal direction. The output is finished products of the required width and thickness.
The engine of this unit allows you to perform work in shifts and process timber of different hardnesses. The saw carriage has a reinforced structure. The gasoline unit is often purchased separately.
Fuel consumption is up to 1.5 liters with a power of 10 kW. It is possible to run the engine idle; this feature makes it easier to start and reduces gasoline consumption in case of downtime.
Taiga T-4 is a large-sized sawmill, characterized by high productivity and high power consumption. Currently not in serial production.
Tags
check valve by your check valve for check valve for check valve by yours Check valve submersible check valve check valves outside the valve bore. check valve sufficient check valve in making a check valve making a check valve making a check valve making a check valve by making a check valve Check valve Reverse flow the occurrence of reverse flow in the reverse direction. ball check valve The design of check valves is the spring returns to wind the spring
ventilation plate
Corner disc sawmill
This device is distinguished by the presence of two saws, which are located at an angle of 90 degrees. to each other. The cut occurs in both directions. One pass yields one edged board. Angle sawing is slightly different in operating principle from conventional circular sawing. The corner sawmill makes it possible to cut without turning the log. These sawmills can be called the most economical, because the yield of finished lumber reaches 60 - 80%. The cost of a circular sawmill largely depends on its functionality, performance and additional parameters.
A device for making angled cuts is indispensable in sawmill production. Longitudinal sawing of round workpieces and their production with specific geometric parameters on a corner sawmill, in comparison with conventional methods of cutting wood, is carried out due to a number of distinctive characteristics. Such a device easily replaces several machines at once.
Lumber of various sections and dimensions can be produced on a corner circular sawmill as a result of independent movement of vertical and horizontal saw supports. In this case, no time is wasted on turning over or reinstalling the workpiece.
Due to the fact that longitudinal sawing occurs without idling in both directions, the final sawn timber is distinguished by the exceptional quality of the sawn surface. Radial and tangential lumber on such a device have a maximum yield.
There are also single-saw devices. In such machines, cutting occurs using one disk, which is mounted on a rotating mechanism in both directions. There is no idle speed. The movement of the saw blade begins in a horizontal position. When moving forward, a horizontal cut is made along the length of the log. At the end of the log, the saw rotates into a vertical position in one movement. When the carriage moves back, the notched part is cut off by vertical cutting. Afterwards, the disk is turned again to a horizontal position and the cutting cycle is repeated. This sawmill quickly cuts the workpiece to produce edged lumber of the required section.
One sawing cycle: moving forward, turning the saw, moving backward for a six-meter workpiece takes 1 minute.
Use if the system is installed incorrectly
As users emphasize, the same thing happens when the slope is too steep, and the water does not have time to cope with the waste. Check valves for sewerage may be needed when the pipeline is worn out. This occurs during long-term operation of the system, within which deposits form. The clearance inside will become less and less, and provided that the flow rate is normal, coarse-grained elements will be fixed to the walls. Gradually they accumulate, become hard and form a blockage. Home craftsmen note that the need to install the described element may be required when horizontal bends are installed at right angles. These nodes change the configuration of the pipeline, as a result of which the speed of movement of the wastewater is lost. Regardless of whether it slows down or speeds up, it negatively affects the operation of the system, which causes a clog to form.
Choosing a circular sawmill design
Homemade vertical sawmill
The simplest homemade sawing structure consists of a table with a cutting disc above the surface. You can make a similar model at home. However, its productivity will be low.
The main disadvantage of this design is the need to independently supply the log to the sawing site. This will lead to disruption of the geometry of the future board or timber. Therefore, these types of equipment are only used for processing small workpieces or sheet material.
The corner sawmill has much greater functionality. It performs two cuts simultaneously in a horizontal and vertical position. However, its production is more complicated than that of the model described above. The DIY circular sawmill has the following design features:
- movable cutting carriage. It moves along guides located on the body of the stationary platform. The carriage contains two motors, on the shafts of which saw blades are mounted. It is imperative to make a device to adjust the position of the disk edges;
- stationary platform for workpieces. It has log clamps. Otherwise, displacement may occur during operation, which will lead to deformation of the product.
A similar mini design can be made from scrap materials.
It is important that it can withstand the loads and constant vibration that will inevitably appear during operation
Possible difficulties
In the process of self-production, home craftsmen face a number of difficulties:
- Incorrect calculation of downforce. The spring has to be shortened or, more unpleasantly, wound again. This problem is usually solved by selection.
- Insufficient quality of surface treatment of the seat. The valve does not press against it completely and allows water to pass through. Solved by grinding the surface.
- The flow resistance is too high for the specific system conditions. I can’t decide whether I’ll have to choose a different type of valve or buy an industrial one.
Making a check valve yourself will be a good test of your engineering and plumbing skills.
From this article you will learn a little about the basics of the operation of check valves and in more detail about how to make a check valve with your own hands. The use of pipelines for various purposes assumes that a liquid or gaseous substance will pass through it in one specific direction. By making a check valve yourself, or by purchasing a sample from the series, you can ensure this condition for the operation of the pipeline itself and its equipment.
Assembly order
The DIY installation process is divided into 3 stages. After each, the dimensions, tolerances, and stroke limits of the moving parts are checked against the working drawing.
- Support frame frame. Welded (bolted) joints are made. They check the quality, diagonals, location of seats, stability.
- Feeding part. In the case of a fixed table, the level is set to a horizontal plane. The coincidence of the longitudinal axis with the supporting frame is recorded. For a moving platform, first place the rails at the same level coaxially with each other and the base. Load the trolley with a check for smooth running and no chafing of the wheel flanges. A small homemade circular sawmill can have a light trolley on bearings and rollers. For them, a guide track is made from a corner for passage forward and backward. On larger models, the principle of moving a carriage with a disk above a log fixedly fixed on the table is used.
Household disc sawmill Astrogan 2
Cutting organ. The first to be installed is the sawmill shaft with the saw. The support bearing assembly is mounted on the subframe, the axis of rotation and the presence of runout are checked. Then the engine is hung on the mounting slots. The fastening bolt should not be located at the edge of the groove. If a V-belt/chain drive is used, then with repeated revolutions it becomes loose and subsequent tensioning is necessary. When replacing with a new product, the motor is again fed closer to the shaft. Continuous adjustment can be made with spacer bolts on each side. A heavily tensioned belt or chain will overheat when the equipment is in use for long periods of time.
Homemade apple, potato, tomato crusher
Homemade crusher
The technology for assembling a homemade crusher for vegetables and fruits used as food consists of the following steps:
- Making a working chamber - any old boiler will do for this. A hole is made in the center of its bottom, and a rectangular window is cut on the side, to which a small box is welded.
- A disk with a diameter 15-20 mm smaller than that of the bottom of the working chamber is cut out of metal 3 mm thick.
- A hole is made in the center of the cut out disk.
- Stepping back 20-30 mm from the central hole and the edges of the disk, 4 oval-shaped slits are made on the disk for knives. The angle between two adjacent slots should be 900.
- According to the size of the slots, 4 blanks are made from a 30x30 mm corner. In the outer plane of one of the corner shelves, 2 oblong adjustment holes are drilled. The distance between them is measured and recorded.
- Blanks from the corners with the ends of the shelves are welded to the side of the oblong slots. In this case, the adjustment holes should be located on the outer plane of the shelf that faces directly to the slot.
- To drain the crushed feed from the tank into the receiving tray, two rubber elastic strips are also attached to the lower surface of the disk.
- 4 knives with one-sided sharpening are made from rapid cloth. After releasing them on the fire, 2 holes are drilled into them. In this case, the distance between them is equal to the same value between the adjustment holes on the corners.
- A frame with legs is welded from the corner.
- The tank is welded to the frame.
- Next to the tank, an engine with a power of 500-700 W is attached to the frame using 2-3 bolts. Before installing it on the frame, a seam (driven) is attached to the motor shaft.
- A shaft for a disk with knives is made from a strong rod. A thread is cut at one end, and a groove for a keyed joint is cut at the other.
- The disk with knives is installed on the shaft.
- The shaft is inserted into a hole in the bottom of the tank.
- A second pulley (drive) is attached to the end of the shaft.
- The pulleys are connected by a belt.
- A button to turn the engine on/off is mounted at the end of the stand.
- The motor is connected to the button and to the electrical network.
- To eliminate the need for human participation in the process of grinding raw materials placed in the device, a special stop-bar is attached to the inner wall of its tank, resting against which, the raw materials will be crushed faster by the disc knives.
- To prevent electric shock, the frame of the feed cutter is grounded.
Be sure to read:
We assemble an electric shepherd with our own hands: operation diagram, number and height of lines
Using such a device, you can chop not only tomatoes, but even harder and denser apples and watermelons.
How to make
Let's take a closer look at how to make your own sawmill from a regular chainsaw using the example of a stationary structure.
What you need
For work you will need the following materials:
- Chainsaw.
- Welding machine.
- Square metal pipes.
- Metal squares.
- Rollers.
Expert opinion Kulikov Vladimir Sergeevich
If square metal pipes are not available, you can use regular water pipes instead. Only in this case it is necessary to select pipes of sufficient strength. But it is best to use metal channels, if possible. It is more convenient to work with them during installation, and they can be fixed more reliably.
Manufacturing process
To manufacture the device you will have to perform the following steps:
- Assemble the base of the future sawmill from pipes and angles. There is no need to install the structure immediately. First you need to fold it and check how smoothly all the elements are connected. They do this using a level. Only after this the pipes are connected to each other by welding.
- When the base rectangle is assembled, for greater structural strength it must be strengthened with at least two ties. They can be made from the same metal pipes. The ties are fastened transversely at an equal distance from each other. The best mounting option is bolted.
- Then thinner pipes or metal profiles are welded on top of the pipes from which the base of the structure is assembled. They will serve as guides for the logs being cut and will not allow them to fall off the sawmill. Transverse guides are also welded. Ideally, they should rotate - this will ensure smoother movement of the log and minimize the effort that needs to be applied during operation of the device.
You can do without transverse guides if you used round pipe ties. The log will also move along them quite easily. But you need to remember that its movement will not be as easy as in the case of rotating transverse guides.
- After the base is completely ready, it is installed on racks. Steel squares are best suited for their role. They are welded in the corners of the base. For greater structural strength, braces can be welded between the posts.
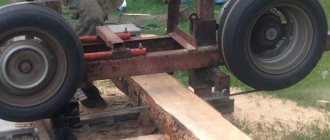
- Afterwards, the trolley for the cutting part is assembled. It is a rectangle of metal pipes supported by two longitudinal steel strips. Between these strips and the walls of the rectangle, two slopes are installed so that the structure is stable. Rollers are placed under the strips, which will ensure the movement of the cutting part along the base. Then another pipe is welded to one of the strips, connecting it to the rectangle on top. This is the attachment point for the saw.
- When the cart is ready, secure the saw. This can be done in a variety of ways. The most common method is to secure the saw body using clamps or metal ties. It is quite reliable and does not cause irreversible damage to the device. If necessary, additional transverse strips are welded to the trolley from the same pipes from which the remaining parts of the structure were made.
There is another way to fix the saw - by the blade on which the chain is attached. It is less reliable, requires drilling out the blade and holds the chainsaw worse. However, with this installation method, the saw chain vibrates less (most of the vibration is transferred to the base of the sawmill) and makes smoother cuts.
Frequent errors and problems during installation
The valve may fail due to errors and shortcomings during its installation. Therefore, it is recommended to follow the instructions specified in the description during the installation process. It is necessary to carry out a technical inspection of the device at least once a month to identify problems. When operating shut-off valves, the following problems may arise:
- If during installation you forgot to remove the plug or valve lock, then there may be a lack of flow. A plug remaining in the tee can cause the pressure in the area before the valve to be less than the pressure in the area after it. This results in the device being unable to pass liquid. To eliminate this malfunction, it is recommended to dismantle the structure and remove the plug.
- In contaminated water, solid mechanical particles can damage the valve or get stuck between the seat and the plate. This leads to the fact that the valve will not seal the passage. To fix this problem, you need to dismantle the device, carry out cleaning procedures and reinstall it. Before doing this, it is recommended to try to wash off this particle with a stream of water. To do this, you can close and open the shut-off valve closest to the valve several times.
- An unsuccessfully selected valve leads to knocking noise. This happens due to the larger valve diameter. This problem can only be solved by purchasing a new device with a smaller diameter or reinstalling the existing one in a more suitable location on the pipeline. Please note that knocking may also occur due to the fact that the device is installed too close to the central pump. High flow turbulence also contributes to tapping in the device.
- A broken threaded coupling is another consequence of non-compliance with instructions during the installation process. This occurs if the valve is under stress from the pipelines, or if too much sealing material was used during its installation. In this case, it is recommended to replace the device.
Main types of sawmills
There are the following types of sawmills:
- Frame. It is a structure with flat saw blades mounted on a frame. Frame sawmills are most often installed in large woodworking shops. This device is distinguished by its high power and robust design. The frame sawmill does not require additional maintenance. Its disadvantage is the large thickness of the cut, which increases the amount of chips produced.
- Tape. Processing of workpieces is carried out using a saw band, regulated by stabilizing rollers. The cutting element makes only translational movements obtained from the rollers. Band sawmills are used in small woodworking shops.
- Disk. It is one of the most common types of manual sawmills. It is equipped with a disc with teeth. Each tooth cuts a small part of the log. To improve productivity, these machines are equipped with several cutting discs.
- Chain. Sawing of logs is carried out using a chain saw mounted on a frame with a metal profile. The chain sawmill is lightweight and small in size. Therefore, this mini-machine is most often used in domestic conditions.
When choosing a sawmill, it is necessary to determine the volume of workpieces processed and the operating conditions of the equipment. You also need to take into account the technical characteristics and materials from which the cutting elements are made. One of the main selection criteria is the strength of the structure. The woodworking machine must be able to support the weight of the logs being processed.
Design features
A household circular sawmill includes a table, a shaft and a cutting disc protruding above the plane of the working surface. The device is suitable for home use. For industrial scale, more advanced equipment will be needed, equipped with a rail track and a mobile operator's cabin. If the sawmill is equipped with several disks, each of them is driven by separate motors. Such a sawmill contains one or more saws. The figure shows a diagram of the equipment.
General characteristics
It's no secret that wood is one of the most popular materials in private construction. Despite the rapid expansion of the range of such products and the emergence of cheap alternatives, wood is still in demand and has no analogues. And although purchasing good material in a hypermarket is not considered difficult, because solutions in the form of boards, timber or slats are available in every building materials shopping center, the opportunity to make similar products at home looks much more attractive. This is not strange, because in this case you deprive yourself of many costs, and the only thing you need to buy is commercial timber. But cut lumber is very expensive. Naturally, it is unwise to buy your own sawmill to touch up a renovation or repair a roof. If you intend to build some kind of structure on a clean site, then a sawmill can be a very useful solution. And if you also try to make it yourself, this will reduce the costs to a minimum.
Today, several key modifications of such equipment are used. However, if you intend to make a homemade sawmill, then most likely you will need to choose between two main types:
- option with fixed saw placement,
- option with a trolley where the workpiece is fixed.
It is she who moves along the rails during operation. Any other varieties are modernized versions that significantly simplify the task and ensure maximum quality of work. For example, you can take a mobile saw.
The dimensions of the structure depend on the location. It is no secret that all areas (adjoining houses, country houses, etc.) have their own characteristic layout, so the selection of the optimal dimensions of the machine must be approached with special care. Any drawings available on the network (relevant literature, Internet resources and other sources of information) serve as “guidelines” - in terms of individual components, parameters and other properties. A homemade sawmill is made in such a way that it is convenient to work with it in a specific place under specific conditions. In most cases, such solutions are used for dissolving logs and cutting boards.
Modern bearing housings
Today, the manufacturing process allows the mechanism to be manufactured with some additional part or as a separate product. The housings differ in the bearing mounting system inside the housing; for example, it can be mounted on legs. It depends on the type of part.
Housings for rolling, sliding and other types of bearings are made from high-quality materials. It can be cast iron, pressed or stamped steel, synthetic rubber.
In the modern market of bearing units, imported mechanism elements predominate. Their popularity is explained by the increasing number of different foreign equipment. During operation, it requires bearing units of a certain type, which our production does not produce.