It's easy and interesting to communicate here. Join us!
The temperature there is low, I already tried it.
You can solder, but you can forget about the operation of microcircuits, transistors or a microprocessor from such a board - overheating will kill them.
The temperature there is more than sufficient. The tip of the burner is made of nichrome; solder will not stick to it; therefore, soldering will not be performed. Attaching a piece of copper to the sting will be problematic. In general, it’s not clear what’s stopping you from buying a soldering iron for 2-3 dollars or even something like a soldering station (soldering iron with stand and regulator) for 25-30
And there is no need to ask a question, but try it, the problem will be in the temperature and serviceability of the burner tip. You can attach a piece of copper to the tip of the burner
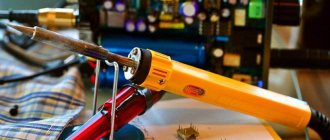
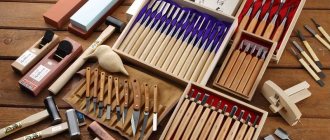
Actually, I'm at work. I do everything I do myself. The burner is homemade, but is not inferior to any analogues. Everything is simple, but convenient. I also use a hot-air soldering station, simple soldering irons with a set of different tips for pyrotyping and for background work, a gas torch and an industrial hair dryer. It happens that I resort to using a drill. Well, and all sorts of bells and whistles. The photo shows “The Corsair’s Mistake” being completed. I will try to help everyone, if something arises in matters of pyrography, I will tell you what I know.
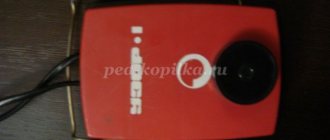
But this is an older device. And in the Union they probably thought that cute kids burn not only on plywood, but also on the burners themselves). This one has a metal case and is an order of magnitude more powerful than modern ones.
My Child. But you have to turn it on via a voltage regulator, laboratory LATER.
Here he is LATER. An extremely useful thing. We will use all heating devices, the only requirement from the connected device is that it does not increase the current in amperes (this one is half an ampere) and everything will work. The “Stayer” burning set, in combination with it, already turns into a worthy tool. If you connect an electric tile and put a sheet of duralumin or stainless steel on it, you will get a wonderful table for encaustic painting, by the way, and an iron, everything also works perfectly for it, for encaustic painting.
Soldering station "Magister". It can maintain a constantly set temperature. Actually “Stayer and LATER, only compactly.
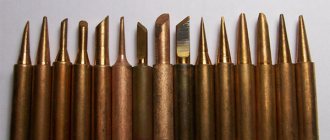
Well, these are the pins that I use with the “Master”. Turned from a copper billet, forged, sharpened, giving it a radius plane. Well, those that are straight work on the principle of poster feathers.
Industrial dryer. Can be used to darken the background and work with stencils.
Engraving machine. Widely used in any creative endeavor.
Gas soldering iron. Works better than an industrial hair dryer. You can simply burn the wood to reveal its texture.
Well, and the most interesting thing is a hot air soldering station. I'm still trying to master it completely. In short, this is a miniature hair dryer, its capabilities are similar to an airbrush, only with a temperature one.
Well, this is what Western craftsmen do. A combined device with all the bells and whistles.
Equipment for a real pyro workshop.
The master is working. Engraving on bamboo.
Many people asked me how to protect my hand from overheating of the holder. Cut the cork cork into pieces, select the middle and fold the resulting two halves, secure with nylon thread.
The holder is homemade. I want to immediately assure you that you will not become a master by purchasing this or that device, it is a long path to perfection. It is very useful to first read Stefan Poole, or Norma Gregory, about pyrography. Many people learned from them.
If anyone has tried to do something with a poster pen, they will immediately understand what kind of stamps can be made and what can be created with it. Large circles are 16mm in diameter, small ones are 6mm. But this can only be done on a lathe.
I remade the holder, a very good solution, each electrode is wrapped with a cord, and then both are wrapped together, insulators are installed and the wire is soldered. You can forget about heating.
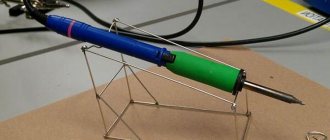
While looking at the ancient technique of Korean pyrography, I made a similar assistant for myself. Anyone who uses air guns or soldering iron-type burners will, I think, appreciate the convenience. Made from a welding electrode, 5mm cross-section (stainless steel), a thread is cut and screwed into a handle with a drilled hole. The bend in front of the ring was made for convenience, it requires less effort, and you can create a good hold with just one finger. those. slightly improved.
Hello! Hello. All your works are magnificent! Well done!
Nice to meet you! Your work was amazing, how great it is that you are with us.
Hello, very nice to meet you
CLASS. I look forward to your work!
Beautiful work you have!
Nice to meet such wonderful artists! Your work is impressive.
It’s very interesting, but could you add a photo of those same tips, as I was increasingly thinking that this was done with a burner, but here is a soldering iron - you intrigued me.
Read also: Do-it-yourself gas generator for 220 volts
Thank you Elena! There will be an album and there will be explanations. About the soldering iron, I meant the “Stayer” burning set, essentially an ordinary soldering iron, it has a set for pyrotyping, beveled and sharp tips for burning.
But children simply won’t burn it with it, everything will turn out dirty, it will get terribly hot, and burns on their fingers are guaranteed.
Valisy, hello! I see that many residents of the Country are interested in your work. I would like to ask you to add a little to your post, that is, to show separately the tools and fragments of the work that you perform with them. Then we will refer your entry to the “materials and tools” section. It’s interesting to see what creates such beauty that you show us.
I’ll definitely make an album and tell you everything.
Great!
Your works are fascinating, it is very interesting to follow your creativity. Thank you!
Thank you! Very nice!
a cool tour of the pyrograph workshop, it will come in handy, otherwise sometimes they think that a piece of equipment like “PATTERN” is enough and you can do everything with it.
If you make a homemade holder for the “Pattern” to change needles, also of your own making, it will be a very worthy assistant.
Hmm, we burned out as children, we indulged more and more. But they didn’t even realize that it was possible to burn out such beauty as yours. I want to look at each of your works and look at them.
Thank you Elena! There are masters better than me and they will have more experience, and I learned from them.
Nice to meet you
Bravo. I was amazed by all your work! how much work and patience
You are a great master, Vasily, because you can invent an instrument for yourself.
And I can only dream about such a number of tools))))
At school I studied wood burning and carving, but all the tools were lost long ago ((((
Thank you! But master, I’m still nothing. I am working. one tool, the rest is all auxiliary. It is important to love the creativity of your hands. and the rest comes by itself. At the beginning of the blog, there is a link to the Russian pyrography website, I’m still there, somewhere behind.
very interesting. impressive.
Thank you, Vasily, for sharing with us everything you know. Your advice is very valuable!
Quite by accident I went to Julia’s blog, and there was a link to your blog. But she might not have come in, and she would never have found out that there is a master in SM who does burning! I work with leather, and I just dream of learning how to burn on it. Oddly enough, in Israel they don’t even know about such a device as a burner. I looked in all the stores, tried to explain - it was useless. A friend brought a soldering iron for delicate work (such as repairing telephone sets). It comes with a thing for regulating the temperature. I think it's called a thermostat. But so far things are not going well for me. Please tell me, Vasily, is there any MK in the SM for the very, very beginners?
Thank you Your skin is wonderful! I haven't seen MK. I myself studied from the books of Norma Gregory and Stefan Poole, everything is there, from the basics and more. At the very beginning of my blog there is a link to the pyrography website, you can learn something there. Everything starts small. They burn more on the skin using pyrotyping and it doesn’t have much of a smell). Further down the blog I have a technical album. Just ask, there are no big secrets here, just technique and practice, a lot of patience.
Thank you very much for your answer!
hello, how many interesting things do you have, can I ask you for advice, I have an orbit burner, the thin handle itself heats up terribly, I tried wrapping it in a cloth and it still burns with leather, unfortunately there is no plug, try like you did, I was interested in the method with a cord, it’s a blast Can the girl do it herself or is it better not to suffer and buy another company?
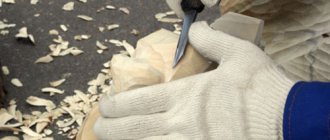
Don't try it with a cord. turning and metalworking work is needed there. The Orbit has a plastic and conical holder, which is slightly inconvenient. But here’s another option, I’ll give you a hint: You need to take a cork from champagne or dry wine, set lengthwise into strips, and then you need to apply them and wrap them with twine, just not synthetic, for a more rigid fixation, you need to help yourself with a needle and thread. First of all, it is necessary to make some kind of stop-limiter at the thinnest end of the holder, otherwise everything wound will slide off. You can use Kompakt Kraft heat-resistant adhesive for fixation. Instant contact heat-resistant adhesive. Bonds wood, plastics, ceramics, cork, soft foams, fabrics, rubber, etc. There are similar glues from other brands, this one comes in a small tube. But remember that someday you will have to disassemble the holder, one of the reasons for strong heating, there may be poor electrical contact, of the wire itself to the nichrome, so I do not recommend wrapping and gluing the threaded nut itself, in front of the holder. Work with cloth gloves, this will prevent grease stains on the wood and also provide thermal protection.
Read also: The flow of the technological process is
thanks for the answer Valisy))) otherwise I burned all my hands and decided to decorate the door in the apartment, I started but I can’t finish, it hurts so much, I’ll definitely take your advice
Basil! Thank you for sharing all your secrets, you are a great hard worker, a creative person with a kind heart. Once upon a time, as a child, I also burned out at work and in every house we had a device for this work. But now we can’t find it for sale here. And somehow I forgot this technique... Now I looked at your work and got such a relaxation. Create, delight and inspire!
Thank you! The skin doesn't come across. otherwise you can burn on it.
Yeah! A whole technopark.
Have you ever wanted to capture a beautiful design or pattern in your wood crafts? Do you have an old, unused (but still working) soldering iron? So you're in luck. This tutorial will teach you how to make your own wood burner and how to turn ordinary nails into versatile, easy-to-use pyrography (wood burning) tools. This project is also great for those who want to learn how to make fires but don't know where to start.
We use an old soldering iron tip as a template when making new pyrography tools, but of a shortened length to reduce heating time.
Is it possible to burn wood with a soldering iron?
Pyrography, or artistic burning of drawings, is familiar to many from childhood.
But for some, the question of whether it is possible to burn wood with a soldering iron remains open. Nowadays there are special kits that contain tools for burning, which creates a number of questions about whether it is possible to burn wood with a regular soldering iron, or whether only specialized models are needed here. It’s easy to understand all this by simply looking at the characteristics of the tools from the kits for these purposes. As a rule, these are 30 W soldering irons, and not of the best quality. Their structure largely coincides with ordinary models, but the differences consist in additional devices. In sets you can often find a wide selection of additional attachments, whereas with ordinary devices you have to work with one tip.
Previously, when the Chinese industry did not yet supply soldering irons for every taste and for any purpose, burning was carried out with ordinary home models. This is done both as a hobby and for decorating, creating souvenirs and other purposes. The main thing is to choose the appropriate tool model. Almost any device with a power of 30 W or more is suitable here. More powerful models are also allowed, but they need to work faster, since they have a higher heating temperature. Less powerful tools will burn the surface for too long or leave no mark at all.
Burning with a soldering iron on wood
Making a spoon-shaped nozzle
A spoon nozzle is essentially a regular wire nozzle with a small loop at the tip. This attachment, just like the previous one, can be easily made independently, and from the same beak-shaped attachment. To do this, it is enough to flatten its tip (beak) on something hard, for example, a small anvil or on the head of a hammer mounted in a vice or on the body of the vice itself, if they are strong enough.
Wire nozzle for burning
When flattened, burrs may appear that distort the profile of the nozzle and must be removed by carefully treating the nozzle with sandpaper or a needle file.
Many burning kits you can buy in stores come with a set of wire tips, so don't forget that.
Source
Advantages
This process has a number of advantages, thanks to which it has earned its widespread use. These include: No need for any additional purchases. The soldering iron is a ready-made tool for burning. Starting from 30 W, there is no longer any dependence on the instrument parameters. All of them become suitable for this task and you don’t need to think about how to make a burner from a soldering iron.
Using a 60 Watt soldering iron for burning
This is a relatively safe process. There is no great risk of electric shock or fire. Using simple, low-power models, children can also be allowed to use pyrography, but you should still not forget about safety rules.
Easy to learn tool. It is much easier to use for burning than for soldering. There is no need to delve into technical details, the selection of additional consumables and modes. Everything is mastered on an intuitive level.
Flaws
The disadvantages of this process are as follows:
- This is a lengthy process that consumes a lot of electricity, which in a home environment can have a significant impact on your electricity bill.
- There is no way to redo any action. Any wrong movement leaves a mark on the surface of the wood, which cannot be corrected.
- During a long process, high loads are created on the soldering iron, which can lead to its breakdown.
Tools and materials for burning
Before you begin the actual burning, you need to prepare everything in advance. Having basic tools and materials is a must.
Naturally, the arsenal of beginners and professionals may differ. The main necessary tools include:
- A soldering iron with suitable power (the presence of several modes, a temperature regulator, the ability to change the tip and other features do not play a major role, although they can make the burning process more comfortable);
- Aluminum oxide, which is used to clean tool bits and tips;
- Tips of various thicknesses and shapes, or special nozzles for burning;
- Tool holder or stand.
Next, you need to choose what you will have to burn on. The wood should have a smooth surface on both sides. On the one hand, this is necessary for direct application of the design, and on the other, for a stable position. Beginners are advised to use soft wood, but experienced pyrographers can handle harder wood. Soft rocks are lighter and the pattern will be more visible on them. Any unnecessary materials at hand are suitable for training.
How to burn correctly?
Next, it’s worth considering the features of how to burn wood with a soldering iron, so that this process is simple and the result is of high quality. The tool needs to be plugged in and wait until it warms up to maximum. During heating and in those moments when the soldering iron is not in use, it should be kept on a stand. If irregularities are noticed on the surface of the wood, they can be treated with sandpaper while the tool is heating.
Before burning wood with a children's soldering iron, you can apply a design to the material. Sometimes people immediately begin to create a composition without a sketch, but for beginners it is advisable to make a preliminary sketch with a simple pencil.”
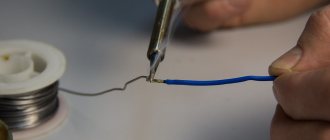
When the soldering iron is fully heated, you need to press its tip against the wood itself. Under the influence of high temperatures, the surface of the wood begins to fade. This only happens to the top layer, which affects only 1-2 mm of the total thickness. Almost any technique involves constant pressure from the tool on the working surface of the workpiece. This is not a time to rush. Evenly moving the tip along the contours with visual control of the result will help to achieve excellent results. If you do everything quickly, you may end up with uneven cauterization, not to mention the possible mistakes that may occur if you rush. The longer you hold the pen in one place, the deeper and brighter the burning becomes. The regulation of colors and shades occurs precisely by changing the intensity. Naturally, it will not be possible to achieve smooth transitions and thin lines right away, but this skill will come with experience.
If you position the workpiece so that the wood fibers run vertically, this will make the process easier, since when burning most often the movements go from bottom to top.”
To understand new burning techniques and techniques, you need to experiment frequently. Taking any unnecessary wooden part, you can train on it and practice new elements. This also applies to changing tips and soldering irons. If we are talking about simple inexpensive models that do not have a removable tip, then sometimes you have to use several tools for pyrography.
Is it possible to burn leather with a soldering iron?
Just like when working with wood, burning leather with a soldering iron is also possible, and at home. The process itself occurs approximately the same as in the previous case, with the exception of the peculiarities of preparing the skin itself. For this, pork, goat and sheep leather are most often chosen. But this is all much less common among hobbyists, since consumables are very expensive, as for a simple hobby.
Leather burning is more common among specialists who do it professionally, creating various things for sale. Here it is more appropriate to use expensive multifunctional soldering irons with replaceable tips. The power of the devices may be less than those used for wood.
Conclusion
The features of the process, like burning with a soldering iron on fabric, wood or leather, are not very different, although they have their own nuances. This is a fairly easy and safe process that does not require any special investment. Fantasy and originality play a much larger role here.
Wood burning for beginners: videos, methods and instructions
Decorative wood burning is a beautiful and fascinating art that came to Russia at the end of the last century, and its homeland is considered to be Peru, where fire has always been held in special esteem. According to ancient writings, pyrography, which originated in 700 BC, was found in one form or another among almost all peoples. In our country, the history of decorative burning began with the fact that craftsmen used this technique to decorate nesting dolls.
The first tool intended for wood burning was very imperfect, and ran on gasoline, due to which the platinum needle was heated. The master, burning a pattern on a wooden surface, was forced to constantly ensure the supply of fuel by controlling the foot pedal. Using a primitive device for burning, and engaging in a very labor-intensive process, many folk craftsmen still managed from time to time to create truly unique works of art, which is why pyrography gained even greater popularity.
At some point in Russia, burning was replaced by decorative painting, and the technique, beloved by many, faded into the shadows, although craftsmen devoted to their craft continued to decorate boxes, chests, jugs and other wooden household items in the old fashioned way.
Modern instrument
During the Soviet era, all kinds of handicraft clubs became widespread, and it was then that schoolchildren began en masse to attend wood burning classes for beginners. Many people still have a cutting board in their kitchen, beautifully decorated by a child’s hand using the burning technique. By the way, it was with the advent of a convenient new type of burning device that artistic wood burning became accessible and safe for children, and the scope of use of the device itself expanded, and leather, textiles, bone surfaces and paper were now added to wood.
The simplest electric burner includes several required elements, namely:
- a step-down transformer;
- handle;
- nozzles of various types (feathers, filaments).
It would seem that an electric burning device, which compares favorably with a gasoline prototype, should completely satisfy the most sophisticated artists with its design and functionality, but this is not so. Many craftsmen prefer to replace the built-in rheostat with a more reliable laboratory transformer, which allows for much better burning of paintings with different tonal intensities. Today, burning lessons use a so-called school device, with which every child can burn a contour or tonal image.
Where to start?
In order for pyrography to reveal all the secrets to a novice artist, it is necessary to begin the burning process by becoming familiar with the intricacies of this applied art. First of all, it is necessary to choose the right wooden material for burning, and here it is better to give preference to soft hardwood. As practice shows, poplar, linden or aspen have ideal characteristics for making crafts decorated with wood burning. Do not forget that one type of wood can withstand temperatures of 250 degrees, while another will ignite at 120 degrees, therefore, the softer the wood, the better and more comfortable the burning will be.
Before actual work, you need to thoroughly treat the board. The smoother its surface, the better the burning process will be, especially if you are a beginner. After this, using the prepared stencils for burning, transfer the image. You can trace it with a pencil or a knife with a thin tip by pressing on it. You will get a groove along which it is convenient to guide the soldering iron. You can simply draw a sketch by hand if you already have an idea in your head.
To perform a complex design, with an abundance of strokes and intricate patterns, experienced craftsmen recommend using carbon paper, but not everything is so simple here. To ensure that the surface of the craft remains clean and does not get dirty from carbon paper, you can use the old-fashioned method and transfer the intended picture onto transparent tissue paper. Next, fix the picture on wood or on plywood intended for burning. Brewed starch or wheat flour can be used as an adhesive base here. It is interesting that pyrography here is performed directly on tissue paper, and the sketch is removed only after burning is completed.
All kinds of master classes are held for beginning artists, where everyone can learn the basics of needlework and receive practical advice from pyrography gurus. Of course, the first job in burning should be some simple design, the execution of which does not require special skills and the simplest nozzles will do. As for the pyrography tool that is used in the wood burning process, there is no shortage of choices, and you can easily find a suitable option for yourself in any specialized store. Also on sale you can find a huge selection of replacement brackets for burning from nichrome wire, the diameter of which varies between 0.3-1.5 mm. This material is considered the most resistant to thermal loads, so it is ideal for installation on a burning soldering iron.
Many craftsmen make tips for a burning soldering iron from wire at home, but for such procedures it is necessary to gain a little experience, and for beginners it is better to limit themselves to purchased copies. In the next part of the article we will talk about how to burn wood correctly so that the result does not disappoint you and you enjoy your work.
It is necessary to prepare a stand made of non-flammable material for the working tool. This could be a ceramic plate, mug or thick glass glass. The device must be turned on in advance by placing it on a prepared stand. It is worth remembering that the nozzles heat up quickly.
Burning methods
Burning on the board begins immediately after the soldering element of the pyrograph heats up to the required temperature. Uneven heating of the tip at the moment of burning indicates a malfunction of the tool or the need to change the working attachment. To avoid overheating of the burner, especially for models without temperature control, periodically turn it off to cool.
Artistic burning does not allow you to erase or remove the drawn lines, as can be done when drawing with a pencil, so you need to avoid blots and mistakes from the first stroke. For greater convenience in work, the wood is fixed at an angle, and the working hand with the burner is provided with stable support, so you can apply straight lines to the material according to a given sketch.
The volume and liveliness of the artwork is given by shades, which can be achieved with lines of different thicknesses and burning intensity, which is regulated both by the burner and by your actions. So, the faster you move the hot tip along the board, the thinner the burnt outline will be. Art burning technology allows you to adjust the shade of the design by varying the temperature of the pen, and the higher it is, the darker the pattern will be. The main thing to remember is that we burn in the same way as we draw with a pencil - easily, without excessive pressure, sharp jolts and long stops.
If, when burning, it is necessary to apply a stroke at an angle, then it is “drawn” from top to bottom and the wood is not burned to its full depth. In some cases, craftsmen first form recesses with a chisel, and only then process them with a pyrograph. The decorative background of the picture is created, as a rule, with the help of figured nozzles for burning.
Burning is an interesting and easy activity if you follow a few tips:
- Take a comfortable position so that neither your back, nor neck, nor arms get tired while working. The board should be positioned on the table in such a way that any area of the drawing can be reached without effort or problems.
- It is recommended to start with the outer lines, the errors on which will not be so noticeable (they can be sanded down). Then you should move on to the main part of the drawing, and only after its completion - to the secondary fragments.
Burn in several areas of the canvas one at a time.
Things to remember while working:
- Hand movements must be stable and precise;
- The speed at which the tool is drawn across wood and the intensity of pressure affect the thickness of the line and the depth of color;
- Different soldering iron attachments allow you to obtain lines of different shapes and thicknesses. Using them you can burn 2D and 3D drawings;
- Soldering iron nozzles must be periodically cleaned of carbon deposits with a sanding pad;
- The nozzle should only be touched with pliers during operation.
Of course, we introduced you to only a small part of the subtleties used in pyrography, so if you want to master the skill of wood burning, we recommend attending special classes or watching video lessons.
derevo-s.ru
How to make a wood burner with your own hands - a homemade pyrograph from a soldering iron
Have you ever wanted to capture a beautiful design or pattern in your wood crafts? Do you have an old, unused (but still working) soldering iron? So you're in luck. This tutorial will teach you how to make your own wood burner and how to turn ordinary nails into versatile, easy-to-use pyrography (wood burning) tools. This project is also great for those who want to learn how to make fires but don't know where to start.
We use an old soldering iron tip as a template when making new pyrography tools, but of a shortened length to reduce heating time.
How to make a wire burning tip
Wire nozzle for burning
You can independently make nozzles of the required shape from wire. The most popular designs of wire nozzles include beak-shaped and spoon-shaped nozzles.
When making your own nozzle, always remember that the quality of your future projects largely depends on the accuracy and correctness of the nozzle. The main material for creating a wire nozzle is nichrome wire with a diameter of 0.5 to 1 mm.
Wire nozzle for burning
How to choose a soldering iron burner
This question is one of the most frequently asked to us on various sites on the Internet, and at master classes too. We decided to put together all the necessary knowledge, in our opinion, for a more confident purchase of the device.
It’s worth mentioning right away that we are talking only about soldering iron-type burners, based on our own experience of working with them and the testing we conduct for implementers. Without any extra cleverness, just an answer to the questions:
— how to choose a burner for a child or as a gift?
— I burned it as a child or I want to try again. Where to begin?
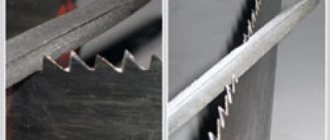
So, the most basic thing: all soldering iron-type burners belong to the “hobby” category because they are easy to use and inexpensive. The range of prices among different manufacturers is very small, and there is often only one country of origin;) Therefore, when choosing, you should not rely on a higher price and widespread advertising. The first thing you should pay attention to is the length of the “sting” from the tip to the holder. Due to the high temperature, it is pulled away from the hand, and this makes the work a little more difficult: after all, we hold the pen or pencil much closer to the drawing.
A rod that is too long is difficult to control—precision is lost, and small parts cannot be easily burned out. A rod that is too short can result in stronger heating of the hand, although this is very subjective. Between the hot metal part and the handle-holder of the soldering iron burner there are protective plates. They are designed to protect the hand from the heat of the hot rod. It is believed that two such “rings” are better, but in reality, one completely copes with its functions. (On the right is our student’s work on MK, her second burning experience in her life).
When choosing a device for a child, it is a good idea to pay attention to the thickness of the holder: it is difficult for a small hand to grasp the device tightly. And what is also extremely important is the length and thickness of the cord. Everything is clear with the length, but the thickness greatly affects the work: the load on the hand increases. When working for a long time, this is very noticeable, and even more so for children. That is, on the one hand, reinforced wire and plug guarantee a longer life for the device, on the other hand, they make the work physically more difficult. So it is better for children to choose a lighter device. The material of the handle - rubber or plastic - does not matter, the whole beauty of “soldering irons” is that they heat up to a certain temperature and that’s it, then they just hold it.
Heating power and temperature are also important criteria. Devices with a power of less than 30W and with an incandescent temperature of less than 480 degrees should not be considered - the wood will burn too slowly, and burning may seem too long and painful :)
Separately, we would like to say about the positioning of soldering iron burners as 3 in 1 (burner, soldering iron, hot knife). Perhaps someone is captivated by such versatility, but we prefer to have a separate device for each type of activity.
Well, about the attachments: don’t let the wide variety confuse you, this is just a marketing ploy. In reality (and not only here, but also according to reviews in general), a small standard set is enough for the eyes. All you need is a comfortable “spatula”, an attachment with a sharp tip, and, in general, everything else is up to your desire and preference) Numerous shaped attachments are more for children’s entertainment. Although, let us emphasize, with a certain amount of imagination, you can create unique masterpieces, even creating ornaments using only figured prints :)
And in conclusion, before purchasing, we would like to advise, if possible, to try out the burner at all available demonstrations in stores, at master classes, with friends and acquaintances: hold it in your hands, try to draw - in burning a very important role is played by personal preferences, your own feelings, not recommendations.
We hope that this material will be useful to someone, and will slightly dispel the myth about the “childishness” of soldering iron-type burners. For example, our works below were performed by him, using one attachment. Not for the sake of bragging, but for inspiration :)
If this topic turns out to be in demand, we will continue publishing. We will answer all questions in the comments, and the most pressing ones in separate articles :)
Inexhaustible inspiration to you!
Maria and Tatiana,
(when using materials, placing an active link to the authors is mandatory)
Tips for choosing
To choose a high-quality and convenient device, you must understand the principle of operation of the device, its design features and its properties. The device works very simply. The needle heats up when exposed to electric current, then the master draws with it on the surface of the wood.
All types of devices are characterized by the presence of almost identical parts. These are a holder, a housing, an electrical wire, a burning needle and a metal screen. The tool operates on a 220 V network. For amateur burning, pyrographs with wire and hard pens are used. People call them soldering irons.
When choosing a burner, focus on your preferences. There are some tips on what to look for when purchasing a device that you will be comfortable using. Therefore, your money and time will not be wasted.
The first thing we pay attention to when choosing is the length of the rod. If it is large, it will be inconvenient to operate the pyrograph and it will be impossible to work out fine details when burning. To check, take the burner in your hand and try to draw something.
It is better to give preference to a higher-quality device, but with fewer attachments, since several basic ones are often used in work. Choose a device with high power.
All about wood burners
There are various ways to decorate the surface of wood, one of the simplest and most effective is pyrography, or wood burning.
Any wood product can be made beautiful and unique by adding just a few contrasting touches.
It is not difficult to become a master of creating masterpieces using the burning technique. To do this, you don’t need to purchase expensive equipment, just buy or make a wood burner.
It's really simple - to create a beautiful and original thing, you don't even need artistic talent; you can download any images from the Internet or purchase an album of drawings in a store.
Methods for creating images
The principle of creating a pattern by burning is that part of the wood is charred and darkened, thereby standing out in contrast against the general light background. Working with a very thin tool, you can paint pictures on wood.
There are various pyrography technologies, many of them are complex and require special equipment. Among others:
- open flame treatment;
- firing using a clay stencil;
- burning with hot sand;
- friction burning on a lathe.
These are quite complex techniques, but an electric device is best suited for creating pyrography masterpieces at home. In the design of such a wood burner, the high temperature of the tip is created due to the flow of electric current through it.
The industry produces various models of burners, so it is not difficult for a novice master to choose the right tool. In addition, if you have the skills to work with a soldering iron, you can assemble such a device yourself.
Types of burners
Choosing a burner is a responsible matter. The quality of the resulting products largely depends on its characteristics. Both professional wood artists and beginning craftsmen use two main types of burning devices. These are devices with a wire tip and models with a solid tip.
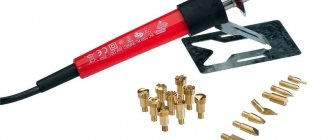
With hard pen
This device is in many ways reminiscent of a regular soldering iron. Its working part is a sting, which is heated by a nichrome wire hidden under a metal casing. Unlike a soldering iron, a burner is equipped with removable attachments of various geometries. Depending on the price of the device, their number can reach 20 or more pieces.
The abundance of attachments allows you to make strokes of different widths and shapes, and by combining them, create unique images. Wood burners with a hard pen are characterized by low price, high durability, and ease of use. As disadvantages, it is worth mentioning the heating time (5 minutes or more), as well as the bulky design with a long handle, which complicates the performance of delicate work.
Types and features of burners
There are several types of electric burners:
- with a wire pen (nichrome thread),
- with replaceable brass (solid) nib,
- laser pyrograph for wood (engraver).
An alternative to factory-made devices is a homemade burner. The role of the incandescent element is played by sewing needles, syringe needles or nichrome thread. Let's take a closer look at each type of electric burner.
- allows you to adjust the heating temperature of the pen,
- The power of the device allows you to work with any type of wood,
- heats up and cools down quickly,
- It takes less time to work compared to a hard pen,
- allows you to perform small details,
- average cost from 1500.
With replaceable brass nibs:
- takes a long time to heat up and cool down,
- does not allow you to perform fine details,
- with prolonged use it often burns out,
- convenient to draw large and medium-sized drawings,
- has a low price,
- The set includes attachments.
- can be used on any type of wood, even undried,
- high performance,
- laminated chipboard cannot be processed,
- thickness of the processed material - no more than 2 cm,
- There is no way to make shadows on the image,
- can also be used on other materials (plastic, leather),
Despite the wide range on the market, it often happens that the parameters that factory-made burners provide are not enough for the master, or the price of the desired device may be too high. Homemade burners are inexpensive devices and are made to suit the needs of the craftsman. But, like all devices, if it breaks down it is difficult to find spare parts for repair.
How to work correctly
It is easy to notice that the working tool of a wood burner resembles an ordinary pencil, and therefore the technique of working with it is not much different from ordinary drawing. It’s just important not to forget that the “pencil” is very hot.
The entire work process can be represented in a few simple steps.
Preparation
You need to choose a board on which the drawing will be applied. Its surface should be flat and smooth. To level the wood, the wood is scraped and treated with sandpaper.
A good material for burning, especially for a beginner, is plywood. It is cheaper, its surface is almost ready for work, you just need to smooth it with sandpaper.
Drawing
For those who have drawing skills, it is not difficult to cope with such work; moreover, craftsmen can do without a sketch, working straight away with a burner. For beginners, we can advise you to select a suitable picture on the Internet, print it and transfer it to your work surface. Here, old time-tested copy paper will come in handy; you can scale the image using the square transfer method.
For a novice master, it is worth choosing simple drawings that are not replete with small details. In addition, it is better to immediately make something concrete, not some abstract board, but, for example, a plywood stand for a microwave oven, which can be decorated with floral patterns.
Burnout
Using the heated tip of the burner, they begin to apply a pattern along pre-designated lines. The handle of the instrument is held like a regular pencil.
Drawing begins with the outer contours. Straight lines are performed with quick movements without pressure. It’s not difficult to make an accent or draw a thick line; you just need to slightly reduce the speed of the burner’s movement. In curved areas, you must hold the tool perpendicular to the surface of the board, avoiding excessive pressure.
Note! If there are several closely spaced lines, you should not try to draw them as quickly as possible; the wood must cool, otherwise the spaces between them may burn out.
The shade of the line can be changed within a fairly wide range. This is easy to achieve by changing the temperature of the tip, the shape of the working tool (in the case of replaceable attachments) and the angle of inclination.
Final processing
The completely finished image is processed with fine-grained sandpaper. Then they are coated with a layer of furniture varnish and, if desired, partially or completely painted.
Step by step process
Pyrography is a very creative and exciting process. First you need to collect all the necessary tools and make a sketch. You will need a pyrograph or soldering iron, various attachments, sandpaper, and a stand for the burner. The design burning technology itself is quite simple:
- At the first stage, you need to decide on the wooden base. If it is plywood, then you can start working right away, but when the surface is rough or uneven, you need to sand it with sandpaper. And to make the work look brighter, you can coat the surface with a special wood varnish before work;
- Then you need to transfer the drawing. To do this, you need to use carbon paper and carefully transfer the image onto the wood along the contour;
- The electric burner must be warmed up well. You need to hold it like a regular pen or pencil;
- To burn the design accurately, the strokes should be quick and smooth; you should not spend a long time with the tip over one place. It is better to start with the main contours and gradually move on to small details;
- For a better result, you can visually divide the drawing into several parts and work on each one in turn;
- When the image is completely ready, you need to treat the wood with fine sandpaper and, if desired, varnish it.
When the burner first touches wood, a fairly large black dot may form. To prevent this, there is a little trick - you can lightly blow on the tip of the tool, and then it will not appear and will not be able to ruin the work.
You can learn how to burn wood correctly, the main thing is to never settle on one style and tool, you need to try to develop your creative abilities in this direction and try to learn something new.
The simplest homemade burner
To decorate a small board with pyrography or simply try your hand at something new, you don’t have to buy a professional machine.
From a soldering iron or radio components
You can make your own wood burner using a soldering iron. To do this, it is better to choose a model with a replaceable tip. Nozzles with the required profile can be easily made from a copper or brass rod.
A practically professional burning device can be made according to a circuit with current regulation in the primary winding. To work, you will need very few parts: a transformer, several resistors, capacitors and dinistors. The circuit is not particularly complicated, however, manufacturing the device will require knowledge and skills in working with a soldering iron.
Mini burner
If soldering radio components doesn’t appeal to you or you simply don’t have the time, you can make a device of the simplest configuration. To make a mini-burner you will need:
- unnecessary power supply (charger) from a mobile phone;
- syringe needle;
- sewing needle;
- material for the handle (wooden skewer or brush handle);
- soldering iron and solder;
- shoe thread;
- electrical tape or heat shrink tubing.
The process of making a burner is not particularly complicated. You should start by preparing a syringe needle. The plastic part is bitten off from it; it is not needed in this device.
Both needles are attached to a wooden handle diametrically opposite. The easiest way is to secure them with threads. The sewing needle is carefully bent to such an extent that its point barely touches the point of the hollow syringe needle.
The plug is cut off from the old power supply; it is also not needed. The ends of the wires are stripped. The wires are soldered to the needles. Polarity doesn't matter. At this point, the production of a homemade wood burner is almost complete.
As a final touch, it is necessary to give the product an attractive appearance and create conditions for convenient use. The wire is wound to the handle. This can be done using the same thick thread. This design will be convenient and reliable, however, it is worth strengthening the thread with glue, and after it hardens, put heat shrink on the handle or wrap electrical tape.
Note! Heating of the tip occurs almost instantly. The principle of operation of the device is extremely simple: resistance arises between the needles and the needle from the syringe (due to the fact that it is thin-walled) becomes hot.
Perhaps, such a burner will not be able to make a picture (insufficient power, not the most convenient tip), but you can practice and decorate, for example, a cutting board.
Making a burner
If you don’t want to buy an electric burner, you can make it yourself. You will find many options on the Internet. According to the manufacturing principle, almost all devices are the same; they differ only in the set of design elements.
When working at home on the manufacture of a device, you need to study the electrical circuit and determine the sequence of actions, as well as prepare all the items and devices that will be needed for the work.
To make a portable electric burner using nichrome thread, you will need:
- phone charger at least 5V–2A,
- soldering iron,
- flux,
- heat shrink tubes,
- drill with a small drill or screwdriver,
- wooden strip approximately 10 cm long,
- nichrome thread (plays the role of a needle),
- insulating tape.
First, we prepare all the necessary equipment and tools. Nichrome thread and flux can be bought at a hardware store, at a radio market, or you can take it from an old soldering iron. In a soldering iron, the thread is located under a metal casing on the “tip” - after disassembling the device, you can easily remove it.
Why wooden slats? Wood is the best material for creating an electric burner. The market also offers carbolite, which is a good option, but it conducts heat more, and on powerful devices the holder will heat up. Plastic - in appearance, one might say, is a cheap substitute for wood. But heat-resistant varieties are expensive. If you try to save money on this material, the device will eventually become unusable.
- Soldering iron handle. We make it from a regular slats and select the length to suit ourselves. On average, 10 centimeters is enough. We make a slot inside the handle using a drill or screwdriver. The hole should be the width of the wire. The place where the wires will come out needs to be slightly widened. Nichrome wire is installed here.
- Connect the charger to the handpiece. To do this, you need to divide the two-core wire from the charger into two ends and insert it through the hole in the rail, then bring it out.
- Solder the nichrome tip at the ends to the lead-out wires. You need to put a heat shrink tube in place of the soldering joint. We attach each part of the tip to a separate end of the wire. Nichrome is difficult to solder; use flux solder for this. The thread size is at least 5–6 centimeters - otherwise, the pyrograph will heat up the tip and will not perform the job properly for its intended purpose.
- We isolate the burner handle. We wrap the rail in 4-5 layers of electrical tape and squeeze it tightly in our hands until the winding completely adheres to the wood. Care must be taken to ensure that no electrical tape gets on the tip.
- We are testing the device. We plug the charger into the outlet, then your homemade device warms up. The color of the tip becomes dark red. We check how the device works on the board by carefully applying the burner to it.
The second option has more filling, but there is no need to look for nichrome thread.
For this we need:
- wooden block,
- nails (2 pieces),
- wires with a connector from the power supply,
- wire cutters,
- insulating tape,
- soldering iron and tin (solder),
- connecting terminals for wires,
- syringe needle,
- power unit.
We make marks on the wooden piece with a marker and hammer the nails into the block, removing the heads with pliers. We cut grooves for the cord along the base and file them for smoothness.
We install the wires with the connector from the power supply into the grooves and fix them with liquid glue. Using electrical tape, we insulate the base where the cord will be inserted. We attach wires to the nails and solder them. We take connecting terminals for wires that are attached to nails. We install the terminals on the nails. We insulate the wires.
Then we take the needle from the syringe from which the heating element will be made, and sharpen its center a little so that it heats up exactly in the middle. We blunt it and bend it into a triangle shape. We install the resulting part into the terminals. We connect the power supply and test our device. We wait for heating, try the burner.
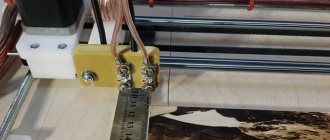
CNC burner
The burner will help add originality to the interior, diversify it with handmade products, but not only. You can make good money by making paintings created by fire. Landscapes, decorative panels, portraits, household items and kitchen utensils with elements of burning are in consistently high demand.
The use of modern technologies will significantly simplify the creation of masterpieces using the burning method. Computer-controlled machines have long become commonplace in wood and metalworking shops. There are similar solutions for pyrography. Such a burner can be connected to a personal computer, transfer the required image to it, and it will do the rest itself.
To make your own CNC wood burner, you will need significantly more knowledge and materials. Typically, such machines are purchased for production purposes. But for those who want to assemble the device themselves, you can use a laser for burning.
In general, there are two directions in the development of CNC burners. They differ in the main working tool.
Laser burner
As the name itself suggests, the main part of the machine is the laser. It is from this that its main advantages emerge:
- high accuracy of drawing due to a small contact patch;
- versatility, the machine can be used when working with wood, leather, films, paper;
- The burner is immune to changes in temperature and humidity.
Disadvantages include the low speed of the laser burner and difficulties in drawing halftones. In addition, the cost of such devices is high.
Burner with nichrome thread
The working part of this device is a nichrome filament. Actually, this is a unit transformed from an ordinary wood burner into a more functional and modern device. Its advantages:
- saturation of the picture;
- the machine works on wood and leather;
- high speed;
- lack of graininess characteristic of a laser device;
- no harmful radiation.
With all the visible advantages, there are also some disadvantages. This burner is sensitive to the microclimate of the room. The slightest change in the basic indicators will entail a decrease in the temperature of the tip, as a result, a decrease in the contrast of the pattern. In addition, the working tool has an extremely short service life.
Pyrography as an art appeared in the 18th century, and since then its popularity has only grown. Classics, multiplied by modern technologies, give excellent results. Burning is worth adding to your list of hobbies, no matter how the work is organized. You can buy a simple device, you can make a wood burner with your own hands, the main thing is that the result is pleasing and the process brings pleasure.