The main working tool of a radio amateur or equipment installer is an electric soldering iron, which cannot be used without a stand that is suitable in size and reliable in operation.
In amateur radio practice, a homemade stand for a soldering iron is most often used, the design of which is selected depending on the specific conditions of use.
As a rule, it consists of a base and two support posts on which the tip and handle-holder of the heated soldering device are placed.
Stand accessories and tools
If you have plans to make a soldering iron holder with your own hands, then you need to find the necessary tools and things that will help you realize your plans. The main items you may need for this include:
- A metal sheet;
- Wooden board;
- Screwdriver;
- Wire;
- Metal can;
- Screwdriver;
- Electric drill;
- Screws with nuts or self-tapping screws.
Depending on what kind of do-it-yourself soldering iron stand you will make, you may need a different set of tools and parts. But most people choose these options because they are the most convenient.
What breakdowns and malfunctions are most likely?
Let’s take the “bull by the horns” and immediately name the most likely reasons for the inappropriate behavior of the blowtorch:
- it is not possible to create and maintain sufficient air pressure in the fuel container to spray fuel;
- fuel leaks anywhere, but not through the nozzle;
- the fuel from the nozzle is not sprayed, but flows out in a stream, and not evenly, like that of a well-known animal.
Most often, the listed “adventures” can be resolved with the help of basic cleaning of “sore” areas. To do this you need to have a certain set of tools.
It also happens that it is not possible to revive the instrument without replacing parts. In such a situation, most problems can be eliminated with the help of a special repair kit, which is better to purchase in advance.
Repair kit for blowtorch
Most likely, the pressure problem is caused by a faulty pump. If there is a spare one, it is simply replaced. Otherwise, you will have to work hard to repair it yourself.
If you have to constantly pump air, it means it comes out through a safety or service valve or threaded connections. It helps to clean the surfaces of these components and replace the gaskets.
If the fuel from the nozzle is not sprayed, but comes out in some other form, a normal flame will not work. The most likely cause is dirty fuel. You will have to drain the gasoline and fill it with clean gasoline, after rinsing the container. Of course, the nozzle and all fuel supply channels should be cleaned, rinsed and purged before refilling the lamp.
It happens that cleaning does not help and fuel continues to flow out in a stream. This will happen if the tool is not warmed up sufficiently. If warming up does not help, you will have to change the burner nozzle.
Sometimes gasoline flows down the flame adjustment valve rod. So the fire is not far away! We stop work, disassemble the control valve and change its seal, which is the stuffing box.
Wire soldering iron stand
Making a wire stand for a soldering iron with your own hands begins by straightening the wire itself.
To get started you need:
- Cut a piece of wire 0.3 meters long;
- Clamp one end of the wire with pliers, and then wrap the remaining length around the tool several times;
- With the other end you need to do the same procedures;
- Stretch the wire from this position in different directions with two pliers
- Next you need to start making the stand. The straight wire must be divided into several parts. It is worth making a rectangle out of it, for example, with sides of 5 and 10 cm. It is advisable to solder this structure so that it retains its shape. At the same time, you need to solder the top part. To do this you will need a few more pieces of wire. Thus, on one of the sides of the resulting rectangle there will be another “U”-shaped structure soldered to its ends. The upper part of the structure can be bent to the bottom so that the soldering iron does not roll off it.
- On the other side of the base rectangle, a similar “U”-shaped structure of the same or a different size should be made. With the same values, a homemade soldering iron stand will hold the soldering iron in a vertical position. Otherwise it will be tilted. The upper parts of the towering forms must be soldered together for stability. Then you need to check the structure for strength by installing a tool on it. If everything is fine, then the do-it-yourself soldering iron stand made of wire is ready.
How to use
Before we talk about how to use it, we need to remember where a blowtorch is generally used. Among the areas of application are the following:
- soldering metal parts using molten solder;
- heating the elements to be joined by welding;
- heating pipes with frozen liquid in the event of malfunctions and accidents on pipelines;
- removal of old paint and varnish coatings from metal and sometimes wooden structures;
- heating rusted joints to facilitate their disassembly;
- heating and cooking food on the go;
- Use a blowtorch with extreme caution to warm up internal combustion engines before starting them in very cold weather.
In almost all cases, the lamp must be used the same way. It is filled with flammable liquid and ignited. The differences relate to the amount of time the flame is exposed to, the adjustment of its intensity and how to properly direct it.
Soldering iron stand made from fuses
A do-it-yourself soldering iron stand using improvised materials is the simplest and cheapest way to get the desired design. To create a stand from fuses you need:
- Textolite, or as its replacement - a wooden block;
- Circuit breakers.
The block is prepared as a base, so its surface must be flat for greater stability. After preparing the base, the fuse jaws are installed on the product. The distance between them is selected individually according to the size of the soldering iron. They can be secured using self-tapping screws, since there is always a hole on the sponge where they can be located.
How to make a complex stand?
A do-it-yourself soldering iron stand made of wood and other extremely simple varieties often turn out to be of little functionality. For those who are constantly engaged in soldering, more complex options may be required, in which additional devices will be placed, and the holder itself will also look more serious.
First comes the manufacture of the base of the stand, which is best made from a wooden block or board.
- A width of up to 10 cm is quite sufficient; sometimes you can get by with smaller sizes. The length can be 15-20 cm, but this will depend on the size of the soldering iron used. "Important! The main criterion here is the stability of the surface, therefore, the wider it is, the more stable the position of the soldering iron will become.”
- To create supporting elements, two metal strips are cut out. They need to be bent so that they create a frame, the upper part of which will contain a deflection for placing a soldering iron on them. The dimensions of such arms and their location are selected according to the size of the soldering iron. To attach the arms, you need to make holes in them and then secure them with self-tapping screws.
- This is the main part, but to complement it, you can place a jar of rosin in the free space. To do this, it is enough to drill a hole in the prepared container and fix the jar through it to the stand with a self-tapping screw.
- One of the most difficult options may seem to be a do-it-yourself soldering iron stand with a power regulator. This is relevant in cases where a complex product will also serve as a power source, along with an extension cord. Then it is reasonable to first allocate a place for mounting the power regulator. They can be found in specialized stores with various required parameters. A socket is connected to the wooden base, from which a plug is connected to a wire of the required length to connect to the network. The socket housing can also be purchased from relevant stores. After this, the prepared regulator is attached to the board.
Manufacturing options
There are several options for stands - depending on the specific requirements for soldering functionality, choose any one.
Regular
- First, prepare a wooden board - the base of the stand.
- Select a piece of board - for example, 25*12 cm.
- Mark the points on the board according to the drawing and drill holes in these places. The diameter of the holes should be slightly smaller than the cross-sectional diameter of the wire - it should fit into them with great effort.
- Cut the required piece from a coil of steel wire and mark it with a marker. Bend it along these points, as shown in the drawing. You will get an M-shaped frame - its dimensions can be, for example, as follows: two sidewalls of 5 cm each and two sides (slopes) of 3 cm each. There should be two such frames.
- Press the ends of the frames into these holes.
The simplest homemade soldering iron stand is ready. If desired, it can be modified as follows.
If rosin and solder are sold in ready-made industrial cylindrical capsules, then drill a hole using a core drill of a slightly smaller diameter than the capsule itself. It may not be through.
Press the capsule itself into this hole. Before inserting it, this container can be coated with glue - for example, universal “Moment-1”, then it will not fall out over time. There can be 3 of these capsules: for rosin, solder and flux. It is advisable to choose a glass container for soldering flux.
To prevent the hand-made stand from scratching the varnished surface of the table, legs are attached to it.
Do the following.
- Cut four identical circles with a diameter of no more than 1 centimeter from a piece of thick (from 3 mm) rubber. Here, rubber from old car inner tubes can be used as a consumable material.
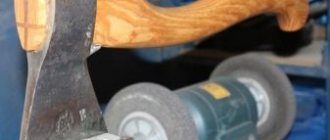
- Using an emery block, a sharpening stone, or a grinding machine, sand the rubber on one side and the base underneath where these circles are installed.
- Apply a layer of the same Moment-1 glue to the stand and to the circles themselves. After a few minutes, use a vice or clamp to firmly press them to the piece of wood where they are glued. Compression is also carried out by pressing with your hand on the stand installed on these mugs, and any horizontal surface that can withstand the force applied to the stand serves as a support.
- After a day, the glue will completely dry and harden, and the stand can be used.
- Stands of increased sizes are used for powerful soldering irons of 100 watts or more, as well as for blowtorches running on gas.
Gasoline and kerosene
A blowtorch running on kerosene, like a gasoline one, consists of a tank in which the fuel is compressed to several atmospheres, and a burner. During compression, the fuel is partially mixed with air.
Reservoir and pump
The reservoir has a volume of 1-2 liters. Its body has a built-in filler plug, a pump to create pressure and a tube that connects the body to the burner, providing fuel to the latter.
To use the maximum amount of fuel from the tank and reduce the number of refills, the free “receiving” end of the tube is located almost at the bottom. All parts are built into the tank in such a way as to ensure tightness.
The simplest pump design is a cylinder with a piston. At the lower end of the cylinder there is a simple check valve that prevents air from escaping from the reservoir.
The piston is a cup-shaped cuff that compresses air when moving towards the cylinder valve, and when moving in the opposite direction, it allows air to flow, filling the cylinder.
Burner device
The burner consists of a nozzle, a control valve, an ejector tube and an ignition cup. From the injector, fuel is injected under pressure into a tube in which it is mixed with air captured from its rear hole.
To ensure complete combustion of the fuel, it must first be heated. This is ensured thanks to the design of the ejector tube. Fuel under pressure, before reaching the injector nozzle, is heated in the “jacket” of the tube, inside which a flame burns.
The initial heating of the tube is carried out when preparing the lamp for operation by igniting the fuel in the bowl. The adjusting screw ensures the required flame temperature by limiting the amount of injected fuel.
Fuel requirements
Fuel for use in a blowtorch must be clean, otherwise mechanical impurities may cause clogging of the nozzle. For the same reason, it is recommended to use gasoline with a low octane number, as it contains fewer additives.
If the hole is clogged, it can be cleaned with a soft wire of suitable diameter. Steel wire should not be used so as not to damage the nozzle by changing its geometry. Very often, gasoline and kerosene blowtorches come with a special wire cleaner.
https://youtube.com/watch?v=gbZ-HmK5O9g
The difference between and on kerosene is the diameter of the nozzle hole. In addition, in older designs of kerosene blowtorches, a small coil was located inside the ejector, which allowed the fuel to be heated more intensively. This design was a consequence of the fact that the combustion temperature of kerosene is slightly lower than that of gasoline.
Start and end of work
To start working, the device must be filled with fuel in an amount of no more than 2/3 of the volume of the fuel tank, and pressure must be created using a pump.
Then you should fill the burner bowl with fuel and carefully set it on fire. As the burner warms up, slowly open the control valve and increase the pressure in the tank.
When the fuel stream ignites, the nozzle nozzle must be directed into a fireproof, refractory surface, such as a brick wall or a sheet of asbestos. This will speed up the heating of the burner.
After completing the work, the flame is extinguished by stopping the fuel supply to the nozzle. Only after the lamp has cooled can the fuel tank be opened. It is allowed to refill the lamp if its temperature does not exceed 50 ℃.
Casket
The box design is the most compact and easy to carry. It is made from any wooden or metal box shaped like a parallelepiped. The soldering folding box is a pencil case with several compartments in which capsules with flux and rosin and a roll of solder are stored.
Fixation of such a pencil case in the closed state is carried out using M-shaped wire inserts. If the pencil case is large enough in size - for example, 25 * 12 * 5 cm, then the soldering iron itself will fit into it. The volume of such a box is enough to, in addition to soldering consumables, accommodate the soldering iron itself, its power cord and plug when folded.
- If you don’t find such a stand on sale, you can make it yourself from wood. Natural wood or plywood with a thickness of no more than 1 cm is suitable as a consumable material.
- Mark and cut a sheet of wood for the parts of the future soldering case.
- Connect them using furniture corner screws made from wood glue. You will get a soldering box with sections.
- Cut another piece of wood or plywood the size of the bottom wall of the pencil case. Attach it to 2 small furniture hinges. You will get a lockable box.
- At the ends of the pencil case, closer to the bottom, drill holes for wire inserts that serve as supports for the soldering iron when the pencil case is open.
- Make these inserts according to the above diagram and install them in the place intended for them.
- Installation of the inserts is carried out the next day - when the glue dries and hardens. The pencil stand is ready for use.
Drawings and models
I haven’t sat down to draw for fifteen years, so if something is not clear in the drawings, please let me know in the comments.
Base (foil plate 12 mm):
Plate for the soldering iron handle (12 mm plate):
Soldering iron plate fastening plates (2 mm sheet), two identical pieces:
Blade holders (square rod 10x10 mm), three identical pieces:
Sources of all drawings and 3D models of printed parts are available in this project.
With diode
The purpose of the diode is to reduce the supply voltage by one and a half to two times. This significantly saves the life of the soldering iron.
The fact is that periodically there are significant interruptions in work when the soldering iron is not actively used. In order not to keep it constantly turned on at full power, and also to eliminate the loss of time for its complete, “from scratch”, warming up when it is needed again, a diode - or a step-down regulator - is simply necessary.
Long-term operation of the soldering iron at a temperature significantly lower than 300-odd degrees prevents the nichrome wire from which the active (heating) element is wound from burning out prematurely. Periodic overheating of the soldering iron can also cause the layer of mica to crumble, transmitting heat from the heated spiral of the steel structure to which the copper tip is rigidly connected.
To build a heat control circuit into the stand, do the following:
- Install on the stand a small-sized switch, pre-built into a small rectangular housing. In parallel, a high-voltage diode should be connected to it, designed for industrial mains voltage up to 300-400 volts. This refers to the reverse voltage that a given diode can withstand. The current strength (we are talking about direct current) must be at least 200 milliamps. All these characteristics are indicated in the description of the specific diode.
- Connect an additional power cord to the stand - it is the one that is connected to the 220 volt lighting network. Connect a switch with a diode into its gap.
- Mount a compact, small-sized socket at the output of the stand. Connect it to a switch with a diode.
Reliably insulate all live contacts. The stand with diode is ready for use.
PCB holder
The simplest version of the holder is a pair of electrical installation “crocodiles”. They are positioned so that they are turned in one direction. They are installed on supports made of linear sections of the same wire from which the inserts holding the soldering iron are made. There is also a more advanced device with brackets and guides that allows you to hold printed circuit boards prepared for soldering more firmly and reliably. The PCB retainer can be installed anywhere on the stand.
General requirements for materials and design
You can make a high-quality stand with your own hands, used for soldering various products and metal parts, from any available means that meet the following requirements:
- reliability and stability of the foundation;
- fire resistance of the material of the support posts;
- availability of space for containers with rosin and solder.
The simplicity of the device in question does not mean at all that you can use low-quality parts to assemble it and treat it as something not particularly important.
On the contrary, to make a stand for a soldering iron you will need durable and reliable materials suitable for working at high temperatures, as well as accurate calculation of the dimensions of the base with holders and containers placed on it.
- Jars of rosin and solder attached to the base must be placed in an order corresponding to the sequence of operations performed during soldering and not interfere with the work with the soldering iron.
- Some craftsmen place soldering irons along with a power regulator on such stands, which significantly complicates the design of the entire device as a whole.
- Unlike small-sized factory samples, self-made stands must have dimensions sufficient to accommodate all the elements listed above.
- Sometimes such devices are equipped with a special holder for a soldering iron (the so-called “third” hand), which allows you to fix the workpieces or parts being processed. One of the simplest product options is a crocodile-type holder.
Simple version
To assemble a simple, convenient stand with a minimum of parts yourself, you may need the following consumables:
- a wooden flat piece made of beech or oak measuring approximately 25 by 12 cm, necessary for making the base of the soldering iron stand;
- duralumin plates no more than 1.5 mm thick;
- miniature metal containers (brass cups from an old-style telephone call can be used to make them).
After all this material has been prepared, you can proceed to assembling the stand for the soldering iron itself, starting with preparing the seats for containers with rosin and solder.
In the case of using brass cups from a ringing device (bell), they are simply screwed to a wooden platform in a pre-designated location.
After this, triangular or oval shaped supporting elements are made from a duralumin plate (the distance between them is selected according to the length of the soldering iron).
The supports formed in this way are attached to the base of the stand using self-tapping screws or large screws.
If necessary, the height of the supports for placing a soldering iron can be increased by lengthening them using short metal stands with threads at the ends.
All prepared parts should be carefully processed with a file, and then their surfaces should be cleaned with sandpaper, which will smooth out sharp edges and remove dangerous burrs.
Soldering iron stand - what is it for?
A high-quality part is necessary for those people who do a lot of work with soldering. To make such a device as a soldering iron stand, no special skills or abilities are required. The process uses simple and accessible materials and tools. The finished device is easy to use. A homemade soldering iron stand should consist of separate elements. First of all, special containers are provided for rosin, flux and a department for mixing them. Some models are equipped with a box where small parts are stored. The soldering iron stand is suitable for any device, regardless of its power and degree of heating.
When making the structure, the location of these containers should be taken into account. Everything should be located so that it is convenient for the master to solder.
The principle of operation of a blowtorch
The blowtorch can run on kerosene and gasoline.
After refueling the device, air is pumped into the tank using a pump, which creates increased pressure inside the fuel cylinder. Excessive air pressure forces fuel into the burner, where it burns and forms a flame. To ignite the burner and ensure stable operation, it must be preheated to a certain level. To carry out heating, a fuel cup is used, which is mounted under the burner. The capacity of one cup is usually enough to heat the burner to the desired temperature.
When a certain burner heating temperature is reached, the fuel supplied from the reservoir to the burner evaporates in the evaporator. Gaseous fuel enters the combustion area and forms a flame through a special nozzle. During the combustion of evaporated fuel, oxygen is sucked into the combustion area and the process is maintained.
During the process of heating the burner, air is not pumped into the tank for safety reasons, and the shut-off valve must be closed at this moment. The shut-off valve opens only after the burner and evaporator have warmed up. After opening the shut-off valve, the flame strength is adjusted. After finishing work with the device, turn it off by screwing in the shut-off valve.
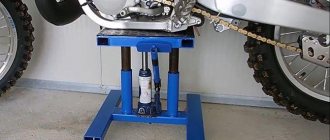
Stand with “third hand” device
This design allows you to work with the soldering iron as comfortably as possible, without wasting effort on holding the soldering iron and the two parts being connected at the same time. It is quite deservedly called the “third hand”.
To make it you will need the following available materials and accessories:
- two glasses from decorative candles;
- a leg from an old table lamp or small lamp;
- two alligator clips;
- a magnifying glass that will make it much more convenient to work with small details;
- a spring retainer, which you can make yourself from ordinary steel wire;
- wooden base.
The first step is to prepare the basis for the future stand. To do this, we mill three niches in it. The first two will be used to install candle cups, and the third will be used for a cleaning cloth that removes solder from the soldering iron.
After this, all work is performed in the following sequence:
- We mount the cups in the prepared niches.
- We mount alligator clips onto the flexible lamp rod. It is better to make the distance between them adjustable.
- We install the spiral soldering iron holder in one of the corners of the base.
- We drill holes and screw the rod with clamps to the wooden stand.
- If desired, you can attach a magnifying glass to the top of the “third hand”. Also very often it is made removable or installed on a separate rod.
- This stand does not require significant financial investments, but makes working with a soldering iron easier.
From scrap material
By using materials that are available in the house, you can save the costs required to make the stand.
To build a convenient structure you will need to prepare:
- coarse sandpaper;
- hacksaw for metal;
- Phillips screwdriver (you can use a screwdriver);
- thin screwdriver;
- iron plate;
- a spring that can be removed from the pen;
- a tin covering the board (can be removed from a broken receiver);
- metal retainer from the antenna;
- self-tapping screws 20 mm - 4 pcs.;
- bolts - 4 pcs.;
- Thin-sheet chipboard (up to 18 mm).
Also during the work, in addition to improvised means, you will need pliers and 2 rubber stoppers from chemical test tubes.
For reference! On Avito or Yula you can find craftsmen who make interesting and unusual stands for soldering irons. Such products look almost like works of art.
Step by step guide:
- The cut chipboard sheet is sanded, giving it a rounded shape.
- Rubber plugs are sawn straight. To achieve uniform thickness, you should use sandpaper.
- 1 self-tapping screw is screwed into each rubber leg.
- Holes are made in the structure and legs with screws are screwed in.
- The iron plate is bent, giving the outline of a hook.
- Using a screwdriver, holes are made for a pair of bolts intended to secure the hook.
- The final stage of making a stand from scrap material will be tightening the bolts and checking how well the hook holds.
Making a gasoline burner with your own hands
Not everyone can purchase a new burner that runs on gas or a fuel-air mixture, which is due to the relative high cost of the device . And the purchased model does not always cope with the assigned tasks, especially if it has already been used. This may be due to the presence of hidden defects or breakdowns.
To avoid becoming a victim of such an unwise purchase, many men prefer homemade solutions, which are particularly affordable and easy to assemble. As mentioned earlier, even the most inexperienced welder can easily install such a device using improvised means, saving himself from high costs.
If a homemade gasoline burner is made taking into account the basic rules and recommendations, it should produce fire immediately after a lit match is brought to it. In this case, stable and steady combustion of the fuel-air mixture will be noticeable for another 3-7 minutes. During the combustion process, it is possible to reach temperatures up to 1000 degrees Celsius. Using such a device, you can successfully melt all kinds of solder, including hard solder, as well as metals and glass. In addition, the burner easily solves the problem of heat treatment of small-sized products.
To make a device with your own hands, it is enough to use a number of materials. Among them:
- Frame.
- Pen.
- Sleeve.
- Hook.
- Emphasis.
- A tube.
- Balloon.
- Ring.
- Rubber bulb.
- Filler.
By the way, it is not necessary to create such elements with your own hands - they are present in many other tools that are available in the home workshop. For example: instead of a rubber bulb, you can use a spray bottle .
Step-by-step instruction
A lathe is used to turn the body of the future device. Products from different manufacturers are used as steel. In this case, the body of such an important part is made composite so that one end remains open and the other is closed with a plug.
The latter case involves making a hole 0.1 millimeters larger than the outer diameter. This nuance will allow the body to move tightly within the tube, maintaining the necessary tightness.
- A ring is fixed in the inner part of the body, which is made of slag wool or durable metal mesh.
- At the next stage, the stop and bushing with a hook are manufactured, which involves the use of a durable steel sheet. Then a handle for a gasoline burner is cut out of oak or beech.
- Then all that remains is to prepare the tube by very carefully drilling two holes so that they are parallel to each other. The finished product is processed using special sandpaper, covered with colorless varnish in three to four layers.
- The last manufacturing step is to prepare the tube. The end of the element is passed through the middle of the body, which allows the formation of a nozzle. Using hard solder PMC-54, the end of the tube is soldered, and then a hole with a diameter of 0.2 millimeters is made along its axis.
Solder is optionally made from copper or zinc . In the first case, copper wire is used, which is fired and cut into several pieces using scissors. When choosing the second option, use a glass from a regular electric battery, which is first cleared of its contents and hardened by fire. After this, the glass is placed in a container with cold water and a weak solution of hydrochloric acid, cut into small pieces after such treatment.
Next, you need to combine pieces of zinc and copper in equal proportions, placing them in a crucible and sprinkling with borax. The fusion of metals is carried out on a burner. As a result, the block is cooled, secured in a vice and leveled using a file. The collected sawdust is collected and mixed with borax.
Other features and creation methods
It is not always possible to buy a ready-made burner that runs on a fuel-air mixture or gas, which is due to many reasons. Sometimes this is explained by the too high cost of the equipment, and sometimes by a simple lack of time to visit the store. Therefore, more and more people are becoming interested in making a burner with their own hands. By the way, homemade solutions look no worse than purchased ones. Their productivity is quite high, and there are practically no .
As mentioned above, if you bring a lighter or a lit match to a homemade burner, a fire will immediately break out from the corresponding window, which will burn for about 5-7 minutes, reaching a temperature of over 1000 degrees Celsius.
Due to these features, the device can be used for productive melting of hard solders, heat treatment of small tools, melting of all kinds of metals, solders, and sometimes even glass.
Most of the parts of a homemade burner are created using improvised materials, since they can be borrowed from other unnecessary things.
The burner device itself includes:
- Frame.
- Sleeve with hook.
- Emphasis.
- Handle.
- Rubber ring.
- Balloon.
- Pear (can be taken from a spray bottle).
- Filler.
№
If we talk about this method of making a gasoline burner, then it may be familiar even to those people who have never before asked the question of creating such a device . When completing this task, you need to take two aluminum cans, which must be empty. Cans of beer, condensed milk, Coca-Cola and other products are suitable.
- After thoroughly washing and drying the container, you can begin work. Four punctures are made in the central part of the bottom of the first jar. You can use a nail for this. Similar holes are made around the perimeter of the rim of the can. As a result, it is possible to produce a base part that will supply the flames.
- After this, you need to cut off the part that was made earlier from the rest of the container. The length of the side is three to four centimeters. If you cannot cut the product using ordinary scissors, you will have to use any other sharp object.
- The next step is to prepare a second jar, the bottom of which is simply cut off. Try to perform this step with extreme caution to prevent nicks from occurring. If there are nicks, it is enough to sand them off with sandpaper.
- In the end, all that remains is to connect the two resulting parts. By the way, at this stage, novice welders often have difficulties, because the cans have the same diameter and this significantly complicates the work. To solve the problem, it is enough to make a small cut in the side of one of the cans, wrapping the entire structure with aluminum tape to increase the tightness.
In order for the gasoline burner to be ready for use, all that remains is to fill it with gasoline and then heat the area with a lighter. It is better to thoroughly warm up the burner for 5-10 seconds, after which it will be able to maintain the optimal level without your help.
Now you see that creating such an indispensable device with your own hands is very simple.
№
Another method is used to make burners. It is significantly more complex than the previous one, but allows you to achieve higher reliability, strength and operational durability. Therefore, if you place emphasis on such features, then it is better to make the burner using the second method. True, this will require a lot of effort, patience and time.
So, to successfully manufacture the structure you should take:
- Compressor. You can use an old car inner tube that is constantly inflated, or a basic compressor from an unused refrigerator (if you have one).
- Receiver. Here you can use a regular plastic canister with a volume of up to 10 liters. You also need to find a dense translucent cork.
- Fuel tank. It uses a two-liter metal barrel that will store the fuel mixture.
- Burner. This element is created with your own hands or purchased at the appropriate store.
If all the necessary parts have been collected, all that remains is to follow the instructions and assemble the future device. If you strictly follow the basic rules and follow the step-by-step guide, the end result will exceed all your expectations and you will be pleasantly surprised by the quality of the homemade burner. The main thing is to be ready to devote several hours of time and patience to the upcoming event.
Soldering iron stand with power regulator
This type of design is equipped with a device that independently adjusts the heating level of the hand tool. This prevents overheating of the device and extends its service life.
In the process of making the stand, the home craftsman will use:
- copper wires;
- a piece of plywood;
- elements for fixation;
- tin boxes;
- rubber feet;
- socket.
You will also need a transformer, diodes and a resistor.
Step by step process:
- During the assembly work, the master assembles a power level control board according to the diagram.
- Using a heat gun, you need to make a plastic blank for the board body and solder the corners of the tin box.
- At the next stage, a tin box is made for the brush, with the help of which the tip is cleaned and the stop for the device is assembled.
- Next, the bolts on the clamp are soldered (like a third hand) and the base of the structure is made of plywood, on which a recess is cut for further placement of rosin melted with a hairdryer.
- Metal boxes, clamps and stands are fixed, after which the board is screwed in and the housing part is secured.
- The final stage of making the stand is to screw the brush box and fix the anti-slip rubber feet on the back side.
The abundance of options for making stands at home allows each craftsman to choose the most suitable method for himself. By strictly following the step-by-step guide, you can quickly build a convenient design that will prevent damage to surfaces when using a soldering iron.
Design of a gasoline blowtorch
In the design of a gasoline blowtorch, there are two main structural parts - a tank for storing fuel reserves and a burner.
An ejector is a device in which kinetic energy is transferred from one medium moving at a higher speed to another.
The burner is called an ejector. The ejector has a design that promotes the flow of air and decaying combustion products during the combustion process. The operating principle of this device is based on creating thrust due to fuel combustion.
A supply of fuel is poured into the tank, after which it is closed with a tight lid with a seal. The lid with a seal prevents fuel leakage during storage of the device, as well as during its operation. The tank for storing a supply of gasoline is equipped with a pumping device that allows air to be pumped into the tank to create excess pressure in it. Excess pressure contributes to the transportation of gasoline from the tank to the burner during operation of the device.
A typical device contains the following structural elements:
- fuel tank;
- handle for holding the device during operation;
- hermetically sealed fuel filler neck;
- pump with valve - to create excess pressure in the tank;
- siphon tube providing fuel supply to the evaporator;
- a needle valve used to regulate the fuel supply;
- evaporator;
- nozzle;
- ejector;
- nozzle cleaning device.
The fuel filled into the device tank is a consumable item. The smokiness of the flame and the clogging of the nozzle depend on the quality of the fuel used; in addition, the degree of explosion hazard that occurs during the use of the device depends on the quality of the fuel. For normal operation of gasoline devices, it is necessary to use special gasoline or gasoline with an octane rating of at least 80. If low-quality fuel is used, the device may require repairs.
Recommendations
For stands with a diode, select the diode itself in terms of power, with a margin designed for a specific soldering iron. For example, 25 W soldering irons will require a diode with a maximum operating current of 110-120 mA, and taking into account a 2-3-fold reserve to prevent overheating of the part itself, the maximum operating current will reach 0.3 amperes. The use of diodes with a reverse voltage less than 300 V is not allowed - if the voltage is at the limit or slightly beyond the limit, thermal and electrical breakdown will occur.
Do not use plastic as the main material - the heated inserts of the holders, which transfer excess heat in a matter of seconds, will quickly melt it. The holders will fall to the side, and the soldering iron will “move” off the stand onto the table.
It is recommended to use heat-resistant and non-flammable power cables. Ground the soldering iron body separately.