I would like to share my experience in making stubble for a soldering iron. At work, I often have to solder and very quickly the soldering iron rod gets torn by scale, decreases in diameter, and the very tip of the soldering iron tip burns out, cavities appear on it, which ultimately forces you to constantly sharpen and tin it.
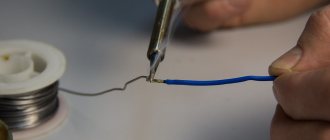
Everyone knows that the copper rod of a soldering iron requires periodic molding of the tip, since it “burns out” quite quickly - shells form on the tip due to the dissolution of copper in the solder. Therefore, I decided to experiment a little in this matter and check how a brass soldering rod would work. It turned out that the tip of the brass rod is perfectly tinned and “holds” solder no worse than copper. At the same time, the rod is not covered with scale at all. The resistance of the tip to the formation of shells with a brass rod is also much higher.
The experiment with bronze rods also yielded good results. Soldering iron rods made of brass and bronze are more convenient for making various nozzles of complex shapes for group soldering of microcircuit pins, for removing multi-pin components from the board, and others.
Attention: Just keep in mind that not all brands of bronze are tinned.
You can make many elements in a soldering iron yourself or replace them with improvised materials, since the design of this tool is simple. The need to create a soldering iron tip with your own hands can arise both when you create a tool yourself, or when replacing an old one. The part is any metal that heats up well over the entire area, holds the temperature for a long time and melts at high temperature. For ease of operation, it will need to be sharpened in a special way, but this is not difficult.
Types of soldering iron tips
The main difference is the material of manufacture. It determines the performance characteristics of the tip. If initially only copper products dominated, today the choice is becoming wider.
Copper
Craftsmen believe that the best tip for a soldering iron is copper. For a long time, manufacturers produced this particular option, as it is durable. The material conducts heat, which is also an important quality. Copper is cheap compared to other tip materials. Often, fixed tips on budget tools are made from it. Copper is a relatively easy metal to process, from which you can independently make a replacement for a used tool.
Copper soldering iron tips
Fireproof
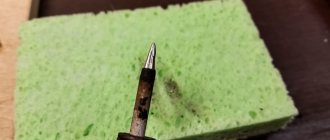
Unburnt tips are vulnerable to mechanical processing. This is a delicate option, as it must be handled with care, otherwise there is a risk of spoiling it. Under no circumstances should sandpaper or files be used, otherwise the protective layer will peel off and the entire tip will lose its advantage. The protective layer prevents the material from burning. For processing, you only need to use a special sponge soaked in the dissolving composition. The size of the soldering iron tip does not matter, since the top layer remains thin.
Unburnt tip
Ceramic
A soldering iron tip made of ceramic material is durable, just like the metal version. The heat capacity and thermal conductivity here are much inferior to copper. The product is not subject to corrosion and is more durable. You don't have to worry about constantly cleaning the tip. Thin ceramic tips are excellent for working with radio components.
Ceramic soldering tip
Composite
There are many options as to which soldering iron tip is best to use. Composite ones allow you to combine several properties of different materials, which helps to achieve truly unique properties. Composite models combine two types of materials. For example, steel is placed in the core to achieve strength. Then the length of the soldering iron tip can be higher. The copper becomes the heat-conducting material located between the end and the heating element. Nickel is applied as a top coating to protect against corrosion. A silver alloy is placed at the end of the tip used to perform the work and is used for better adhesion to the solder.
Features of handling and recommendations for use
Whether it is a tip or nozzle for a pulse soldering iron, a cartridge tip or another corresponding specialized product, the service life is determined by the consumables used ( solder , flux ) and the operating temperature. A feature of replaceable solutions is the absence of the need and inadmissibility of additional sharpening and shaping.
In order for the T-shaped nozzle or soldering iron tip used to carry out specified technological and production tasks to serve for a long time, you should:
- avoid overheating and standing idle in heated conditions;
- use only high-quality consumables ;
- regularly clean used nozzles for a gas soldering iron, etc.;
- Do not use excessive force when working.
Advantages of a DIY soldering iron tip
At home, making a soldering iron with a thick tip from copper wire is quite possible. Homemade elements are most often made from copper. They are not much different from store-bought ones if they are made well. The advantage is that you can use a piece of wire in any condition, as long as it is clean and of the correct diameter to perform simple operations.
Soldering iron tip made of 6 mm copper tube
Other advantages of homemade stings include:
- Low cost, which is determined only by the cost of copper wire.
- The ability to make a tip, if you have a wire of the required diameter, without much difficulty and at high speed: you just have to cut it and sharpen it.
- The durability and practicality of the resulting tool is due to the technical characteristics of copper.
There are many options for what to make a soldering iron tip from, but copper still remains the most practical. If desired, you can also use brass: its technical characteristics are weaker, but processing is easier. According to statistics, when choosing which soldering iron tip is better - copper or brass, most users prefer the first option.
What to look for when choosing a tip?
The main qualities that suitable stings should have include:
- Thermal conductivity. This is the most important performance characteristic for the product. It determines the desired temperature in the working area. Good thermal conductivity allows you to save energy due to rapid heating.
- Wear resistance. When working with a soldering iron there should be no severe mechanical damage. Chemical exposure to consumables such as flux and solder causes rapid tip wear.
- Possibility to accumulate heat. This property depends on the size of the tip. The larger it is, the longer the sting will retain the accumulated heat. Thin models cool down quickly. This is also affected by the material of manufacture.
- Oxidation resistance. This is an important factor, since oxidation greatly spoils the working properties of the tip, although they are not visible to the naked eye. The finest oxide deposits lead to a decrease in thermal conductivity and poor soldering.
What metal is best to make a soldering iron tip from?
It is preferable to make a homemade soldering iron tip from copper. Simple factory models are made from this metal, since it is a refractory variety and is excellent for this purpose of use. More modern devices may have a ceramic tip; other types of material are also used. If you can’t find copper, you can make a soldering iron tip with your own hands from stainless steel or brass. The steel rod will take longer to warm up, but will be quite suitable for work.
Preparing metal for the tip
Having figured out what a soldering iron tip can be made from, you can move on to preparing the metal. All areas on the casing tube are leveled - a hammer is useful for this. If the part turns out to be too long, it can always be cut into several parts.
Read also: How to find the elasticity coefficient of a spring formula
You can reduce the tip of a soldering iron that uses copper wire in the same way. It would also be a good idea to level it. After all elements are aligned, the metal is cleaned of contaminants.
Making a soldering iron tip with your own hands
When creating a soldering iron tip with your own hands from copper and other materials, select the diameter so that it coincides with the inner Ø of the casing. Thus, to make a thin tip for a soldering iron with your own hands, it is correct to take thinner copper wires, but otherwise the process will be similar.
You need to choose the length of the tip with a small margin, since over time it will need to be ground down and will decrease in size. But the length should not exceed 3 cm, otherwise the tool will be inconvenient to work with. In addition, a tip that is too long will lead to losses in thermal efficiency.
To secure the tip, you will still need to create a casing. It is made from the same materials that can be used to make a soldering iron tip. It is advisable to select identical materials. For the casing, pipe scraps about 2.5 cm long are suitable. The edges of the cut should not have burrs or other irregularities. After sawing, the workpiece is processed with a file so that the edges become smooth. The inside can be cleaned using a screwdriver by turning it in the tube. After all preparations, it is recommended to check whether the dimensions of the casing match the tip itself.
The next step in the process called “How to make a thin soldering iron tip” is to grind the working area to give it the desired shape. Most often it is made in the form of a cone. At this time, you have to grind off a significant amount of material using a file. If it is possible to use a bench sharpener, this will significantly speed up the process, since copper is a difficult metal to work by hand, and turning with a file will take a lot of time.
Visually, the shape of the tip should be similar to a sharpened pencil. The first time it may turn out far from ideal.”
When we make a tip for a soldering iron, we need to devote enough attention to grinding so that the part turns out to be as similar as possible to the factory models. The convenience of further work depends on this. When cutting the back of the tip, you need to create as smooth an end as possible so that it can stand on the table surface without support. This is necessary for the maximum level of contact with the heating element.
When making a copper tip for a soldering iron with your own hands, you need to ensure its reliable connection to the casing. Using taps and dies, threads are cut on the surface of each part. Despite the fact that homemade tools and parts rarely require such a serious approach, it is the thread that will help avoid problems with the tip falling out due to thermal expansion and contraction during operation. This is a reliable way to secure the sting. In the future, when the part wears out, only the tip itself will have to be changed, as well as threads cut on it, because the casing will remain the same.
Read also: The sharpening stone will win
There is no difference in where the cutting begins - the tip or the casing. The workpiece must be clamped in a vice and the surface must be worked to the desired length. The next step in the process “How to make a soldering iron tip with your own hands” is stripping and joining. The threads should be cleaned with steel wool.
If there are any rough corners, you can file them down. After cleaning all parts, the casing and tip must be connected to each other. If resistance is felt at first, there is nothing to worry about, since the new thread can behave this way, especially if it is poorly stripped. To improve the thread progress, you can screw the part in and out several times.
At the last stages, the tip is polished when it is already screwed into the casing. To extend its service life, it is necessary to additionally coat the surface with nickel.
This is not necessary, but without such a coating the sting will not last long. This is a simple, not particularly expensive and quick process. Nickel plating protects the instrument from rust and corrosion.
Conclusion
Not all craftsmen want to take a thorough approach to the production of stings on their own. Homemade tools and parts for them are often perceived as a spare and simple option for quick work. In this case, precise sizing and threading will not be required. But when you want to make a high-quality and durable tip yourself, it is better to follow the above instructions. Although, taking into account the current cost of stings, making a part with your own hands is not always economically justified.
Video: soldering process with a homemade tip
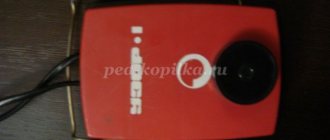
I decided to share one more, God knows what kind of homemade product: a homemade tip to replace the factory soldering iron from Solomon.
I have long noticed that soldering irons, especially new designs from almost all companies, come with a working tip of a cone sharpening with a tip or a small platform at the end, the platform, as always, at a right angle to the longitudinal axis. This tool is not the most convenient for work. Tips of other forms of sharpening come separately and are prohibitively expensive. Various multilayer composites from copper alloys, steel to ceramics are used as materials; such a tip cannot always be sharpened. Yes, and it’s problematic to tin him. I'm used to soldering with a copper tip. And you can always correct the shape and grind down the shell, and vice versa, make it for a microwave effect, and the material is not in short supply, at least for those who worked under the Soviet Union. There can be many replaceable working rods, but do not start the soldering station to change one DIP chip, but change the tip to a specially made one for this purpose in about 30 seconds. We made rods with a hole inside for desoldering various switches with leads with a diameter of more than 1 mm, knife-type ones for soldering of multi-pin parts, where the pins are in a row, whole dies for multi-pin microcircuits with round bases or shaped arrangement of legs, everyone has their own imagination, the material is usually the same - copper.
Copper is one of the best heat conductors, it is perfectly wetted by tin alloys, and is easy to process. After brief attempts to solder with a standard tip and two new soldering tips, the solution arose on its own: replacing it with copper ones. Where can I get a new copper tip? Nowadays pure materials are becoming scarce, but I have accumulated a large stockpile of old copper rods. Previously, a soldering iron had at least one spare or several tips of different shapes, which were not always needed. There is still a copper rod with a diameter of 1 to 5 mm left from the former work with welding transformers, there is also brass. But the problem was that a copper rod or ready-made tip to fit the size of the new soldering iron was never found, but the brass rod was just right.
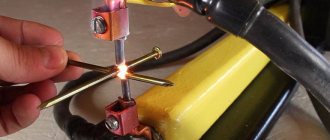
Read also: Felt wheel for polishing on a drill
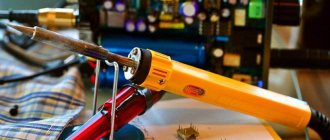
Brass did not work for long, in a few hours the tip of the tip dissolved in the solder, perhaps other types of brass or bronze will work, I have not tested (some of these alloys do not transfer heat well, some are very loose in structure, some are not wetted by solder). The advantage of brass and bronze is the absence of scale from prolonged heating, and there is no danger of the rod jamming in the soldering iron body. An idea came up: the body of the tip was made of brass, but the working tip itself was made of copper. The rod cut to size was drilled along the longitudinal axis to a depth of 1.5 cm, the drill was taken according to the size of the existing copper rod, which was driven into the hole with a hammer. The brass was previously heated to expand. The result was a very tight connection, very similar to an ordinary pencil, where instead of a lead there was a copper rod. Sharpening was not difficult; everything was done on an emery wheel, followed by light sanding with fine sandpaper. I shaped the working tip into a platform at an angle of 45 degrees; in the future there will be other shapes.
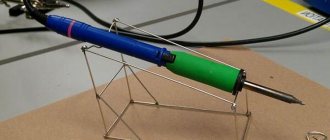
To replace the bead holding the homemade tip in the fastening of the soldering iron body, I inserted a pin made from the shank of a broken drill in the right place, and using sandpaper adjusted the length to the size of the inner diameter of the fastening nut.
The photographs were taken after using the new tip for several months; the tip has already been corrected several times with a needle file. So far there have been no problems, no warping or loosening detected.
It is advisable to use electrical copper for the tip, not annealed, it is less ductile, and it is advisable to forge it, or at least form the working part with a hammer on an anvil, followed by finishing with a needle file. This treatment will give the sting durability. Instead of a brass rod, you can use a standard tip if it is not used.
| Published by admin December 02 2012 20:24:40 · · 8056 Reads · |
| Comments |
| No comments yet. |
| Add a comment |
| Please log in to add a comment. |
| Site partners |
| Max Polyakov Firefly Aerospace told the President of Ukraine about plans in the aerospace sector |
| Navigation |
| Home Articles Files Photo gallery Link catalog Feedback Search Site Map |
You are not registred? Click here to register.
Forgot your password? Request a new one here.
| Authorization |
Reliable solutions from trusted manufacturers
We offer a selection of attachments and heaters to suit any occasion. Among such a variety of products, you will certainly select options for the required conditions and purposes of use. Reasonable prices for soldering iron tips for microcircuits and SMD components are perfectly combined with the performance properties and characteristics of the products presented.
To buy a tip for a pulse soldering iron gun or induction hand tool, place your order online or contact our employees.