A thimble for a steel rope or cable is a frame made of high-strength carbon steel, which can have various shapes: round, triangular or teardrop-shaped. It is assumed that such a useful device as a thimble was originally used to equip ship ropes and cables. The name of this device, which is actively used in the construction industry today, has Dutch roots and means “stocking” (kous). It’s no wonder that the Dutch are also considered the authors of this device.
Throat DIN 6899B
OST 1 03824-75 op. V
| Continuation of the table. 3 |
| 3.12. 5% of rope seals from a batch are tested for tensile strength until failure, but not less than 2 pieces* The distance between the places where the rope is secured must be at least 300 mm. It is allowed to carry out tests on samples with a length of at least 400 mm, prepared in one batch with ropes of any length. The conditions for the strength of the seal during the tensile test before failure must be satisfied by 100% of the tested cable seals. 2.13. In the event of destruction of at least one of the tested ropes or the rope being pulled out of the seal under a load less than the breaking force indicated in Table. 3 of this standard., the doubled cat-patio of OshchiNmlS is subjected to crushing, Irp mpmi/moiJdii.tH. r^utlgptik rtontapm.l* F?NYT «SHY the entire batch of oadeyaashgmkh ropes is rejected. 2.14. Rope seals must be soaked for 3-5 minutes in gun lubricant according to GOST 19537-83, heated to a temperature of 110-120 °C. Note. Drip!, treated before sealing with a mixture consisting of 50% linseed oil according to GOST 5791-81 and 50% varnish PF-170 or PF-171 according to GOST 15907-70 with hot drying, do not impregnate with grease after sealing. During long-term storage and delivery of ropes in bulk, the seals must be soaked in lubricant. 2D5. Protection against corrosion during storage or storage is carried out with SHA1IM-201 lubricant in accordance with GOST 6267-74 within the time limits specified in the technical documentation approved in the prescribed manner. An example of an entry in the technical documentation for embedding steel ropes tala Sealing 1-OST 1 03824-75 |
Methods for sealing the ends of rope slings
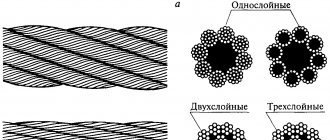
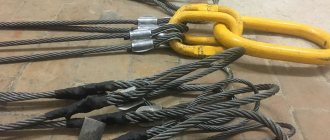
Rope slings are the most common type of slings used in all industries as a flexible load-handling element. Although rope slings are the most universal, few people know all the variety of forms of their execution - from slings of the SKP (USK1) type and multi-branch slings of the 4SK type, to special types of rope slings.
There are two basic designs for rope slings: loop rope sling SKP (USK1) and ring rope sling SKK (USK2). These are the simplest types of slings; for their manufacture, a piece of rope is used, the ends of which are connected using one of the sealing methods. For the manufacture of multi-leg slings of types 1SK, 2SK, 3SK, 4SK, additional components are used. The sling itself consists of a suspension link, a directly flexible element and a gripping device. The gripping device can be hooks of various types and shapes, as well as removable load-handling devices for carrying out a certain type of work.
In the process of making slings, many methods are used to seal the ends of the rope, but the main ones for a long time have been braiding and crimping with a sleeve. When forming a loop using the braiding method, first the free end of the rope is unraveled, then the strands are woven into the body of the rope according to technology.
The number of punctures of the rope with each strand during braiding is determined depending on the diameter of the rope according to RD 10-33-93: diameter up to 15 mm - at least 4 punctures, from 15 to 28 mm - at least 5 punctures, from 28 to 60 mm - at least 6 punctures . The last puncture of each strand should be carried out with half the number of its wires (half the cross-section of the strand). After cutting off the technological allowances, the ends of the strands are sealed in such a way as to avoid unwinding of the wire and the possibility of injury to the slinger when working with the sling. The ends of the rope are sealed manually using a braiding machine; to pierce a large diameter rope, a machine with a hydraulic needle drive is used.
Sealing the ends of the rope using the crimping method requires an additional element - an aluminum or steel bushing. Bushing blanks are made from aluminum tubes and have an oval cross-section. The sleeve is put on the branch of the rope that forms a loop so that the end of the branch extends out of the sleeve after crimping by at least 2 mm. The blanks are placed in a press and compressed with a punch until a round cross-section is obtained.
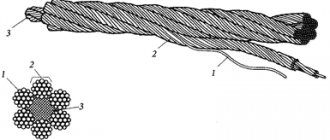
To prevent premature chafing and breaking of the rope when forming a loop, a thimble made of galvanized steel is used. The thimble is a teardrop-shaped product with a groove on the outside. The shape and depth of the thimble groove corresponds to the diameter of the rope for which it is intended. The end of the rope goes around the thimble, lying in the groove and is connected to the main branch using one of the sealing methods.
One of the easiest ways to terminate the ends of rope slings is to terminate using screw clamps. The number of clamps is determined by calculation according to the standards of Gosgortekhnadzor, but their number must be at least three. The spacing of the clamps must be at least six rope diameters. The jumper of the clamp should always be located on the load-carrying side of the rope, the U-bolt of the clamp is placed on the tail of the rope. It is necessary to bend a long enough part of the rope so that the minimum required number of clamps can be placed.
Together with screw clamps, special devices - thimble clamps - can be used to form a loop on ropes of small diameter (up to 16 mm). The device is designed to quickly form the end element and facilitates the process of sealing rope ends. Going around the thimble, the ends of the rope converge at the base of the device, where they are tightened with bolts.
The most reliable methods for sealing rope ends are cast end fastenings (cable connections). The main part of the cables is the glass, which has a cast or turned structure. The rope for making jellies must be prepared: below the intended end of the jellied glass, it is braided with soft knitting wire with a diameter of 1-1.5 mm, after which the rope wire is unraveled. After initial cleaning, the wire is etched in a solution of hydrochloric acid, washed in boiling water with the addition of soda ash, and sometimes the wire is degreased in other alkaline solutions. The filling glass is cleaned in the same way and before pouring, together with the threaded rope, is heated to approximately 250–300 ° C. For pouring, pure zinc is used, as well as alloys of aluminum, zinc, lead, tin and antimony. The result is a monolithic connection that is highly durable.
In the manufacture of rope slings, wedge clamps (sleeve wedge connection) can be used, which allow for quick assembly and disassembly of connections. The connection consists of a cylindrical sleeve, inside of which a wedge insert is placed between the anchored strands of the rope. The reliability of the wedge connection is determined by the angle of inclination of the wedge and the coefficient of friction between the rope and the clamping elements.
The reliability and quality of rope slings directly depends on the components that were used during its assembly. When ordering slings, be sure to specify the method of sealing the ends of the rope and its diameter.
Tools
For work you need: a pair of worn flat screwdrivers with “clogged” edges, one of which is sharpened “to a cone”, pliers, or better yet, tongs, a hammer, a roll of masking tape and gloves. It is very advisable to have in addition a small angle grinder with a cutting disc and a solid vice.
An example of sharpening screwdrivers, hereinafter referred to as “piles”.
For example, they work like this. Preparing to punch the first strand.
Weaving a cable onto a thimble - proven methods
By itself, this simple device will not create a strong fire; you also need to skillfully braid the cable. If the expected loads are small, then you can get by with a special clamp clamp or an ordinary flattened tube. The process of creating a loop is as follows: pass a loop into the tube so that the required area for the thimble looks out from one edge, and both ends of the cable come out from the other side. From this edge you should clamp the tube with the cable in a vice, pass a metal strip into the thimble for convenience and tighten the tube. The main thing is not to overdo it, so as not to damage the cable itself.
A reinforced clamping clamp will allow you to fire even faster, but the finished structure does not look the most aesthetically pleasing, and even when working with such a cable you will cling to everything . A cable braided in a special way will look much more aesthetically pleasing and strong. To do this, you need to unravel the cable into two parts by about 30 cm, with the same number of fibers in each part. Don't forget to wear protective gloves, as metal fibers can easily damage your hands. If there is a core not made of metal fibers inside, it can be cut off - we don’t need it.
We try on the resulting halves to the thimble - it is important that they fit tightly to it and that it does not dangle after weaving is completed.
You can secure them with wire or mark the required length so as not to get lost, since rarely does anyone succeed in making a loop correctly in this way, and having achieved the result, you are unlikely to want to redo everything again. We need to knit the two halves by crossing them in such a way that the fibers on the main part intertwine with the loose fibers. Having wrapped the loose part once by hand around the main part, use a screwdriver or a metal rod to pry up the fibers and turn them deeper, mixing them with the fibers of the main part.
Instructions for installing clamps
As mentioned above, clamps are widely used for creating loops and splicing cables. When carrying out such work, it is necessary to comply with technological standards, since incorrect installation can reduce the maximum operating load of the backbone node by 40%.
First you need to make sure that:
- The product has no nicks, dents or cracks.
- The size of the product corresponds to the size of the cable.
Traditional clamps
Step one. The first fastener element is located at a short distance from the free end of the loop. The nuts or bolts are tightened one at a time until the required torque is achieved.
Step two. The second is placed closer to the loop, so that it has a minimum course of deformation. The stroke can be checked by flattening the loop towards the clamp after installation.
Step three. The third is positioned exactly between the first two. It is taken into account that the mating parts of the clamps (those from which the nuts or bolts are tightened) should be directed upward.
Step four. A load equal to or greater than the required one is applied to a section of the main line. The tightness of nuts or bolts is checked and, if necessary, increased.
When splicing, the algorithm for installing the clamps will be the same.
Flat – Simplex and Duplex
They are used in the same cases as traditional ones, but have a different design. Let's look at their installation below using DUPLEX as an example.
Step one. Make sure that the product is complete, the parts are in good condition, and the nuts are not tight on the threads.
Step two. When creating a loop, place the product closer to its beginning; when creating a loop or splicing, position the cable inside the clamp as shown in the figure.
Step three. Install the mating part and tighten with nuts. Apply a load on the structure equal to or greater than required. Check the tightness of the nuts and increase them if necessary.
SIMPLEX Clamp Installation
Installing the DUPLEX Clamp
Special clamps
In relation to special types of clamps, it is impossible to give a general algorithm of actions, however, since it is not possible to position them except for their intended purpose, tightly tightening the fasteners solves the issue of their reliable installation.