To restore order and free up space occupied by accumulated things, a metal rack is assembled. You can buy a ready-made design or make it yourself. If the weight of the objects is small, an aluminum corner is used as the material. To store preparations for the winter in city apartments, racks made of steel corners are installed on the balcony. To accommodate a large number of heavy objects, make a rack from pipes in a garage, shed, or cellar.
What types of metal racks are there?
Drawing of a metal rack and the maximum permissible load on it
They are divided by type:
- Shelf.
- Pallet.
- Palletized.
- Angular.
- Frontal.
- Stationary.
- Mobile.
Prefabricated metal racks are chosen depending on the size of the room. They are used in the office, in the store, in the garage or at home for seedlings (see How to make a rack for seedlings with your own hands).
All warehouses use prefabricated metal shelving. Because it is a convenient design that allows you to lay out any product compactly. Sizes and shapes are selected depending on the purpose.
The most common shelf racks. They are no more than 2 meters, so they are convenient to use in shops, offices, libraries and archives.
For warehouses, pallet or pallet racks are used. They are larger in size, which allows you to arrange a lot of goods in a small space.
Mobile and stationary shelving is used in archives and libraries. Mobile phones are equipped with wheels, which makes access to documents easier.
Shelving design
Trade rack that can be used in a greenhouse
The rack is a frame made of metal profile pipes. Between them there are shelves for storing various items.
The dimensions of shelves and racks depend on the size of the premises and the loads on them. Let's assume that a prefabricated metal rack is assembled from sheets whose thickness is 2 mm and corners 50 * 50 mm thick 5 mm. This design will undoubtedly be especially durable and will withstand heavy loads.
They are most often equipped with:
- separators;
- side walls;
- back walls;
- inclined shelves;
- awnings;
- mesh shelves;
- drawers;
- pallets;
Shelving provides optimal storage in a small area. Possibility of expanding them in any direction. Sufficient load capacity and strength.
Designs and sizes
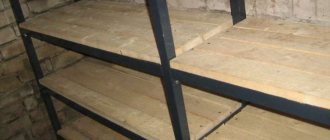
Structurally, garage racks consist of racks, crossbars and shelves. Sometimes, to increase rigidity, transverse ties are also made on the back side - two steel strips welded/screwed to the outer posts diagonally. They compensate for lateral loads, increasing overall stability and reliability.
Garage shelving can be made according to this drawing (dimensions are approximate)
The dimensions - the height and depth of the shelves - are chosen almost arbitrarily, depending on what you intend to store. The only thing that needs to be selected carefully is the span length - the distance between the racks in one section. It depends on the rigidity of the material that you decide to use: the shelves, even under full load, should not bend. For heavy things/objects, the span is about 1.5 meters; if the load is not too large, the distance can be increased to 2 meters, but it’s definitely not worth doing more. If you need a longer garage rack, install intermediate racks, the distance between which still cannot be more than 2 meters.
A few words about the height of the shelves in the rack. The lowest shelf can be raised from the floor level by 50-70 cm (even more if desired). The heaviest items are usually placed here. The remaining shelves can be made at different heights; 30 cm is inconvenient and impractical. In general, a 1.5 liter plastic bottle should optimally fit on the shelf, which is 35-37 cm. This distance is convenient for use.
DIY wooden book rack
First, it is advisable to select a drawing of the future design on the global network, special publications, or develop your own original version. Classic shelving with and without a base looks like this.
Required tools and materials:
- boards 2–4 cm thick;
- slats 4x4 and more;
- holders, wooden blocks, metal corners on which the shelves will rest;
- plywood for walls;
- self-tapping screws;
- wood glue;
- varnish, brush;
- jigsaw, grinder, electric drill;
- screwdriver, hammer;
- pencil and tape measure for marking.
Step-by-step instruction
After developing the drawing and purchasing everything necessary, they begin to manufacture the parts. The process must be approached responsibly.
Sequence of operations:
- The first stage is choosing a base, if the design provides for it. For it, take a board with a thickness of at least 3 cm. When selecting the length, take into account that it is necessary to install vertical walls on the sides of the base. At the bottom, longitudinal boards 50–70 mm wide should be nailed, and crossbars between them to make the rack strong.
- The second stage is the manufacture of the back wall. This element is made of plywood or construction cardboard. Based on the drawing, the height and length of the rack are determined and the part is cut out according to these parameters. It is necessary to align the angles at 90°, otherwise the structure will warp.
- The next stage is making the sides. To reduce the cost, thick plywood is often used or walls are dispensed with by using beams. The height of the sidewalls is chosen arbitrarily. Having cut the plywood or beams of the required size, you need to mark out the spaces for the shelves on the inside, for example, cut grooves. It makes sense to strengthen corners, holders or pieces of beams there. If you screw them in after assembly, it will be somewhat difficult.
- Then install the sidewalls and tighten them with self-tapping screws.
- Strengthen the back wall, cut from plywood. Its presence will help save the structure from distortion.
- Only after this should the shelves be made and strengthened. Usually their dimensions are equal to the dimensions of the base. If the corners were strengthened at the third stage, then you do not need to screw the shelves to the sides.
Many people make the shelving unit open at the back. In this case, it is necessary to screw all the shelves to the sides, and strengthen special corners at the top and bottom that will prevent the structure from warping.
We make and assemble a metal frame with our own hands
When all the necessary materials and tools are ready, we begin to manufacture the structure. We follow the following algorithm:
- We use a marker to mark the pipes from which the blanks will be made.
- Using a hacksaw or grinder, we cut the racks, transverse and longitudinal crossbars.
- We make the sidewall from blanks. To do this, we first mark the location of the jumpers on the rack, connect them with clamps or weld them.
- We attach the second rack to the welded jumpers.
- We process the welds with a file or grinder.
- We lay the first side frame on the workbench and assemble the second from the blanks, securing the parts with clamps.
- All parts are connected by welding.
- We assemble the second side frame with a bolted connection, without fixing it with clamps, so that clamps can be installed.
- We weld the longitudinal jumpers to the sidewall using a joining angle.
- We process the seams with a file or grinder.
- We weld the second side panel to the jumpers.
- We weld metal plates-legs to the ends.
- To secure the shelves, we will make embedded parts from metal plates. Each mortgage five cm long must have two holes for self-tapping screws.
- We weld the plates in increments of 30 cm.
- We install the finished rack vertically, check for strength and stability by shaking it to the sides with our hands.
If the rack is prefabricated, we weld the sheets and begin painting with special metal paint. If you need a collapsible structure, the frame is ready, we prime it, paint it and make shelves. Usually in this type of rack they are made of wood about 1.5 cm thick. We install them on a metal base using corners after the paint has dried.
Tips and tricks
Sometimes a garage rack is made mobile. This is convenient if the room is often rearranged and if it is generally quite spacious. Wheels need to be welded to the legs of such a rack.
When placing your work equipment and items on the rack, remember that it is better to put the heaviest ones on the lower shelves, and rarely used ones on the high ones. We place things that are often in use on the central levels.
On the outside, you can make small hooks on the side walls to hang work clothes and wires on. The versatility of the rack is an important aspect in its use.
How to assemble a commercial metal rack for a store
To assemble a metal rack yourself, you don’t need any special skills. There is no need for special tools. You can assemble it using the parts, racks and shelves included in the kit; no additional ones are required.
Metal racks are made in such a way that they can be easily disassembled and reassembled at any time.
The entire installation process is divided into certain stages, the sequence of which should not be changed, because the structure must be assembled strictly in parts.
You can assemble a metal rack with your own hands as follows:
Step 1. Preparing the racks.
The parts of the stand are a perforated double-sided profile, screws for adjustment and a base. First you need to assemble a stand from the indicated parts. We determine the top and bottom of the profile, for which we inspect the rack and look for the absence of a notch in the bottom perforation, this will be the bottom. The notch is removed during production in order to better connect the profile and the base. To fix the base with the profile, heels or screws, whoever calls them, snap into place at the bottom of the stand. Then the adjusting screws are tightened on the base.
When installing a wall rack, only one base is used, in the case of installing a free-standing structure, two bases are used, one on each side.
Step 2. Installation of the rear panels.
The back panels are considered the base of the metal shelving unit. To install them, the racks are pulled together, this prevents the panels from falling. They can be perforated or solid. To carry out the screed, traverses are also used, which strengthen the structure, increase its load-carrying capacity and make it resistant to other loads that arise during operation. This can be a simple movement of the product around the sales floor or mechanical impact on it during product placement.
Let's continue assembling the rack. To do this, we put panels on two assembled racks along their entire height.
It is important to check that the teeth on the panels snap into the holes on the posts. Otherwise, they will fall out, which is very inconvenient when working.
Purpose of the rack
The direct purpose of the rack.
It doesn’t matter how complex the rack will be, you must first prepare for the work and decide how the furniture should look in the end:
- Decide on the location where the structure should be located.
- Take measurements.
- Create a sketch, drawing.
- Select material.
- Perform assembly.
- Final result.
Universal rack for a greenhouse.
Shelving and bookcases can be created for a variety of purposes.
Country racks
There is no need to purchase expensive models; it’s easy to create a rack for cans with your own hands.
Ready storage rack.
Design options:
Robust design for cans or tools.
- If desired, you can place on them not only conservation, but also a variety of metal parts, as well as men’s tools.
- During the summer season, you may need racks for strawberries (see How to grow strawberries in a greenhouse) with your own hands.
Interesting design for strawberries.
They are very easy to make; you can install any seedlings on such furniture and be sure of their safety.
Thanks to the presence of a large number of extra shelves that can withstand impressive weight and easily cope with the load.
Materials and tools
Racks are made from various materials. It all depends on the shape and weight of future objects that will be placed on it. But the most durable and reliable are structures made from profiles or corners. To make your own rack from the materials described above, you will need the following components:
- Profile pipe 20 x 40 or 30 x 40 mm. In general, any profile can be used, and additional reinforcement and stability can be provided through jumpers and wall mounting.
- If there is no pipe, then a corner with a shelf width of 30 x 50 mm will do. This will even create low sides for future shelves and prevent small parts from rolling off onto the floor.
- Boards with cross-sectional parameters 15 x 25 mm or 15 x 150 mm. This depends on the items stored on the rack: for large items, shelves with gaps are suitable, and for small parts it is better to create a continuous covering. This element can be made from sheets of plywood.
To create a homemade rack you need to have the following tools and supplies:
- welding machine for connecting the main components of the structure;
- drill for creating holes for fixing shelves;
- grinder and cutting wheel for metal;
- electrodes;
- level;
- roulette;
- drill;
- self-tapping screws for fastening shelves;
- scribe;
- wood saw.
Type
Racks can be made in two design options:
Floor supported
Mounted
The first group usually consists of structures made of vertical posts with shelves between them. The second group is most often made from ready-made standardized parts - shelving beams (attached to the wall) and brackets (inserted into shelving beams). They are designed for relatively light loads, but are convenient due to their simplicity and the ability to change the height of the shelves.
Racks supported on the floor are conventionally divided into two subgroups:
Separately installed structures with the possibility of access from two sides
Shelves installed close to the wall (usually they are additionally attached to it for greater stability)
The choice of one option or another is determined by the characteristics and configuration of the room, as well as the needs of the owner. Large warehouse complexes have a large number of racks, but small storage rooms have only a few structures installed along the walls. If the lower tier of the room is occupied by workbenches or cabinets, hanging structures are installed.
In addition, there are straight and corner racks. The first are installed (hung) along one wall, the second - along two adjacent walls.
Another important property is the type of construction:
Whole . The rack is welded from the profile once and for all, no changes can be made. Used in rooms where similar items are constantly stored (for example, similar structures can be used to store workpieces)
Team . If necessary, such a rack can be completely or partially disassembled, the height or number of tiers can be changed. This design is good almost everywhere. However, you have to constantly monitor the condition of the threaded connections, otherwise they will rust and it will be very difficult to disassemble the rack
An important indicator is the material of the shelves. If the supporting structure is made of a metal profile, then other materials are used for the shelves:
Boardwalk
Plywood
Chipboard
OSB, etc.
Expert opinion
Vakhrushev Ivan Andreevich
Furniture maker with over 15 years of experience
Practice shows that the most durable and reliable option is plank flooring. It is durable and can withstand significant loads. Plywood is somewhat worse, and OSB or chipboard are used only in the absence of more serious options. The reason for this is the instability of these materials to air humidity. Chipboard and OSB absorb moisture, the bonds between particles gradually weaken, and the shelves simply fall apart.
Since the humidity regime in storage facilities of any type is quite complex, it is not recommended to use shelves made of such materials. You can impregnate them with special compounds, cover them with drying oil and other paints and varnishes. However, such treatment is not always permissible - an odor appears and the fire danger increases.
In addition to simple shelves, which are ordinary platforms, baskets can be used to store loose or small items. These are containers made of metal lattice, mounted on bracket supports (used in conjunction with shelving beams).
How to make a classic shelving unit with solid walls
Classic shelving is reinforced with a solid frame on the outside, and sometimes also with a back wall. This design will withstand heavy loads, such as full shelves of books.
What do you need
- Plywood sheet 2×125×250 cm;
- plywood sheet 0.6×125×250 cm;
- three slats 2.5x5x250 cm;
- one rail 2.5×8×250 cm;
- a circular saw;
- pencil;
- long ruler and tape measure;
- jig for drilling ends (if any);
- drill with a diameter of 3 mm;
- clamps;
- drill;
- hammer or nail gun;
- confirmations and nails;
- 220 P grit sandpaper;
- paint and brush, wallpaper and glue (optional).
How to do
Unfold the plywood sheets and battens onto the following elements.
Frame:
- two side walls 2×30×180 cm;
- five shelves 2x30x70 cm;
- top of the rack 2×30×75 cm;
- back wall 0.6×75×180 cm;
- bottom plug 2.5×8×70 cm.
Facial finishing:
- two vertical slats 2.5×5×170 cm;
- two horizontal slats 2.5x5x75 cm.
Let us remind you: if you do not have a circular saw, you can cut the elements to the desired size at a hardware store.
Frame: The Home Depot / YouTube
Mark under the shelves on the side walls. Using a pencil and ruler, place marks at a distance of 8, 36, 72, 108, 144 cm from the bottom edge.
Frame: The Home Depot / YouTube
To install shelves, prepare holes for fasteners. If you don't want the screws to be visible, use a jig and drill holes in the shelves at a sharp angle. If there is no jig, drill through the outer side walls of the rack at right angles along the marking lines from the previous step. In both cases, step back 5 cm from the edges.
Frame: The Home Depot / YouTube
Assemble the outer frame with nails and reinforce the joints with confirmats. Place the shelves along the marking lines and screw the euroscrews into the pre-prepared holes.
Frame: The Home Depot / YouTube
At a distance of 10 cm from the front surface, attach the bottom plug in the same way as you attached the shelves.
Frame: The Home Depot / YouTube
Nail the trim pieces around the perimeter of the frame. To do this, use a nail gun or a regular hammer.
Frame: The Home Depot / YouTube
Sand the surfaces and paint if desired.
Frame: The Home Depot / YouTube
Attach the back wall with nails.
Frame: The Home Depot / YouTube
If you haven't painted the back wall, you can, for example, stick wallpaper on it.
Frame: The Home Depot / YouTube
What other options are there?
Such a rack can be of any shape, for example triangular:
Or stylized as antique:
A classic shelving can be made from one material, as in this master class, where it is made from MDF sheets:
Base manufacturing technology
The second stage of work is preparing the foundation. Let's move on to its lower part. A thick board will be useful, equal in width and length to the dimensions of the rack. To add the necessary strength in this place, you can also nail cross bars.
The base consists of vertical and transverse slats.
We move on to the side walls if their presence is suggested by the design. If your budget is limited, you can replace wooden boards with plywood of an acceptable thickness. Its width should correspond to the lower base. The height must be according to the developed drawing.
Having prepared the sides, you need to use a pencil or chalk to mark the place where the shelves are attached. Their height can be different, depending on the objects that need to be placed in a given structure. Experts advise making the distance between shelves about 20 and 40 cm. You can use these two indicators to compactly place each item and make it universal.
The distance between shelves may vary. Another step is preparing the back wall. Some craftsmen do not use this part; the texture of the wall surface suits them. But if the design requires this shelving part, then it can also be made from thick plywood.
What materials and tools will be needed to make a rack?
To store fairly heavy items, racks are made from steel equal or unequal angle 40x40, 45x45, 50x50, 30x50 mm with a wall thickness of 3-5 mm. Typically, hot-rolled corner steel is used for these purposes, which is primed and painted to increase corrosion resistance. For this purpose, it is convenient to use “2 in 1” primer enamels, which serve as both a primer and a finishing coat. If for the manufacture of a structure you use a corner that has been used and has become covered with rust, then it is better to purchase “3 in 1” metal paint. It functions as a converter of rust, soil and decorative enamel.
For flooring, plywood, OSB, chipboard, and less often sheet metal are used. To store large items, the covering of the shelves is made of bars located with gaps; for storing small items and installing cans of preserves - from plywood, fiberboard, chipboard, OSB, boards. Metal flooring is made in cases where it is planned to store heavy objects. A big disadvantage of wood is its low resistance to aggressive biofactors. The tree quickly rots, becomes moldy, and is damaged by insects. To extend its service life, the wooden covering is treated with antiseptic compounds. To increase resistance to fire - fire retardants.
To create a welded rack you will need a welding machine. Welding inverters are the most popular now. For welding ferrous metal up to 10 mm thick, machines can be used that provide a welding current of 160-180 A. The diameter of the electrodes is 3-4 mm.
- angle grinder (angle grinder, “grinder”) with a cutting wheel designed for metal work - cutting workpieces to size;
- cleaning wheel - for processing welds;
- drill or screwdriver, self-tapping screws with a drill-shaped end, washers with rubber gaskets for securing the shelf covering;
- electrodes;
- building level;
- a wood saw or electric jigsaw for cutting boards or plywood to size;
- measuring instruments;
- primer and enamel.
To carry out procurement and assembly work, you will need personal protective equipment - gloves and goggles.
Profile types
The assortment of retail chains includes a large number of types of profiles from which shelving of any type can be made.
As a rule, the following are in greatest demand:
Angle
Profile pipe of square or rectangular cross-section
Drywall guides
One of the most popular types is a corner. It is convenient in all respects - it allows you to make a frame for laying horizontal platforms, and is practical when assembling vertical racks. There is a special rack corner equipped with continuous perforation along the entire length. It can be used to make supports with the ability to change the height of the tiers of the rack.
Expert opinion
Vakhrushev Ivan Andreevich
Furniture maker with over 15 years of experience
Profile pipe is a good choice when making racks designed to store heavy items. It can withstand high loads, is easy to use, and durable. Its only drawback can be considered its high cost - it is the most expensive of all existing options.
However, if you plan to store a large number of heavy items (for example, when placing car parts or hardware in boxes on racks), you have to choose the most reliable materials.
Drywall guides are designed to perform specific tasks. However, their performance qualities turned out to be so high that many users use them in other areas of construction or landscaping. Shelving from guides is easy to assemble; they can be installed as independent structures, or made as hanging shelves.
The disadvantage of this option is the limited permissible load - if you plan to store heavy loads, it is better to choose a more powerful type of profile.
Advantages of metal shelving
Assembling fasteners on coupling bolts
Thanks to recent developments, prefabricated metal shelving has become lightweight and compact, but the material used for manufacturing is durable. Many people think that only wooden furniture can be cozy.
Furniture made from precious wood has always been a luxury item. But nowadays, most furniture is made of chipboard, which does not guarantee its strength.
In contrast to such furniture, prefabricated metal shelving, which is durable, can withstand heavy loads. Moreover, they fit perfectly into the popular high-tech interior style. It contains a combination of steel and metal.
Installing metal shelving is easier than assembling furniture. Doesn't require a lot of tools and equipment. The entire assembly is carried out using hooks. Disassembling it will not take much time and in this form it can be put in any closet.
The advantage of this design is its low price. Moreover, you will also get space savings. It’s easy to replace worn parts, either buy ready-made ones or order them by size.
They don't burn. If you paint them with powder-polymer paint, they look attractive. This increases resistance to rust. If the metal elements are galvanized, then such racks can be used in rooms with high humidity.
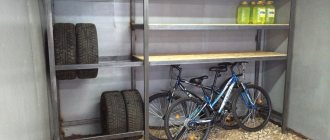
At home, prefabricated metal shelving is convenient to use for libraries, cellars, sheds and garages. The sturdy design can hold up to a variety of jars, books, tools, and many different household and automotive items. The corner rack is collapsible, perfect for loggias.
They do not deform, there are no breaking glasses or creaking doors. They don't rust. Cleaning won't take much time. Simply wipe with a damp cloth.
Assembly technology
In order to install metal prefabricated shelving, you need to measure the room. Once measured, you can decide whether to buy ready-made or have it made to order. You also decide whether you will assemble it yourself or invite specialists.
If you do it yourself, then below we suggest that you familiarize yourself with the assembly installation technology:
- Preparing the rack stands. Screw the thrust bearing with bolts and nuts to the racks.
- Put up shelves. The structure will become durable.
- Install intermediate shelves.
- Attach blank walls. If included.
What you need to know about metal racks and their assembly
The scope of use of metal shelving is quite wide: from industrial areas to domestic use. Unoccupied walls of shops, warehouses, offices, basements, industrial premises, etc. will remain idle if shelves are not conveniently placed on them. Their main function is to maintain order in the premises and prevent chaos from scattered things. This quite strongly influences the psychology of relationships within the team, including at home, with a spouse or mother-in-law.
For use at home, lightweight design options are more often purchased, on which light household items, dishes, etc. are stored. Similar racks are made from a metal profile used for:
- electrical wiring installation work;
- building frames for attaching drywall.
There are several reasons for manufacturing metal structures from profiles:
1. The workpiece is supplied in a sufficiently large length while maintaining high mechanical strength and structural rigidity. We are talking about workpieces with wall thicknesses:
- Not less than 0.45 mm for a profile for plasterboard. A lightweight profile with a wall thickness not exceeding 0.35 mm has significant technological and design limitations. It is not used for the manufacture of metal cabinets (or is used in rare cases) and will not be discussed in this article.
- From 0.2 to 0.4 cm for the profile of the electrical installation sample.
2. The profile has a protective coating against corrosion. It comes in two types:
- Zinc.
- Polymer-zinc. Reinforced protective coating, used for products intended for use in rooms with high humidity, such as loggias, basements, garages, etc.
3. The cost of such a profile is low.
4. Profiles can be assembled using simple mounting units and hardware: nuts, bolts, washers, screws, etc.
5. Any installation error can be easily corrected.
6. Installation is simplified by the absence of welding. The advantages of this assembly:
- lack of equipment for welding and specialists to carry it out;
- preserving the anti-corrosion coating, which would otherwise be damaged;
- mobility of the structure, which can be disassembled at any time, moved to a new location and reassembled.
Metal racks can always be completed and additionally equipped in accordance with your taste or need: glass, wood or plastic panels, decorative tiles, etc. They can also be used as zoning partitions in rooms, creating a unique design or fitting them into an existing one interior. Such a partition can have built-in lamps, windows and niches, as well as any other structural elements.
VT-metall offers services:
7. Metal profile racks are equipped with gussets and spacers, giving rigidity and stability to the structure. If necessary, they can be installed without attaching to the wall.
You can select or manufacture a prefabricated metal structure if you know the dimensions of the product, as well as the purpose of its use: storage of a library, automotive tools and parts, household supplies, etc. The racks have a fairly high load capacity, and at the same time they are quite light. For example, a shelf with only one stiffening rib can support a weight of no more than 90 kg, and two ribs - no more than 120 kg.
Such designs are in demand due to their ability to save room space. They belong to budget types of products. They are extremely easy to repair since any part can be replaced with a new one.
We recommend articles on metalworking
- Steel grades: classification and interpretation
- Aluminum grades and areas of their application
- Defects in metal products: causes and search methods
The protective coating allows the product to be used in difficult environments: high humidity and large temperature fluctuations. The rack does not rust or mold, is resistant to wear, lasts a long time and is resistant to fire.
How to assemble a metal rack? The installation process is much easier than when assembling cabinet furniture. Required tools: open-end wrench and screwdriver, preferably electric. Some designs have fastenings on hooks.
How to make a shelving unit in a garage or greenhouse
Greenhouse that can serve as a garage
All motorists know how much is in the garage. Bolts, nuts, keys and a lot of other necessary sundries. And all this needs to be tidied up so that it doesn’t lie around the garage and doesn’t get in the way underfoot. For this, it is best to use prefabricated metal garage racks.
It will be expensive to buy ready-made ones and install them. Therefore, it is better to make them yourself. It will be much cheaper. The price of the material is lower than the finished structure. Well, you will assemble it yourself, so it will be quite inexpensive.
Requirements for garage shelving:
- The shelves should be more than 1 m. This is enough to store all the tools and items.
- The lower shelves should be 20 cm from the floor. This will keep the floor underneath them clean.
- Shelves with holes are better ventilated, which will protect tools from rust and dust.
A prefabricated metal rack according to the installation method can be:
Stationary.
They are attached firmly. They stand in one place. All parts are connected to each other by welding. Attached to the wall with brackets and anchors.
Mobile.
Mounted on casters or a trolley. Convenient to move to any place. The disadvantage is that due to the moving part, the structure is unstable and cannot withstand heavy loads.
Easy to assemble metal shelving
Collapsible.
Prefabricated metal racks can be disassembled and assembled in any convenient place. You can also change the parameters as needed.
Used in production:
- metal parts;
- wooden parts;
- plastic parts.
- from different materials.
The best material for garage construction is metal.
Its advantages are:
- robust design;
- fireproof;
- resistant to water, gasoline, temperature changes, does not mold, does not develop fungus;
- long service life;
Installation technology:
- Marking is being done. Dimensions are determined.
- When marking, we plan the height to reach the ceiling.
- We mark the length of the racks from one wall to the other.
- The depth of the shelves is from 60 cm to 70 cm. Wide objects will not fit on narrow shelves, and wide ones are less convenient for use.
- For structural strength, it is recommended to make shelves of different heights. The higher you go to the ceiling, the greater the height of the shelf. Heavy objects are located on the lower ones; objects closer to the ceiling should be lighter.
- The topmost shelf can be made high. Store large but light objects on it, as shown in the photo in this article.
- To store long items, shelves should be made one meter wide.
After we have decided on the dimensions and made the markings, we proceed to purchasing materials:
- we make the racks from channels or pipes (rectangular section);
- We will make transverse elements from corners;
- for shelves, take corrugated metal or chipboard sheets;
Make a drawing and cut metal parts according to it. Start assembling the structure. Place all the parts on the floor, as it is easier to assemble them in this position. Fasten the parts by welding or bolting.
Watch the corners to ensure the racks are level. After the entire structure is assembled, it should be primed and painted with metal paint. When the paint dries you need to put it in place.
What are they made from?
As already mentioned, garage shelving is made of wood and metal. Wooden ones are lighter in weight, it is easier to work with wood, but they do not withstand such heavy loads. Metal ones are heavier (many times heavier), but you can lay an elephant on them.
There is also the issue of price. Rolled metal is not cheap at all these days. If you buy everything at the market or in a store, one rack (including consumables) will cost you almost the same amount as a finished one. The only real way to save money is to buy metal at a metal warehouse in whole lengths (there are 6 m and 12 m), and then cut it into pieces of the required length. The cutting can be done directly at the base; you will have to pay additionally for the services, but the amounts are quite small. In this case, you will be able to reduce costs by about 20-30%.
One of the layout options
Lumber costs less than metal. But don’t think that the costs will be small: you will have to buy graded wood without knots, and this is the “elite” or “premium” class with a corresponding price tag. So it won't be very cheap.
Made of wood
Operating conditions in the garage are far from the best - high humidity, frost, alternating freezing/freezing, and sometimes heat. Not very good for wood. Therefore, all material must be treated with antibacterial and protective compounds before work. Use wood products for exterior use, as conditions in an unheated garage are more similar. You can choose a product that simultaneously tints the surface being treated and your product does not need to be painted. After processing, the materials are dried and only then work begins.
How to connect bars
When connecting parts of a wooden rack, you can use standard methods for carpenters - quarter-foot or half-foot. If this is difficult for you, you can also butt nail and use metal angles and/or overlay plates to reinforce the joints.
Another point: it is better to connect with nails, not with screws. The result is more stable and fewer connections become loose. If you choose the option with reinforcement with plates, they can be mounted with self-tapping screws.
Wooden garage rack
Now in terms of size: for racks they usually use 50*50 mm timber, for crossbars you can use the same timber or a little thinner - 50*30 mm. Flooring is made from:
- boards with a thickness of at least 21 mm;
- moisture-resistant plywood with a thickness of 10 mm;
- laminated chipboard;
- OSB.
The cheapest are boards and plywood. Laminated chipboard is much more expensive, but it does not need to be painted, which is a good plus. In order not to spend a lot, you can take the first and last sheets in a pack at the bases - they are scratched and are much cheaper.
Wooden shelving for the garage - drawing with dimensions
Another point: chipboard shelves have an open side cut. If it is not treated, as humidity increases, the chips will swell and the shelf will begin to warp. To prevent this from happening, coat the edges with silicone. With this treatment, nothing will happen to the chipboard.
Metal
If you decide to make metal shelving for the garage, the choice of materials is wider - there are two options for rolled metal, plus standard solutions for warehouses (perforated corners). You can also use metal parts intended for other purposes - for example, steel cable racks or cable channels that are used in communications are suitable.
Cable channels and shelves - convenient and not very expensive
So, what is the frame of a metal garage shelving made from:
- From a metal corner with a metal thickness of 3-4 mm. The width of the corner shelf is 25-45 cm, depending on the planned loads. Durable, but metal-intensive material, weighs a lot, and is expensive.
- Profile pipe (rectangular in cross-section). With less metal consumption (less wall thickness), compared to a metal corner, it has better elasticity characteristics (more difficult to bend), and is more resistant to torsion. Approximate dimensions for racks are 50*50 mm or 40*40 mm, for crossbars 50*25 mm or 40*25 mm, respectively.
- The racks are made from corrugated pipe, and the crossbars are made from angle iron. The thickness of the metal is 2-3 mm, the width of the shelf is 25 mm or more. Unfold the corner so that the laid flooring looks like it is in a “nest”.
Take a closer look at how the corners are located.
The flooring on the shelves is made from the same materials as for a wooden rack (board, plywood, OSB, chipboard), only sometimes non-standard options are added, which are used sharply with a wooden frame due to the high mass - sheet metal.
The board remains optimal for most regions - a reliable, not very expensive material. You need to take wood, without knots (with a minimum of knots) with a thickness of 21 mm. Treat with antiseptics, then paint.
The advantage of metal shelves is high reliability with a small thickness, the disadvantages are price, weight and “loudness”. They also need to be painted, but first clean them of rust, then go over them with a rust converter and primer, then paint them, preferably in two layers. Also, by the way, the metal frame must be processed. Then the rack in the garage will not rust.
Stages of making a rack yourself
First of all, you will need to choose the location of the future product, determine the desired size, perform calculations and a drawing.
All important data is recorded only on paper, then the rack will turn out correct and there will be no unexpected discrepancies during the installation process. Well, then you can start creating a metal frame.
Stage No. 1. Create a drawing
On sheet A4 you should draw a sketch of the future rack indicating all the desired dimensions that were determined during the calculations:
- Optimal width 2000 mm
- Nowadays, designs with wide shelves are quite common, making it much more convenient to install containers.
- At the same time, it’s a good idea to make different distances between the tiers. There is more at the bottom and less at the top, so the mass will be distributed more evenly throughout the metal frame.
- It will be convenient to place heavier objects on the lower shelves and lighter ones on top.
Stage No. 2. Choosing a fastening method
We choose a reliable fastening method.
Mounting options:
In a hardware store you can purchase special chrome-plated pipes for structures, their standard diameter is 22 mm. And at the same time, devices for assembling metal structures
It is important that all parts are matched to the diameter of the structural pipes. The welded fastening method is quite strong, but also labor-intensive. It is possible to assemble a frame from various profile pipes using a welding machine, but this work is more difficult, dusty and noisy. The racks are bulky and heavy, but reliable. Thick metal often needs to be drilled for numerous fastenings, which can also cause some inconvenience and waste of time
Thick metal needs to be drilled frequently for numerous fasteners, which can also cause some inconvenience and waste of time.
Stage No. 3. Assembling a metal structure
We assemble the rack.
When the drawing is completed, calculations are made, and materials and assembly method are selected, then installation work can begin:
Taking into account the recorded dimensions, the necessary parts for the rack are cut from a profile or prefabricated pipe. Next, the frame is assembled
It is important to remember that the rack must be attached to a wall or floor. A metal wall rack adjacent to the wall is attached to slats
The metal wall rack is attached to the wall and is attached to slats.
- If you are planning an additional box, then it is better to use sheets such as OSV and chipboard for it.
- The use of gypsum plasterboard is undesirable for the rear wall and side ceilings. If you plan the drawing correctly, it is not necessary to attach the sheets to a metal frame.
You can plan everything so that they can be placed in the nests that formed the corners.
Stage No. 4. Final processing
If the rack is black metal, but you want to somehow enhance it, then painting is the most suitable option.
Small instructions:
- It would be a good idea to varnish or cover all existing wooden elements, if any, with a paint composition.
- And in general, there are many different shelving structures with very complex structural features.
- It is not necessary to create a skilled frame yourself if the structural model is very complex.
You can purchase a ready-made metal rack in a specialized store. The product, as a rule, is sold disassembled and is quite simple to assemble (see How to assemble a rack from a profile). In conclusion, we recommend that you watch the video in this article and become more familiar with the nuances of the assembly.
Main features of a profile rack
A profile-based shelving unit is a multifunctional option for organizing storage. When constructing a rack, it is possible to attach additional drawers, levels, and hooks to it.
Purpose:
- additional storage space;
- specially decorated models serve as a partition and a room zoning element;
- places for arranging flowers;
- storage of pickles, jam in the pantry;
- placement of old equipment;
- additional shelves for books and things;
- in the hallway is intended for small things and shoes.
A special feature of the profile version is its versatility and compactness. The design does not take up much space, it can be expanded and used not only for storing something. This option is stable, durable, and unpretentious to wet locations.
The disadvantages of using it are the lack of doors and the rapid accumulation of dust on surfaces.
The rack is compact and allows you to save space
Positive sides:
- ease of assembly;
- does not take up much space;
- multifunctional;
- it is possible to construct a collapsible model;
- low price for materials;
- It’s possible to do it yourself and show your design skills.
So, what points should you pay attention to when choosing a rack?
Rack load capacity
Main operational characteristics of the rack
. When choosing a rack, you should first of all carefully calculate the mass of goods that will be stored on it. Consider not only the load capacity of the shelf, but also the overall load capacity of the rack section (the load capacity of the racks), in case you need to increase the number of storage shelves and, accordingly, increase the load on the rack.
In no case exceed the load capacity declared by the manufacturer: of course, if you load the rack by 300 kg instead of 250, it will not immediately fall apart, but if the excess load is constant, then over time the rack structure will deform
, and the strength of the system will be seriously threatened. In controversial cases, it is better to buy a rack with a higher load capacity, leaving a margin for the load, than to take risks by buying “back to back”.
Painting metal shelving
The most common painting now is polymer powder coating.
. It is durable, quite resistant to physical, chemical and temperature influences, aesthetically pleasing and neat looking. Another, slightly less popular option is galvanizing. In terms of resistance to damage and corrosion, galvanizing is approximately identical to powder paint. In terms of appearance, galvanizing is inferior to polymer painting, but it is significantly cheaper. That is, if the appearance of the racks is not important to you, but you need maximum savings when purchasing them, you can choose galvanized racks, but if you need external attractiveness (for example, installing racks in sales areas or office premises), then it is better to buy a rack with a polymer coating .
Fastening the shelves
If you need to buy shelving racks, pay attention to such a factor as attaching the shelves to the racks. It comes in two types
Bolted fastening (MS racks): the rack is assembled using ordinary bolts; installation requires the use of a tool (screwdriver), and the assembly process takes quite a significant amount of time. Hook fastening (SBR shelving): installation is carried out by fastening the shelves on hooks, which automatically wedge under load, increasing the rigidity and stability of the structure. Each type of fastening has its own advantages and disadvantages. Bolt-on shelving is cheaper, but it will take a lot of time to assemble, and to add a shelf, you will have to disassemble the entire shelving and then reassemble it.
This option is suitable when you do not need regular design changes
, that is, the rack will remain in its original form for a long time. The hook fastening makes the racks more expensive, but they are assembled literally in a matter of minutes, and can be modified just as quickly: you can change the number of shelves and the height between them without disassembling the rack. Hook-on racks are good when you need to quickly assemble a racking system, or you plan to change its configuration frequently.
Choosing a trusted supplier
It is important not only which rack to buy, but also from whom! It is most profitable to purchase racks directly from the manufacturer: prices may not differ much, but the difference in delivery times can be very significant; manufacturers usually keep large stocks of finished products in warehouses, and racks, especially the most popular models, will be delivered very quickly. Manufacturers can afford to give good discounts and also implement complex individual projects. . The second good option is to buy a rack from an official dealer who works directly with the manufacturer
In this case, you receive an additional guarantee of quality, because dealers also value their reputation and will not cooperate with unscrupulous manufacturers. We will help you decide on the choice and design features of this product.
The second good option is to buy a rack from
an official dealer
who works directly with the manufacturer. In this case, you receive an additional guarantee of quality, because dealers also value their reputation and will not cooperate with unscrupulous manufacturers. We will help you decide on the choice and design features of this product.
Design Features
A shelving unit is a type of multi-tiered shelf that has its own vertical supports. Different materials can be used for their manufacture, but most users prefer a metal profile. It has the highest mechanical properties, is able to withstand enormous loads, and works equally well in any conditions.
The main advantage of the rack is the ability to use the volume of premises with maximum rationality. As a rule, they are made to the full height of the room so that all available space can be used.
If the parameters of the rack are correctly selected, the owner gets not only the opportunity to neatly fold and store things or other items, but also take them at any time without having to dig through a pile of various utensils.
Using a profile for making shelving is one of the most rational and reasonable solutions. An alternative would be to make it from wooden blocks, but they are less durable and cannot work in conditions of high humidity. If steel parts rust, then wood rots and quickly turns into dust.
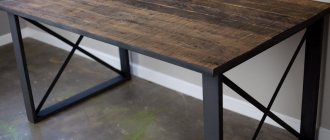
How to make benches, tables and benches with your own hands
To implement the task, three conditions are necessary: accurate drawings, pre-prepared materials and tools. First of all, you need to decide on the model of future furniture and draw a drawing of a bench, table or swing on paper indicating the dimensions of each component (profile supports, vertical and horizontal jumpers, wooden slats, etc.) Based on the drawing, the required amount of material is determined.
Blueprints
There are a huge number of different drawings, diagrams and drawings on the Internet for making benches and tables from profile pipes, and they all differ in complexity: some have a simple linear shape based on a rectangle, others include radial elements and even fragments of artistic forging.
If you have no experience in handling a welding machine and other tools, it is better to focus first on the simplest drawing of a bench without a back or with a low back.
What you need
For manufacturing you will need the following materials:
- profile pipe of any shape measuring 30*30 mm (approximately) for the manufacture of a load-bearing frame;
- wooden planks 30 mm thick and 100 mm wide;
- fasteners - galvanized or phosphated bolts and nuts.
The exact amount of materials can be determined based on the developed drawing. For example, to make a simple bench without a back, 2.3 x 0.6 x 0.45 m, you will need about 10 m of pipe profile, 5 wooden boards and 10 sets of hardware.
Tools:
- angle grinder (grinder) for cutting metal profiles and wooden boards;
- welding machine for welding profiles;
- electric drill with a metal drill;
- a pipe bender for bending a profile if it is intended to use curved elements as part of furniture.
You should also prepare measuring instruments - a building level, a tape measure, a ruler - to check the symmetry, verticality and horizontality of the location of the main elements of the product.
Additionally, you should take care of protective coatings for metal and wood. To prevent corrosion of the profile pipe, special powder paint is used. Wooden planks are treated with ordinary stain with antiseptic properties. Paint or clear wood varnish is used as a finishing treatment.
Sequence of work
The design for making a simple bench without a back in the shape of a rectangle can be used as the basis for making any type of garden furniture. For the bench, in addition to these works, you will need to do the backrest. The table will differ in height and width.
It is recommended to first mark the profiles and wooden planks to avoid mistakes.
- Using a grinder, pipe fragments of the required length are cut in accordance with the dimensions of the workpieces in the drawing.
- The supporting elements of the bench are lightly welded together, forming a rectangle.
- After checking the alignment of opposite supports, the workpieces are finally welded.
- Jumpers from the profile are successively welded to the supports, and the welds are cleaned with a grinding disc of an angle grinder.
- Wooden boards are re-measured with a tape measure, and marks are placed on them for future cutting.
- Blanks of appropriate length are cut from the boards for the base of the bench.
- Marks are placed for holes for fasteners.
- Using a drill, holes are made.
- Wooden planks are attached to the metal structure with bolts and nuts.
When cutting profile pipes, it is very important to adhere to the correct cutting angle to ensure a clear fit of the fragments when connecting. The most convenient and practical cutting method is diagonally, when the profile is cut with a grinder at an angle of 45 degrees. As fasteners, experts recommend using bolts with an invisible head or a round shape that is safe for furniture use.
As fasteners, experts recommend using bolts with an invisible head or a round shape that is safe for use of furniture.
If desired, you can weld another jumper at the bottom to the load-bearing structure of the bench, connecting two rectangular supports. It will act as a stiffener, providing additional resistance to loads.
Types of shelving
First of all, you need to analyze the main design options in order to understand the pros and cons of each solution:
Perforated profile structures are strong and durable
Modular storage systems. An option that is widely used in warehouse complexes (see Warehouse racks: requirements for them and tests), industry and trade. The perforated steel profile for shelving is already cut into pieces of the required size, so all that remains is to simply assemble the structure according to the instructions. The main advantages are reliability and the ability to choose different standard sizes. Minus - considerable cost;
Showcase racks made of aluminum profiles are reliable and light in weight
Aluminum structures. This group of products is distinguished by its attractive appearance and high strength. That is why this option is widely used in trading. The advantages are factors such as light weight and ease of assembly, while the disadvantages include the high price and low resistance to deformation under shock loads. But if you need retail display racks, an aluminum profile will be the best solution;
Shelving made from profile pipes is simple and reliable
A rack made of profile pipe is a very good solution for a garage or basement. Such structures can withstand high loads and can have almost any size and configuration. But to make them, you will have to put in a lot of effort - cutting the pipes into pieces of the required size, then precisely aligning them and welding them. Without a welding machine and skills in this area, you are unlikely to cope;
Wood is an affordable material for making shelving
Wooden structures. A very popular solution due to the fact that wood is easy to process, it is easy to purchase and the cost will be low. You can build a structure of any configuration, which is a plus, but the material is not resistant to moisture, and in unheated rooms the wood can rot in a few years;
The profile is perfect for making shelving
Structures made from profiles for plasterboard. The good thing about using CD profiles for shelving is that it is easy to build on your own. To do this, you don’t need to have a professional tool, you don’t need to be a welder or mechanic. Materials for work can be purchased at any construction supermarket, and they are inexpensive.
Profiles for drywall are available in any hardware store.
Based on all of the above, you can make a decision. If you want to take a ready-made option, then steel shelving is a good choice. If you decide to cope on your own, then the easiest way is to use a profile for drywall.
Assembly of the trailer hitch rack
Do you want to know the features and assembly sequence of the trailer hitch rack? Read our article!
What is a trailer hitch rack, what is it for?
The universal TSU rack is an excellent option for organizing a warehouse system of any size. Such a rack will be very useful both in a warehouse and in an office, garage or store. Racks from the TSU series can be assembled either as a free-standing section or in other ways. If desired, you can use the tape method, with which you can set the rack to any length.
Step-by-step instructions for assembling a trailer hitch rack
- The first thing you need to do is take the stand and ties. Then the crossbar and support ties are inserted into the 1st groove from one of the edges of the rack.
We also carry out manipulations with the 2nd rack. Support ties are inserted from the ends of the racks, thus creating a paired rack.
Next, you need to decide on the height at which the shelves will be located. Mount brackets for future shelves on paired racks (at the same height). Place paired racks at a distance of 7-10 cm (depending on the type of shelves) with the brackets inward.
One side of the shelves must be lowered until it stops on the brackets, and the other side must be pressed firmly until fully engaged.
The hooks of the stiffening cross are inserted into the holes in the end of the opposite soldered racks at the same level, after which they should be bent 45 degrees towards the center of the rack.
The cross plates are connected using two lanyards (hook to hook).
Ready! The rack can be used!
Why are TSU racks called quick-assembled?
Due to the fastening with the help of special hooks (clips), which self-lock under load, the racks received this name. When installing the trailer hitch, no bolts are needed, the racks can be assembled without any special skills or knowledge, and it takes a minimum of time! Now you know how to assemble a trailer hitch rack.
Which profile pipes are suitable and how many of them will be needed
It all depends on the size and shape of the rack. It is better to use rectangular profile pipes. First, I choose a diagram and drawing of the future shelving so that it fits the room in height and size. Next, you need to decide whether all structural elements will be the same or not. It is better to weld the racks and crossbars from pipes of the same section, but the longitudinal strips are thinner.
Having chosen the desired scheme, I write down all the dimensions of the planks and height posts, their number. Then I calculate the total length of all pipes of each standard size. This will help you buy profile rolled products so that as little scraps as possible remain.
When making the first rack, you will need 21.6 m of 20x40 mm profile pipe. When using rolled products 1.8 m long, 12 pipes will be needed. With a pipe length of 2.7 m, 8 pipes will be needed.
For the second option, depending on the size of the walls, you will need to measure and calculate all pipe lengths. For racks you can use larger profile pipes. Knowing the dimensions of the wall and choosing the distance between the shelves, these dimensions are entered into the template, and then the number of pipes used is calculated depending on the options available for sale.
If the store has pipes of 6, 8, 12 m, then for ease of transportation they can be cut to the required length, so make calculations in advance using the proposed template.
The assembly of a rack with a frieze and an island rack is carried out in the same way, and differs only in the following:
Freeze rack:
Secure the frieze brackets in the upper grooves of the racks. Then install the frieze base on them, and then install the frieze panel into the grooves on the brackets.
Island rack:
Install the decorative island shelving cap to the top of the shelving unit and secure it between the back panels.
When assembling additional sections of the rack, place the installation hooks in the free grooves of the racks.
For safe operation - accurate calculation
Thank you for choosing the Factory of commercial equipment for Standes stores.
We want the equipment purchased from us to serve you for a long time, ensure the safety of goods and be safe. Therefore, before placing an order, please accurately calculate the overall dimensions of the retail shelving, taking into account the maximum permissible load. And although we are absolutely confident in the strength and safety of our equipment, we advise you to carry out calculations with a small margin. This will allow you to avoid unpleasant surprises if, for example, promotional items in packaging of greater weight for the same price are placed on the rack or conveyor belt of the checkout box. The equipment we produce will serve you for a long time and reliably, this is guaranteed by the professionalism of our employees, high quality materials and adherence to manufacturing technology. Call us and our consultants will help you perform the calculations.