05.06.2020
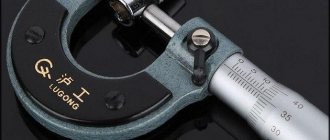
This is a sought-after tool, the accuracy of which depends on correct operation. That’s why we want to tell you how to use a micrometer: instructions for taking readings will be discussed step by step, with all the details. We will also pay attention to the types of design, setup, calibration, care and maintenance - so that you can, firstly, choose the most suitable model, and secondly, apply it as correctly as possible.
Let us immediately note that all variations of the device, regardless of the design features, must have one common property, namely, be easy to learn. So that, having figured out how one of them works, you won’t have problems with all the others, and this is possible not only for the machine master, but also for the operator at the very beginning of his professional career.
How a micrometer works: device and measurement principle
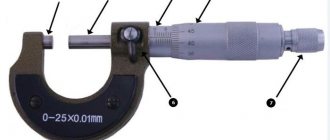
A typical tool is a vice for clamping the part and a set of mechanisms for taking readings. It includes the following elements:
- bracket;
- spindle;
- stem with markings;
- heel.
During operation, two screws are moved, connected to an axis and deviating from zero marks. Observed discrepancies are the required data that should be recorded on one of the scales:
- main (circular) – made motionless, with an intermediate step of 0.5 mm;
- vernier (additional) - made rotating, on a drum, shows fractions of millimeters; needed to clarify the linear dimensions of the workpiece.
To prevent mechanical damage to the part, a ratchet is provided: it is installed at the end of the device and rotates with a characteristic sound if the positioning is correct.
Monitoring the accuracy and settings of the device
Checking the zero reading of any measuring instrument, including a micrometer, must be performed each time before making any measurements, and if an error is detected, adjustments are made. The process of setting the micrometer consists of the following activities:
- Check how rigidly the heel and the stem of the micrometer screw are secured in the bracket. All parts of the instrument are wiped with a soft, and, most importantly, clean rag.
- The micrometer zero reading is checked. For this purpose, on most instruments, a micrometer screw and the surface part of the heel are connected to each other with a force of several clicks of the ratchet (from 3 to 5). If the instrument is configured correctly, all its jackals will show zero.
In order to check a micrometer, the measurement range of which ranges from 25 to 75 mm and more, a standard corresponding to it with an exact fixed size is used. The standard, cleaned of any kind of contaminants, is clamped between the working surfaces of the device without distortion with a slight force of a couple of clicks of the ratchet. The received data is compared with the set parameters and if an error is detected, the measuring instrument is adjusted.
How to measure with a micrometer: instructions for using standard, lever, electronic models
It all depends on the option for recording indicators. In the case of standard analog instruments, it is necessary to add all the obtained parameters from the stem and drums. Naturally, such results are extremely inaccurate, since they are determined “by eye”, and the errors can be significant.
There are much fewer problems with digital and laser devices, because they read the dimensions automatically and show the final values on the display. You can’t go wrong here even if you have no experience. Although much more often they are used by professionals employed in research institutes and laboratories, since they are relatively expensive for household purchases.
Micrometer zero setting
In order to adjust the zero readings, the micrometer screw is fixed using a locking mechanism so that the gauge block is in the clamped position and the measuring surfaces are connected.
The drum mechanism is disconnected from the micrometer screw. For this purpose, hold the drum with one hand, and with the other unscrew the ratchet approximately half a turn. There are devices in which a micrometer screw is connected to a drum, nut or screw , then to disconnect them, use the appropriate tool - a wrench supplied in the kit.
The zero mark on the drum is compared with the longitudinal mark on the stem. Then the micrometer screw is connected to the drum mechanism and the test is repeated. If necessary, the procedure is repeated.
As you can see, figuring out how to use micrometers is not that difficult. The main thing is to avoid distortions when clamping the part being measured and constantly check the device for the correctness of the readings using a standard, and then all measurements will be carried out quickly, easily, and, most importantly, without errors.
Source: stanok.guru
What types of micrometers are there?
Their classification is wide; they can be sorted according to a variety of criteria. But if we take it globally, then all these measuring instruments (simple and complex, precise and rough) are divided into 2 groups:
- by nature (niche) of use;
- according to the indication method (result output).
Each of these categories has its own subspecies that deserve our attention. Let's look at them.
Options by application
They can be of similar design or radically different from each other. The important thing is in what cases they are in demand and what dimensions allow them to be fixed.
Smooth
They are standard mechanisms - exactly the shape that we described above, that is, with a C-shaped bracket and a rod-handle. Relevant for a wide range of flat and round parts - to determine their cross-section and/or double radius.
Bore gauges
Measuring the diameter with this type of micrometer becomes an extremely simple task. Due to the convenient structure with sliding legs, you can take readings from any internal surface of the workpiece, directly during the process of boring it, which is well suited for workshop conditions.
For hot rolling
Specialized models of original design, the key element is the marked wheel. The markings applied to it make it possible to record the thickness of objects passing through the tongs, without the slightest deformation. They are suitable for both sheets and rods, ensuring control of their geometric parameters, so the conveyors of manufacturing plants cannot do without them.
Dental gauges
As their name implies, they find the distance between the teeth of gears and wheels and the indicators of the grooves. How to measure with this type of micrometer? Very simple:
- place the desired element strictly between the legs of the device;
- move them until there is even contact on both sides;
- take readings
The task is facilitated by the presence of conical nozzles and the ability to quickly and accurately calibrate using reference samples.
Two-scale
The key feature of their design is two ranges of values at once instead of one, which makes it possible to achieve the highest possible accuracy of results. Therefore, they are also proudly called ultimate. Designed for workpieces with curved and/or complex shapes and large dimensions.
Pipe
Master this type of instrument, and you will know how to measure the wear of pipes and, in general, any hollow cylindrical objects with a micrometer. There is nothing complicated to use, just:
- put the item being tested on the rod;
- twisting the lever, bring the foot to the surface of the object (so that they are in contact);
- take readings.
Advanced models are equipped with special attachments that make it possible to accurately determine the parameters of even uneven or bumpy surfaces, for example, corroded surfaces. Therefore, they are more than in demand when servicing heating systems, water supply, and centralized communications.
Thread gauges
Using them, you can easily find the operating parameters of metric and/or inch threads. And you already, in principle, know how to measure these values with a micrometer, because the method for reading them remains standard.
Only one thing in the design changes - nozzles are added. Although they are included in the assembly kit, they do not need to be installed separately, so you don’t have to think about their presence at all, but simply take the device and operate it.
To determine the thickness of sheets
They are in demand in the conditions of mass production of rolled metal products, flat and dimensional elements made of polypropylene and similar objects. The design is quite standard mechanical - with a C-shaped bracket, handle, rod.
Their key difference from other tools is the attachments, which are divided into 2 types:
- narrow - for sheets of small width;
- elongated - for elongated objects.
In practice, such a division increases the horizons of application.
Grooved
We will separately consider how to measure correctly with a micrometer of this type. Because it is equipped with a probe. This is the main organ of the instrument, which must be inserted into a recess, hole, hole or other desired cavity. Then all that remains is to record the deviation and check what numbers it corresponds to.
Wire
They are in demand in quite specific cases: when it is necessary to determine the double radius of ball bearings, as well as the cross-section of thin rolled metal.
They are convenient due to their compactness, simplicity of design and build quality. They consist of a small number of functional units; there is simply nothing to break in them.
Prismatic
The micrometer measurement technique is standard in this case as well. What is unusual is the shape of the bracket - it is no longer C-shaped, but more like the letter P. Although, in fact, it is made in the form of a prism (hence the name), which allows you to easily fix even the thinnest objects between the legs of the device.
This design makes it possible to determine all the geometric parameters of knives and all kinds of blades. This explains the breadth of application of the tool. It is in demand in production shops, for quality control of machine tools, and in a dozen other situations.
It is worth highlighting universal models in a completely separate group - with interchangeable attachments, they can be oriented towards fundamentally different parts and objects, but their level of accuracy is usually not the highest.
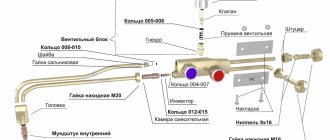
Micrometric instruments
Micrometric instruments are designed for measuring the female (holes), male (shafts) and stepped (depths, grooves) dimensions of products using the absolute method. The tool division value is usually 0.01 mm. In addition to traditional ones, micrometric instruments (and caliper instruments) of higher accuracy with digital readout are produced, in which scales (verniers) are supplemented or replaced with liquid crystal displays; connection of a printing device is provided for recording measurement data.
Measuring instruments use the principle of a screw pair: a micrometric screw - a nut that converts the rotational motion of the screw into translational motion. Similar micrometric pairs are also used in some instruments: instrumental microscopes, projectors, etc.
According to their design and purpose, instruments are divided into several groups: smooth micrometers, micrometric bore gauges, micrometric depth gauges and special micrometers - sheet, pipe, threaded, gear, etc.
A smooth micrometer (type MK) is intended for measuring the external dimensions of parts (Fig. 99). The micrometer consists (see Fig. 99, a) of a bracket 1, into which a heel 2 with a measuring surface at the end and a stem 4 are pressed. The stem has an internal micrometric thread (split nut 7), relative to which the micrometric screw 5 moves, and an external conical thread. When screwing on nut 8, split nut 7 is slightly compressed due to the slots in the conical part. Thus, the gap in the micrometric pair is adjusted (to compensate for wear).
Types by indication method
There are several options for how to determine micrometer readings. This is usually done visually, but you can focus either on the markings or on the numbers on the display, depending on the design of the device. Let's consider the issue of removing values in more detail.
Analog
Also often called mechanical, because during their operation the required indicators are calculated manually, based on data from the main and/or additional scale.
They have 2 important practical advantages:
- Reliability of the design - functional units are made of metal, and during the assembly process they fit well together; therefore, the tool is difficult to damage - it will not break if it falls from the workbench or accidentally hits something.
- Affordable price - they have been produced for a long time, do not contain expensive elements and therefore are cheap (especially considering their long service life).
But there is also a minus - not the highest accuracy. It is necessary not only to know how to properly operate an analog-type micrometer, but also to have some experience in handling it in order to record fractions of mm. Therefore, we would recommend the following models for beginners.
Laser
At the moment they are considered the most advanced. All readings are read automatically (which is as convenient and fast as possible) according to the following scheme:
- a narrow beam passes over all surfaces of the workpiece;
- the difference in deviations is determined;
- Based on this, the result is displayed on the display in the form of final numbers.
The user is practically not involved in the process, which eliminates human error. This is convenient, but it is important to understand that the very principle of measuring dimensions with a laser-type micrometer implies fine-tuning the program, so an operator is still needed.
At the same time, such models are the most expensive and require specialized care, which somewhat limits the scope of their use. As a rule, they are used not in everyday life, but in laboratory conditions, when it is important to ensure precision accuracy.
Digital
Their key feature is the presence of a display on which the results are displayed. And the main advantage is in readings down to hundredths and thousandths of mm. The disadvantage is that they are relatively easy to disable by intentionally or accidentally damaging the already mentioned screen. Otherwise, they have the same properties as mechanical ones, and even the procedure for measuring with a micrometer remains standard.
Lever
They are either clockwork or pointer. This is an improved version of analog. They were improved by adding a special scale with a visual indicator. The latter provides greater accuracy in recording the necessary parameters. The only downside is that one accidental but noticeable blow to the body or a fall from a workbench is enough for the reference point to be lost, and then the device will have to be sent in for repair.
Well, the price of such models is 1.5-2 times higher than basic mechanical ones, although they are still considered quite affordable for purchase for household purposes (especially if the tool is expected to be used frequently).
Reading on the Vernius scale
https://i.imgur.com/vIkI0fZ.png Micrometer tip showing 0.276 inches. In the picture above, the meter is positioned so that it is between graduations 2 and 3, so 2 x 0.100 = 0.200, three additional subdivisions that make up 3 x 0.025 = 0.075. Finally, graduation 1 is on scale is closest to the long line, so 1 x 0.001= 0.001 inches. 0.200 + 0.075+ 0.001, which is 0.276.
How to read an external micrometer with a degree of 0.0001 (using the optional Vernier scale).
Many instruments include a Vernier scale in addition to the regular scales. This allows measurements to be made within 0.001 millimeters on metric micrometers or 0.0001 inches on inch micrometers. The additional number is obtained by finding the line that best matches the line on the reel. The number of this matching line represents the additional digit.
The horizontal scale is marked with graduations every 0.025 (25 thousandths). Every 4th line, starting from zero, is numbered sequentially. These numbers are 0.100 (4 x.025 = 0.100), which are considered 100-thousandths. The vertical scale limits are 0.001 (1-thousandth). Every fifth line is numbered. Vertical scale gradations represent 0.0001 (tenth of a thousandth). Micrometric reading is 1.1551 inches. Total of all five digits: 1, 0000; 0, 1000; 0.0500; 0.0050; 0.0001.
Is 1.1551 inches or can be read as one thousand five hundred fifty-one tenths of a thousand inches. Another example in inches using a 0 to 1 inch micrometer: 0.300 + 0.075 + 0.006 + 0.0001 = 0.3811.
How to measure with a micrometer: details about calibration, adjustment, checking for accuracy
Debugging must be done before each use case. This will eliminate errors as much as possible and achieve the greatest plausibility of the result. It takes relatively little time and comes down to three simple steps:
- Remove dirt, chips and other residues from contact surfaces; You can use regular thin paper - just place the sheet between the jaws, then press the paws together and carefully pull it out.
- Check with reference samples - rectangular parts with the most accurate dimensions; fix it, take measurements with a micrometer, and any possible discrepancies or deviations will be immediately detected.
- Make sure that it is in good working order - it is necessary to inspect those elements that may fail first. In the case of lever models, this is, for example, an arrow. Well, with digital ones you can check the battery and make sure that its resource is enough.
Digital display
The measuring instruments segment of the modern instrument market offers micrometers that, instead of scales, have an electronic display for digital display of measurements. Such devices definitely have a number of advantages compared to their mechanical counterparts:
- Digital display of values greatly simplifies the measurement procedure and minimizes reading time.
- Electronic devices have a relatively small permissible error limit and a division value of one micrometer.
- Digital micrometers provide the ability to carry out both absolute and relative measurements, which is extremely convenient when carrying out technical control, performing calculations of a high level of complexity, sorting parts, and the like.
- The ability of some devices to “remember” tolerance limits.
- The presence of a computer connection connector that allows you to analyze measurement statistics with subsequent reporting.
- Possibility of using the English measurement system along with the metric system.
To be fair, it should be noted that there are certain disadvantages characteristic of micrometers with digital measurement display. The main disadvantage is lower reliability compared to mechanical devices, since electronic instruments are more susceptible to various kinds of negative factors: shocks, falls, elevated temperatures and humidity, and so on.
How to set it to zero
This is necessary to eliminate errors and make the final results more accurate. The sequence of actions is as follows:
- clean the paws using the method already described above – with a sheet of thin paper;
- then bring these legs together until they stop;
- tighten the screw properly so that the fixation is reliable;
- make sure that the notches on the scale correspond to the zero mark.
You know how to use the micrometer next. But if the risk does not lie at 0, you will have to arm yourself with a tuning key, which is included in the standard kit of any analog or lever instrument. To do this, you just need to twist the rod to the desired position.
If for some reason this unit is missing, you will need to center the knurling by first removing and then replacing the ratchet. Only after this will it be possible to proceed to taking readings, otherwise there will be no practical meaning in the recorded results, because due to the error they will not reflect the real parameters of the object, which is fraught with defects in production.
Devices
Before choosing a micrometer model, you need to know exactly for what purposes it will be used. The best choice, of course, would be a universal type model. It is suitable for measuring parts of almost any shape. It is also worth considering the type of reading. It is better to choose currently available digital devices. They provide results without the need for calculations from all instrument scales.
Calibron MKTs-50
Model from Chinese manufacturers. It is a type of smooth electronic micrometer. A special feature is a wide range of configuration and calibration functions. There is a screen backlight, a memory function, and an energy saving mode. The tool allows you to measure external diameters and sections.
Advantages:
- High accuracy.
- Measurement within 5cm.
- Memory mode.
- Build quality.
This model can be used as a household tool.
Expert MK-25
Russian model of a smooth mechanical micrometer. It is distinguished by the possibility of absolute measurements up to 2.5 centimeters in increments of 0.1 mm. Can be used to control pipe thickness. A special feature is the build quality, stainless alloy from which the device parts are made.
Advantage:
- Average price.
- Build quality.
- Ease of use.
Such a device can be used for technical work in workshops and industries.
Norgau NMD-165D
High precision smooth type digital micrometer. Available measurement threshold up to 25 mm. A special feature is the ability to independently release pressure when the jaws are tightly coupled. There is a memory function, wide calibration settings.
Advantages:
- Data accuracy.
- Pressure release.
- Clear fixation.
- Average price.
The tool is characterized by a long service life, build quality, and high functionality.
How to use a micrometer correctly: an example of care and maintenance
Any model should be treated with care. Throughout the entire period of operation, it is important to follow the following recommendations:
- Keep all elements and functional units clean - remove any remaining chips and dirt immediately after performing technological operations.
- Gently wipe the paws with a thin sheet of paper or sponge.
- Reconfigure the instrument as soon as the slightest discrepancy or failure of readings is detected.
- Remove the ratchet when working with workpieces made of soft materials.
It is important to know not only how to measure the parameters of a part with a micrometer, but also how to store it afterwards, until the next time it is used.
If we are talking about an analog or lever version, then its internal moving parts should be lubricated (with machine oil, grease). Absolutely any model must be set to zero and placed in the original case in which it was sold. After this, all that remains is to send this container to a niche in the closet or leave it in a personal workshop, in a warehouse or other room with a low level of humidity; just place it so that it does not fall from a height and receive any damage.
We described in detail how to measure the diameter and thickness of a part with a micrometer, we also gave examples of instruments - the choice is yours. Well, we will help you make it - contact us, we will recommend the best tool for you.
Preparing for work.
6.1. Before starting work, familiarize yourself with the data sheet for the lever micrometer.
6.2. Before using the micrometer, thoroughly wipe the measuring surfaces, check the smooth movement of the microscrew and the zero setting.
6.3. Before starting measurements with a micrometer instrument, it is checked and set to zero. The micrometers are set to zero at the initial scale division. For micrometers with a measurement limit of 0-25 mm at the zero scale division, for micrometers with a measurement limit of 25-50 mm at scale division 25.
By carefully rotating the microscrew, the measuring surfaces of the microscrew and the heel are brought into contact. For microscrews with a measurement limit of 25-50, the microscrew and the heel are connected to each other through a block of end length measures measuring 25 mm or through specially adjusting cylindrical measures included in the kit for micrometers. With this contact, the beveled edge of the micrometer drum must be positioned so that the stroke of the initial division of the main scale (zero or 25) is fully visible, and the zero division of the circular scale of the drum coincides with the longitudinal horizontal line on stem 5 (Fig. 1). In this case, it is necessary to fix the micrometer screw so that it rests in a free state on the heel so that the arrow on the reading device of the indicator 8 is at zero.
If the zero setting is off, bring the measuring surfaces into contact with each other or with the setting standard, and secure the microscrew with a stopper. Then use a wrench to unscrew the drum locking screw so much that by rotating the drum, you can align the zero stroke of the drum with the longitudinal stroke of the stem. At the same time, make sure that the distance from the end of the conical part of the drum to the edge of the zero stroke of the stem closest to the end does not exceed 0.15 mm. Secure the drum locking screw with a wrench.