Modern technologies require high precision in the production of various technical products. This parameter is achieved through the use of various measuring instruments.
The article provides a detailed description of the micrometer, its varieties, types, and areas of use. Instructions will also be given on how to use the micrometer and how to set it up correctly, as well as store it.
Purpose
A micrometer is used to measure quantities such as thickness, diameter, width, cross-section, depth of various objects. Depending on the type and purpose of the device, measurements are available from a few centimeters to microns.
Such devices are used for designing, creating, and repairing various technical parts, devices, and technological projects.
How to take measurements correctly
To learn how to use a micrometer, take a small metal piece. This could be a nail or a drill. It is better to know in advance the diameter or its value to which it must correspond (it is not a fact that the declared size corresponds to reality). The measurement algorithm can be described in 3 simple steps.
Step 1. Place the part between the measuring surfaces. To do this, by rotating the drum, we move the screw - open the micrometer for measurement.
Step 2. Clamp the part by rotating the ratchet nut. As soon as you hear clicks, you need to stop rotating.
Step 3. Look at the values. The size is calculated as follows: the values on the horizontal scale are added to the values on the vertical scale. We'll tell you more about this later.
It is important to know! Do not clamp the part by rotating the drum, otherwise there is a risk of squeezing it and getting incorrect measurements. This will not happen when fixing with a ratchet, since it regulates the force and gives a signal with clicks.
Let's look at the example in Fig. 4. First, we count the integer values on the horizontal scale - 4 divisions are obtained from zero. Then we look at the hundredths - the mark after four divisions of 0.5 mm clearly coincides with the beginning of the drum. This means that on a horizontal scale it turns out to be 4.5 mm. The remainder of the hundredths is calculated on a vertical scale. In our example, 2 divisions coincided with the reference mark (which is equal to 0.02 mm). This means that the thickness of the part will be 4.52 mm. If the half-millimeter mark on the horizontal scale is not visible, you should immediately look at the values of the vertical scale.
Rice. 4. Example of calculation with a micrometer
Now you know how to use a micrometer. There is one more useful thing you should know about. Using a clamp. When is it needed? For example, to restore a bearing, you need to find 5 of the same size among many metal balls. We take the first one and measure its diameter according to the algorithm described above. We fix the screw in the desired position, remove the ball and then substitute different balls to match the sizes. The process speeds up significantly, since you do not have to unscrew the screw every time you measure a new specimen.
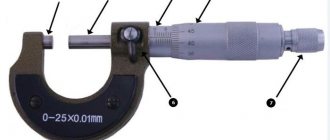
Device
Despite the many varieties of micrometers, the device retains its basic design details. The micrometer consists of the following parts:
- Diametric bracket. This is the base of the micrometer. It is used to place the item being measured.
- Fixed sponge. Placed at the end of the bracket to hold the part motionless.
- Movable sponge. It is she who presses the object for measurement.
- Threaded clamp. Used to fix the movable jaw.
- Calculation scale with markings stamped on it. One side of the scale is divided into centimeters, the other into millimeters. Depending on the type of micrometer, the graduations may be smaller or larger.
- The cylindrical drum is also the moving part of the micrometer. This part is marked in microns.
- Ratchet. Necessary for fixing the sponge without pressure. The ratchet assembly prevents deformation of the surface of the part being measured during strong clamping.
This is a standard micrometer device. Different types of this device may have additional or modified parts. Next, the main types of micrometers and their areas of use will be described.
Micrometer definition
A micrometer is a device for making high-precision measurements; it is used in industry to make the most accurate measurements. This device has a small measurement error, it is about 2-9 microns.
There are many varieties of the device, which allows you to measure parts of various shapes and sizes with a micrometer. The micrometer has found wide application in industry, especially in the automotive industry, as well as in jewelry.
Varieties
Every year the design of various parts becomes more and more complex. Various types of micrometers are used for precise design.
There are 4 main types of device according to the measurement method and the function of issuing the final result:
- Analog micrometer. The simplest and most common device. This micrometer is completely mechanical. The measurement result is controlled using markings on the scale and drum.
- Pointer or lever. Almost similar to its mechanical counterpart. It is distinguished by the presence of a pointer dial. The display is marked in microns and also shows the degree of pressure on the object being measured. These micrometers are highly accurate.
- Electronic. These micrometers are similar in design to mechanical models. A special feature is the presence of a display on which the final measurement result is displayed. Such devices also have a memory function; they can be configured for calculations in the smallest parameters.
- Laser device. It is the most accurate and technologically sophisticated. In addition to the main function, it can calculate the most minor curvatures, deviations, and surface abrasions.
Next, we will look at what types of micrometers there are according to their area of use. The scope of application makes some adjustments to the design of this measuring device.
- Smooth. Using these devices, the diameter and cross-section of an object are measured.
- Pipe. They are used to calculate the difference between diameter and wall thickness. Often used to control the corrosion layer.
- Micrometer "tooth gauge". It is used in gear design. Using a gear gauge, the size, thickness, and depth of gear teeth are measured.
- Sheet micrometers. Necessary for measuring the thickness of thin sheet steel.
- Wire meter. Using it you can measure thin rods, wire, and balls of small diameter. Structurally, it differs from a mechanical device only in the absence of a bracket.
- Universal. It is equipped with special movable attachments, which significantly expands the scope of its intended use.
- Prismatic. The prism-shaped bracket allows you to measure parts with an angular or triangular cross-section.
- Depth gauge. Allows you to control the internal size of the part. Used to measure the depth of holes.
- Thread gauge. Used to measure metric and inch threads on fasteners.
- Double or paired. Necessary for measuring parts with several surface levels.
- Bore gauge. Just like depth gauges, they are used to control the depth of a part. They are distinguished by higher accuracy and the ability to measure the depth of a hole with a small cross-sectional diameter.
All the described varieties are similar in the principle of working with them.
What is a micrometer
A micrometer is a precision measuring instrument used in machine shops around the world. The test showed that mechanical, as well as instruments with digital display, easily carry out high-precision measurements.
The word "micrometer" refers to two terminologies:
- the first is the smaller metric unit, which is 1/1000 of a millimeter
- the second is a measuring device called a micrometer, which measures dimensions with very high accuracy, because during the measurement process, the line of the object being measured is parallel to the axis of the device.
The instrument is used to measure smaller dimensions such as length, width and depth of precision machine parts and objects with an accuracy of 0.01 mm in the case of a metric scale and up to 1/1000 of an inch in the case of an inch scale engraved on a micrometer head.
A huge number of micrometers are used in industry, for conditions such as linear lengths, angular distances and hole depths.
Widely used in machine shops
Hole width
Diameter of precision parts
Used in industry
Thread depth of precision parts
Thickness of precision parts
Setup instructions
Before you learn how to use a micrometer correctly, we suggest that you familiarize yourself with several nuances in preparing the device for use.
Setup and calibration
Before starting to measure a part, you must ensure that the calibration is accurate. This requires:
- Clean the surface of the tool jaws. To do this, place a blank sheet of plain paper between them. The jaws are clamped under slight pressure. Next you need to remove the sheet. The operation must be repeated several times. This removes dirt, grease and moisture. It is prohibited to use hard rags or sandpaper for this purpose.
- To set up the device you need to use a standard. Each similar tool is equipped with such a part. The reference workpiece must be clamped between the jaws, fixed using a ratchet mechanism and checked for alignment of the mark with the size of the standard.
If the indicators differ, the tool will have to be adjusted. To do this you need:
- Loosen the movable jaw and remove the reference sample.
- Combine the jaws again until they stop without applying pressure.
- Check how zero risk is combined.
- If there is no alignment, you need to fix the position of the jaws.
- Loosen the ratchet mechanism.
- Scroll the drum until the zero marks align.
- Secure the ratchet mechanism with the fastening screw.
Thus, all parts of the micrometer are brought into alignment with zero. This calibration will help you measure with a micrometer as accurately as possible.
Mechanical type micrometer
In most cases, mechanical micrometers are used for measurements. Its device consists of a handle and a recess, which houses the part that needs to be measured. It is a semicircle with a stand on which the micrometer screw is directed.
The handle must be adjusted to close the screw. When they close around the part being measured, they begin to rotate the ratchet for adjustment. After this, you can take readings on the scales that are applied to the drum and stem of the micrometer.
Read here: How to use a voltage indicator: the principle of operation of a screwdriver, probes and the best modern testers
To record measured data or compare it with another part, some micrometers are equipped with a locking mechanism.
Operating instructions
Measurements with a micrometer should begin by setting the most convenient position for the instrument. It can be held in your hands, or firmly secured in a vice. Next you need:
- Place the part to be tested in the tool bracket.
- Squeeze using a movable sponge until it stops. Do not clamp under high pressure.
- Turn the ratchet mechanism as far as it will go, but without applying excessive pressure.
- Secure the position by moving the clamp to the closed position.
- Look at the combination of marks.
The micrometer readings are read as follows:
- The stem of the instrument has a main and an additional scale. The main one is marked in large quantities and is located below. On the additional one, risks of small value are displayed, its position is above the main scale. The main ones are the risks of the main scale with digital marks.
- The drum has a scale with marks calculated in hundredths of a millimeter.
- First, the integer numeric value of the lower scale is determined. If the line stops near the number “5”, then the whole number is equal to 5 millimeters.
- Then you need to add the number from the top scale to this value. The markings on it have values in fractions. If the risk stops before the mark, its value is not taken into account, and if after, then it must be added to the main result. For example, if the mark has passed by one division, it will be equal to 0.5 mm.
- Next you need to determine hundredths. To do this, you need to remove the values from the drum.
- The drum line is aligned with the central strip between the 2 scales on the stem. For example, the value is 50.
- The final calculation is carried out by adding all the data: 5+0.5+0.5=6 mm.
Working with a micrometer is quite simple if it is accurately calibrated and has a flat surface on both jaws.
A micrometer for internal measurements is used in a different way. Its movable jaw is placed in the hole until it stops. Next, you need to align the tool stem with the surface of the part. After alignment and stop, the stem is fixed with a ratchet, and the resulting data is read. The reading method is completely identical to the description in the instructions.
How to use a micrometer
Using a micrometer is quite simple. At the same time, if a person knows how to handle a classic analog device, he can easily master any type of meter. To ensure accurate results, it is necessary to set up the micrometer and perform an initial calibration before starting work.
Checking the zero position is mandatory. Especially if the micrometer is often used, works with different types of workpieces, and is used in a wide temperature range. Before any adjustments, it is necessary to clean the surface of the heel and movable sponge. This is done as follows.
- Take a sheet of paper. If the device was used to examine metal workpieces, it can be moistened with a solvent.
- The paper is clamped between the heel of the staple and the movable jaw, then slowly pulled out.
- If necessary, if contamination is noticeable on the surface of the control elements, the operation is repeated. Only after this do they begin setting up.
Zero setting
You can set the micrometer to zero using a special key that comes with the device. In general, you need:
- extend the movable jaw to the limit until it touches the heel of the bracket;
- rotate the drum until the nominal pressing force is achieved (the ratchet is activated);
- check that the center line of the stem scale coincides with the zero mark on the drum.
If this does not happen, calibration must be performed. The algorithm for how to adjust a micrometer is quite simple. In the compressed state, when the ratchet is scrolling, you need to fix the movable jaw with a clamp. Then, using a special key, the fastening in the drum is loosened. After the ratchet is released, the part with the scale is turned until it is set to zero. Then the drum mount is tightened again.
Important! For devices of a more complex class, for example, prism devices, calibration is performed using a reference sample. This must be done for both analog and digital devices.
Measurement order
You need to measure with a micrometer carefully, without using excessive force. The part is clamped between the fixed heel of the bracket and the movable jaw. Then you need to turn the drum screw until the ratchet engages. After this, it is recommended to fix the movable jaw with a clamp so that accidental displacement of the workpiece does not damage the threaded elements inside the micrometer.
Determination of indications
Some types of micrometers offer data about the measured value in a visual form. First of all, these are digital solutions. But most devices have the same method of displaying the result as a classic analog, sleek device.
The value of the measured quantity can be determined as follows.
- The stem scale measures integer values - this is the number of marks at the bottom of the scale.
- The upper markings show half values. If a risk is visible here, another 0.5 is added to the value of the integers.
- Hundredths are determined using the drum's circular scale. This is the value at the point of contact of the central line of the stem scale.
Thus, the value of the measured quantity consists of three parts: whole units on the lower scale of the stem, half units on the upper scale, and the number of hundredths on the drum.
Storage
The micrometer is a very fragile instrument. It must be stored following the following rules:
- Be sure to store it in the protective case that comes with the tool.
- Storage in high humidity conditions is prohibited.
- It is necessary to monitor the condition of the jaws and moving parts.
- If necessary, carry out regular cleaning, calibration and lubrication.
- It is prohibited to throw or drop the device.
The following will describe: how to choose the right device; the best models for use in everyday life and industry.
Preparing for work
How to use a micrometer correctly? First, let's look at setting it up. An important skill is setting the zero mark. This will be needed both at the beginning of work, for example, to check the accuracy of the device, and during operation, for example, if you assume that the settings have gone wrong.
Measuring surfaces must be wiped. They should be free of dirt and dust. Unscrew the drum with the screw - separate it from the micrometer stem. The drum cylinder is not yet secured and is in free rotation. It becomes motionless when it is secured with a ratchet nut. Use the nut to rotate the screw until the jaws close. Using a ratchet, tighten the screw until it clicks to secure the measuring surfaces. The drum is rotated until the zero point on its scale coincides with the reference mark on the stem. This is the zero position.
It is important to know! When setting zero, look at the scale at a right angle, preferably from the drum side. The divisions must match exactly. If you look from above or below, you can visually make a mistake with the risks and get an incorrect zero position. The correct principle is shown in Fig. 2.
Rice. 2. Viewing angle when setting to zero
When the divisions are aligned correctly, you need to fix them. Here it is important to know how to use a micrometer: hold it by the cylinder and carefully tighten the nut. Do not hold onto the bracket under any circumstances, otherwise the setting may be lost.
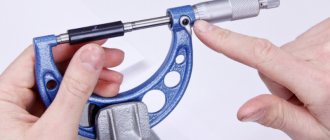
It is important to know! Some models come with a standard insert, for example, 25 or 75 mm. These are micrometers, the measurement range of which does not start from zero, but from the value corresponding to this insert. In this case, the zero mark is checked against this reference part. An example is shown in Fig. 3.
Rice. 3. Tool with reference insert
Devices
Before choosing a micrometer model, you need to know exactly for what purposes it will be used. The best choice, of course, would be a universal type model. It is suitable for measuring parts of almost any shape. It is also worth considering the type of reading. It is better to choose currently available digital devices. They provide results without the need for calculations from all instrument scales.
Calibron MKTs-50
Model from Chinese manufacturers. It is a type of smooth electronic micrometer. A special feature is a wide range of configuration and calibration functions. There is a screen backlight, a memory function, and an energy saving mode. The tool allows you to measure external diameters and sections.
Advantages:
- High accuracy.
- Measurement within 5cm.
- Memory mode.
- Build quality.
This model can be used as a household tool.
Expert MK-25
Russian model of a smooth mechanical micrometer. It is distinguished by the possibility of absolute measurements up to 2.5 centimeters in increments of 0.1 mm. Can be used to control pipe thickness. A special feature is the build quality, stainless alloy from which the device parts are made.
Advantage:
- Average price.
- Build quality.
- Ease of use.
Such a device can be used for technical work in workshops and industries.
Norgau NMD-165D
High precision smooth type digital micrometer. Available measurement threshold up to 25 mm. A special feature is the ability to independently release pressure when the jaws are tightly coupled. There is a memory function, wide calibration settings.
Advantages:
- Data accuracy.
- Pressure release.
- Clear fixation.
- Average price.
The tool is characterized by a long service life, build quality, and high functionality.
Digital type meter
A more modified model of this device for measuring small quantities is an electronic micrometer. This is a modern option that is easier to use. The measurement accuracy of such a device reaches 1 micron and its error is up to 0.1 microns.
Some models have built-in calibration. Externally, you can distinguish an electronic micrometer from a mechanical one by the presence of a digital panel. It provides the ability to select a calculation system, for example, you can make measurements in millimeters or in inches.
The display also displays other important information, such as the battery charge level. The device is equipped with automatic shutdown to save battery power. All technical requirements of the micrometer must comply with GOST.
Advantages of an electronic micrometer:
- the presence of an electronic panel greatly simplifies the measurement of parts and reduces the time for reading information;
- the error of electronic devices manufactured according to GOST has a small error, and the division value is 0.001 mm;
- the ability to carry out relative measurements. Possibility to set the value to zero at any time;
- the ability to enter various tolerances into the memory of the measuring device;
- the ability to display instrument readings on a computer and take photos of readings obtained using a micrometer;
- universal measurement system.
Purpose and types of tools
Linear dimensions, internal and external, are measured with a micrometer - a device in the form of a bracket. The procedure is carried out using a contact method, focusing on a micrometer screw. As a result of measurements, maximum accuracy is obtained up to a micrometer, or micron - this is the designation for a unit of length equal to one millionth of a meter.
The readings in different models can be taken using the stem and drum scales, the stem and drum scales with a vernier (the letter N is added to the marking), the stem and drum scales and an electronic digital device (the letter C is included in the marking).
Design and use of micrometers
As a universal measuring instrument, the use of a micrometer is possible in any area where it is necessary to determine linear dimensions with an accuracy of 2 microns. This is, first of all, mechanical processing of parts, precise assembly of components and mechanisms, adjustment of the operation of industrial equipment, and much more. other.
The design of the micrometer is quite simple; the design of the instrument includes only three main elements:
- A frame in the form of a semicircle equipped with a support stand (1) for fixing the part being measured.
- Handle equipped with a ratchet (6), a fixed stem (4) with a scale and a measuring drum (5).
- Screw (2) with a fixed nut (3) for measuring linear quantities.
Measurement with a micrometer is performed by moving a screw in a fixed nut. Based on the rotation angle of the screw, the displacement is determined and the linear dimension is calculated. The number of full revolutions is indicated on the stem, the fractions are indicated on a circular scale on the drum. The tool is also equipped with a ring nut device for fixation.
To ensure measurement accuracy, the movement of the micrometer screw should not exceed 25 mm. Therefore, micrometers are produced in the range of 0–25, 25–50 mm, etc., up to 300 mm, with further increments of 100 mm. - 300–400, 400–500, etc.
Rules for caring for the device
It is important to remember that the accuracy of the measurements depends on how you handle and care for the device correctly. It is necessary to keep the measuring surfaces clean - clean them after each use, avoid mechanical influences and shocks. After all, if the ends are dirty or damaged, the contact with the surface of the part being measured will be incomplete - hence the error and incorrect measurements. It is recommended to store the micrometer in a box separate from any instruments. So prepare a neat box for it in advance or buy the device already included with it. For more careful storage, you can line it with thin foam rubber, especially if you are planning field work.
Don't have a micrometer yet? Then it's time to buy it! You can do this in our online store. We offer products from leading tool manufacturers: FIT, SCHUT, TOPEX, Zubr, Mastak, etc. Choose your option. And may your measurements be accurate!
Source