What will be needed for production?
The working body of a factory trimmer (motor, body, cutting disk) is similar to a conventional manual circular saw. Therefore, the hand saw can easily be adapted for miter cutting. The first thing you need is the handsaw itself. All that remains is to add a frame for attaching the electric saw and placing workpieces.
A variety of design options are possible, from the simplest platforms for straight sawing to complex devices: sawing at angles, with broaching for large-sized workpieces. Therefore, different materials and parts can be used.
For the frame, plywood with a thickness of 10-20 mm is best suited. Its advantages over other materials:
- Not brittle like chipboard, doesn't bend like fiberboard.
- Doesn't warp like wood.
- It is easy to process and attach in any home workshop, unlike metal.
- Under the roof, without moisture, it lasts quite a long time.
In addition to plywood, you will need:
- Fasteners for connecting frame parts (screws, studs, bolts, nuts).
- Wooden blocks or metal corners for joints and hinges.
- Hinge axis (pin, long bolt, washers, nuts).
The following tools are required and may be required:
- Sawing tool (hacksaw, jigsaw, circular saw).
- Drill or screwdriver (we also recommend reading how to make a circular saw from a drill).
- Drills of the required diameter.
The dimensions of the blanks for the bed will depend on what design the master chooses and on the dimensions of the circular saw itself, on the basis of which the trimming is done. For example, to trim a fence picket, you will need a bed length along the workpiece (1.2-2 m). For small parts, a more compact bed is suitable.
The photo shows an example of the so-called monkey - a cutting circular saw with an abrasive disc for metal, but it serves as an example of what a small frame can be used in such a design.
The cost of materials and parts cannot be calculated, since they will be different in each individual case. Someone may simply already have everything they need to make it, and the parts won't cost anything. If purchased, the cost will depend on what design the master chooses.
Comparative table of technical characteristics of the considered models
| Model | Length/Length with legs extended, cm | Height, cm | Weight, kg | Permissible load, kg |
| DeWalt DE1000 | 82 | 70.5 | 10.6 | 182 |
| DeWalt DE 7023 | 176,5/383,5 | 81 | 16 | 227 |
| Metabo KSU 251 | 127/250 | regulated | 23 | 250 |
| Metabo KSU 401 | 168/400 | regulated | 25 | 250 |
| Metabo UMS | 60 | 83 | 12 | 250 |
| TOUGHBUILT TB-S600 | 145/315 | 88.5 | 31 | not specified |
| TOUGHBUILT TB-S510 | 105/205 | 78 | 22 | not specified |
| Makita DEAWST05 | 117/275 | 50/80 | 24.6 | 180 |
| Makita DEAWST06 | 115/255 | 85 | 17 | 225 |
| WORTEX MT 7625 | not specified/250 | 76 | 16 | 150 |
| BOSCH GTA 2600 | 122/260 | 94 | 15 | 250 |
As a summary of our review of stands for miter saws, we highlight the following points:
- DeWalt products are distinguished by their build quality and have quite a lot of positive user reviews. Model DE 7023 has a long length with extended legs – 383.5 cm.
- Tables from Metabo differ from all other models in that the table height is adjustable, and the KSU 401 model is the longest of all reviewed (400 cm).
- TOUGHBUILT is an overseas well-known brand with a lot of positive reviews about its products. However, even the best models of stands have some flimsy design, which is not particularly to the liking of users.
- Makita is a Japanese brand, all of whose products are durable and of good quality. And even though the table models do not have any extremely outstanding technical characteristics, they are the most popular among buyers due to their quality.
- WORTEX is a Chinese brand that finds it difficult to compete with famous brands. But surprisingly, his products found their consumers.
- BOSCH is a famous German brand whose products are popular all over the world. Miter saw tables are no exception.
In our rating, we have collected the most popular models of stands for miter saws, which have received the largest number of positive reviews from real customers.
Which tool should you choose?
Manual circulars are used, which the owner already has. The peculiarity of homemade miter saws is that on most designs they can be easily removed and used for their intended purpose, like a hand saw. Therefore, the need to buy a second circular does not always arise. But in the following cases it is better to buy a new or second circular:
- The saw is old, its service life is expiring, there is no point in making a stand for it, because a new saw may not fit.
- The design is such that it takes a long time to remove and install the saw.
- The operations are constantly alternating, and you have to take turns working either with a miter saw or with a hand saw. Frequent installation/disassembly is inconvenient.
- Two people work, one on a cross-cut saw, the other with a hand saw.
The selection criteria are the same as for a manual circular saw. When cutting, the circular saw engine experiences almost the same, and even less, loads as when working with a hand saw. Therefore, increased power is not required for simple trimming. The power will not be superfluous when cutting with a broach, since it cuts dimensional workpieces.
Any circular saw is suitable for trimming. Optimally – average power and price, from a brand with a good reputation for quality.
For example, Makita HS7601, its technical characteristics:
- Power 1200 W
- Cutting depth 66 mm, at an angle of 46 mm.
- Disc speed 5,200 rpm.
- Disc diameter 190 mm, seat diameter 30 mm.
- Price about 10 thousand rubles. 2022
Or Interskol DP-190/1600M with technical characteristics:
- Power 1600 W.
- Cutting depth 63 mm at right angles.
- Disc speed 4800 rpm.
- Disc diameter 190 mm, seat diameter 20 mm.
- Price from 6,000 rubles, 2022.
We also recommend reading interesting articles about choosing a circular saw for the home and about the rating of the 10 best circular saws; it contains all the most necessary information that will definitely come in handy when choosing a tool.
Interskol DP 190 is an excellent option for homemade trimming
Trimming based on a grinder
To solve this problem, a grinder is often used. It is ideal for making your own miter machine for processing end surfaces. The homemade version will have the following technical characteristics:
- The disc speed of the grinder should not be less than 4500 rpm;
- The cutting length is 350 millimeters. Note that this figure is significantly higher than that of a factory tool, which belongs to the middle class.
The created design allows you to remove the grinder from the table and use it as a regular tool.
When considering how to make a similar embodiment, we note the following points:
- the cutting tool is mounted on an axis, which is represented by a car wheel. This moment determines the possibility of facing at an angle. To fix the rotating mechanism, a bearing with a diameter of 150 millimeters is used. To fix the grinder, a special mechanism is used, which is mounted on a rotating axis. After a certain time, it is recommended to lubricate this axis, as there is a possibility of squeaking;
- To fix a certain angle during the production of a machine on a bearing, special ears are welded on the outside. Fixation is carried out using a screw, for example M6. The ears should be attached so that there is not a large distance between them. Otherwise, there is a possibility of strong backlash, which will significantly reduce the processing accuracy;
The last stage of production can be called creating a shield for the saw. This element eliminates the possibility of foreign bodies entering the cutting zone. You can use your own cross-cutting machine at home.
However, the design in question also has significant disadvantages that should be taken into account. These include:
- A DIY cross-cutting machine is very noisy. This is due to the peculiarities of the grinder’s work. During processing, noise appears, which is almost impossible to reduce;
- The cross-cutting machine is used for high-quality processing of end surfaces. That is why quite a lot of attention is paid to the accuracy of the position of the grinder with the disc relative to the workpiece. To adjust the position of the grinder with the disk, trimming bars are used. The rod should be fixed with a bolt, after which processing can be carried out.
The drawings of the cross-cutting machine indicate that it can be quite easily installed in almost any workshop. One should take into account the fact that the structure is small in size, and the workpiece can be quite large. In order to eliminate the possibility of loss of accuracy during processing, the structure should be secured to the base.
Particular attention is paid to the type of disk installed. Initially, the grinder was intended for metal processing, which determines the presence of a large number of metal discs
But there are also discs for wood processing, which have their own characteristics.
In conclusion, there are quite a few blueprints that can be used when creating a cross-cutting machine. Some are quite simple to implement, others are difficult to implement.
If you find an error, please select a piece of text and press Ctrl+Enter.
How to make a crosscut from a manual pendulum-type circular saw?
The simplest trim using a manual circular saw can be done in a few minutes. To do this, you will need a door hinge, preferably with one long side (strip). One side is attached to the circular platform, the other to the bed. The entire step-by-step manufacturing process is shown very clearly in this video:
It didn’t even require plywood and fasteners to make the frame. An ordinary wooden pallet was used as it. You can also use any suitable ready-made platform.
In some cases, if there are no slots in the wooden frame for the disc to pass through, they are cut through with the disc itself. Before this, the fastenings of the circular saw are loosened in order to make a cut with slight shifts to the left and right. This way the slot will be slightly wider than the disk, and during operation the disk will not rub against the sides of the slot.
The advantages of this solution:
- extreme ease of manufacture,
- a minimum of parts (a hinge and two bolts with nuts and washers).
- minimum tools for manufacturing (drill, drill bit, wrench).
- speed and ease of transfer from a hand saw to the miter mode and back.
Minuses:
- limited ability to cut at angles in length and height.
- there is play in the hinge axis; when sawing, you need to select one side and press the saw against it. In another case, due to backlash, the cut may be inaccurate (plus or minus 2-5 mm).
- changes to the safety device – the disk cover is always fully open.
An example of another homemade trim with a specially made frame instead of a pallet is here:
The method is a little more complicated, since you have to make a frame out of plywood. But the advantages of this design are compactness and mobility. It can be put away on a shelf, placed on a workbench, etc.
Step by step guide
Let's look at the sequence of actions when converting a circular saw into a miter saw. A special feature of the “parquet” is its characteristic movement. You need to move it along the surface of the material being cut, but not vertically. Therefore, the machine will represent itself as a base, which, firstly, will allow you to position and secure the workpiece, and secondly, it has a base with limiters along which the circular saw will move in the device (parquet).
Preparing the base
The base of the circular trim is a rectangular sheet of thick plywood or chipboard, not deformed. In the future, a shelf will be rigidly attached to the base for the movement of the circular saw.
You need to make a slot in the base sheet (in the table) to allow the saw blade to pass freely. The disk must completely cut the workpiece positioned on the surface of the table, so the saw teeth must go deeper than its surface, but the disk must rotate freely. It is even recommended to form a table from two sheets of chipboard or plywood, attached flat to each other: then in the top sheet you will need to make a through transverse slot for free movement of the saw blade.
Determining shelf height for cross movement
If the person working on the machine is right-handed, then the shelf for the circular saw should be located along the right edge of the table so that it is possible to secure the workpiece on the table.
You should adjust the protrusion on the circular saw to the maximum and measure at what height above the table you need to place the shelf for the transverse movement of the circular saw so that the teeth of its saw blade do not touch the table. This measurement will actually determine the maximum thickness of the workpieces.
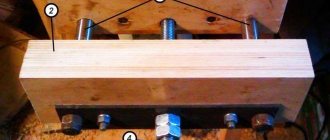
Shelf design
Fragments of chipboard or thick plywood should be secured to the surface of the table relative to the slot with self-tapping screws, increasing them, screwing them to each other, to the previously measured level of the positioning height of the circular saw.
It should be noted that at the very last level there will be a layer of chipboard, which will form a shelf for the movement of the circular saw. So, when increasing the height, you should remember the thickness of the chipboard of the last layer.
The shelf for the movement of the circular saw consists of two parts, symmetrically located relative to the cutting line for free movement of the disk. There should actually be 2 “bridges” aligned parallel to each other across the saw blade space and the right edge of the table on the very right side of that table.
Setting limiters
When the shelf for the circular saw is formed, you should position the saw on it and mark it so that the teeth of the disk fit into the cutout under them, but do not touch anything. It should be noted the dimensions of the housing on the shelves - it is according to these marks that in the future it will be necessary to set the limiters for the movement of the circular saw.
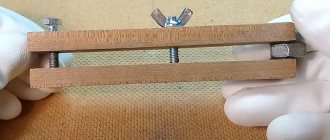
These stops should be made from scraps of chipboard or thick plywood. They must be at least 5 cm wide. Their main feature is the most even edge along which the circular saw will move. The stops should be set so that the circular saw runs along them tightly and evenly, without any play.
To do this, it is recommended to initially expose them to the glue, and until it sets, test the movement of the facing device. If everything is set correctly, then the stops (or guides) should be fixed with self-tapping screws, screwing them to the shelves. Since the guides are 5 cm wide, it is recommended to take the width of the shelves at least 10 cm.
Setting guides for workpieces
This should be a strip of chipboard or thick plywood, only here it is no less than 10 cm wide, since it will have a much greater length - the guide should be 20% longer than the table, so that it is always possible to secure it with a clamp in two places. It is installed closer to the front edge of the table at the desired angle to the slot for the saw blade, and secured with clamps.
There is no need to fix the guide with self-tapping screws at all, since in this case it will be impossible to adjust the cutting angle if necessary. Naturally, there should be one guide for the workpieces, since the second one simply cannot be secured with a clamp in 2 places. When working on such a crosscut, you need to press the workpiece tightly against a pre-fixed guide with one hand, and use the other (right) to cut the workpiece with a circular saw.
How to do it with a broach?
If a conventional crosscut saw only has a pendulum stroke (in a semicircle), then on a crosscut with a broach the saw can also move horizontally. This type of trim can cut to size along the length of workpieces of greater width.
If for a simple trim the width of the workpiece is limited by the width of the disk at maximum immersion in the material, then for the version with broaching the width of the saw stroke along the guides is added.
Factory miter saws with a broach design have both a pendulum stroke in a semicircle and a horizontal stroke of the saw along the guides.
Most homemade crosscuts with broaching are simpler in the very principle of their design. They do not have a pendulum motion in a semicircle, but only horizontal movement along the horizontal.
An example of making a homemade crosscut with broaching in this video:
This design cannot be called a crosscut in its pure form; it is rather an analogue capable of performing certain operations. Its plus:
- availability of materials,
- comparative ease of manufacture,
- ability to cut to the width of the workpiece.
Minuses:
- limited functionality, you cannot cut at angles in different planes,
- it is inconvenient to insert long workpieces under the saw blade,
- for long workpieces that are placed perpendicular to the homemade bed and saw, you will have to additionally make a support workbench.
Why does it cut crookedly?
The disc cuts the line it is directed towards. In this case, the tool should be held or pressed against the guide firmly enough so that it does not move to the side.
If, despite all efforts, the cut turns out to be crooked, the reason is a waste disc. A scorched disc with blue spots on both sides may begin to wobble at the slightest heat. If the teeth on one side are normal, but on the other they are knocked out or blunted, dust may be introduced in one direction, no matter how hard you try to hold it.
Sources:
https://stroyvolga.ru/%D0%BA%D0%B0%D0%BA-%D1%80%D0%B0%D1%81%D0%BF%D0%B8%D0%BB%D0%B8% D1% 82% D1% 8C-% D0% B4% D0% BE% D1% 81% D0% BA% D1% 83-% D0% B2% D0% B4% D0% BE% D0% BB% D1% 8C / https://dnipro-m.ua/news/pravilnaya-rabota-czirkulyarnoj-piloj/ https://benzopilok.ru/rabota/kak-rovno-pilit-tsirkulyarnoj-piloj.html
Safety during work
Safety precautions when using homemade and factory trimmers are no different. Basic Rules:
- The hand should not approach the cutting disc closer than 20-30 cm. When cutting small parts, clamps are used.
- Care must be taken to ensure that the electrical wire does not get caught in the cutting blade.
- Do not work outdoors during rain to avoid water entering the electric motor through the ventilation grille and socket.
- You cannot work tired, intoxicated, or with reduced reaction.
A circular saw is a very noisy type of instrument; long-term use of it has a negative impact on the hearing organs, so you must use headphones. Also with safety glasses, because... During the sawing process, a large amount of small sawdust is formed, which fly into the eyes.
Properties of finished products
There are usually two types of saws on sale:
- narrow-profile, having a specific purpose;
- models equipped with some additional functions.
Different types of saws differ in price, related to the tasks of the model and the popularity of the manufacturer. The most famous brands:
The crosscut type includes the following parts:
- saw blade;
- motor;
- kickstand with start;
- handle for holding and directing.
The commutator motor does not require regular monitoring and lubrication of parts, while the asynchronous motor is distinguished by long-lasting and quiet operation. There are options where the engine is mounted at the rear, which makes visibility much better when working manually.
The motor operates using a mechanism that transmits rotation through a belt or gear. In the first option, noise is reduced and there is no jitter of the cutter, and the second option does not allow the saw to slip when cutting in case of strong pressure.
Video: DIY miter saw.
What is the meaning and benefit of homemade products?
Homemade trims are one-piece, even unique products. Each master makes a tool to solve his specific problems. To cut long workpieces, you can attach the trimmer to a flat beam (up to 6 m). The beam itself will work as a support (workbench) for long workpieces.
Factory trims do not make it possible to cut long workpieces unless an additional extension of the bed is built.
Sometimes there is a manual circular saw, but there is no trimmer and no money, no time to purchase it, and so on. The material for making such devices is cheap or costs nothing and is already at hand. Therefore, the question of whether to do the trim yourself or buy a factory one is decided by each master, based on the conditions.
The prices for factory trims are also taken into account:
- Miter saw Makita LS1040FN 196176, power 1650 W – about 22 thousand rubles.
- Makita LS1219L with broach. Power 1600 W – about 67 thousand rubles.
- Budget options: Encore Corvette-8M 90080. Power 1200 W, - about 7 thousand rubles.
Circular saw miter saw
A miter saw is the same circular cutting saw based on a regular circular saw. It allows you to cut almost all materials – from plastic to metal – with great precision at the required angle. Such a tool is not cheap from the manufacturer, that is, in finished form, and it is not so difficult to assemble it yourself. Therefore, if you have an urgent need for a miter saw, and your hands are growing out of the right place, further information will be very useful.
A miter saw consists of several essential elements
- the cutting disc itself;
- a handle to hold and guide the tool;
- engine;
- footrest with start button.
Let's get to the heart of the matter: you have a circular saw and you are assembling a homemade miter saw. The first three points are already present in the circular saw itself, and the fourth may not be needed if you skillfully assemble the guide bar for the saw.
Pros and cons of homemade products
The homemade product makes it possible to fully use a manual circular saw, for its intended purpose and for trimming. This saves space in the workshop and money on purchasing a factory trimmer.
Disadvantages of homemade products: limited functionality, rough cutting. They are good for rough carpentry work, and less so for fine carpentry. The factory trim has degrees of adjustment for sawing at different angles in two planes. As well as other options - laser pointers, clamps, backlight. Some models are broached. There are no such opportunities on homemade products.
Advantages
When a tool (and even more so a machine) is produced independently, its design, as a rule, takes into account as much as possible the needs and tasks that are supposed to be solved with its help:
- so that the molded parts do not have burrs and creases when cutting, it is necessary that the circular saw has an adjustable speed of movement relative to the plane being cut (so that the burrs are removed by the cutting edges of the saw teeth);
- Suppose you need to make not the usual transverse trimming of molded products, but at a certain angle. In this case, it is necessary that the workpiece be fixed to avoid play during cutting;
What problems can a homemade design have and how to solve them?
Due to the simplicity of the design, such products have practically no problems with the frame. If a loop breaks, it can easily be replaced with another one. If a support block or plywood wall comes off, it can always be put back in place. There may be problems with the operation of the manual circular saw itself. But they can also occur without trimming. Therefore this is a separate question.
In general, making a miter saw from a circular saw is simple and it significantly helps solve various household problems, for example, accurately cutting 200-500 pieces of picket fence, blanks for boxes, pallets, etc.
Features of a circular saw
In practical terms, when making repairs or running a wood-related business, a circular saw is an indispensable tool in the household. With its help they do the following:
- dissolution of wood;
- processing and obtaining the same size of planks, boards and slats;
- creating connections on boards;
- obtaining smooth edges when cutting boards and slats.
In economic activities, a circular mini saw is often used to cut firewood from leftover waste in woodworking production.
When making a circular saw with your own hands, you can get a unit that has many unique additional functions:
- drilling;
- sharpening;
- grinding;
- sawing;
- planing.
Stationary machine with your own hands
To perform everyday or one-time tasks, a hand-made circular saw is quite suitable. Small-volume sawing work does not imply heavy loads on the disk drive. The compact tool has small dimensions, which makes it possible to put it away after finishing work in a certain place. An experienced carpenter will need to make a large stationary type circular saw.
Circulation table
The main condition for making a table is the selected material. It is recommended to use a solid steel sheet, duralumin or silumin alloy. Materials such as moisture-resistant plywood, plexiglass and textolite require processing and installation on top of a galvanized sheet. The use of any material in manufacturing must meet the main conditions:
- increased vibration resistance;
- sagging with a load exceeding 50-60 kg is unacceptable;
- the presence of a perfectly flat surface.
In cases where the conditions are not met, a DIY circular saw may stop due to a jammed disk or a broken drive. The consequences can be different, from a damaged part to injury to a person.
There are several options for making a circular table. Stationary tables can be sawed or made from two parts. The circular saw blade should protrude no more than a third of its diameter.
Saw blade
Saw blade
The design of a DIY circular saw must contain a saw blade. The working surface of the disk is set to one third of the total diameter. For example, with a diameter of 210 mm, the disk should protrude 70 mm from the table. Parts with greater thickness will require a powerful motor, from 1 kW. A miniature circular saw will not cope with such tasks.
The splitting knife installed on some models serves to prevent short circuits and jamming during operation. It is located at the back a few millimeters from the teeth of the saw blade. The device may also be needed when making a circular saw with your own hands.
Adjustable side support
Any type of work will require a stop. The side support is made of a block of dense wood. In other cases, it is possible to make it from a metal corner. The arrangement should be slightly longer than the table structure. The stop is installed using bolts. The template is installed between the table and the cutter for precise installation and better settings.
Shaft
Homemade shaft
The most important part of the design is the shaft mounted on the circular saw. A self-made shaft for a circular saw can damage the structure and cause injury. The reason for this is runout, which cannot be avoided when making a shaft using artisanal methods. The manufacture of the shaft should be entrusted to a specialist with good turning equipment. You should remember that there is a cutter that needs a seat. The holes must be symmetrically machined and machined.
Finished shafts are sold in specialized markets. Preference should be given to parts with a self-aligning bearing. Otherwise, the conventional mechanism may soon render the circular machine unusable.
Broadcast
There are several types of gears that can be used in the design of a DIY circular saw:
- V-belt transmission;
- mechanism consisting of gears.
The preferred option is to use a belt drive. Using a mechanism with gears can lead to jamming if a foreign body enters and injury to the worker. When choosing the pulley diameter, the maximum number of revolutions of the saw blade is taken into account.
Motor
Electric motor for circular saw
In most cases, homemade machines are equipped with an engine from an old washing machine. The main features are increased service life and efficiency. The speed of such engines is not high, which makes working on a circular saw assembled with your own hands safer, longer, and has a positive effect on the result. The use of a special three-phase motor implies the presence of a 380 Volt network. If one is not available, you will have to use a starting and running capacitor, which leads to additional costs.
Main selection criteria
Before going to the store and consulting with sellers, familiarize yourself with the parameters that you should rely on when purchasing a tool. And then you can rationally make your choice.
- power. Affects performance and speed. As it increases, the weight and cost of the tool increases. Household trimmers consume less energy than professional ones;
- disk size. The depth and speed of the cut depends on it. Also find out whether replacement discs for the selected tool model are available for sale;
- cutting parameters. Angle, width and depth. The saw should cut the workpiece at the angle required for your purposes, preferably in both directions. The manufacturer also indicates the maximum cutting depth when working at an angle of 45 and 90 degrees to the surface. The function of limiting the depth of cut is important. It is used when selecting grooves and processing workpieces according to thickness;
- the presence of a horizontal broach. Allows you to increase the cutting width by moving the cutting part in a horizontal plane. You can cut a fairly wide workpiece in one pass.
- number of revolutions per minute. Affects the cleanliness of the cut and makes it possible to work with hard materials. RPM of 4000 or more is a very good indicator.
- engine type: commutator. It is necessary to check the armature regularly, but such a motor has more torque;
- asynchronous. Works quieter and longer;
- serrated No slipping under heavy loads;
- have clamps for frequently used corners and clamps;
- a system that automatically closes the working disk with a protective casing when lowered onto the workpiece;
splitting knife Protects against disk jamming;