Homemade devices
Making a circular saw is not that difficult; problems may arise when fitting the components.
Choosing all the elements correctly so that they work flawlessly is an important task. The shaft must have self-adjusting bearings if the unit is used daily. It is best to select the bearings themselves with two rows of balls, which will be adjusted using a clamping nut. The working surface must have a “grid” marking. Without this coordinate system, accurate woodworking is quite difficult. The protective casing must not be neglected - during operation it reliably protects the device from mechanical damage. A circular saw operates in different modes when working with different materials, so it is advisable to have a device that controls such a process. Several grooves should be made on the shaft so that it is possible to rearrange the pulleys, thus changing the speed.
When you have to saw bars or make several cuts from different directions, you need a stop that has a “P” configuration. At its base lies a board 30 mm thick. Sidewalls 12 mm thick are screwed to the base. Thus, the emphasis is installed on a beam, the size of which from the cutting point corresponds to the size of the cutting disc. On both sides it is pressed against the beam with clamps. If the beam is too massive, then it is rearranged and another cut is made.
There is also an edge stop that is in demand. To make it requires a lot of time and good qualifications of the craftsman. Be sure to make a diagram before starting work. This stop is made from plywood (20 mm), and the stop strip is also made from this material. Manufacturing phases:
- longitudinal grooves for keys are cut;
- the keys are mounted on a thrust strip;
- Another groove is cut between the grooves made to secure the thrust strip;
- another hole is made in the base, its size corresponds to the saw blade of a circular saw;
Sidewalls-limiters are mounted, and there must be clamps in order to securely fasten them. To place the emphasis on the workpiece, the bar moves in the grooves and is fixed through the slot with clamps. It is best to immediately attach a ruler or tape measure to the frame - this makes the work much easier. The pusher is convenient for working with small workpieces - it allows you to fasten the part on both sides, which ensures precision in work
It is also important to do:
- elevator;
- riving knife;
- lifting mechanism.
Capacitors are calculated according to the following scheme: per 1000 watts there are 100 uF for a working type capacitor. The capacity of the starting capacitor must be ordered twice as large. It should be remembered that the SB starting block is a device that automatically returns to its original position. This is very convenient, since literally a few seconds after the start you can begin the workflow.
Table saw
Sometimes there is a need to change the width of the board or the thickness of the block. The best option for such work is a circular saw, especially if there are a lot of boards. For cutting boards of short length (1-2 m), a tabletop version of a circular saw is very useful. It is not necessary to buy such a machine; you can make it yourself from the same grinder.
The design of a circular saw is much more complex than a miter saw. The contact time of the saw blade with the wood is quite long, therefore the reliability of attaching the grinder body to the frame should be higher.
This is what one of the options for a tabletop circular might look like.
The photo shows that the desktop consists of two planes:
- the upper table is designed to advance the workpiece;
- The lower one serves as a stop for the sander.
The disc passes through a groove in the top surface. If the angle of contact of the two planes is provided with rotary hinges, then it will be possible to adjust the working height of the saw blade to reduce the area of rubbing surfaces.
The head of the bolt with which the angle grinder is secured is clearly visible on the top surface of the table. The protruding bolt limits the width of the board being processed. You can cope with this problem by laying another layer of plywood.
Turning the angle grinder on and off using the key on the body is quite inconvenient. If the key can be fixed in the working position, then it is worth installing a socket with a switch on the outside of the machine.
The stop angle must have the maximum possible length to prevent the board from deviating from the cutting direction. It is better to fasten the corner in such a way that you can change the working distance between it and the disk: then the width of the cut part will also change.
Security measures
When repairing an instrument, we must not forget about safety measures. First of all, you need to disconnect it from the power supply and do not plug it into the network until final assembly.
It is recommended to wear gloves when working with the chain and bar; this will protect your hands from cuts. When disassembling screw connections, if the screw cannot be unscrewed, you need to stop making efforts and use an aerosol lubricant like WD-40; this will relieve the tension and after a few minutes you can simply unscrew the screw.
It is also worth remembering about electrical safety; you can repair parts of electrical equipment by using only the nominal value of the parts that were originally installed.
It is optimal to use machine chain sharpening. But if it is not possible to use an electric machine, then you can also use the manual sharpening method using a special file and a guide jig.
The chain is put on the bar and secured in the saw. After this, the chain is tensioned. After it is tensioned, sharpening is done:
As you can see, the process of repairing an electric chain saw does not pose a big problem and is quite feasible even for those who have never repaired power tools. Another thing is that before you start disassembling, you need to carefully study the structure of the tool and imagine all the operations that will need to be performed during repair.
Source
What characteristics should you choose based on?
All models, even of the same brand, differ from each other in both significant and minor details. Below are the main qualities, the most important first. Then in descending order.
Engine power and location
The more powerful the engine, the easier the electric saw cuts the material. If two models have tires 40 cm long, but engines are 1.2 kW and 2.2 kW, both are capable of sawing a stack 35 cm long. But the more powerful one will do this easier, faster, without overheating and overload, which means it will last longer.
Therefore, when choosing, you should choose the option that is suitable for the upcoming work. There is no point in sawing medium-sized workpieces with a heavy tool. Medium power chain saws are the most versatile.
Power type
Comparisons of corded and cordless electric saws are given above. Battery-powered options are chosen without hesitation when you need to work far from electrical outlets, at heights, or in hard-to-reach places.
This includes pruning the garden, preparing firewood for a fire in the forest, and construction work, especially at heights. That is, wherever there is no network electricity nearby or the wire will seriously complicate work.
Due to the weakness of the engine, the saw set on such a tool must always be in good condition. If with a powerful engine you can saw with a slightly dull chain, deformation and slight jamming of the chain in the tire groove, then the battery version will lose a significant part of the power and capabilities.
Kerf dimensions
What diameter of a log, or how wide a stack can be sawed in one pass, depends on the length of the bar and chain (saw set). A 25 cm long tire is capable of sawing a log with a diameter of 20-24 cm and a stack of the same width. Why not 25 cm - it’s better if the tip of the bar extends outward, so sawdust is easier to remove from the cut.
In this case, the height of the stack can be any. Therefore, the depth of cut for such a tool is not limited.
Availability of oil tank and its capacity
The chain requires lubrication during operation. That's why all models have an oil tank. The volume of the oil tank is specified in the operating instructions for each model (approximately from 100 to 180 ml). The larger it is, the less often you have to fill in oil.
An enlarged tank increases the size and weight of the tool. Taking into account the fact that the sizes of the tanks differ slightly, this parameter is of little importance when choosing.
Power cord
In many cases, work is carried out at a distance from the outlet. Therefore, you have to use an extension cord. The longer the wire of the saw itself, the more often an extension cord is not required. A wire 1.5-2 m long can be considered an advantage. But it turns into a disadvantage when storing and transporting the instrument.
It is easier to put a power saw with a short cord of 30-50 cm in a box on a shelf. No need to wind and unwind the cord. Long extension cords are wound on a drum or left permanently in place, making them easier to handle. There is no point in installing a drum under the cord on a hand-held instrument (dimensions, weight). That's why most models have short power cords.
Trimming from various scrap metals
This is a fairly heavy crosscut on a stationary metal table. It will take some effort to control it. But in the end, the saw mechanism moves smoothly, without jerking, and trimming with your own hands is easy.
- electric motor power - 2.2 kW;
- disk revolutions - 2800;
- cutting depth 80 mm.
Materials and tools required for assembly:
- 900 W electric motor;
- a metal sheet;
- metal corner;
- channel;
- hinge group;
- powerful spring;
- Bulgarian;
- welding machine;
- file.
The bed is made from adjustable supports, a metal corner and posts from an old bed. The working surface is a metal sheet like a table surface, in which we cut a hole, and process the edges with our own hands using a file.
- The pendulum stand for the saw is welded from a channel mounted on a sheet of metal; its height is about 80 cm.
- The stand for the electric motor is made in the form of a movable metal plate mounted on hinges. When installing an electric motor, a spring is used as a stabilizer. Then you can do without a pendulum and belts.
- The tension belts are adjusted with a conventional hinged bolt, and the pendulum for the mechanism is also made of metal.
- As an operating tool, a disk with a diameter of 420 mm is installed on the trimmer.
Basic malfunctions of electric saws
Electric chain saw breakdowns do not occur out of nowhere. Most often, they can appear due to power surges in the network, improper operation of the unit, or poor build quality of the device. The main malfunctions of electric chain saws include the following.
- When I press the start button on the unit, the saw does not start. The network cable or power plug of the device may have failed. If everything is in order with the cable, then the cause of unit failure may be a faulty start button, burnout of the motor windings, or complete wear of the brushes.
- During operation, the brushes on the electric saw burn, and a circular fire appears on the motor commutator. The malfunction may be caused by worn brushes or a short circuit in the armature winding.
- The chain is not receiving lubrication. This happens if the oil in the tank runs out, the tube or hole responsible for supplying lubricant is clogged, or the oil pump fails.
- The unit cannot develop full power. Possible reasons are as follows: the brushes are worn out; interturn short circuit or break in the armature winding; low voltage in the network; the start button is faulty; jamming occurred in the gearbox; brake system malfunction.
- The power saw motor stops during operation. This behavior of the unit may be caused by gearbox jamming or brush wear.
- The electric motor of the device quickly overheats. There may be several reasons why the saw heats up: high ambient temperature; poor engine ventilation when operating at low speeds; ventilation holes are blocked or clogged; long-term operation of the unit under heavy load; increased rate of operation of the device without rest breaks; gearbox malfunction; lack of lubrication; damage to the motor windings.
- The unit makes an uneven cut. This may be due to dull chain cutters or uneven tire wear.
- When the motor is running, the chain remains motionless. Most often, breakdown occurs due to clutch failure. Also, this malfunction can occur if the gears of the gearbox and drive sprocket break.
Types of frame units
It is recommended to pay attention to a sawmill made from an electric saw, in which the frame is the base. Typical factory-produced products are expensive and are considered professional equipment with rich functionality and a high level of performance.
The finished tool will be able to pay for itself after a few months. It is necessary when there is a large volume of forest. In other cases, it is advisable to purchase or make your own sawmill from a small electric saw.
Equipment designed for sawing wood is presented in a wide range. Most of them are too expensive for a typical country farm, and processing volumes are aimed at the scale of industrial enterprises and reach several thousand cubic meters per day. Experts distinguish 3 types of such devices:
- disk;
- tape;
- tire
Circular saws are the most common on the farm. Among their disadvantages are the increased volume of waste compared to tape counterparts and the high cost of high-quality discs. Electric band saws are recognized as one of the most profitable options. They are weather tolerant and produce little waste. It is recommended to use them with wood whose diameter does not exceed 70 mm. The design of the device complicates the process of reproducing it yourself.
Tire sawmills are in great demand among hobbyists. They are capable of processing large volumes of wood. A do-it-yourself tire sawmill can be made more easily and quickly compared to analogues.
Specifications
Factory-produced devices have their own characteristics that affect the price. Electric saw PCM-1E (380 V) has small dimensions and copes well with processing wood with a diameter of no more than 60 cm and a length of no more than 9.5 m. It is equipped with a three-phase electric motor, the power of which reaches 5.5-7.5 kW.
The small-sized PCM-3B (Stihl MS 660) equipment is capable of processing logs with a diameter of up to 60 cm and a length of up to 9 m. The professional model has an engine power of up to 5.2 kW. The unit can process 6 cubic meters of wood during an 8-hour shift.
The Taiga DP-1 disc sawmill easily processes wood with a diameter of no more than 90 cm and a length of up to 7 m. It is capable of producing several types of wood products and is equipped with an 11 kW electric motor. Produces up to 10 cubic meters of wood per 8-hour shift. The Wood-Mizer LT-15 band sawmill processes wood with a diameter of up to 70 cm, the length of the logs is not limited, and the weight can reach 2 tons. It is presented in two configurations - with an electric motor with a power of 11 kW and a gasoline engine with a power of 18 hp.
Cordless chainsaw - characteristics, models
A cordless chainsaw combines the advantages of an electric tool with the mobility of a gasoline tool. The use of rechargeable batteries in energy-intensive equipment has become possible with the creation of batteries with high power but low weight. The tool operates without harmful emissions and with low noise. In countries where ecology is paramount in production processes, even forestry professionals are being converted to using cordless chainsaws.
Operating principle of chain saws, requirements for battery models
A battery-powered chain saw has a number of advantages over gasoline and corded models:
- mobility, like a gasoline tool;
- minimal noise, like a network device;
- smooth and easy start;
- no exhaust and no danger of using flammable substances;
- no refueling or maintenance of the combustion system is required;
- easy safe transportation of the tool.
However, cordless tools are expensive and are inferior in power to gasoline models of equal price.
Like other chainsaws, cordless chainsaws are divided according to intensity of use into household, universal and professional. The more work a cordless chainsaw can do, the heavier and more expensive it will be.
Basically, all tools are equipped with lithium-ion batteries with the lowest terminal voltage of 18 V, but more often two sets of batteries providing 36 V.
When choosing a tool, you need to focus on engine power, tire length and engine location. Determines the choice of a comfortable grip and a comfortable body position when working. You should not buy a saw without a lock button to prevent accidental activation.
Homemade electric saw from a grinder
Some craftsmen decide to convert standard equipment into what they believe is more functional.
DIY circular saw from an angle grinder
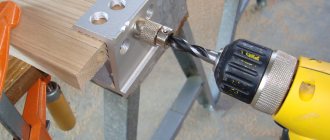
To convert an angle grinder into a circular saw, you will need a saw blade, bolt ties, a gearbox, a metal angle, steel rods, metal clamps, and a set of tools. Before assembling the device, it is advisable to make drawings and calculate the gear ratio taking into account the parameters of the gear disk.
The grinder's engine will become the power plant for the created circular saw. First, remove the disc from the angle grinder. The new toothed disk is tightened with a metal corner. The body of the angle grinder itself is covered with clamps, and from below - with a double strong metal tape.
Next, a hole is made in the gearbox to install the handle mount and grooves for the bolts are drilled in four places. The metal rods are shaped into 6 cm loops, then the handle is attached to the body along with the electric motor. Sometimes such a saw is installed on a base made of plywood or chipboard to create a stationary circular saw.
What can be made from an electric saw
Since sawing logs into bars and boards always requires cutting equipment, factory sawmills use rack (band) and circular saws. Naturally, for the construction of a small house or the production of several cubes of boards, it is impractical and expensive to purchase such a machine. The best alternative may be a homemade design based on an electric chain saw.
Its potential is quite enough to satisfy the small needs of private developers, and just ordinary home craftsmen who cannot afford ready-made lumber. The electric saw here is the main device, combining a universal mechanical feed of the cutting tool and an electric drive. A chain sawmill, unlike a circular saw, is best suited for longitudinal bucking and sawing logs, as it has:
- rough cut sufficient for efficient sawdust ejection;
- capaciously arranged electromechanical feed of the cutting tool (chain);
- relatively low cost.
Important points when constructing a pendulum machine
The type of tool under consideration belongs to the category of dangerous, therefore, when constructing the equipment, the following main points are taken into account:
The manufacture of the frame is the basis responsible for the reliability of the installation. It is impossible to save on the manufacture of the frame, therefore, exclusively steel materials are used, the thickness of which is at least 2 mm. Frame - the design of this part can be different, but the most important thing is to ensure the mobility of the cutting tool. This is achieved through the use of different materials, but in any case, you need to think carefully about the quality of the hinge joint, since your life depends on it. It is better to spend more material, but make a high-quality and safe cutting machine. Tool fastening - the angle grinder is fixed directly to the moving part. Moreover, the fixation must be as reliable and high-quality as possible. When using an angle grinder, “reverse impacts” may occur, which are dangerous because the machine may simply be damaged, and the master who performs the manipulation will suffer as a result. Provide a counterweight - this is a small but important element that allows the tool to return to its original position when not needed
This will eliminate the possibility of damage to parts of the human body. A protective casing - it must be required, and it does not matter what design of the machine is invented, but using the device without a protective casing is strictly contraindicated. The presence of a ruler - this will improve the accuracy of the work performed, which is important when cutting such parts, like tiles, ceramics, and also metal. A starter is also a kind of device that affects safety. The control button should be located in close proximity to the master performing the work. This will allow you to quickly react at the right time by turning off the power supply to the tool.
This will allow you to quickly react at the right time by turning off the power supply to the tool.
In addition to options when the machine has a moving part, there are also methods for manufacturing cutting devices with the tool located in the lower part of the bed or workbench tabletop. However, this option is suitable only for cases when sawing wood is planned. Below is an example of how to make a home sawmill from a grinder quickly and easily. Details on making home sawmills can be found in this article.
This is interesting! The tool can only be used in this form with disks or circles for processing wood. Cutting tiles and metal in this position of the grinder is extremely dangerous.
How to sharpen a chain yourself
Working with a properly sharpened tool makes it possible to significantly extend its service life. Regardless of the type of chain, sharpening is the main operation to maintain the chain in good condition.
It is optimal to use machine chain sharpening. But if it is not possible to use an electric machine, then you can also use the manual sharpening method using a special file and a guide jig.
The chain is put on the bar and secured in the saw. After this, the chain is tensioned. After it is tensioned, sharpening is done:
- At an angle of 90 degrees to the bar in a horizontal plane, a jig with a file is installed in the cutout of the cutting tooth.
- After this, a tilt is made in the vertical plane so that the file follows the direction of the previous sharpening.
- The metal is removed using 2-3 movements with force.
- The jig is removed and moved to the next tooth on this side of the sharpening.
- Having finished setting the edge on one side, the file and jig are moved to the other side, and the process is repeated.
As you can see, the process of repairing an electric chain saw does not pose a big problem and is quite feasible even for those who have never repaired power tools. Another thing is that before you start disassembling, you need to carefully study the structure of the tool and imagine all the operations that will need to be performed during repair.
Transferring the body with the saw to the base
The next step is to transfer the entire structure to the main frame, which has the shape of a parallelepiped. This frame is installed on rollers that will move along the rails and cut the log. The sides are a welded frame made of thick metal. They are fastened together at the top. In other words, the front view will resemble the letter P mounted on rails.
The distance between the side posts is 1-1.5 meters and is calculated based on the length of the tire: it should be slightly larger. The side posts themselves are so wide that a structure with a cutting base can be installed inside. If this structure is 60 cm wide, then the width of the side edges should be the same. This is done with the expectation that a saw will be installed inside one of the racks. The axis along which it moves is attached at the top and bottom inside the side frame.
Thus, vertical movement is ensured by the axis. Horizontal movement occurs using rollers that roll on rails.
How to make a miter saw
Let's start assembling
- We cut out a rectangular sheet of plywood and make a long cut on it, along which your trimmer will ride;
- We screw two guides on top, for example, from an aluminum angle, to the width of the working plane of the circular itself;
- From below to the plywood sheet you need to screw two stands with a height equal to the cutting depth of your saw (5.3 cm).
As a result, we get a guide along which the circular will move. Depending on how we fix it on the table using such a simple mechanism, we can make an accurate cut at any angle. The simplest version of the design is ready.
But what if we want our miter saw to be more functional in operation and look like a factory miter saw? In this case, you will have to show more ingenuity.
- First, you need to make a bracket and a stand on which the circular will be attached. Chipboard (27 mm) is an excellent raw material for such a mechanism. Using self-tapping screws and aluminum corners, you will get a very decent upper part of the trim. And the springs attached to the top can make working on such a saw more convenient;
- Secondly, we need to fix the tripod itself on a movable rotating stand, make a pendulum saw, thanks to which we will eventually be able to change the miter angle.
Carefully! Not only the quality of work and functionality of the trim, but also your personal safety will depend on what material you choose for the stand and tripod, and how securely you attach them to the stand. It’s not for nothing that they say that if a carpenter is experienced, then he is definitely missing a finger. Secure the circular as securely as possible! Safety is paramount!
Secure the circular as securely as possible! Safety is paramount!
As for the trim itself, everything is said about the assembly. However, if we decide to make a saw that looks like a factory saw, then it will be difficult to do without a table.
Making a miter saw
A miter saw is a circular saw with guides, i.e. tire. The latter is attached to the platform and allows the saw to cut complex shapes from wood.
Therefore, the question of how to make a miter saw is always relevant. It is solved in the following way:
- A chipboard bridge-stand for guides is made from wood;
- A slot is made in the blade of the stand for the saw, and tires are attached to the sides;
- A circular saw is inserted between the tires;
- The platform is attached to a chipboard semicircle, which serves as a clamp and regulator of the position of the workpieces.
Now the hand tool can move smoothly along one axis, which makes high-quality and unique cuts possible.
DIY Cordless Saw
A lightweight electric reciprocating saw is used both for summer cottages and in home construction.
One of the first saws invented by man was the bow saw. It was made with your own hands, easily customized, and was accessible to everyone. There could be canvases. One inconvenience is that you need to hold it with two hands.
Then a hacksaw was invented, which was simply held with one hand . And the second hand held the piece of wood being processed. To prevent the working hand , the hacksaw was replaced by a reciprocating electric saw. For a summer residence it is simply an irreplaceable option. You can trim branches from trees, cut firewood, and do carpentry work on your property without getting tired.
In essence, a reciprocating saw is a jigsaw, only the hacksaw blade comes out from the end, like the chuck of an electric drill. It is much safer to work with than a chain saw, and cuts can be made as neatly and precisely as with a circular saw.
What is a power saw for?
The application is almost unlimited. Using a variety of blades, you can cut firewood, carefully cut a blank for a window frame, saw out an old door frame, cut a brick or asbestos-cement pipe, saw a metal corner.
The main advantage of this tool is its ease of use and its weight. Compact specimens can be easily held with one hand , allowing you to work in awkward positions and reach the most inaccessible places.
Homemade sawmills from electric saws: design options
Among all the variety of homemade products made from electric saws, sawmills are the most popular and widespread product that craftsmen have been producing for many years. Factory analogues of such devices are quite expensive due to their high performance. They are capable of processing thousands of cubic meters of timber per day of operation.
When there is neither such a scale of woodworking nor finances, you can pay attention to one of 3 types of homemade sawmills:
- tape; They have a complex design, but are adapted to any working conditions.
- disk; Quite easy to assemble, but not reliable, which is why they are in demand among amateurs. Circular sawmills based on electric saws are quite common in everyday life, productive and versatile in the tasks they perform;
- chain
In view of this, we will dwell in detail on their manufacturing technology.
Main stages of work
First of all, we cut out the housing to which the electric motor will be attached. Then, on a lathe, we turn a steel pulley onto the engine drive shaft. To make a homemade cordless electric saw, you will need a small tire and a piece of chain of suitable length.
Then you need to make a wooden handle, in which you will need to drill a hole and install a power on/off button.
At the next stage, we make a whole 24V battery pack from 18650 batteries. We weld the contact plates using resistance welding. A full battery charge will last for one hour of continuous operation of the electric saw.
It is necessary to make a stop handle from a piece of round steel pipe to make sawing more convenient. Then we begin assembling the entire structure. The result is a compact electric saw that runs on a battery.
When working at home, you should always be able to make a tool with your own hands. A homemade circular saw will perform its duties no worse than its factory counterpart, and its maintenance and dismantling will be much easier. In special cases, a circular saw can be converted into a radial or grinder, which has its own very pleasant moments.
You can make a circular saw yourself; for this you need to have good drawings and tools.
Option 2 - how to quickly and easily make a pendulum saw
If you have a welding machine and consumables, you can make a stationary machine from an angle grinder in a matter of hours. Moreover, you don’t need to buy anything for this, since the necessary tubes, fittings and profiles can be found in a garage or a pile of scrap metal. To build a simple cutting machine using an angle grinder as the main tool, you will need to use the following parts:
- Metal profiles measuring 150-200 mm
- Sleeve 10-15 cm long
- Hairpin 20 cm long and 8-10 mm in diameter
- Washers
- Metal corner
- A sheet of metal 2-3 mm thick, which will act as a base
So, to make a simple homemade product you will need to perform the following steps:
Cut the stud to the required length, then place the sleeve inside (it should move freely along the stud), and tighten the nuts onto the ends of the protruding stud. Tighten two nuts on both sides, since the second will act as a locknut. The nuts should not be screwed in completely, they should not come into contact with the sleeve. The resulting structure should be welded to a steel sheet
In this case, it is important to grab the nuts, and the sleeve must remain mobile, that is, move freely. At the next stage, it is necessary to make fastenings for the angle grinder. To do this, you will need metal profiles, as well as washers that will play the role of brackets. Cut to the required length (it all depends on the tool used, but for a low-power angle grinder, the profile length is 15-20 cm)
Weld washers to the ends of the profiles. It is recommended to use at least 2 mounts for an angle grinder, but three are better. The angle grinder has threaded holes for connecting the handle. We use these holes to attach the tool to the movable base using pre-prepared brackets. First, the brackets are attached to the tool using bolted connections of the appropriate size, and then the reverse ends of the profiles are welded to the sleeve. As a result, we get a ready-made machine that can be produced literally within an hour
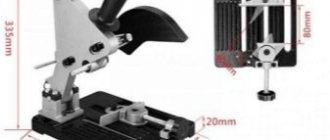
The photo below shows the design of a homemade machine made from a grinder with a detailed description of the necessary materials. Using the instructions, and for some, a diagram is enough to make a homemade cutting machine
It is important to take into account that a casing for an angle grinder must be provided, otherwise the risk of serious injury increases. It is strictly prohibited to operate the tool without protective clothing, not only on a person, but also on the device itself.
The simplest device is ready for use. The angle in the machine design is used as a guide for centering cutting materials. You also need to make a straight hole in the iron sheet, into which part of the disk will “go” when sawing workpieces.
Disk speed and security
Without ensuring high speed of the toothed disk, it is impossible to guarantee the quality of the cut. However, for homemade equipment operated in a home workshop, safety during operation is no less important.
It is necessary to provide protective devices that are traditionally equipped with industrial designs. The opinion that one can completely do without such protection at home does not stand up to criticism.
TB rules are “written in blood.” All it takes is one awkward move to end up on the surgeon's table.
Therefore, security should be given the utmost attention
What can be made from an electric saw
Since sawing logs into bars and boards always requires cutting equipment, factory sawmills use rack (band) and circular saws. Naturally, for the construction of a small house or the production of several cubes of boards, it is impractical and expensive to purchase such a machine. The best alternative may be a homemade design based on an electric chain saw.
Its potential is quite enough to satisfy the small needs of private developers, and just ordinary home craftsmen who cannot afford ready-made lumber. The electric saw here is the main device, combining a universal mechanical feed of the cutting tool and an electric drive. A chain sawmill, unlike a circular saw, is best suited for longitudinal bucking and sawing logs, as it has:
- rough cut sufficient for efficient sawdust ejection;
- capaciously arranged electromechanical feed of the cutting tool (chain);
- relatively low cost.
Working with a saw and grinder
Tools and materials:
- grinder 150-180 mm;
- drill;
- self-tapping screws;
- steel clamps;
- sheet steel;
- pliers.
Circular saw diagram.
Before you make a circular saw yourself, you need to try making it from other tools. Most often, the process is organized with the help of an angle grinder, because it can be remade much faster and easier than any other analogues.
The simplest option best damages the instrument. To do this, you will need to screw the tool to the base using metal screws. If desired, you can make through holes with a drill and tighten them with bolts and nuts, which will be much more reliable in operation, because the tool will no longer strip the thread in case of strong tension. The only nuance that should be taken into account is the factory imbalance of the tool, due to which you will have to fix it very carefully so that there is not even a small chance of movement.
If desired, you can complicate this design, and this will also protect the instrument from unnecessary interventions inside. For fastening you will need steel clamps that wrap around the tool at 3-4 points and then secure it with bolts on both sides.
This design is very reliable, but special attention should be paid to the quality of fixation in order to avoid even small misunderstandings
Diagram of a station for a circular saw.
For those cases where the tool is made stationary, you can use more powerful options for angle grinders. The angle grinder itself is attached to the reduction gearbox using bolts or self-tapping screws (depending on the ability to make a joint without damaging the tool, because sometimes the mounting locations do not match), after which they are installed together on the table top and screwed in the highest quality way.
The most reliable method will also be the most difficult, because it will require the support of a turner-miller. His task is only to carve a special part that would be suitable in its parameters for coupling the grinder and the tabletop. This coupling method is the most reliable; moreover, even microscopic movements are excluded, which is not possible to achieve in every factory tool.
One should take into account the fact that in any case the protective casing is removed, and instead a homemade one is made from sheet steel. It will no longer be possible to use the mount for the casing due to the fact that it is used for coupling, and the homemade product should be mounted directly to the tabletop. To make it, you need to cut a semicircle from sheet steel, the end of which is bent and clamped with pliers. This design will withstand any surprises after it can be screwed on.
When choosing an angle grinder, you need to be extremely careful so that the number of revolutions is small and the power is high. If the speed exceeds 4500 rpm, you will have to use reduction gears, because otherwise, the cutters will grind down very quickly.
It is very important to remember that under no circumstances should a circular saw made from an angle grinder be remade back, because for this reason, every day in all parts of the world people end up in hospitals with injuries of varying severity
Even if an angle grinder is urgently needed, and there is no other option, it is better to be patient, because even the factory protection will most likely not save you.
Saw conversion
Tools and materials:
Diagram of a carriage for a circular saw.
- chain Saw;
- flat steel roller;
- nozzle for cutters;
- reduction gear;
- welding machine.
Electric saws and chainsaws are a gift from the 20th century, which fits very harmoniously into life, but there are situations when it is desirable to remake them, which is not easy. Please note in advance that this alteration is of a momentary nature, but if desired, you can repeat it over and over again without any damage (the replacement will take some time).
In order to get a circular saw, you only need to weld a movable wheel at the very end of the boom and cut off the end itself. The wheel must perfectly follow the contour of the cut element so that the chain does not stretch or fall off when moving.
An adapter for cutters is attached to the side of the wheel. This adapter is removable so that there are no difficulties when sawing with a chain.
With high-quality modification, the wheel will not in any way harm the performance of the chainsaw in the absence of cutters at this moment. In addition, the basic operating speed allows you to do without serious third-party modifications.
What can you make yourself?
The main difficulty faced by anyone who wants to make a hedge trimmer on their own is the manufacture of serrated knives, which must move close to each other, with the permissible gap between them being hundredths of a millimeter . Moreover, the knives should fit tightly to each other everywhere, including where the teeth pass each other.
Due to such high requirements, non-compliance with which leads to a severe deterioration in the operation of the cutting mechanism, homemade workers take two paths:
- use a ready-made cutting mechanism from a brush cutter with a burnt out or broken motor;
- They develop their own cutting tool designs for less stringent requirements, albeit with noticeably worse cut quality.
The advantage of a ready-made cutting tool, especially premium brands and expensive models, is that it is made of the highest quality, so it cuts the bushes evenly and accurately.
And using an angle grinder (angle grinder) or a chainsaw instead of a standard motor allows you to restore the functionality of the tool without purchasing a new engine, which is the most expensive component of a brush cutter.
The advantage of a self-made cutting tool is that its construction does not require a faulty brush cutter, so even those who do not have spare parts from a serial device lying around in their pantry can use this method.
The noticeably worse quality of cutting the green fence is not a problem for such DIYers, because otherwise they would buy an inexpensive Chinese device and use it as is, or attach it to a grinder/chainsaw.
The most effective cutting tools that you can make in your garage or workshop are:
- chain saw with comb;
- attachment made from parts from an old hedge trimmer.
Jigsaw
A pendulum electric saw, better known as a jigsaw, has its own scope of use. This device is primarily intended for longitudinal, transverse and shaped cutting of sheet material. Using cutting tools with different characteristics, you can equally successfully work with boards, wood-based boards, plywood, cut laminate, and thin sheet metal.
The cutting part of a jigsaw is a file, which at one end is fixed in a clamp, performing reciprocating movements. Often the vibrations of the cutting tool are not limited to the vertical plane, but are supplemented by a pendulum movement, this provides greater speed and increases the service life of the blade.
In addition to conventional (straight) cutting, many models provide the ability to saw the workpiece at a precisely specified angle. To do this, the support table is rotated and fixed. This function significantly increases the scope of application of the jigsaw. An ordinary household tool allows you to cut at an angle of up to 45 degrees.
Which grinder should I use to make a circular saw?
There are no special comments here, since you can use both low-power and powerful angle grinders, which differ in size, weight and diameter of saw wheels. The greater the power and size of the blade, the higher the efficiency and productivity of the sawing machine. If you use a small and low-power angle grinder, then in the end you can use the machine exclusively for cutting chipboard, thin boards and plywood.
If a household tool is used as a drive mechanism on a sawing machine, then the features of its temporary operation must be taken into account. If a household grinder overheats, the motor will quickly fail. When planning to frequently use a sawmill for wood, it is necessary to purchase an appropriately powerful power tool.
Security measures
When repairing an instrument, we must not forget about safety measures. First of all, you need to disconnect it from the power supply and do not plug it into the network until final assembly.
It is recommended to wear gloves when working with the chain and bar; this will protect your hands from cuts. When disassembling screw connections, if the screw cannot be unscrewed, you need to stop making efforts and use an aerosol lubricant like WD-40; this will relieve the tension and after a few minutes you can simply unscrew the screw.
It is also worth remembering about electrical safety; you can repair parts of electrical equipment by using only the nominal value of the parts that were originally installed.