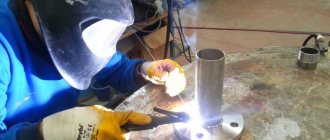
The car body is constantly exposed to the destructive effects of moisture, dirt, and chemicals that are sprinkled on the roads in winter. The problem is aggravated by vibration loads. Therefore, even with careful care, the appearance of cracks and holes eaten by corrosion is inevitable. There is only one way out - welding the car. However, this does not mean that you need to go to a car repair shop. Minor damage can be repaired by welding the car body yourself.
Areas most susceptible to rot that need welding
After the expiration of the period described above, the car body most often begins to rot. This may not have any impact on performance at first, but over time the rot can cause the car to break down completely.
If you purchased a car that is more than ten to fifteen years old, you need to carefully examine its body. Areas affected by rot must be repaired as soon as possible. Ideally, you need to completely change the car body, but not everyone has the means to do this.
To repair rotten body parts, nothing more than welding is used. With its help, you can repair the affected area without much difficulty. The final result is in no way inferior in characteristics to the factory state of the body.
Most often, car parts such as doors, areas under the wings and bumpers are the first to begin to rot. These places are most susceptible to pollution during operation. Also, doors are largely subject to rotting due to the human factor - the driver and passengers step on the thresholds with dirty shoes, etc. In addition to the above parts, the interior area of the trunk, precisely the place where the spare tire is located, can rot. The fact is that most drivers put the wheel there without cleaning it first.
Most often, large areas of rot can only be completely removed through major repairs. In specialized centers, professional equipment is used for this. This process is also expensive; if you do not have the necessary funds, then you can easily weld the desired area yourself. However, before you begin the repair, you need to thoroughly understand how to perform welding work, as well as which of the many welding methods to weld a car body.
How to repair a car body?
The car body can be described as its main component, which requires the most careful attention to itself. It needs regular timely care, high-quality repairs, and its condition should be checked as often as possible.
It is quite possible to weld a car body yourself. The work must be carried out in a garage, and the performer must have at least minimal welding skills. Performing such tasks yourself will allow you to avoid significant expenses, which will certainly occur if you take your car to a service station. The prices for this work are quite high.
Can an inverter be used to weld a car body?
Most often, welding, in the classical sense of the word, is performed using consumables in the form of electrodes of various compositions. Using this type of welding, it is quite easy to connect anything; the process does not require a large amount of money. However, it is not advisable to repair the visible part of the body using this method, since the welded joint is very noticeable and its aesthetics leave much to be desired.
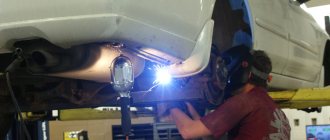
Areas around the trunk of a car, under the wings and other hidden areas can be repaired without problems using a welding inverter. In this case, it is important to use small equipment in order to easily repair areas that are difficult to reach.
When welding anything with an inverter, all safety precautions must be observed. Therefore, you should not risk the safety of the process and try to weld a hard-to-reach area. It is worth noting that the inverter is most often used for bulky, large parts.
Today, both inverter welding and semi-automatic welding are widely used to carry out repair work on a car body.
Using one or another welding method has its advantages and disadvantages. In any case, in order to work with welding machines, you must have specific knowledge. If you do not have any experience in this industry, then it is best to entrust the entire process to a person with experience behind him. When making welded joints, great attention should be paid to the level of safety, and the room should also be well lit.
How to treat the body after welding
After completing the repair, it is necessary to clean the welding seams from slag, since the metal underneath quickly oxidizes. In areas hidden from view, a metal brush is sufficient. In open areas, the body is processed after welding using a grinder with a grinding wheel or a flap attachment. To clean hard-to-reach seams, use a grinding machine with a burr.
Cleaned surfaces are degreased with acetone or gasoline, then treated with an anti-corrosion compound or acid primer. Epoxy putty is used to protect against corrosion. Thanks to its dense structure, it reliably protects the metal surface from contact with moisture and air and is used as a leveling layer.
After applying a thin first layer, it is left to dry for a day. You cannot use a hairdryer to speed it up, because after the top layer dries, the putty inside will remain damp, since the moisture has nowhere to evaporate. Scores are then applied to roughen the surface using 120-grit sandpaper. After applying 2 - 3 layers, preparations for painting are made.
Automotive seam sealant is used to protect seams that are invisible from the outside in easily accessible areas. If necessary, it is smoothed with a spatula and painted. The sealant is applied to hard-to-reach places using a pneumatic sprayer through a plastic tube.
After welding work, it is necessary to treat the body against corrosion
Welding a car body with an inverter
Firstly, body repair using this method does not take much time. A professional welder will be able to complete all the work in the shortest possible time. The help of an inverter in repairing car bodies was used back in the days of the Soviet Union. Most car repair shops use inverter welding to fasten various additional equipment: a luggage rack on the roof, the so-called “kanguryatnik”, racks for additional lighting fixtures, etc.
Welding with an inverter is carried out by creating a high-frequency current. Most budget inverter welding machines are quite bulky. But expensive models can be compact in size. The main advantage of welding with an inverter is that the quality of the final welded joint is practically independent of the human factor.
You can learn how to use inverter welding equipment in just a couple of hours. However, repairing a car body using inverter welding has several disadvantages:
- Compared to other welding methods, this method is quite expensive;
- using this equipment it is simply impossible to create a seam if the thickness of the part exceeds the three millimeter mark;
- The device is very sensitive to dirt and dust; if anything gets inside its body, it will fail.
Is it possible to weld a car using inverter welding? — Metals, equipment, instructions
Currently, inverter welding machines (or inverters) are those welding machines that allow welding using electrodes.
Welding a car with an inverter: is it possible to weld a car body with an inverter?
Very often, when purchasing a used car, buyers are faced with various problems with the condition of the body. Before a transaction, it is necessary to pay great attention to even the most insignificant nuances, because they almost always have a strong impact in the future.
When buying a used car, most people only pay due attention to the technical specifications, appearance, horsepower, etc. But strangely enough, the car body is practically not checked, but only briefly examined from the outside. It is worth saying that the inside of the body is not always in the same condition as the outside.
Most experts tell us that almost all models of domestic automobile production regularly maintain the original condition of the body during ten years of operation. Foreign cars outperform our cars in this regard; their bodywork can “maintain” its factory condition for fifteen years.
Car body repair using semi-automatic welding
The bodies of most Soviet cars were created with very poor quality. After just ten years of active use, the body began to rot and break. Soviet models were much more susceptible to this process than others due to the fact that the metal was simply not painted correctly. It is commonplace, in order to save money, the paint was applied directly to the metal, without first priming the surface.
Today, there are practically no cars painted in this way, and those models that were painted in this way were transformed using semi-automatic welding. This welding method is ideal for repairing areas affected by rotting.
For semi-automatic welding, a special wire is used, it is a consumable material and can be created from various substances. Car body repair using this method is by far the most popular in our country, this is due to its versatility. Using semi-automatic welding, you can connect parts whose thickness can reach six millimeters.
Using semi-automatic welding, you can perform the following manipulations:
- create high-strength connections on the side members;
- create patches in areas susceptible to corrosion;
- straighten small dents on the body.
The semi-automatic welding machine operates using carbon dioxide. In the process of welding something, it is supplied to the work area from a special cylinder, which is under pressure. With its help, it is possible to protect the treated area from the oxidation process. This is achieved by displacing oxygen by influencing it with carbon dioxide.
The repair process using this method involves gradual melting of the metal. The welding unit has ample customization capabilities, as a result of which the chance of burning through the metal completely disappears.
One of the main advantages of this welding method is that it can be used on any type of metal. Also, if you replace carbon dioxide with argon, the welder will have access to join products made of non-ferrous metals and stainless anti-corrosion steel. To obtain a high-quality final result, it is recommended to make welded joints no longer than two centimeters, the interval between them should be at least five centimeters. Before carrying out actual repairs, the area of work must be primed.
Do-it-yourself welding
Welding car parts can be done even by a home craftsman. Auto welding is possible if there is space to carry out this process and the enthusiasm of its owner. Is it possible to weld a car using conventional welding? Of course, because the main parts of the car are made of metal.
Of course, welding a car will require purchasing the necessary equipment, consumables and tools. You should also consider secure fixation. It should be noted that welding thin-walled parts is more complex and requires knowledge of the intricacies of this process.
The first question for a welder to carry out repairs on his own is what welding machine can be used to weld a car. It is convenient to do this with semi-automatic devices and inverters.
For auto repair, a welding machine may have its advantages and disadvantages. Before choosing a welding machine for a car, you should familiarize yourself with their characteristics and application features. The selected welding machine for a car will help eliminate all existing shortcomings and allow you to use your car for a long time.
Tips for repairing a car body using DIY welding
It is quite difficult to connect parts made of very thin metal. To do this, it is better to use the services of a professional, since you will most likely simply deteriorate the quality of the metal yourself.
First, you need to conduct a detailed inspection of the car body to understand which areas need repair. Also, with the help of a careful inspection, you will be able to understand whether you need a major overhaul or can get by with a small local one.
A major overhaul involves performing full-scale repair work, which most often involves replacing a body part completely. If you have all the necessary equipment and experience behind you, you can easily carry out both local and major repairs to the body of your car
Welding work is carried out to repair damage or eliminate corrosion. There are several ways to accomplish this task. In this list, a special place is occupied by welding a damaged car body with an inverter. This method ensures high-quality connection of parts and allows you to reach hard-to-reach areas. But inverter welding machines also have negative sides, so such devices are recommended to be used in certain cases.
Cold welding for metal
Cold welding is a special substance for joining metals without the need to heat them up. Thanks to the special composition, two metal parts, pressed tightly against each other, form an inseparable and durable connection.
The method of repairing car bodies using cold welding allows you to eliminate small and large defects and restore the original appearance of the vehicle.
What is cold welding and what does it consist of?
The main components of cold welding are: resin, filler and hardener. The last substance is responsible for hardening; it has a special chemical formula. The filler is designed to improve the viscosity of cold welding, and the resin is its main synthetic component.
To repair a car body, any cold welding for metal is suitable.
The main advantages of cold welding include:
- Rapid hardening, which occurs in 10-60 minutes;
- Ease of use, to do this you need to mix both components of cold welding, after which the resulting mass is used to connect the parts;
- Good properties regarding mechanical strength and withstand elevated temperatures.
Hardened cold welding can be processed in every possible way: grinding, drilling, sharpening.
Car body repair using cold welding for metal
To properly repair a car body using cold welding, it is necessary to properly prepare the metal.
Firstly, there should be no traces of paint, dirt or primer on the area of the body being repaired. Its surface must be cleaned to bare metal and completely free of dust. Also, if there is rust on the damaged area of the body, then you must get rid of it. Rust greatly harms welding, this was discussed on the website mmasvarka.ru.
Then, using gasoline, kerosene or solvent, it is necessary to thoroughly degrease the prepared surface. Only after all the above manipulations can you begin to repair the car body using cold welding.
How to carry out this procedure:
- If the temperature in the garage is 0 degrees or lower, then you should definitely heat the body surface to be repaired with a hair dryer;
- Then you need to take the required amount of cold welding and knead it thoroughly with your fingers. In this case, the resin, filler and hardener must mix well and become a homogeneous mass. If cold welding sticks to your hands, you can moisten them with water;
- After this, you should apply cold welding to the car body and smooth it well with a small spatula.
After hardening, and the time it may take varies, everything largely depends on the composition of the cold weld, you can begin processing the body. As mentioned above, hardened cold welding can be safely ground and even threaded if repair work requires it.
Main characteristics of the equipment
An inverter is a welding device characterized by high performance. When repairing damage and fastening parts, the car is welded using electrodes. The disadvantage of this method is the presence of visible seams. The device's current conversion frequency varies from 30 to 40 kHz. Despite its power, the unit is compact in size and weight.
There are a number of advantages when working with an inverter:
- the device quickly heats the metal;
- equipment performance does not depend on the stability of the mains voltage;
- the device is 20% economical in terms of electricity consumption;
- low rate of molten metal during the welding process;
- ease of use.
Both car service workers and people without professional experience can cook a car with an inverter. Training to use the device takes a week. The disadvantage of the equipment is its high cost.
Precautions before welding
Working with the device involves some risks, so the technician must follow the following rules:
- Welding is performed in boxes with screens that protect the eyes from light radiation. The minimum screen height is 150 cm.
- When working in a garage, the elimination of body defects begins after ventilation and turning on the forced exhaust.
- When welding in rooms with high humidity, a rubber suit and a mat will protect workers from electric shock. When working in a lying or sitting position, add felt.
- Before starting welding, inspect the cable and other important components of the apparatus. Only high-quality equipment and consumables are used for work.
- When welding the body, the mass of the battery is first removed, which eliminates accidental fire. When repairing parts located near the gas tank, the latter is dismantled.
- The semi-automatic device can only be moved when it is turned off. During a break, the equipment is placed on a dielectric stand.
Features of inverter welding
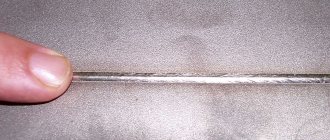
To use the inverter, you will need to connect through a standard outlet to a 220 Volt power supply. Car body repairs are carried out in the presence of metal elements with a cleaned surface. The quality of the seam depends on the brand and diameter of the electrode. For domestic purposes, a suitable option is welding with an electrode with a diameter of 2 to 5 millimeters. This is enough to ensure the creation of reliable patches.
The main advantage of the device is the ability to weld large parts. The device creates a seam on metal up to 3 millimeters thick. The manufacturer placed a special table on the surface of the inverter. It indicates the permissible current values. This value is set independently based on the dimensions of the electrode and the part being welded.
The inverter provides high quality seams and is mainly used for body welding. This device is also used to create welds at joints:
Welding with inverter
Choosing an inverter is a good answer to the question of which welding machine to weld a car with. It is not difficult to deal with, so a do-it-yourself car repair welding machine in the form of an inverter is the most suitable option. The inverter has high performance.
Welding with a car inverter has the following advantages:
- rapid heating of welded surfaces;
- independence from the power grid;
- ease of arc ignition;
- economical electricity consumption;
- a small number of defects;
- ease of use.
To use it, you will need a 220 W power connection. You can start welding with an inverter only after thoroughly cleaning the surfaces to be joined. Using an inverter, you can also apply patches to problem areas.
The ease of use of welding with a car inverter is combined with high quality results. Is it possible to weld a car using inverter welding? The answer is ambiguous. Of course, it is possible, but it is advisable to do this by welding thick parts, which, in particular, include the bottom and side members. In addition, the considerable cost of this equipment should be taken into account. You can learn how to weld a machine using inverter welding by carefully studying the operating instructions supplied with the device.
To choose the right welding machine for your car in the form of an inverter, you should consider the following points:
- Resistant to voltage surges.
- Temperature limits at which equipment welded using an inverter can be used.
- Diameters of electrodes used in the inverter.
Electrodes with a diameter of two millimeters are used for thin parts - on the wings and doors, and with a diameter of four millimeters - for work on the body.
Before starting automotive welding work, you should pay attention to the humidity of the room where the process will take place and ensure its minimum value. This will reduce the chance of water droplets getting into the seam when welding, which can cause small pits and damage to the seam. In case of significant corrosion damage, the edges of the future seam are treated with a special primer.
Welding a car with an inverter is used if it is necessary to carry out repair work in the trunk area, under the wings, as well as other hidden areas of the car.
It is advisable to choose an inverter with continuous adjustment. When welding thin-walled car parts with an inverter, the polarity should be reversed. This will help avoid burns of parts and changes in their shape.
Inverter selection
Inverter devices boast portability. But the quality of the seam depends on a number of indicators, one of which is a uniform supply of voltage. The selection of a suitable device is based on a number of indicators:
- how resistant the device is to working with unstable voltage - the permissible protection factor specified for the device should be from 20 to 25%;
- permissible temperature during operation – from –40 degrees Celsius to +40 degrees Celsius;
- electrode diameter - depends on the thickness of the parts being welded (No. 2 - for thin elements, No. 4 - for components with large thickness).
In the absence of a device that meets the necessary characteristics, it is quite difficult to achieve reliable fastening of the weld.
On some models, the following systems are listed as additional features:
The device may also contain other functions that allegedly allow you to achieve a seam of higher quality than when using analogues. In fact, the additional features are a promotional ploy from the manufacturer, aimed at inexperienced users. Almost all modern and domestic welding inverters are a priori equipped with such functions.
Straightening body panels
After restoring the geometry of the body, its panels are straightened. A wide range of hand tools are used for straightening: hammers of various shapes, rubber and wooden mallets, levers and clamps, various chisels, scissors, a hacksaw, hand anvils of various shapes, etc. (Fig. 24, 25, 26). To restore a damaged surface while preserving the paintwork, smoothing hammers or hammers with an inserted striking part made of soft metals (copper, lead) and synthetic materials are used. The working part of all straightening hammers is made along a radius and should not have damage (nicks, scratches, marks).
Rice. 24. Hammers for straightening the body : a – straightening; b – lightweight type; c – for bending flanges; d – with a convex impact part; d – special with a notch on the working part; e – smoothing hammer
Rice. 25. Levers and clamps for correcting dents : a – lever for correcting stamping defects; b – lever for straightening the wings after painting; c – clamping lever; d – lever for fixing dents; d – plate lever for fixing dents in hard-to-reach places; e – lever for correcting various defects; g – lever for preliminary editing; h – lever to eliminate large deformations
Rice. 26. Shaped plates, mandrels, anvils : a – plate for finishing the surface of front parts; b – plate for fixing dents; c, d – anvils for restoring the profile of parts; e) mandrel for correcting flanges and gutters; e – plate for finishing flat surfaces
To straighten parts made of thin sheet metal that have large deformations, wooden hammers (mallets) are used. Shaped plates and hand anvils are used as supports, placing them under the deformed areas of the panel (Fig. 27).
When a hammer and anvil are used together, the anvil serves to lift the metal in the depressed area and the hammer serves to shape the panel into the correct shape. The working surfaces of these tools should always be well polished and stored properly.
Rice. 27. Straightening the surface of the body wing in an easily accessible place
Some of them are additionally chrome-plated and their surface is brought to perfect cleanliness, which makes it possible to straighten small dents or bulges on the front panels of the body without damaging the paint layer.
In Fig. 28 shows techniques for straightening minor dents using a hand anvil and hammer; in Fig. 29 – using clamping levers. To remove dents from panels in cases where blows with a regular hammer from inside the body are not possible, a pulling hammer can be used, which consists of a rod, a handle and a massive bushing placed on the rod. The end of the rod has a clamp for securing the wire. The wire is welded in the center of the dent in the panel, a pulling force is applied to the handle with one hand, and the massive sleeve is moved with the other hand and blows are applied to the handle (Fig. 30). After the panel is pulled out, the welded wire is cut off.
Rice. 28. Scheme for eliminating dents on flat and convex surfaces (the numbers show the sequence of blows)
Rice. 29. Editing panels using clamps and levers
Rice. 30. Dent pulling scheme
There are sets of equipment that allow you to pull out large-area dents. This straightening technology is based on the principle of smooth application of deforming force only from the outside of the panel (Fig. 31). This allows you not to disassemble the car panel from the inside, which usually takes a lot of effort and time, and requires significant material costs to replace damaged plastic parts, caps and other finishing elements. Smooth loading of the deformation zone allows you to accurately dose the force and control the straightening process, and, if necessary, simultaneously perform straightening with a hammer or local heating.
Rice. 31. Drawing diagram using a lever clamp
The set of special devices and tools includes a spotter, an electrode attachment, washers of various shapes, rubberized support pads, and equipment of various designs to create a pulling force based on the operating principle of a lever or screw (Fig. 32).
Rice. 32. Set of equipment for drawing with a screw clamp
The principle of drawing with a clamp is as follows. A special washer (nozzle) is “grabbed” to the damaged area using contact welding. A special low-power welding machine (spotter) allows you to melt the metal of the panel to a depth of 0.1...0.2 mm. This ensures easy removal of the nozzle in the future with virtually no damage to the surface layer of the metal and the possibility of its reusable use. The device is also equipped with an electrode for local heating of the straightened area in difficult situations. After this, using a lever or screw device, the dent is pulled out through the support points to the line of the original profile.
There is also a technology for eliminating body defects, when the repair clamp is not welded, but glued to the body panel, with a smooth and precisely measured straightening force applied to it. This technology for repairing damage can reduce labor costs for sheet metal and painting work, and is applicable for straightening aluminum panels. Equipment and consumables are cheaper than a spotter and its accessories. In some cases, if the decorative coating in the defect area is not damaged, after editing you can do without painting work at all. The entire set of tools and materials for work is placed in a small suitcase.
The main attention with this technology must be paid to the gluing operation. Hot glue is applied to the end of the clamp using a heat gun. After 2...5 s, the clamp is pressed tightly against the damaged area and held in this position for about five minutes. After cooling the glue to room temperature, a strong connection is formed. Next, using an adjustable two-support device, taking into account the characteristics of the damage, the dent is pulled out. Adjusting screws allow you to install the device anywhere on the body panel. The glued clamp can be torn off when it is heated.
In some cases, it is more convenient to straighten the panel after it has been removed from the body. In Fig. Figure 33 shows such an operation using a stationary flat anvil or in combination with a manual anvil.
Very often, during an accident, a blow to a body panel leads to residual plastic deformation of the sheet metal, manifested in the form of a bulge.
Straightening of such a panel should ensure that the metal of the bulge is settled and the original profile of the panel is obtained. This is achieved
Rice. 33. Correction of deformation of a panel removed from the body : a – original (required) panel profile; b – panel profile after deformation
Rice. 34. Upsetting a bulge on an anvil : 1 – plate with notches; 2 – anvil
various methods. In Fig. Figure 34 shows the straightening of the removed panel using an anvil and a special tool in the form of a plate with notches, which is struck with a hammer. Sharp notches at the moment of impact keep the metal from spreading, and the sheet of metal falls plane-parallel down.
Often, the bulge is settled without removing the panel by tapping it with a special hammer with a sharpened striker resembling a punch. Each blow leads to the formation of a hole; with a large number of such holes, their total surface becomes equal to the surface of the bulge, which leads to the return of the panel contour to the original profile (Fig. 35). The blows are applied in a circular manner over the entire surface of the bulge, starting from its center. Subsequently, the leveling of the panel area treated in this way is ensured by puttying.
Rice. 35. Upsetting the bulge by “tapping”
The next method for eliminating bulges is spot heating of the metal followed by rapid cooling. Heating the metal
Red-hot welding is produced by electric arc welding using a carbon or non-consumable tungsten electrode (a gas torch can also be used). When a small area is locally heated to a plastic state, the adjacent zones, although smaller, also heat up, which is accompanied by thermal expansion of the metal. The expanding metal cannot move into the cold hard metal zone, and the ductile zone offers no resistance and the expanding metal moves into this zone. When the heated point area is cooled, the metal ceases to be plastic, and with further cooling of the heated zone, tensile stresses arise, under the influence of which the bulge contracts.
To speed up the cooling process of heated spots, use air blowing on the panel or wetting it with water (in winter - with ice). Spot heating is carried out in a spiral, moving from the periphery to the center of the bulge (Fig. 36). If the bulge is not completely eliminated the first time, then the operation is repeated.
Rice. 36. Sequence of spot heating of the panel when eliminating a bulge
The efficiency of upsetting the bulge can be increased if, in parallel with heating, the direct forging method is used, i.e., tapping the bulge with an aluminum hammer.
The thermal method can be used to eliminate small depressions on roof panels, hoods, etc. - “hail damage”.
Using a gas burner, the panel in the dent area is heated in a spiral pattern, starting from the periphery and moving towards the center, until a temperature change in the color of the paintwork begins. Due to the expansion of the metal in the heating zone, the depression experiences compressive stress, its edges seem to break, and it rises above the general surface of the panel (Fig. 37). After this, the raised edges begin to be processed with a cold file, the teeth of which, cutting into the metal, intensively remove heat, which leads to the cooling of the metal ring around the dent and its hardening. The metal inside the ring, which cools a little later, also narrows, which leads to tensile stresses and stretching of the dent. The operation can be repeated several times. With the correct heat treatment mode, the painted layer on the other side of the panel is not damaged and the upholstery elements do not peel off. The time required to remove a dent is about 5 minutes. After removing the dent, the panel must be painted.
Rice. 37. Removing a spot dent using a thermal method
Elimination of small dents on the panel without the need for subsequent painting is done using a special lever-type device with a cable drive (similar to the principle of a bicycle hand brake). When you press the drive handle, a rod with a magnetic tip extends from the device body. The device is installed on the inside of the deformed panel and screw stops in the amplifiers, door stiffeners and other body elements are secured in this position. The fact that the retractable rod with a magnetic tip is located
strictly on the dent, judged by the position of a steel ball with a diameter of 0.5...0.7 mm, which is held by the force of a magnet on the outside of the panel. After this, pressing the handle of the cable drive, pushes out the dent, observing the glare of light on the shiny painted surface.
Preparatory work
To start the inverter, a connection to a standard electrical network is used. You must first check whether the electrical wiring is able to withstand the equipment load with an indicator of 16A. If necessary, the device is connected to the vehicle battery.
The inverter turns on step by step:
- a black clamp is connected to the negative terminal;
- the red clamp is connected to the positive terminal;
- additional elements are attached to the welding machine;
- the device starts in test mode.
If a 24 V network is freely available, you cannot work with a 12 V device on it. Only one device can be used at a time.
The car is cleaned of dust and dirt. If such a need arises, components that complicate the work are removed. The humidity level in the room must be reduced to a minimum.
Types of connections of welded elements
Before you decide how to cook correctly, you should find out what seams exist. The welded joints, which ensure welding of the car body, are divided into two types: butt and corner. Butt connections are the same type. Typically these connections are used when body repairs are made from uneven parts. In this regard, the weld can have a continuous or intermittent trajectory. For butt welding of parts through the gasket, welded electric rivets are used. They are:
- convex;
- normal;
- concave.
This is a spot welding method that involves making small holes in the part at a distance of 0.5-2 cm from each other. Through them the connection of elements is ensured. Sometimes the method can be used for lap joints.
Corner joints in a car are divided into three subtypes:
- overlap - the parts to be welded are located parallel and partially overlap each other;
- angular - the parts to be welded are placed at an angle relative to each other, and are connected at the points where the edges touch;
- T-shaped - one of the parts is adjacent to the side surface of another part with its end part.
If there is serious damage, body welding work is carried out using various methods of connecting parts.
Step-by-step instructions for welding the body
An inverter welding machine allows you to connect parts with a thickness of 0.8 millimeters. The maximum thickness of machine elements should not exceed 6 millimeters. Before welding the car body, it is necessary to determine the scope of work and close the parts of the body that will not be welded.
If welding is used to eliminate corrosion with your own hands:
- part of the metal damaged by corrosion is cut off, or the parts are completely removed;
- the edges along which the cut passes are primed;
- After processing using an inverter, individual pieces of metal or entire parts are welded.
If new elements are attached to the surface, welding with an inverter should be done using the electrode step-by-step method:
- the length of the seams is two centimeters;
- the interval between seams does not exceed six centimeters;
- After passing along the entire perimeter of the part, full welding is performed.
This system allows us to ensure high strength and rigidity of the weld. To process the seams after welding, you will need a grinder. If sanding and painting work is not carried out, the mount will quickly become unusable.
When welding in stages, you should take breaks necessary to cool the hot metal. The duration, depending on the thickness of the parts, can be several hours.
How to learn to weld metal with an inverter
Begin training by igniting the arc. To do this, in addition to the apparatus, metal (5-6 mm thick) and an electrode, you will also need a welder’s mask and leggings (thick leather gloves), as well as thick clothing and boots made of thick leather to protect against sparks and scale.
Start work by connecting the welding cables. Then the selected electrode is inserted into the holder (to start, take MP 3 with a diameter of 3 mm - they light easily and cook well). After turning on the power, set the welding current (see table). For an electrode with a diameter of 3 mm, the current is set to 90-120 A. The current can be adjusted during the welding process. If you see that the result is not a roller, but just some disjointed stripes, increase it. If, on the contrary, the metal is very liquid and it is difficult to move the weld pool, reduce it. The settings greatly depend on the device and the selected electrode. So try it, change it. Having set the current, put on a welder’s mask (it will be easier for beginners to work in a chameleon mask), and you can work.
General recommendations for choosing the diameter of the electrode depending on the thickness of the metal
Welding with an inverter for beginners begins with learning how to ignite an arc. There are two methods: tap the tip of the electrode on the part several times or strike it like a match. Both methods work. Whichever is more convenient for you, use it. But for the future, keep in mind that you need to scratch along the seam line so that there are no marks left on the product. To consistently strike an arc, you will have to practice for a while and burn several electrodes.
When the arc lights up without any problems, you can move on and master the movements. This is done by laying rollers on thick metal. On a metal plate, draw a line with chalk that will replace your seam. Then you strike the arc. In the place where it rests, the metal melts and becomes covered with a film of liquid slag. This place is called the weld pool. So you will have to move it along the drawn line. Do this with one of the movements shown in the figure above.
In order for the bath to move, the electrode must be tilted slightly, approximately at an angle of 50-45°. Some have a larger angle, some have less. In general, by tilting the electrode, you change the size (width) of the weld pool. You can experiment: there are a lot of different techniques in welding and the only important thing is that the seam is of high quality, and how you achieve this is your business, especially since you will be working for yourself and for yourself.
There are two main working positions of the electrode: forward and backward. When welding at an angle forward, we get less heat and the seam will be wider. This technique is used when welding thin metals . Thick ones are usually welded at an angle backwards.
Electrode positions for welding and their use
But the angle of inclination is not all the parameters that will have to be maintained. There is also the length of the arc. This is the distance from the tip of the electrode to the surface of the part. The average arc is 2-3 mm, the short one is 1 mm or even right next to each other, the long one is 5 mm or more until it comes off. Practice begins with working on the average length of the arc. Maintain 2-3 mm to metal. Then the seam will be smoother and of better quality: if the gap is too large, the arc begins to jump, the heating of the metal is insufficient, the seam turns out to be smeared, and the connection is unreliable. With a short arc, another problem arises - the seam is too convex due to the fact that the heating zone is too small. This is also not good, since undercuts remain - grooves along the seam on the part - reducing the strength of the connection.
The length of the welding arc and its effect on the quality of the seam
After practicing for some time laying beads using different movements, and when the beads are the same width and the surfacing flakes are approximately the same size, you can try welding the seams. You can read about the types of seams and joints, as well as their preparation, here, or you can watch another lesson, “Welding for Dummies.”
All the basics of welding with an inverter for beginners. All you have left is practice: you need to use more than one electrode for training. Even, maybe, more than one kilogram. When your hand makes all the movements itself, everything will seem completely uncomplicated to you.
To consolidate the acquired knowledge, first try to train your hand a little without an electrode, practicing movements while holding a pencil in your hand. This is also a good option, maybe it will seem more acceptable to you. This video tutorial on welding with an inverter for beginners explains everything very clearly, simply and easily. If there are any uncertainties, please review. You will understand how to cook using inverter welding. Lots of useful information for beginner welders.
And finally, about some features of the operation of welding inverters. They are very afraid of dust, especially metal dust. Therefore, it is advisable not to use an angle grinder near them and carry out regular cleaning with a vacuum cleaner inside (after the warranty period has expired). It is not recommended to use them in the rain or in damp areas. This is especially true for inexpensive household models. Although they have protection against electric shock, it is still better to be safe.
When choosing electrodes, pay attention to the area of their use: they must be suitable for direct current operation. When welding at the highest current or voltage, the operating mode is intermittent. It is indicated for each device in the passport.
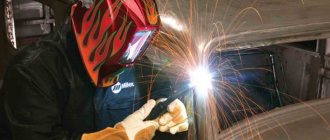
Means of protection
The welder working with the inverter must ensure his own protection while performing the task. This condition is met using:
- masks;
- gloves;
- fireproof overalls.
Protective equipment should cover the body as much as possible during welding. It is necessary to ensure that there are no folds or pockets on the clothing where hot or molten metal particles may fall.
Without protective clothing it is impossible to ensure a sufficient level of safety, so you should not take risks if there is no protective uniform. It is also recommended to have a fire extinguisher or a container of water in the work area in case of fire.
The car body is an important part of the vehicle, like other components or parts. The body is at risk, being a buffer in contact with the external environment - the inevitable mechanical impact of surrounding objects, other vehicles and objects in road accidents is guaranteed to lead to breakdowns and disruption of the shape of parts and loss of external attractive appearance. Don’t forget about the aggressive influence of the environment - moisture, dirt and salt cause corrosion spots and cracks. In all of the above cases, car body repair is required.
Welding of body parts
To eliminate damage to bodies as a result of an accident or corrosion, various welding methods are used (Fig. 38). The correct choice of welding method is important from the standpoint of weld quality and process productivity.
In modern welding technology (in relation to the automotive industry), the following welding methods are mainly used: electric contact, gas manual and electric arc. In the manufacture of passenger car bodies at mass production factories, preference is given to electric contact spot welding (about 80%) as the most productive for parts made of thin-sheet low-carbon steel, 15% of body parts are joined by spot and seam welding in a shielding gas environment and about 5%
– manual gas welding and hard soldering.
It is almost impossible to widely use resistance welding to restore bodies due to the characteristic damage, the very complex configuration of the supporting body components and difficult access to the welding sites. Therefore, in the repair technology of passenger car bodies, the main methods of connecting body parts and assemblies are manual gas welding and electric arc welding in a shielding gas environment.
Rice. 38. Methods for making welding seams, their types : a – T-joint; b – overlap; c – angular; g – butt; d – horizontal seam; e – vertical; g – lower; h – ceiling seam execution
Gas welding is used to tack panels to each other when assembling a body, applying brass solders in places where stress is concentrated and performing a number of other operations. The main disadvantages of gas welding are significant warping of the parts being welded, their overheating and the high complexity of finishing the surface. At the same time, the simplicity of the technology and the availability of the equipment used still determine the widespread use of gas welding in body repairs.
When repairing bodies by welding in a shielding gas, carbon dioxide CO2 is used as the latter (Fig. 39). And since it is not neutral, in order to reduce the oxidizing effect of free oxygen, electrode wire with a high content of deoxidizing impurities (manganese, silicon) is used. This results in a non-porous seam with good mechanical properties.
Rice. 39. Body welding using a semi-automatic installation : 1 – welding torch; 2 – power supply; 3 – protective gas cylinder
Regardless of the type of welding used, there are two ways to connect body panels and their fragments - lap and butt. Before welding, the edges are thoroughly cleaned and anti-corrosion treatment of the covered surfaces is carried out with special conductive pastes or primers.
When joining face panels with an overlap, their edges are pre-profiled and carefully adjusted so that they fit snugly against each other. Then the parts are fixed in this position with quick-release clamps and welded with an intermittent or continuous seam over the edge of one of the parts.
When joining panels end-to-end, their edges are welded without backing tape or with tape. When connecting without backing tape, the parts are adjusted so that the gap at the joint does not exceed one and a half diameters of the filler wire. Overlaying the edges of parts in this case is not allowed. After fitting and final fitting, the parts are secured with quick-release clamps. When joining panels end-to-end with backing tape, maintaining an exact gap between the edges of the parts is not required. The strength of the connection is achieved by covering the connection area with a lining tape 30...40 mm wide.
Since the possibility of using spot welding during repairs is limited, welding of a new panel is carried out using semi-automatic welding wire in a shielding gas environment through holes with a diameter of 5 mm, which are performed in increments of 40...50 mm with a special hole punch or by drilling along the edge of the panel fastening. This type of connection is often called an electric rivet. In cases where part of the panel is replaced, it is cut off with scissors, and the edge of the remaining part is molded with special pliers (Fig. 40).
Rice. 40. Joining a panel with a molded edge
Preliminary fastening of the panel to the body is carried out using special mounting brackets, clamps, etc. If the position of the panel being replaced affects the conditions for mating other body elements with it (trunk lid, hood, etc.), then the panel is first “attached” by soldering brass at 3...4 points using a gas burner. After making sure that the position of the panel on the body is correct, its final welding is carried out. After welding is completed, the beads at the welding points are cleaned with a grinding machine flush with the plane of the panel.
If necessary, to reproduce a connection made at the manufacturing plant with edges flanged by ..10 mm at an angle of 90°, one of the edges is perforated (holes are punched) and welding is carried out with electric rivets.
Welding of the load-bearing elements of the body (spars, racks, etc.) is carried out end-to-end, after which the seam is cleaned and reinforced with a sheet steel plate 1.5...2 mm thick. To make an overlay, a pattern is first cut out from whatman paper using scissors, the shape of which is adjusted to the location where the overlay is installed. Next, a blank of the lining is cut out from the pattern; if necessary, holes are drilled in it for pins or screws and holes with a diameter of 8 mm for welding (electric rivets). Using a metalworking tool, the workpiece is given the desired shape and welded to the body.
It should be noted that it is unacceptable to connect the two ends of a straight seam with points and then make intermediate points, since this causes expansion in opposite directions, which leads to deformation of the edges. Also, you cannot start welding from the edge of the part, since the edges diverge. Welding should begin from the inner (middle) part of the seam and proceed towards one of the ends of the part. Then the remaining part of the part is welded - from the completed part of the seam with gradual movement to the other end of the part (Fig. 41).
Rice. 41. Sequence of welding points : a – when applying a straight seam; b – formation of an angle by tacking with dots; c – tack of cracks and fractures; d – spot welding of a closed seam
Semi-automatic gas-shielded welding is technologically quite simple. The main tasks of the welder are maintaining a constant electrode extension, uniform movement of the torch along the seam, maintaining a certain inclination of the gas tip relative to the part and the direction of movement of the electrode. Several types of welding tips meet these requirements: for welding with a continuous seam, for spot welding, for welding studs used when straightening a car body.
The internal insulation of the tips allows welding even when they touch the part to be welded. Some modern gas tips have a special coating that reduces the adhesion of metal spatter to the inner surface of the tip. For the same purpose, special pastes and sprays are used, the regular use of which can significantly increase the service life of the tip.
The quality of the weld also depends on the degree of wear of the internal hole of the current tip. If the hole is worn out, the electrical contact deteriorates, which leads to arc instability and increased metal spatter. The current tip is the same consumable material as welding wire or gas. Insufficient welding wire feed speed or too low shielding gas flow rate leads to severe overheating of the tip and rapid wear. Insufficient gas supply to the welding zone causes overheating of the weld pool with possible burning of the metal, and excess gas leads to increased spreading and overheating of the peripheral areas of the weld with the occurrence of mechanical stresses.
When welding metal sheets with a thickness of about 1 mm, the gas flow should not exceed ..12 l/min. A standard cylinder in a small-sized semi-automatic machine is usually enough for one hour of continuous operation, which allows you to make a seam 40...50 m long.
The technique of semi-automatic welding in a shielding gas environment is built taking into account the following provisions:
- when the gas tip is in a vertical position, the metal is heated quite evenly, but at the same time it is difficult to observe the arc and small drops of metal from the welding zone fall onto the gas tip, which reduces its service life;
- When the electrode is tilted in the direction opposite to the direction of movement (at an angle forward), spattering is reduced. In this case, the penetration depth decreases, the seam becomes wider, and the likelihood of burning through thin metal decreases;
- when the torch is tilted in the opposite direction of movement
side (angled backwards) due to additional heating, the metal remains in the liquid state longer, the depth of penetration increases, and the width of the seam decreases. Welding vertical seams should be carried out at an angle backwards, directing the arc to the front part of the weld pool, which prevents the metal from flowing down, helps to increase the penetration of the root of the seam and eliminates leakage along its edges;
- when welding sheets of different thicknesses, the burner position is selected in which the exhaust gas is directed towards the more massive part;
- ceiling seams are made at an angle back to the maximum possible
currents. The arc and gas flow are directed directly into the liquid metal bath, which reduces its flow. For this purpose, gas consumption is increased;
- You can increase the mass of the seam by zigzag movements of the torch. You can put metal on top of an already cooled seam;
- when spot welding (with electric rivets), the position of the torch should be vertical;
- Each wire diameter has its own welding mode parameters (voltage and current). The welding current is proportional to the product of the cross-sectional area of the wire and its feed speed.
Fine-tuning the welding mode parameters comes down to adjusting the feed speed of the welding wire at an average voltage value taken from the reference book. Regulation ends when a stable arc is achieved. You can clarify the settings by analyzing the shape and quality of the resulting seam. The welder's experience plays a decisive role here.
The general rule for welding work in all modes is a reliable connection of the grounding cable to the body being repaired. The grounding location should be minimally distant from the welding site. In addition, reliable contact is required between the wire electrode and the first sheet, between the two superimposed sheets and between the second sheet and the mass. The amount of overlap depends on the thickness of the metal of the parts being welded - it should be equal to 15 thicknesses of the top sheet.
Semi-automatic welding machines provide high-quality seams in all spatial positions, which is especially important when repairing a car body. The quality of the seam is affected by the thorough cleaning of body parts from paint, rust and oil before welding.
When performing spot welding, the end of the torch with support legs is placed against the panel surface to be welded and lightly pressed to ensure tight contact between the parts (Fig. 42). The burner switch must be pressed and quickly released. The resulting arc melts the metal of the upper part, passes through it, then melts the metal of the lower part.
Rice. 42. Welding methods (a) and installation of the torch for spot welding along holes (b) : 1 – welding with a continuous seam; 2 – lap welding along holes; 3 – support legs of the gas nozzle
Due to the high quality of welding and the slight protrusion of welding points above the surface of the base metal, this method is effective for welding front panels, as it significantly reduces the cost of grinding surfaces at welding points. When choosing a pitch of welding points, the number of points with which the part was welded to the body at the manufacturing plant can serve as a guide. Welding is performed along the holes created by detaching damaged parts.
Electric contact spot welding, performed using special equipment, is the most promising when repairing car bodies (Fig. 43). Compared to gas-shielded welding, the parts being welded heat up less, which eliminates the need for preparatory operations (perforating flanges). The joints are almost invisible, which reduces the labor intensity of operations in preparation for painting. With electric contact spot welding, the quality of the metal in the joint remains virtually unchanged, which ensures long-term operation of the repaired body assembly.
Rice. 43. Manual welding pliers (a) and universal resistance welding apparatus (b) : 1 – trolley; 2 - external current source; 3 – spotter; 4 – balancer; 5 – flexible cable; 6 – welding pliers; 7 – replaceable electrodes
However, this type of welding also has a number of disadvantages:
- increased requirements for the cleanliness of welded surfaces;
- the need for a large set of replaceable special holders with electrodes to provide two-way access to various areas of the body;
- the need to provide the required compression force;
- The weight of the pliers for spot welding is quite large compared to the weight of the torch of a semi-automatic welding machine, which somewhat complicates welding work.
To obtain a welding point, well-cleaned parts to be welded must be overlapped, compressed with a certain force, and a current pulse of the required duration (0.01...0.5 s) passed through the contact point. In this case, a melt zone is formed at the contact boundary between the parts, which is called the core of the point. Upon completion of the current flow, crystallizing under the influence of compressive force, the core forms a strong connection.
The parameters of the welding mode that determine the strength of the welded joint include the diameter of the electrodes, current strength, compression force, and welding time. In addition, the quality of welding is affected by the pitch of the welding points and their distance to the edge of the sheet.
All parameters of the welding mode are set depending on the thickness of the panels being welded, their roughness and the mating edges being welded. Practice shows that with the correct choice of welding modes, after turning off the welding current, the surface of the thinner part being welded turns red for a short time. If redness persists for a long time, it means that the pulse duration or current intensity is too high.
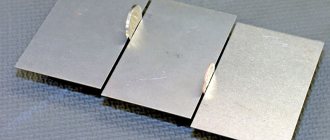
The quality of the welded joint is checked by testing the tensile point. If, when a point is torn off, a column of metal remains on one of the parts, the diameter of which is equal to the core, and on the other part there is a through hole, then the connection (at this point) is considered to be of high quality. To ensure guaranteed welding quality, before starting work, the welding machine is adjusted and the welding mode parameters are adjusted when performing test welded samples.
Even with a highly qualified straightener, it is not always possible to align the body panels well enough. In this case, at the welding site, the panels can be aligned with tin solder (usually 25% tin, the rest lead). Tin solder has good adhesion, does not peel off under the influence of vibrations and changing body temperatures, and protects
it from corrosion, i.e. it is a valuable material for body repairs. The tinning temperature of the body is in the range of 186…260°C. As a flux for soldering, a special paste or zinc chloride is used - “soldering acid”, which is applied with a brush to the tinning site after thoroughly cleaning it with a metal brush (needle cutter).
The body is heated with a torch for gas welding with excess acetylene (light blue flame about 5 cm long), the end of the solder rod is also heated with a torch. After heating the area of the body to be leveled, wipe it with a cotton rag, clearing it of flux residues, and solder is pressed against the depressions until all the depressions are filled with it. For uniform distribution and compaction, solder is leveled with a wooden block made in the shape of the body section to be leveled. It must be taken into account that too much heat will lead to solder dripping, and too little heat will not allow it to be smoothed out well. After the body surface has been given the proper shape, it must be cooled and leveled with a file, ensuring that there are no ledges at the border of the tinned area.
Requirements for welding a car body
Welding a car body is a labor-intensive process, be it arc, spot or other type of welding. In any case, it requires a high-quality welding machine for automotive body work and a highly qualified welder - only this combination guarantees a satisfactory result. Lack of proper experience and a good welding machine does not allow you to achieve an accurate and thin seam. Body welding work should be carried out in a specially equipped room, where there is a connection point to the network with the appropriate parameters of frequency, voltage and current, a gas source, etc. Welding a car body with your own hands is possible only in simple cases and for body repairs in places where the aesthetics of the seam is not so important.
A professional approach to body processing in an equipped service station allows you to obtain a weld seam with the necessary criteria:
- the type of seam is selected depending on the location of the damage;.
- taking into account the characteristics of the metal, the type of welding is selected;
- welding repair method - gas, manual arc, semi-automatic, laser - is selected individually in each case.
Resistance spot welding
Resistance welding has been the dominant joining method in automotive manufacturing and repair since the 1930s. Spot welding is carried out by pressing the electrodes of the machine firmly against the metal of the body and a combination of intense heat created by a very high current in a short period of time. The metal of the body panels is melted at one point and welding occurs.
The advantage of spot welding is the speed of action, the accuracy of the resulting weld points and the strength of the connection.
Modern passenger cars have from 3,000 to 4,000 weld points that connect individual body parts into one structure.
There are spot welding machines used in body repair, the electrodes of which do not need to compress the welding area. The force is applied to only one sheet of metal, and the second sheet touches the first sheet and is connected to the ground. Such a device is convenient to use when access to the reverse side of the metal to which another metal panel is welded is impossible.
Resistance welding points are often not protected from corrosion because the areas between the joined panels are susceptible to attracting moisture. This problem is aggravated by the fact that when exposed to spot welding, all metal processing elements, such as galvanized coating, evaporate at the hot spots. This problem is reduced by using a special welding primer between the panels being welded. This soil contains a high percentage of zinc. It is capable of conducting current. After exposure to spot welding, zinc ions protect the weld site.
What type of welding should I use to weld the body?
As stated above, the choice of which welding and which materials are suitable for welding a car body should be done by professionals, as well as which apparatus to choose to implement the process. The car body is made of low-alloy steels with a small titanium content or carbon steels with a carbon content in the range of 0.08 - 0.14%, and such steel, with an average thickness of about 0.8 mm, is excellent for stamping and is resistant to strong tension. As for the types of welding repairs, the specialist chooses from the following range:
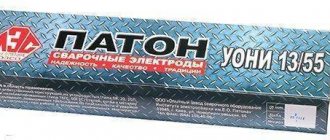
- manual arc welding using a multi-station welding rectifier of the “VDM 1202” type or its equivalent with electrodes with a diameter of 1.6 mm of the UONI 13/45 brand, the weld position is lower;
- gas welding of a car body is performed with a gas torch with an acetylene-oxygen flame and filler wire with a diameter of 0.8 mm, brand Sv-08G2S;
- semi-automatic welding of a car body is also in high demand - it will require a carbon dioxide cylinder and wire with a diameter of 0.8 mm of the Sv-08G2S brand. However, you can weld semi-automatically and without gas, using cored wire or flux-cored wire.
Car welding instructions
The procedure for restoring the body or other parts of the car depends on the chosen method.
Using the Electrode
This method is used when there are no high requirements for the aesthetic qualities of the seam. Choosing the right electrode for the type of metal helps ensure a strong connection. It is recommended to use inverter equipment that supports a stable arc. The reliability of the weld depends little on the experience of the welder.
To reduce the likelihood of joint deformation, welding work is performed in the following sequence:
- Create potholders.
- Apply short stitches in 5 cm increments.
- Weld the part with a continuous seam.
Semi-automatic device
To weld with such a unit, you will need copper-plated wire with a diameter of 1 mm, coarse sandpaper, a gearbox, and carbon dioxide.
The work is carried out as follows:
- The edges treated with abrasive material are installed as close to each other as possible. For fixation, self-tapping screws, bolts, and clamps are used.
- Set the required current strength and supply speed of the consumable material using the regulators located on the device body.
- The gas cylinder is equipped with a reducer and a hose. Unscrew the nozzle and remove the tip from the burner.
- Install a coil of wire into the apparatus. The free end is inserted into the feed mechanism. Place the tip on the wire and return the nozzle to its place.
- The polarity is set: the holder is connected to the plus, the burner to the minus. The opposite option is installed when using wire that is not coated with copper.
- Connect the unit to the electrical network. The burner is brought to the area to be treated. Press the button to start the supply of gas and filler material. To form a long seam, you need to weld 3-4 points. Next, stitches 2-4 cm long are made.
- Wait for the metal to cool, weld the distances between the tacks.
SAIPA-165
Inverter Features
The popularity of such devices is explained by their compact size, low power consumption, the use of new current conversion technologies, and an expanded range of modes. The unit can operate in a wide range of input voltages. The arc is excited quickly and burns stably.
Many people starting work for the first time wonder whether it is possible to cook a car with an inverter. The process is not much different from standard welding, but the seam is of lower quality - uneven, thick.
The metal overheats, which can cause it to become deformed. Inverter technology is used to repair hidden places, such as the bottom.
Is it possible to weld a car body with a welding inverter?
The inverter body welding machine with high frequency electric current is used to weld bumpers, additional frames, rear and front winches, bull bars and even fog lights if the customer wanted to place them on the roof of the vehicle. The basic advantage of welding a car body with an inverter is high speed - the work will be completed in the shortest possible time. The inverter has been actively used in the process of creating welds on a vehicle since Soviet times, however, only in areas of the body that do not make any claims to the aesthetic appearance. The resulting seams are reliable and durable, but only on metal with a thickness of over 3 mm. To obtain a high-quality seam with an inverter, it is important to carry out the procedure in a clean room - moisture and dust entering the housing will inevitably affect the quality of the seam.
Stages of preparation for welding
Finding out how to learn to cook with electric welding is not difficult, but using the acquired skills in practice is more difficult. First of all, it is important to understand that all work is divided into several stages, which include:
- selection of inverter and electrodes;
- preparation of equipment;
- welding work.
Selection of inverter and electrodes
The choice of electrodes has a direct impact on the quality of the result in the welding process. They differ in steel grade, coating, thickness, purpose and mechanical properties. Most often, the instructions describe which electrodes are recommended to be used during the work process, but there may not be such a clause. In this case, it is important to know the basics of their choice.
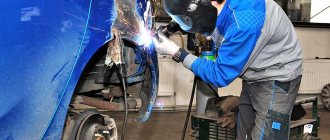
Semi-automatic body welding
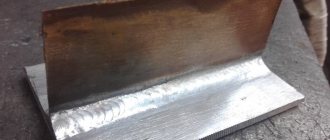
Which device to choose for underbody repair? A semi-automatic welding machine for body work is optimal for making patches on rust-affected areas of the body. Semi-automatic body welding is performed using a special wire and has deservedly received the title of the most universal means of body repair today. This method allows you to connect metal sheets with a thickness of 0.8-6 mm. Regarding the types of work performed using a semi-automatic machine, it is important to note the following:
- reliable connections on the side members;
- patches in place of corroding metal;
- restoration of the shape using a welding machine in place of ordinary dents.
In addition to connecting the parts, during the welding of the parts, the contact point gets rid of oxygen, and the car body gradually melts, but since semi-automatic welding of the car body is carried out under the control of the operator, the iron does not burn.
Which welding machine is best to choose for creating connections on any type of metal? Of course, this is a semi-automatic welding machine. Indeed, if you use argon rather than standard carbon dioxide for the welding process, then it is also possible to weld non-ferrous metals such as aluminum and stainless steel.
How to cook a car with electrodes and semi-automatic?
Semi-automatic welding with a welded electrode is considered the most acceptable type of equipment relevant for vehicle repair.
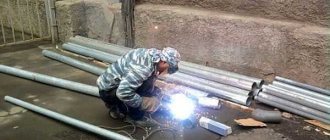
Carrying out welding work on a truck or car using a semi-automatic machine allows you to reach any corner of the car to create a weld without additional difficulties. This does not require in-depth knowledge of welding or experience in performing such work.
Table of characteristics of welding wire.
In technical terms, a semi-automatic welding machine is designed quite simply: it uses the same current converter as other types of similar equipment; only the current consumables are specific.
Welding with a semi-automatic unit is performed using welding wire with a diameter of 0.2-2 mm, as well as carbon dioxide.
Often the wire is coated with copper to ensure good electrical contact. And carbon dioxide is necessary to prevent oxidation processes, since it does not allow the molten metal to come into contact with oxygen.
Since the welding process of the machine uses carbon dioxide in a cylinder, the semi-automatic machine also requires a reducer to reduce the pressure. The optimal value can only be obtained if such a device is properly configured.
On a note! A semi-automatic machine for welding cars at a service station allows you to edit both the current strength and the feed speed of the welded wire. Therefore, it is possible to achieve precise adjustment of the unit, which in turn will make it possible to create almost invisible to the eye, but very strong welds on the surface of the vehicle body.
Sometimes service station workers or private owners use a special welding wire instead of carbon dioxide, which, although it does not have a copper coating, contains a special flux inside.
The powder allows welding of the exhaust system and car body without gas supply. It is impossible to use standard wire under such conditions, because it will burn without gas.
Separately, it is worth noting the welding work to eliminate defects on the car muffler. Only an experienced craftsman can perform this task using electric welding and only by spot welding without moving the electrode.
It is better for an inexperienced craftsman to weld car mufflers with an inverter. And if you plan to replace this part of the car soon, then more economical cold welding will suffice for a while.
Features of welding a car body with an electrode
Manual arc welding
allows you to weld thin-layer metal, but to obtain a neat seam you need not only a welding machine for body work, but also experience. If you have no experience using a welding machine yourself, you can only patch the rusted through areas of corrosion on the bottom - to perform such operations, you can take any materials, the main thing is that they meet the requirements for thickness and reliability. The rest should be left to professionals. This option for connecting metal parts is the oldest and most reliable, and at the same time the most versatile. Moreover, this option can be used for any spatial location of the weld, even in places with limited access. And the wide selection of manufactured electrode grades makes it possible to weld a wide variety of steels - both carbon steels of ordinary quality and high-quality steels with different contents of alloying elements. In this case, the quality of the seam directly depends on the qualifications of the welder, and in general the productivity is lower compared to other welding technologies, but the relevance of a manual welding machine with electrodes is not reduced due to the simplicity and transportability of such equipment.
For obvious reasons, welding a car body with your own hands is cheaper, but not of better quality, especially if the semi-automatic welding machine for body work leaves much to be desired. Having decided to choose a machine for body repair, a qualified specialist will take into account the chemical composition, the thickness of the metal, the location of the welded parts, so that the condition of the thresholds after welding will please the car owner for many years. Indeed, if you have a high-performance welding machine for body work and competent specialists in an equipped room, then it will not take much time to repair the body. So don’t skimp on your car and your own safety - entrust your vehicle to professionals who have everything you need for auto body work.
Features of welding work
The first thing a novice welder needs to do is to understand the very principle of connecting a structure, and then it’s just a matter of accurately following all the instructions.
First, you need to light an electric arc between the tip of the electrode and the surface of the part. To do this, the welder applies dotted or scratching movements with the electrode on the part. After several touches, a flash occurs, which indicates that the arc has ignited. In the zone of such action, the metal instantly begins to melt, so it is important to practice the movement and do everything as quickly as possible.
When performing electric arc welding, many specialists are faced with the fact that the electrode simply begins to stick to the surface of the metal. This problem occurs if the technician uses excessive force to press the electrode. All work should proceed easily and smoothly. To weld parts together, minimal contact of the electrode with their surface is required.
During the process, it is important to ensure that the length of the arc matches the diameter of the electrode. That is, hold and melt metal products as smoothly as possible, forming a high-quality weld, but this is not the only requirement. The quality of the seam is also influenced by the correct choice of polarity when connecting the ground cable and inverter. It is possible to choose the correct polarity only if you accurately determine the steel grade of the workpieces being joined. If there is no such data, then it is better to use straight polarity, which is suitable for most grades of steel. Reverse polarity connects only rare alloys, thick-plate structures and low-carbon products.
The design of welding equipment includes a wide range of innovative technologies that smoothly and efficiently regulate the current during operation. This greatly simplifies the work and makes it comfortable for novice welders, but why is it sometimes still not possible to achieve an even and high-quality seam? This is due to the movement of the electrodes or incorrect manual adjustment of the current.
When using low current, the seams are narrow and convex, which prevents good joining of parts. Setting a high current splashes the metal on the surface and thereby creates burns that spoil the appearance of the product. A thin and slightly flattened seam is an indicator of rapid advance of the electrode. A thick and blurry seam is evidence of a long advance of the electrode. The correct seam is obtained with the correct choice of current, normal and stable operating speed.
Any person, using general tips and rules, can understand how to weld correctly. There is nothing complicated about this if you follow the technology and properly prepare the equipment, site and special clothing before starting to join metal products. The main thing is to constantly observe safety precautions, and experience will come with practice.