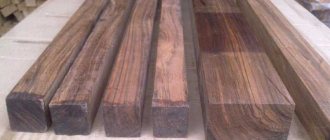
Inflatable wheels
In terms of time consumption, the second most attractive design after snow scooters and sleds is a homemade snowmobile made from a chainsaw on wide inflatable bladders from the wheels of a truck or tractor. For strength, a uniform layer of liquid rubber is applied to their surface or another flexible and waterproof material is glued. Chains are placed around the circumference at equal distances from each other across the chamber or crossbars are firmly attached to increase traction. Wheel rims can be used for bicycles , motorcycles, or made yourself.
Purchased or homemade
A homemade snow scooter has many advantages over a purchased one. Firstly, it's its weight. For the structure to move smoothly in the snow, it must be as light as possible, because the driver’s weight will also need to be added to it. Purchased ?Husky? it will weigh about 80 kilograms. This weight is due to the gasoline-powered engine installed on the snow scooter. A homemade snow scooter can be made, as we discussed above, using electricity. It is cheaper, lighter, more convenient and environmentally friendly. On the other hand, there are children's models that can support one adult. The weight of this design does not exceed 20 kilograms.
Purchased ready-made models, if not made in China, are of better quality. After all, if you are not a master mechanic, then a homemade snowmobile can have various disadvantages? either they didn’t calculate the thrust star, and it quickly “slipped”, then the speed of the snow scooter suffers, and so on. But constructiveness and quality imply considerable costs.
Please note the prices above, including the famous ?Husky?
We make a snowmobile with our own hands - it couldn’t be easier!
We make a snowmobile with our own hands - it couldn’t be easier!
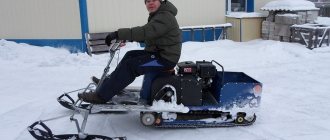
I made this snowmobile literally in a couple of weekends in the garage at the dacha. Although its design at first glance looks very simple, nevertheless, in terms of cross-country ability in deep loose or wet snow, it is not inferior to most industrially produced snowmobiles.
Several years ago, I built a snowmobile for my nine-year-old daughter with a homemade track made from conveyor belts and plastic water pipes as lugs. At first I had doubts about the reliability of such a track and how the plastic parts would behave in the cold. But during two years of winter operation, no breakdowns or severe wear of the pipes occurred. This inspired me to create a light snowmobile for myself with the same homemade track.
Understanding full well that the smaller the mass of the snowmobile and the larger the supporting area of the caterpillar, the better its cross-country ability in loose and deep snow, I tried to make the design as light as possible. The operating principle of the snowmobile is very simple (Fig. 1). There are four wheels installed inside the caterpillar, which, when moving, roll along a conveyor belt on which lugs are attached. And the caterpillar drive from the motor is carried out by a chain through the driven shaft using special drive sprockets. I took them from the Buran snowmobile.”
Read also: How to lose weight in your fingers
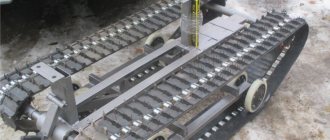
With an engine from a conventional walk-behind tractor with an automatic clutch with a power of only 6 hp. you won't accelerate quickly. I planned to ride the snowmobile not on compacted paths, but on loose snow, so I abandoned the soft track suspension and skis to reduce the weight of the snowmobile and simplify the entire design. First I made the caterpillar. A plastic water pipe with a diameter of 40 mm was cut into blanks for lugs 470 mm long. Then I sawed each piece lengthwise with a circular saw into two equal parts. Using the device shown in Fig. 2, I used a wood circular saw to cut plastic pipes for lugs lengthwise.
I attached the lugs to the conveyor belt with two 6 mm diameter furniture bolts with a large semicircular head. When making a caterpillar, it is very important to maintain the same distance between the lugs, otherwise they will run into the teeth of the drive sprockets and the caterpillar will begin to slip and slide off the rollers. To drill holes in the conveyor belt for mounting bolts with a diameter of 6 mm, I made a jig. The holes in the tape were drilled using a wood drill with a special sharpening.
Using such a jig, you can drill 6 holes in the conveyor belt at once to attach three caterpillar lugs. At the store I purchased four inflatable rubber wheels from a garden cart, two drive sprockets from a Buran snowmobile and two sealed bearings No. 205 for the caterpillar drive shaft. I asked a turner to make the drive shaft of the caterpillar and supports for the bearings. I made the snowmobile frame myself from 25x25 mm square pipes. Since the axes of the ski and steering hinges are on the same line and in the same plane, you can use a continuous tie rod without ball ends. Ski turning bushings are easy to make. I welded 3/4″ female plumbing couplers to the front cross member of the frame. I screwed pipes with external threads into them, to which I welded the bipod of the ski steering rack. I recommend using skis from the Argomak children's snow scooter. They are lighter and more flexible, but they need to be equipped with corners for attaching to the snowmobile's rotating stand and a metal undercut at the bottom - for better control of the snowmobile when moving on crusty or compacted snow. The chain tension is adjusted by moving the motor. Driving a snowmobile is very easy. When you increase engine speed with the throttle handle located on the steering wheel, the automatic centrifugal clutch is activated and the snowmobile begins to move. Since the estimated speed of a snowmobile is low (only about 10-15 km/h) and depends on the density of the snow, the snowmobile is not equipped with brakes. It is enough to reduce the engine speed and the snowmobile stops. I will share a few tips that may be useful when repeating this design. 1. I cut the pipe for the tracks lengthwise using a hand-held circular saw for wood, first on one side, then on the other. This makes it smoother than cutting both walls at once. It is more convenient to process small workpieces. If you immediately cut a long pipe lengthwise, then the plastic will melt and the saw blade will jam. 2. Caterpillars can be made of any width. And each designer has the right to choose what is more convenient for him: to make a wide but short track or a narrow and long one. Just remember that with a large caterpillar the snowmobile will be difficult to control and the engine will be more loaded, and with a small one it may fail in loose deep snow. 3. Some of my photos show that there are plastics installed inside the tracks.” These are guide stops for the slide, which should prevent the caterpillar from sliding off the rollers. But during the operation of the snowmobile, the caterpillar did not slide off the rollers even without slipping, so “barrels” can not be installed, which will reduce the weight of the snowmobile. 4. At the end of winter, I completely disassembled the snowmobile to determine its weight. The weight of its individual components turned out to be as follows: caterpillar - 9 kg; drive shaft assembly - 7 kg; two pairs of wheels with axles - 9 kg; engine and steering wheel - 25 kg; pair of skis - 5 kg; frame - 15 kg; double seat with posts - 6 kg. In total, everything together weighs 76 kg. The weight of some parts can be further reduced. Nevertheless, the weight indicator for a snowmobile with a track of this size is quite satisfactory.
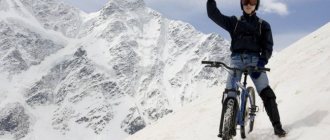
Bicycle with engine from trimmer
A homemade bicycle with a trimmer motor is a high-tech vehicle that differs from simple analogues in its high riding speed, practicality and reduced cost due to the use of cheap equipment.
To assemble a motorbike, the following equipment is required:
- the bike is in working order;
- trimmer motor;
- chain;
- tensioner;
- star;
- clamp;
- cable;
- fuse;
- controller;
- exhaust pipe;
- bushing, bolts, washers.
- 2 rubber spacers are attached to the rear wheel: the first - between the spokes, the second - behind them.
- The sprocket must fit the trimmer motor. It is inserted into the bushing, which is located on the outer part of the wheel. A crescent moon is attached to the inside.
- The engine is mounted on the trunk or behind the seat using a clamp purchased or made from a steel plate with your own hands.
- Install the chain on the sprocket and power unit and adjust it with a tensioner. It is not recommended to use belts instead of a chain. Under the influence of friction, they often become unusable and their service life is minimal.
- The throttle handle and the engine are connected by a cable.
- Attach the fuel tank and carburetor.
- The exhaust pipe is welded with a weld seam.
Some craftsmen create a braking system and replace standard wheel tires with non-slip ones. After assembling all the components, be sure to check the operation of the bicycle. The functionality of the mechanism and its own safety will depend on this.
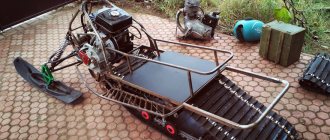
Motor sleigh
Motor sleighs are a foot-powered snow scooter or Finnish sled upgraded with a motor, or are made entirely from scrap materials found in the garage, or purchased at dismantling markets. Main components:
- frame made of metal pipes, welded in the image and likeness of a “finka” sled;
- a pair of old skis;
- engine and gas tank from a brush cutter, walk-behind tractor or chainsaw;
- a caterpillar, or a wheel from a car or motorcycle (a studded wheel from an Enduro motorcycle is excellent) and a chain, if the tire cannot be “tuned” with studs;
- a steering wheel for steering a sleigh, which can be a bicycle steering wheel, a steering wheel from a walk-behind tractor, or one welded by yourself;
- seat (optional): from a bicycle, scooter, or homemade in the form of a bench or stool.
The assembly should begin with the engine, connecting to it a chain, cables and tubes that will serve as the transmission of future snowmobiles. It is best to fix the skis on a low-moving, flat base - on the floor or table. Next, a frame with a steering wheel is attached to the skis, and a motor is installed. Before installing the seat, test the sled to ensure any imperfections are corrected. And the last place to put the seat, if provided.
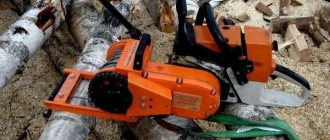
Chainsaw snowmobile
Even this option exists and craftsmen use the saw engine to create snowmobiles. With a minimum of tools and an understanding of the basics of building vehicles, this is not so difficult. True, you will have to work on the frame and propulsion, but everything else is provided by the chainsaw. The power of the chainsaw engine is quite enough to confidently push one or even two adults. After all, the working volume sometimes exceeds the volume of moped engines, and the two-stroke engine increases efficiency.
Metal frame
Of course, a metal structure is not as practical as a wooden one. The material is very expensive and heavy, and creating a snowmobile will be more difficult.
In addition, the disadvantage of metal is its cold surface, which must be covered with something in order to move in it. But there is one big advantage of this option - the durability of the finished structure.
To create a metal snowmobile frame, you will need some materials and tools. The tools include welding and electrodes, a hammer, a grinder, pliers, a set of keys and fasteners for the system.
As for the material, here you will need to prepare metal pipes, a metal corner, steel sheets and a channel.
Before building the frame, be sure to make a drawing here with precise dimensions. This will help you select the quantity and type of material as accurately as possible.
Using a grinder, pipes are cut and welded into a frame. Fastenings for all parts of the snowmobile will be made from the corner. You can make them from channel wood.
Only after this is everything sheathed with sheet metal. In order to make a snowmobile from a walk-behind tractor, it is necessary to provide a place to place the motor.
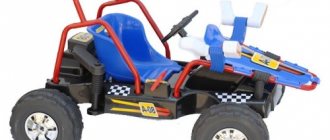
Model overview
Let's look at several popular children's gasoline models.
- Taiga RM "Lynx" . The first domestic unit of this type, designed for the smallest. This device will not carry more than 40 kg of load, and will not accelerate faster than 13 km/h. In fact, this is just a slightly improved sled, but at the same time very reliable, with a bunch of technical devices. The purchase will cost 80-90 thousand rubles.
- Yamaha SRX 120. Model from a manufacturer that has long established itself as an undisputed leader in the light motor vehicle industry. Everything here is done for the utmost convenience of the little driver - the mechanism is very easy to operate, has an automatic clutch, and even allows you to adjust the rear suspension. The quality and thoughtfulness of the unit are justifiably worth the 150 thousand rubles that are asked for it.
- SnowRunner Max 80. A budget snowcycle, the cost of which in domestic stores starts from a modest 40 thousand rubles. At a low price, it has a decent load capacity - up to 50 kg. According to the manufacturer, the unit is so easy to operate that it is suitable for drivers aged 4 years and older.
What it is?
At first glance, the design of a children's snowmobile is not too different from an adult's - there is a seat, an engine, and controls necessary for successful operation.
Technologically, certain very important points can also be highlighted here:
- the presence of a height-adjustable steering wheel;
- simplicity, safety and functionality of management;
- soft and smooth operation of the brake mechanism;
- limited engine power, which prevents strong acceleration;
- high stability associated with the location of the center of gravity in models at a low altitude from ground level.
A snowmobile for a child is generally similar to another popular winter device - a snow scooter. Only instead of a mechanical driving force, an electric or gasoline motor is used here. In addition, such models actively use various control options and more reliable brakes that can easily provide a quick stop.
The snowmobile itself is a vehicle designed to travel on snow. It is equipped with special runners that provide stability when moving on snowy roads.
Adjustment of the steering wheel in children's models is provided on an individual basis, which greatly facilitates the use of riding equipment for children of different ages.
All existing versions of snowmobiles produced for children can be divided into several categories, according to their technical characteristics and design features.
Children's snowmobiles with electric drive. They are equipped with a rechargeable battery that can maintain the operation of the equipment for a long time. They are environmentally friendly, low noise, and safe for children of all ages. When stored at home, such equipment does not emit harmful substances into the atmosphere. The battery is easy to replace after use. Such models practically do not require complex or expensive maintenance.
ATVs and all-terrain vehicles are a universal solution for any age. Recommended for year-round use. Hybrid solutions are equipped with a single chassis with replaceable modules. For example, the package may include wheels for summer driving. Rear tracks exist for use as an all-terrain vehicle. There are special skis required when operating in snowmobile mode. Hybrids are produced mainly in gasoline versions.
On gasoline. They are equipped with modern and reliable gasoline engines, are energy independent, but cannot be called environmentally friendly. Such models are recommended for use by teenagers and are equipped with quite powerful motor options.
Let's look at some features of battery and gasoline models in more detail. Electric, environmentally friendly models are most often developed independently or presented as a concept. Can be produced in limited editions. The batteries they use are usually powerful, similar to those installed in a car.
Maintenance-free solutions used in such an energy carrier minimize losses associated with electrolyte evaporation, which also contributes to a significant improvement in the overall environmental friendliness and safety of the equipment.
Gasoline children's snowmobiles are widely represented on the market in versions from well-known companies specializing in the production of motorcycle equipment. Such models are equipped with two-stroke or four-stroke engines and warm up easily and quickly even in the cold. The equipment's maintainability and ease of maintenance make them a good choice for winter skiing.
Gasoline snowmobiles for children typically use one of two types of cooling systems: air and water type. In the second case, the environment acts as a source of cold supply, namely fallen snow.
Brush and roller
The nozzle is indispensable for quickly collecting debris on the lawn. It sweeps it away without damaging the surface. Thanks to the high rotation speed of the working tool, cleaning efficiency increases. The nozzle is suitable for removing fallen leaves from the lawn, and special bristles can sweep away even small twigs and small debris.
What are they?
In the good old days, metal skis were churned out by the thousands and fitted to virtually every model, and on spring sleds the design of the skis was not particularly important. For many years now, manufacturers have partnered with various snowmobile parts suppliers, who are constantly developing new models of plastic skis with improved performance.
The use of high-tech plastic options allows the skis to flex to stay on track.
Some are suitable only for one specific model with the corresponding marking, while others have a more universal device for wide use. Efficient winter driving depends on proper design and provides improved handling in all conditions.
The weight of each plastic ski is about 2 kg, width from 130 mm, length from 1 meter. At the same time, the supporting area is about 1 m2, which makes it possible to demonstrate surprisingly high cross-country ability in powder. The thermoplastic from which they are made has unique properties, great flexibility and the ability to take on most of the load upon impact.
Ice screw
An ice drill made from a trimmer is a low-power unit for winter fishing enthusiasts, characterized by its low weight and easy transportation. In order to save money on the purchase of new equipment and the effort required when manually drilling ice, fishermen make them from old trimmers. For this you need:
- petrol mower;
- factory or homemade drill;
- improvised materials.
It is difficult to make an ice screw at home. The parts to pay attention to are the screws and the blade base.
To create augers you need:
- Calculate the sizes of product segments.
- Prepare metal blanks, mark, cut out a sector, weld the segments together. The result is a steel spring welded on one side.
- Stretch the spring by a given step on a special machine in order to weld the segments on the other side.
- Grab the flange and weld it to the pipe.
- Boil the screw connections and paint.
- When choosing auger rotation, take into account the direction of rotation of the gas-powered tool.
Converting a trimmer into a gas auger is suitable for units with a folding boom. The connection adapter is the easiest to prepare.
If it is necessary to increase the rigidity and stability of the mechanism, a durable frame is made to mount the gearbox and motor.
Motorized drills are units for making holes for installing wooden piles, laying foundations, and drilling wells. The operating principle and manufacturing method are similar.
How to make a motorized snow scooter
A snow scooter is used for its intended purpose: as a vehicle, for winter fishing, etc. A children's snow scooter with a motor can bring joy and fun to your child in the winter. Read on for more information about the structure and production of motorized snow scooters.
Snow scooter with engine? it's essentially a mini snowmobile. It has a similar structure, but is not intended for aggressive driving in deep, loose snow. Basically, you can move on it along a knurled straight surface. For traction with the road, a caterpillar or homemade structures are used. Such machines are controlled using a steering ski, and are driven by an internal combustion engine or battery. In the first case, fuel consumption is minimal? 1 l/motor hour.
Motorized snow scooter ?Stalker Ice? made in the form of a scooter with wide studded wheels. It moves with the help of a 42.6 cm 3 engine. There is also a seat for the driver. This pleasure will cost approximately 40 thousand rubles.
?Argamak-M? made according to a similar scheme, but has a more down-to-earth look. Maximum load 100 kg? quite enough for two children. It is also driven by a two-stroke internal combustion engine.
Snow scooter ?Husky? equipped with a Chinese engine similar to the Honda GX-200. An 80-kilogram structure with tracks costs about 56 thousand rubles.
Making a homemade snow scooter
A snow scooter consists of a frame, steering wheel, driver's seat, support and steering skis, but in order for it to move in a horizontal plane without outside help, an engine must be attached to it.
For the supporting part, a rubber wheel with lugs is usually used, which are fastened with self-tapping screws. Purchased snow scooters often have tracks installed (for example, the Husky). Since more than half of the rider's weight is on the wheel, the lugs should not dig into the snow, otherwise the snowmobile will turn poorly. If the lugs are sharpened and made too sharp, the snow scooter will, of course, move better on ice, but on snow it will be problematic. The main thing is that the structure moves forward both longitudinally and transversely. To avoid excessive traction, use only one support wheel? it will be quite enough.
Any sufficiently powerful electric motor can be used as a snowmobile engine for winter fishing. It could even be a regular screwdriver. For additional power, you need to use a separate battery, for example, from a scooter or motorcycle. To transfer traction from the engine to the lug wheel, two sprockets and a chain are used. To give the snow scooter agility and agility, you need to install additional metal guides on the front ski. In order to build a motorized snow scooter with your own hands, you can take a model without a motor as a basis and attach it yourself. On the other hand, you can make the frame yourself, but this requires more cost and time. [ads-pc-1]
Tips for using a homemade snow blower
Before starting work, warm up the engine and use seasonal lubricant.
Also follow some guidelines.
- Operate the snow blower at full capacity.
- Avoid unnecessary and frequent pressing of the gas, as this can damage the engine.
- Do not drive over hard obstacles or try to break up the ice.
Once all work is completed, the snow blower is cleaned and stored in a dry place. This will prevent it from breaking.
Operating rules
In general, the rules for operating children's snowmobiles are very similar to similar requirements for using ATVs. Without going into complex technical details, let's start with the fact that the baby will probably show great impatience when he finds out what kind of toy he was given. However, it is unacceptable to let him go on an independent journey before he masters the controls. The first step is to carry out a global briefing, which begins with the principles of correct seating: hold the steering wheel with both hands, place one foot on the near step, then the other is thrown over to the far one.
After this, you need to explain to the child that while riding he must wear a helmet and other elements of protective equipment.
It is also very important to keep both hands on the handlebars and both feet firmly planted on the footpegs at all times. You need to turn the steering wheel smoothly
Before setting off on the first trip, you need to clearly explain to the little driver the meaning of all the buttons and levers, make sure that he understands correctly and remembers everything.
The first training should take place in the presence of an adult, on a level surface, at a speed no faster than a human step - the severity of execution is best controlled by forced restrictions. An adult must literally follow on the heels of the vehicle. In the first lessons, smooth turns are practiced, only after mastering them can you choose more complex sites (with a slope or hills, with sharper turns and obstacles). The speed limit should be removed gradually, only after making sure that the child is responsible and demonstrates skillful control.
For a review of the children's snowmobile RM Taiga LYNX, see below.