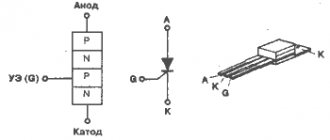
Description and scope of application
The rivet nut is an important connection element, which is used at different stages of the production of many products and structures.
It is difficult to do without such an important component element. Thanks to this fastener, you can get a permanent connection in a place where it is not so easy to reach, or it is impossible to disassemble the product into parts
To work in a small space, it is recommended to use just such elements.
The use of this fastener allows installation in a short time without much effort. Rivet nuts can be installed as individual parts or as a finished product. The product can be riveted on one side.
Of course, it is useful to have the appropriate equipment for installation. If you have a special riveter at your disposal, the job will be completed in a few seconds. Another advantage of using such a tool is that the materials being fastened will not be deformed. However, it is necessary to select the correct size rivets, taking into account the type and thickness of the surface that will be connected. Regular nuts are not suitable for fastening thin steel sheets as they are not as durable. Internal thread makes it possible to connect efficiently, firmly and for a long time. The diameter of the hardware affects the reliability of the nut rivets.
Often this element is used in the automotive industry when it is necessary to repair a vehicle. Disassembling the interior is inconvenient and time-consuming, so using rivet nuts is the best solution. However, the use of such fasteners is wide, since it has many advantages, excellent characteristics and its own characteristics.
Problems that may arise with the riveter
After the exhaust part is removed with the tool, it should fall out through the hole. However, after some time of constant use, you may encounter the fact that the exhaust part will get stuck inside the tool.
If blocking occurs, most likely the jaws inside the tool are misaligned. You will have to completely disassemble the tool and install the jaws in the correct position. After this procedure, the functionality of the equipment will be completely restored.
In the video, a home craftsman clearly demonstrates how to quickly and easily fix the problem of “biting” the rivet part:
We all know what a great thing threaded rivets are.
In some cases, there is no alternative to them. Until one certain time, I somehow managed without them. But one fine day a wonderful car came to me and needed window protection installed. Like this:
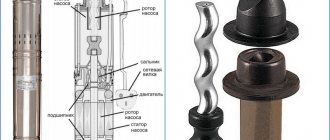
Then I started working on collective farms, and in the end I ended up with an unpresentable-looking device, but it was very functional, and with its help I installed more than a dozen rivets. The base is an M6 bolt, strength 8.8
This is what it looks like assembled, with the rivet installed
Main parts: M6 bolt. A piece of M12 bolt. More precisely, there was no bolt, no stud. A nut is welded on one side, turning it into a bolt. The stud is drilled through D=6.5mm. Then comes the nut from the UAZ stepladder. Strong. Next is the support bearing, the dimensions are not important. Next is a washer with a fitting from the brake pipe. It doesn't matter either. I installed what was there.
I think the principle of operation is clear. We drill a hole, under the M6 rivet it seems 9mm. We insert the device. Use one wrench to hold nut 1, and use the second wrench to unscrew nut 2.
As the effort increases, the riveting is completed. We twist everything back until it loosens, unscrew the M6 bolt, and install the next one.
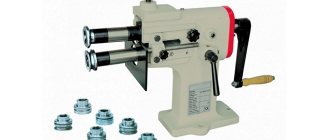
A practical and easy-to-use semi-automatic manual riveter for working with blind rivets can be made with your own hands if desired. At the same time, most of the components for it can be easily found in a workshop or garage.
A distinctive feature of this design is that it does not have a power lever, as on factory models - here a screwdriver acts as a drive. An electric drill will also work.
To make a homemade rivet gun, you will need a working bushing with collet jaws, a conical bushing and a spring, which can be borrowed from an old rivet gun. You will also need a head into which the rivet shank is inserted.
Types of rivets
For each type of rivet tool, only the same types of rivet fasteners are suitable.
Exhaust
A fastener that consists of two main parts. The first part is a hollow cylinder (rivet body) with through holes on both sides, and a shoulder (rivet head) on one side.
The body of the rivet is made of easily deformable metal. The diameter of the cylinder is the size of the fastening material. The second part is the rod (rivet core), twice as long as the rivet body itself. Made from high strength steel. The core extends through the entire body of the rivet and has a seal at one end called the shank head. The diameter of the rod head is slightly larger than the diameter of the rivet body. In appearance, the rivet shank resembles a nail.
Depending on their purpose, blind rivet fasteners are of the following types:
- Countersunk - the junction has a flat surface;
- Regular with collar - standard and most commonly used;
- Conventional ones with a large collar are used when connecting two materials of different softness.
- The enlarged collar allows the clamping force to be more evenly distributed on the joint surface and does not cause deformation of the material;
- Sealed rivets with gas-watertight housing. The name speaks for itself - used for airtight and watertight connections.
Threaded
However, like an exhaust hood, it consists of a hollow cylinder made of soft metal. There is a metric thread inside the body. Some types have a corrugated surface on the outside and on the shoulder. According to the shape of the body, rivet fasteners are divided into: round, hexagonal, corrugated.
A threaded rivet connects very thin materials where a pull-out fastening material would not provide a strong connection and resistance to vibration. This type of riveting is also used in places that are difficult to reach - ventilation and air conditioning systems, medical furniture, automotive parts and shelving.
The body of pull-out and threaded rivet fasteners is made of soft metals - copper, aluminum, an alloy of aluminum and silicon. The rods of the exhaust fastening material are made only of steel. The rivets are coated with zinc as protection against corrosion. If the parts are intended to be used in an aggressive external environment, then the rivets are made of stainless steel
How to rivet?
Before using a manual riveter, it is recommended to understand the structure of fasteners. It is for this method of fastening that rivets are intended.
The cylinder has a hole; it runs along the entire body, while also capturing the head area. Externally, the metal rod is similar to a nail, which has a rounded head. To insert into a cylindrical hole, we need a clamp. Next, the head is retracted until it stops.
The rivet helps secure it. It consists of a metal rod and a cylindrical tube - these are 2 main elements. There is always a head at the end of the tube.
Threaded rivets are relevant for manual pull riveters
It is important to consider that the rod has its own thread. It scrolls exactly until the cylinder is inserted.
Next, we’ll figure out step by step how to properly fasten aluminum and tubular parts with your own hands and carry out their installation. In order to attach rivets at home, you need a special tool. It's called a riveter.
There are 2 types of riveters - amateur and professional. Each of the tools has replaceable heads. They are needed when working with elements of different sizes that are used during fastening. The main difference is the price and the force required to press.
To correctly rivet parts, you need to adhere to the following algorithm:
- we apply markings to the parts that we plan to connect;
- Drill the necessary holes using a drill;
- Next you need to insert a rivet;
- the handles of the riveter are moved apart and a rod is inserted into it;
- then the handles must be squeezed until the rod breaks off;
- loosen the handles and check whether the rod is completely inserted.
To make an exhaust product, you can take almost any metal. It is necessary to approach the choice of material in such a way that there is no subsequent corrosion process.
When creating a rod, it is customary to use a steel base. It is characterized by high strength. Various options are allowed in terms of the size and length of the cylinder, it all depends on what the final purpose of such a product is. Before making a purchase, it is recommended to consider exactly what specifications you will need.
How to install a rivet, see below.
The procedure for installing a threaded rivet nut:
- Choose the right tool.
- Prepare your work surface by drilling a hole of the appropriate diameter.
- Screw the rivet (A) onto the threaded rod (B). If you are installing an open type rivet, the threaded rod should protrude 1 mm from the body of the rivet. If you are working with a closed-type rivet, screw the threaded rod of the tool into the body of the rivet until it stops.
- Adjust the tool head (C) until it fits snugly against the rivet threaded onto the threaded rod. Secure the head with the locknut (D).
- Insert the rivet into the hole and install it. During the installation of the rivet, a reverse head is formed.
- Upon completion of the installation process, unscrew the threaded rod of the tool from the body of the rivet.
- The rivet is installed. The resulting threaded hole is ready for use.
In case of installing a rivet with a countersunk shoulder, it is necessary to pre-process the hole with a countersink with an angle of 90°. Countersinking must be done in such a way that after installation the rivet head protrudes above the working surface by approximately 0.1 mm - this will ensure direct contact of the parts after assembly. If the material in which the rivet is installed is too thin for countersinking, use a rivet with a small shoulder.
How to assemble a tendril button for clothes?
In much the same way as a denim button, a button is installed on a tendril-type garment. The only difference is that all manipulations must be carried out only for the top part of the button.
The lower part of the part is much easier to assemble:
- To install it, you can buy a special tool with a recess inside in the store.
- If you do not have such a tool, then you can use a metal plate with a hole similar to the size of the “bump”. You need to insert the bottom part of the button into the hole of the metal plate, and “slam” the leg with a hammer on the back side of the clothing.
Adviсe:
If for some reason the buttons are not installed correctly, remove them and install new ones. Do not use damaged buttons, as they will not hold securely and will need to be replaced. To install a button on clothes at home, you can use the tools that are at hand: a Phillips screwdriver, a bolt, a thick nail, a dowel
To expand the cylindrical part of the button, you can use any cone-shaped device, and then use a bolt (cylindrical rod) of a suitable diameter to flare (attach) the button rod completely. Install the button on a smooth wooden surface, but be extremely careful not to break the button or destroy it. You can use a block of wood to install the bottom of the button if you don't have a suitable metal object with the right hole. Use a drill to make a hole in a wooden block (the diameter and depth should correspond to the male part)
Assemble the bottom of the button and place a block on top. Tap the part with a hammer.
Rivet nuts
At the ProfKrepezh company you can wholesale rivet nuts (rivet nuts, threaded rivets, rivet nuts).
The nut rivet is one of the new fastening elements, which has gained popularity and is widely used for its ease of installation, for its convenience and reliability when used in components of steel structures.
A nut rivet is a cylindrical, half-hexagonal or hexagonal body with an internal metric thread.
Purpose of a nut rivet
— to create a threaded detachable connection, one that can be easily disassembled and reassembled without disturbing the structure or its components (detachable connections include, for example, bolted, screwed, pinned, screwed, keyed);
- for use in components of steel structures, products for construction and general machine-building purposes, automotive industry, food industry, electrical industry.
Normative documents
A nut rivet is a cylindrical, half-hexagonal or hexagonal body with an internal thread for metric dimensions.
Threaded nut rivets should not be confused with blind rivets. Blind rivets are used to create a permanent connection!!!
The reason for such variety in names can be explained by the lack of GOST, ISO or DIN standard for nut rivets.
TU 1680-001-10702513-2019
Installation
It is made with a special tool - a riveter, which is used to install the rivet into a hole in the structure that is pre-drilled or punched with special equipment.
For reliable fastening, it is important to correctly make the mounting hole for the required type and size of rivet in accordance with the manufacturer’s recommendations
Particular attention should be paid to the thickness of the structural part into which the installation is being made. This is necessary for the correct expansion of the rivet (forming a “skirt” on the reverse side)
There are 2 rivet lengths: first and second length. The difference is in the range of thicknesses - smaller and larger.
The resulting deformed part (“skirt”) should be pressed tightly against the part, without gaps or distortions.
Next, a threaded rod or a regular bolt with a metric thread is screwed into the installed rivet with the required tightening torque, which directly holds the fastened parts of the structure together.
Advantages
Some of the main advantages of nut rivets are:
no need to further use: traditional bolts with a nut (especially an inconvenient option if there is difficulty in accessing the back side of the supporting structure - “blind” installation) or the use of welding, which requires the skills of a highly qualified specialist.
during installation, the pre-treated surface of the part is not damaged if it is coated or painted.
The result is a neat, aesthetic fastening point that provides a reliable connection, convenient and quick installation and dismantling of the attached structural element.
Rivet nut materials
Carbon structural steel with galvanic zinc coating for use in non-aggressive and slightly aggressive environments.
Corrosion-resistant (stainless) steel - alloy steel with a high content of chromium (at least 12%) and nickel for use in non-aggressive, slightly aggressive, moderately aggressive and highly aggressive environments.
How to install a button on clothes at home?
Of course, if you have the opportunity, then entrust the installation of accessories to a master who has a special press, various devices, a set of tools, and most importantly, experience, thanks to which such work will not take him much time. If you don’t have this option, or you want to find out for yourself how to install a button on clothes, then prepare the following tools:
- Awl.
- Hammer.
- Forceps.
- Punch. You will have to purchase this tool. It is necessary to ensure that the hole is smooth and the edges of the fabric do not fray.
Adviсe:
- Do not cut a hole for the block with scissors, as over time the button or block will definitely “fall out” of it. The hole for the button should be minimal, it is advisable to even slightly stretch the fabric over the leg, since the tighter the fabric is pressed against the part, the more securely it will be fixed.
- Punch a hole in leather or fabric using a wooden anvil (not metal) to avoid damaging the tip of the punch. The wood should be very dense (not loose). An area with a knot will do. You can use other dense materials as an anvil that will not damage the punch.
- Areas on knitted and bulk materials where holes will be punched can be glued with adhesive fabric so that the edges of the hole do not fray. You can also treat the edges of the hole with silicone glue.
Rivet installation process
It is necessary to work with tools carefully, slowly and without making sudden movements. Otherwise, the fabric, accessories or tools may be damaged.
The most common type of installation of accessories is the installation of a block on clothing. In workshops and ateliers, forceps are used for this procedure. However, such a tool must be purchased of good quality so that the handles do not bend and the “cheeks” do not move.
Don’t despair if you don’t have special forceps at hand; you can do without them at home. Use the following step-by-step instructions:
- Use a punch to make a hole of the required diameter in textile material or leather.
- Thread the block leg and put a ring on it.
- Place the piece of clothing with the block on the anvil.
- Use a punch to split the stem of the block into petals. If all the steps are done correctly, the petals should bend on their own on the block ring.
- Lightly go over the block with a hammer to finally secure it to the fabric.
When working, place the ring with the convex side away from you so that it repeats the convex shape of the edge of the block.
How to attach buttons to clothes?
The most difficult process is installing rivets on the rough fabric that outerwear is often made from. Difficulties also accompany installing rivets on jeans. But if you use a good tool and follow all the technological steps, you will probably be able to attach the button to your clothes.
You will need the same tool as when installing the block. Sometimes, special punches are included for this type of button, but using them is ineffective. It is much more convenient to use a punch that splits the stem into petals.
To make a rivet on a jacket or other outerwear, proceed as follows:
- Unbend the leg of the four-part button at the top and bottom.
- Carry out the standard riveting process (described above).
Peculiarities
Rivets are fasteners in the form of a sleeve or rod with a rivet head at one end and a head that closes during the rivet process at the other. Threaded rivets differ from blind rivets by the presence of threads. That is, they are hexagonal or cylindrical bushings with a supporting flange at the top and threads at the bottom. The upper part is made in the form of a thin-walled tube without threads and often has a longitudinal external notch. During installation it becomes deformed. The vertical notch on the top ensures uniform deformation and prevents tearing of the material.
The advantages of threaded rivets include:
- ease of use;
- strong bonding of elements made of fragile and thin materials such as sheet metal without deformation;
- the possibility of one-sided fixation if the total thickness of the parts being connected exceeds the length of the fastening element without loss of strength;
- maintaining the strength of the connection over time;
- mechanical and chemical non-aggressiveness;
- maintaining the integrity of the surface and paintwork;
- the ability to connect elements from different materials;
- absence of mechanical stress in the structure;
- Possibility of dismantling and reinstallation.
Despite the fact that nowadays, in most cases, instead of rivets, welded or glued joints are used, the fasteners under consideration have a number of advantages in comparison with them, which determine their indispensability in some assemblies. First, threaded rivets can withstand heat. Secondly, they do not cause structural changes in elements during installation, unlike welding, which is especially important when connecting parts made of different materials, the behavior of which can be unpredictable. Third, threaded rivets ensure mobility is maintained.
However, these fasteners have a number of disadvantages:
- installation is complicated by the need to pre-make holes;
- most threaded rivets do not ensure tight seams;
- installation is associated with a high noise level.
What will you need?
In order to make the body of a future rivet, various materials are required. For the production of rods, only hard metal is used - steel.
When choosing rivets, people usually pay attention to their characteristics. You should be interested in strength and how one part affects another
For durability, it is recommended to select rivets so that their type and material match each other.
Experts additionally advise taking a closer look at the length of the rivet. If the part turns out to be smaller than the thickness of the elements being connected, there may simply not be enough material to create a closing head.
There are a number of varieties of rivets on the market. Each of them has its own advantages.
- Classic ones are usually used for most types of fastening.
- Using threaded ones, reliable connections are created. This is especially true for parts that have thin walls. Typically, such a part is characterized by a countersunk or wide flange. There is a thread on the inside. There is corrugation on the outside, which increases the strength of the fit.
- Piston rivets are distinguished by the fact that at the end of the rivet there is a stamped conical recess. For the manufacture of the part itself, it is recommended to use exclusively soft metals. When the elements are connected, two caps are obtained.
- The rod ones contain a solid rod. It helps withstand intense physical activity.
- If traction ones are used, then they will not need to be held when riveting.
- Tubular ones have a kind of cavity inside the part. This type is most often used at low loads.
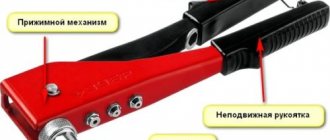
A riveter is a special tool, otherwise called “pincers”. It works similar to a pistol and is necessary in order to connect structural elements, as well as individual parts. The main condition is that the thickness of the product should not exceed 10 mm.
A mechanical gun helps to fix parts from their inside. The manual riveter has 2 parts. The first is the spring mechanism. Its main task is that it helps to pull such a rivet inside. The second is a lever system, which requires additional effort to use.
If you want to fix the rivet, you need to apply a pulling force. The most suitable option is a pull-out type of manual riveter. Retraction of the rivet rod occurs by applying force to the lever. The head of the rod seems to be bursting. In order for the parts to be firmly fixed, the elements on the outside must be flattened.
The work of a riveter with a threaded type is practically no different. It is necessary to remember the main rule - the ball is retracted in the working part, after which such a part is properly twisted. No extra effort is needed here. You should resort to twisting the handle only if there is a need to fix a part that is small in thickness.
Additionally, in specialized stores, you can find attachments complete with the gun. They differ mainly in diameter and tail length.
Advantages of using threaded rivet nuts:
- The ability to create a reliable threaded connection in thin sheet material.
- Installation is simple and does not require much time and effort (one-sided access to the working surface is sufficient).
- No deformation of the working surface or damage to the paintwork after installing the rivet.
- The strength of the established connection does not lose its properties over time.
- Ability to delete and re-establish a connection if necessary.
- You can buy threaded rivets in small quantities, test the installation and then select the fasteners of the required length to be installed in it.
The use of threaded rivets eliminates the need for welding, threading, and the use of additional fasteners and makes it possible to work with thin sheet material, as well as in places with limited access. That is why the threaded rivet technique is widely used in a wide variety of industries - from furniture production to the aerospace industry.
| 1. Bolt or screw for fastening a structural element. 2. Structural element 3. Working surface (one or more materials to be joined). 4. Reverse head (formed during the installation of the rivet). 5. Reliable internal thread of the rivet. 6. Closed (blind) or open end of the rivet. 7. Chamfer (makes it easier to insert the rivet into the hole). 8. Rivet barrel (smooth, hexagonal or grooved). 9. Thickness of materials being fastened. 10. Rivet head (cylindrical, countersunk or small). |
Overview of species
Nut or screw rivets are available on the market in a wide range. Each type of this product has its own characteristics and advantages, as well as scope of application. Therefore, first you need to understand the characteristics in order to make the right choice. Rivets are distinguished by their design, namely the internal thread, since it forms a closure belt during compression.
These products are distinguished by the type of head and type of thread. The M4 - 8 nut rivet has a permanent connection, so it is only suitable for conditions where movement is limited, if it is impossible to access the back of the part. The screw sample belongs to the category of collapsible rivets. The profile of the leg also differs between products - hexagonal and round. The type of collar can be open, closed, hidden, small or large, which should also be taken into account when choosing a fastener.
The hexagonal rivet is intended for fastening sheet profiles to each other. This nut looks like a sleeve with an internal thread. This element is an excellent alternative to welded joints, so you can fasten products with thin-walled material. Often used in the manufacture of furniture, electrical devices, air conditioning systems and the manufacture of metal cabinets. A blind nut is designed to create threads when using screws, studs and bolts. If tight fastening is required, it is better to choose this option. Thanks to standard sides, deformation of the base material is prevented, since the contact area is large. To install such a rivet, you need to drill a hole.
Cage nuts are used when there is no fastening element. If there is a hole, but no thread, this product will help out. However, this will require a special tool that is designed to work with blind nuts. The most common form of riveting nuts is cylindrical. This is a strong item that is easy to work with.
DIY riveter
If the installation of threaded elements is required due to duty or work, then it makes sense to purchase a factory product that operates by hand force or based on a pneumatic mechanism. In most situations, the installation of such rivets is rarely required, so you can assemble the rivet gun yourself.
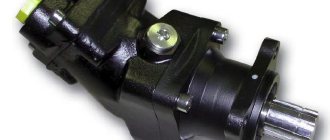
Bolt based
To assemble the entire structure, you will need a bolt similar to the one shown in the photo above. It can be taken from the crankshaft of a car engine. The diameter of the bolt must be such that a hole can be drilled inside it through which another bolt with a thread size that will match that used in the rivet will be inserted. The length of the second bolt must be at least 100 mm. The length of its thread should be as long as possible; if necessary, it can be additionally trimmed with a parallel tool.
Additionally, you will need a nut that will screw freely onto the thread of a bolt with a large diameter, as well as a collapsible bearing. The inner diameter of the bearing must be such that a long bolt, which will be used for clamping, can freely pass through it. The design is quite simple to assemble. To do this, you need to insert a long bolt inside a larger one in diameter. A nut is screwed onto the large bolt, and a collapsible bearing is placed onto the threads of the long bolt.
A rivet is screwed onto the long bolt and must be installed in the hole. You will need two keys to operate. One of them will hold the nut, and the second should rotate the bolt. You can simplify the task by welding a handle to the nut. The bolt rotates until the stop becomes significant. You shouldn't be too zealous. Once the result is achieved, you need to unscrew the long bolt. The bearing in this case is a stabilizer that prevents the bolt from biting inside the structure. There is a video about this riveter below.
Note! The disadvantage of this design is the need for several bolts for rivets with different threads.