A caliper is a tool for taking precise dimensions of various parts both outside and inside, measuring the diameters of holes, their depths, etc. They are used in various fields: repairing machine parts and various equipment, processing products from different materials, construction, etc. , when precise data is needed, down to tenths and even hundredths of a millimeter. This device allows you to make such measurements, unlike an ordinary ruler or tape measure.
Vernier caliper design
Understanding the design features of this device is necessary in order to understand how to use it correctly. The caliper consists of the following parts.
- Fixed bar or ruler (bar). It represents the basis of the structure. There is a scale on it.
- A movable bar that can move along the bar. This bar has a vernier scale. It allows you to get very accurate measurements, namely, it counts fractions of a millimeter.
- Upper and lower lips. These are moving parts that allow you to measure an object and find out the dimensions both outside and inside. When the jaws are perfectly aligned, the zero marks on both scales should exactly match.
- Locking or clamping screw. It is required to fix the bar.
- Depth gauge. A thin retractable bar that can be used to measure depth. Electronic measuring devices are also equipped with batteries and a mobile mechanism.
In addition, there are models in the upper part of which there is a movable inch measuring scale. They are easy and convenient to use.
Checking and adjusting calipers
Calipers, like any measuring instrument, can lose their accuracy due to mistuning, mechanical damage and natural wear.
The straightness of the tool, from the side surfaces and ribs, is checked with a straight edge for the absence of clearance.
There should be no light gap between the connected jaws of the caliper, and the leftmost mark on the vernier scale must strictly coincide with the zero mark on the rod scale. Falling a caliper, even from a small height, can cause the jaw to bend relative to the rod.
Checking tool straightness
Even the slightest bend creates an unacceptable gap between the jaws, leading to incorrect measurements. Such bends can be identified by checking with a curved square of an accuracy class of at least second.
Checking the serviceability of the sponges using light
There should not be a light gap between the square pressed to the rod and the measuring surfaces of the jaws, but as can be seen in the photo, there is one.
Identified bends can be corrected by lightly striking it in the desired direction with a copper tool. After each impact, a square check should be made for clearance. And so on until the perpendicularity of the sponge to the bar is completely restored.
The gap between the closed jaws is visible to the light
With the measuring jaws aligned and aligned, the leftmost mark of the vernier scale should coincide with zero on the rod scale.
The mechanically fixed vernier allows for correction through adjustment. Checking the cylindrical jaws for wear on calipers of the ShTs-2 and ShTs-3 types can be done with a micrometer.
Checking the clearance of the jaws for internal measurements on the ShTs-1 caliper will not lead to an objective assessment, due to the fact that these jaws can overlap each other.
They can be checked by measuring calibrated holes, which can be used as holes in new bearings.
With the jaws closed, the depth gauge must be strictly level with the end of the rod. The accuracy of the depth gauge is checked by measuring flatness, in which the measurement result should be zero.
Types of calipers
There are three main types of such devices. Their use for a certain type of work is determined by its characteristics.
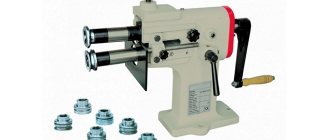
- Vernier or analog calipers. Measurements are made on a vernier scale. These power tools are simple and inexpensive. They are the most common.
- Dial or pointer calipers. To measure, instead of a scale, they have a dial that shows the results and does not require calculations. Their cost is higher than analog models. They are easy to use.
- Digital or electronic calipers. These are devices that have liquid crystal digital displays with rechargeable batteries. The use of such devices allows you to obtain the most accurate results. They show data in both millimeters and inches.
In addition to those listed, there are also models of special-purpose calipers. They are used for special jobs. For example, ШЦЦП, which measures parts with protrusions, or ШЦЦП - a design for measuring the tread pattern of tires, etc. These devices are not sold in regular stores; if necessary, they can be purchased on special websites. They are used by professional craftsmen.
All types of calipers have their own designations depending on the specific application.
- Vernier caliperSHTs-1. They measure parts, their external and internal dimensions using two pairs of sponges. It can also be used when measuring the size of a hole using a depth gauge.
- ShTs-1S. Such devices are equipped with arrow heads, making the measurement process simplified.
- Shtsk. Designs with a dial scale with a spring mechanism. It can be used for measurements when perfect accuracy is not required.
- SCT-I. Devices equipped with carbide-coated jaws to prevent surface abrasion. They are resistant to wear and can be used for a long time.
- SHTs-II. In addition to the jaws, such devices also have a mechanism for feeding the frame. Thanks to this, markings can be applied.
- SHTs-III. This device is large in size. The jaws on it are one-sided. Not suitable for depth measurement.
- SCC. A device with a digital scale from which readings are taken.
Each type of caliper is manufactured in accordance with the currently valid GOST 166-89 and is marked accordingly.
GOST 166-89 Calipers. Specifications
1 file 998.54 KB
How to measure an angle
To obtain a given angle when marking, you can use a protractor, which everyone became familiar with in geometry lessons at school. It is quite sufficient for accurate measurements in everyday life.
The photo shows a plastic ruler in the form of a triangle with angles of 45º and 90º, with a built-in protractor. Using it, you can mark and check the accuracy of the resulting angle.
When marking metal parts, a metalworker's square is used, which provides higher measurement accuracy.
Measurement order
Now let's talk about how a caliper works. Before you start using it, you need to prepare the device and the part being measured: clean the surface of dirt to ensure maximum accuracy. The jaws need to be brought together tightly and the size of the gap between them needs to be assessed. If the design is working properly, then it will be minimal.
Next, the movable frame must be moved so that its first mark coincides exactly with the zero mark on the rod scale. If this is not taken into account and implemented, the results will not be accurate. If you cannot match these marks, then the caliper is faulty and is not recommended to be used. Only after making sure that the structure is completely prepared can you begin to work.
Measuring external surfaces
When it is necessary to measure a linear dimension or outer diameter, the sequence of using the tool is as follows. First of all, the sponges need to be spread apart by moving the frame. And then press them tightly against the opposite surfaces of the part that needs to be measured, and secure the position of the frame with a screw. If the outer diameter of a cylindrical part is measured, then its axis must be exactly perpendicular to the plane of the frame. If the length of a part or product is measured, then its longitudinal axis should be located exactly parallel to the rod. These conditions must be observed when using a caliper, otherwise it is impossible to obtain accurate results.
Measuring internal surfaces
If you need to measure the diameter of the hole, the outer jaws must be set to zero. They must be inserted into the hole that needs to be measured. It is necessary to hold the caliper straight. Next, the jaws need to be spread all the way, so that they are pressed tightly against the inner walls of the part. Secure their position using the locking screw. Then readings are taken and the necessary calculations are made if a vernier caliper was used.
Depth detection
To measure the depth of the hole, you will need to move the frame and extend the depth gauge. Then insert it all the way into the hole so that the end touches the bottom. It must be positioned exactly perpendicular to the surface of the part being measured. Press against the wall. Move the bar to the end also until it stops. Using the locking screw, secure the position and remove the device.
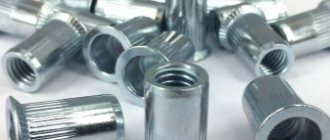
Measuring threaded connections
A caliper can be used to measure threaded connecting parts - screws, bolts, etc. Thread diameters are determined by the protrusions. For this purpose, the screw or bolt to be measured should be installed vertically and clamped with jaws. After this, it is possible to determine the necessary indicators.
If you need to measure the thread pitch using a caliper, this is done in the following sequence. First, the height of the rod and the outer diameter of the part are measured. And then the number of thread turns is counted. By dividing the length of the rod by the number of turns, you can get the thread pitch indicator.
How to measure a large diameter pipe
The caliper jaws, with a measuring range from 0 to 125 mm, are 40 mm long and therefore allow you to measure pipes with an outer diameter of up to 80 mm. If you need to measure a pipe of a larger diameter or if you don’t have a caliper at hand, you can use the traditional method. Wrap the pipe around the circumference with one turn of non-stretch thread or wire, measure the length of this turn using a simple ruler, and then divide the result by the number Π = 3.14.
| Online calculator for calculating the diameter of a pipe along its circumference | |
| Total winding length, mm: | |
| Number of turns: | |
Despite its simplicity, this method of measuring pipe diameter allows for an accuracy of 0.5 mm, which is quite enough for a home craftsman. For a more accurate measurement, you need to wind more turns.
Reading results
It is not difficult to read the results obtained using a caliper. On the fixed frame (bar), where the main scale is located, determine the integer number (mm). The vernier scale shows hundredths of a millimeter. You need to find a stroke on the vernier scale on the caliper you are using that matches a certain number on the main scale. This indicator will be the value of the part size in millimeters.
Vernier scale
It happens that when measuring, a whole indicator is sufficient. If you want to set the value more accurately, you need to inspect the vernier scale. And on it you need to find the point of coincidence of the two marks. The number on the vernier scale will indicate the tenth value. By adding it to an integer, the user will receive the exact value of the part size.
By hourly indicator
When using a dial caliper, the whole number in millimeters can also be seen on the main scale. As on an analog device, it is determined by the coincidence of marks on both scales. The number presented on the dial shows a value from 0.01 to 0.99 mm, this depends on the value of the scale division. A pointer or dial caliper is a more accurate device than a mechanical (analog) one. It should be used when it is necessary to obtain perfectly accurate data.
By digital display
High-precision (up to hundredths of millimeters) readings of the results obtained when working with a digital caliper are presented on the liquid crystal display of the scoreboard. It is necessary to remember that it has different modes that show measurement results in both millimeters and inches. Such devices are also equipped with a vernier scale. It can be used if, for example, the battery runs out.
Why do measurement errors occur?
The most common errors that reduce the accuracy of measurement results with a working instrument:
- Excessive pressure on the frame causes misalignment relative to the rod. The same effect is obtained if, when measuring with the lower jaws, the caliper is brought together by the upper jaws.
- Installation of jaws on fillets, chamfers and roundings.
- Distortions during positioning.
- Instrument calibration violation.
The first three mistakes most often arise from lack of experience, and go away with practice. The latter must be prevented at the stage of preparation for measurements. The easiest way is to set “0” on an electronic caliper: there is a button for this (in Fig. 6 the “ZERO” button). The hour indicator is reset by rotating the screw located at its bottom. To calibrate the vernier, loosen the screws securing it to the frame, move it to the desired position and fix it again.
How to properly store a tool
To extend the life of your caliper, it must be stored properly. To do this, you should use a special case. It is recommended to periodically wipe the surface of the device with a soft cloth to remove dirt. If used frequently, it does not require additional protective measures. If you use it rarely, then you need to treat it with machine oil. It is necessary to avoid exposure to moisture and sunlight and mechanical damage - impacts, scratches, etc.
Vernier calipers are a tool that is often required by professional craftsmen and amateurs. If you need to take measurements frequently, you will need to purchase such a device. When choosing the right model, the user should be guided by the specifics of the work, taking into account the design features and cost of such tools.
How to measure radius with calipers
Measuring with a caliper
When marking and processing parts, inspection and measuring tools are widely used. You are already familiar with the simplest of them - the measuring ruler. It allows you to determine the dimensions of parts with an accuracy of 1 mm. To measure with greater accuracy (up to 0.1 mm), a caliper is used. This is a universal measuring tool. It can be used to measure the external and internal dimensions of parts and the depth of the hole.
In German, a caliper (Stangenzirkel) is a compass for drawing circles and arcs of large radii. In German, a caliper is called Messschieber or Schieblehre - respectively, “sliding meter” or “sliding ruler”. A type of caliper equipped with a depth gauge is called “Columbus” or “Columbian” in professional slang. This name comes from Columbus, a manufacturer of measuring instruments; such calipers were massively supplied to the USSR under this brand. In the aviation industry, such calipers were called “Mauser”, due to the fact that high-quality calipers were supplied to the USSR
There are different types of calipers, they differ in the limits and accuracy of measurement. The figure on the right shows the ShTs-1 caliper. It consists of a rod with fixed jaws 1 and 2, along which a frame 4 with movable jaws 3 and 8 moves. The frame can be secured in the desired position with a locking screw. On the rod 5 there are divisions that form a millimeter scale. Its division value is 1 mm. The length of the millimeter scale is 150 mm.
An auxiliary scale called a vernier is marked on the movable jaws (Fig. on the left). It is divided into 10 equal parts, and the entire length of the vernier scale is 19 mm. This means that the length of each part is 1.9 mm. This value is the price of the vernier division.
When measuring with a caliper, an integer number of millimeters is counted on a millimeter scale to the zero stroke of the vernier, and tenths of a millimeter are counted on the vernier scale starting from the zero mark to the line that coincides with any line of the millimeter scale (Fig. on the right). The figure shows the position of the caliper scales when measuring dimensions: a – 0.5 mm; b – 6.9 mm; c – 34.3 mm.
Before starting measurements with a caliper, you need to inspect it and check for accuracy. To do this, you need to align the jaws of the tool. In this case, the zero risks of both scales must coincide. At the same time, the tenth line of the vernier must align with the nineteenth line of the millimeter scale.
The ShTs-II caliper (see figure on the left) can be used not only for measurement, but also for marking. With its help, direct marks are applied from strictly straight base edges or surfaces of workpieces, serifs are made, and circles are drawn.
A caliper is an expensive and precise instrument, so handling it carefully should be the basic rule of operation. Before starting work, wipe the caliper with a clean soft cloth, removing grease and dust (measuring surfaces are especially thoroughly cleaned). Do not clean the tool with sandpaper or a knife. You can measure only clean and dry planes of parts, without burrs, burrs, chips and scratches. The instrument must not be placed on heating devices or kept in the sun. Measurements should be taken with clean and dry hands.
When measuring a part, do not allow the caliper jaws to skew
Their position must be fixed with a locking screw. When reading the readings of the caliper, you must hold it directly before your eyes. The jaws of the caliper have sharp ends, so be careful when using it. The caliper should lie on the workplace so that it is convenient to use. There should be no shavings or sawdust on it. After work, the caliper should be wiped with a clean rag.
Below you can test your skills in using a caliper.
1.Choose a workpiece
2. Find the size on the caliper scales (on the right).
3.Enter the resulting value into the rectangle below and receive an estimate for your answer.
ШЦК - (caliper with a circular scale). In the recess of the rod there is a rack with which the head gear is engaged, so the readings of the caliper corresponding to the position of the jaws are read on the rod scale and the head circular scale according to the position of the arrow. This is much simpler and faster than reading a reading using a vernier.
ШЦЦ - with digital display (electronic) can measure with an accuracy of hundredths of a millimeter.
What tool do you need for each method?
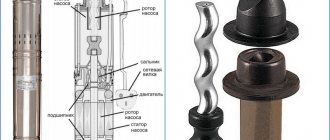
Before choosing the diameter of a heating pipe, or any other system, you need to know what is used in such situations.
well-known caliper is used more often for measurement than other tools. But, it may not be among the set of home tools. Therefore, we have to solve the question of how to measure the diameter of a pipe without a caliper.
It is also not possible to find out the exact dimensions of a product with a large diameter for heating or water supply using this device. In such situations, it is possible to measure the required length of the volume of the tubular product using simpler devices:
- flexible ruler;
- tape measure;
- knowledge of the value of Pi, which is 3.14.
If access to the network is not difficult, a better option for calculating the value would be a tape measure or a metal ruler. But, with a hard ruler it is easy to calculate the size of only the end parts of the line that is being measured.
Watch the video
How to measure the diameter of the riser
Another option for measuring the circumference of a pipe inside or outside is the copying method. In such a situation, for example, a ruler is brought to the pipe. This section of the highway is then photographed. Further measurements in order to obtain the entire set of necessary information should be taken from the photograph. Figures that correspond to reality are obtained after scaling the photographs taken.
In addition, you can find the diameter using the following formula:
D = L:3.14.
In it, D indicates the diameter, and L is the circumference of the tubular product. In a simple example it looks like this. The circumference of the pipe is 62.8 cm. This number is divided by 3.14. The result is 200 mm.
It's not just home plumbers who work with this formula. It is also used in production conditions, only in this case there is a slight amendment. The formula for the work remains in the same form, only the double thickness of the tape measure and the value of 0.2 are subtracted from the final result. This number includes a correction for the adherence of the tape measure to the surface of the highway.
Measurement by copying - photography
This method can be useful when there is no access to the pipe at all. It is suitable for both small and large diameter pipes. To scale, you will need to attach a ruler or any other large-scale object to the pipe, the dimensions of which are initially known. Then the pipe with the attached objects is photographed - and the resulting image will allow an analysis of the diameter of the pipe, based on a comparison of the sizes of a large-scale object for comparison.
Measuring labor using the copying method will allow you to determine the diameter of pipes located in hard-to-reach places.
In particular, this technique is used if it is necessary to calculate the dimensions of pipes in a car without the need to unload it. It will be possible to take just one photo and send the train on its way. Otherwise, it would be necessary to measure each pipe separately.
How does the ShTs-1 caliper work?
Barbell with millimeter scale. Fixed jaws are made together with the bar for measuring external dimensions, and another one for measuring internal ones.
Barbell with scale
The frame, which moves along the rod, is pressed against it by a spring installed inside.
Movable frame
Movable jaws, one of which is for external and the second for internal measurements, are permanently connected to the frame.
The vernier scale on the frame can consist of 10 divisions. For calipers with an accuracy of up to 0.1mm out of 20 divisions for instruments with an accuracy level of up to 0.05mm.
The vernier scale is located both on the frame itself and on a separate plate, which is attached to the frame with screws. This allows you to adjust the vernier scale relative to the rod scale.
Different division scale
A depth gauge connected to the frame is guided by a groove in the rod; it serves to measure the depth and distance of the ledges. The locking screw on the main frame is designed to secure it with the rod at any point of movement.
Depth gauge and locking screw
One pair of jaws has a narrowing of the measuring surfaces on the extreme part of its length, and the second pair along the entire length, which creates additional possibilities for measurements.