Angle grinder - homemade tools
An angle grinder, also known as an angle grinder, is an indispensable tool in the arsenal of any owner, used for cutting, grinding and polishing metal and wood. You can significantly expand the functionality of this tool with the help of homemade devices, which we will talk about in this article.
Bulgarian
The publication will discuss a homemade frame for an angle grinder, which makes it possible to turn an angle grinder into a full-fledged cutting machine from an angle grinder, as well as other simple designs that can be made at home.
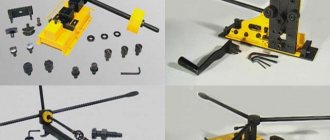
We modernize the grinder with our own hands - we make a cutting machine
The key advantage of an angle grinder is its mobility - it is a compact tool with an extremely wide range of applications. However, it also has disadvantages, including difficulties in processing loose parts, when cutting which there is strong vibration (which can cause destruction of the abrasive disc at high speeds) and the difficulty of maintaining the required dimensions of workpieces when cutting several structures of identical length.
The above disadvantages do not appear when the angle grinder is equipped with a cutting machine, which significantly increases the convenience of cutting both wood and metal. You can make such a machine for an angle grinder yourself, you will need:
- profile square pipe 40*40 and 20*20 mm;
- rectangular profile 40*20;
- metal corner 32 mm;
- bearings with a diameter of 32 mm;
- M12 studs;
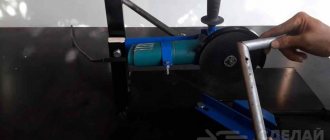
When assembled, a homemade machine for an angle grinder is a square frame made of a 40*40 mm profile, reinforced with crossbars. A rocker arm is attached to the frame - a mechanism that holds the angle grinder, which allows you to change the position of the tool in the vertical plane.
A homemade stand for an angle grinder is made according to the following algorithm:
The resulting homemade frame for an angle grinder is quite easy to use. You need to install the angle grinder into the seat, position yourself to the right of the tool, place the workpiece on the supporting frame and lower the adjustment lever with your right hand. The cut itself is made in the space between the transverse crosspieces of the frame.
Circular saw from a grinder
Making a circular saw from an angle grinder is even easier than making a cutting machine, since there is no need to perform a large amount of welding work. The following materials will be required:
- old table;
- metal corner;
- construction clamps or corner;
- screws, nuts.
Circular machine from angle grinder
Let us immediately note that a low-speed angle grinder (within 4-5 thousand rpm) or one with adjustable speed is needed here, since units with high speeds are not suitable for cutting wood - due to rotation, the workpiece will be torn away from the circular saw, which poses a danger to the machine operator. For cutting wood, it makes sense to use an angle grinder with a disk with a diameter of 150 or 180 mm.
Nowadays, handmade work is gradually changing its meaning. If earlier a handmade product was considered to be a product made with a hand tool, now a truly “hand” tool is being replaced by an electric tool, although at the same time it is also “hand” (tamed:))). We will talk about a device that should relieve the master’s hands a little.
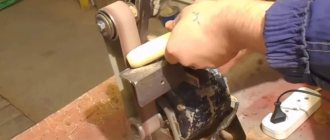
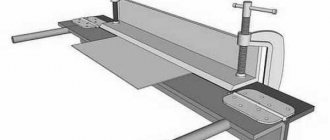
A lot of different tools have been invented, special, high-quality, well-thought-out. Of course, it is correct to use a tool specially made for a specific type of work. But not everyone can afford it, which is why “multi-tools” are held in high esteem. So, that's what we're talking about. To sand wood, I use a grinder with a Velcro disc on which various types of sandpaper are glued. Convenient for relatively large pieces of wood, and for small products I use a board with sandpaper glued on. But laziness is the engine of progress. I have long wanted to make some kind of attachment for an angle grinder to mechanize the processing of small parts. It took me a long time to get ready, but I finally got it together. Looking ahead, I’ll say that I spent about 40 minutes on all the work, including a smoke break.
For high-quality processing, a stop is required, otherwise it will not work smoothly. And as always, just when I was in the mood to do something, I remembered that I had given the welding machine to a friend for temporary use. But as they say, a bad dancer always lacks a welding machine, so I did everything the old fashioned way, without the use of welding. To make the console, I used ordinary scrap metal - a corner and a square pipe. And not waste - an M8 stud and, accordingly, nuts and washers.
We try on an existing piece of corner and mark the locations for the holes. One hole is for attaching the structure to the body of the angle grinder, the second is for attaching the thrust table. The entire structure will be attached through a pin screwed into the factory location for attaching the handle.
The second hole is oval in shape to allow adjustment of the gap between the grinding disc and the thrust table. I used a 30x30 square pipe as a support table. Any square or rectangular pipe will do. If then there was a welder at hand, I would take a piece of angle and weld a pin to it, but otherwise I would have to use a pipe, then it will be clear why it was a pipe.
Cut the pins to the required length. We estimate the length according to location. We stock up on M8 nuts and washers. The use of lock nuts is mandatory! Vibration and all that. That’s basically it, we’re putting the structure together. Everything is visible in the photo.
The machine is fastened in a vice. You don’t have to worry about the thread, in the place where it is clamped in a vice, it is not needed there. The photo below shows the gap between the disk and the table; the newer the Velcro disk, the smaller the gap can be set.
And now ATTENTION!
- For this design, use an angle grinder only with a speed controller, setting the speed to minimum!
- When operating the machine, do not be in the plane of the rotating disk!
- Use personal protective equipment!
- Do not use cutting abrasive or steel discs on metal or wood!
- Only use sanding discs at minimum rotation speed!
After testing, I slightly modified the design, adding another bolt for more secure clamping in a vice.
Well, a short video of work on this improvised machine.
I'm not applying for an Oscar!
You can’t do without an angle grinder—an angle grinder—either in a garage or in a private yard. The unit allows you to cut a metal profile, clean a weld or remove rust from the surface of workpieces and parts; it has a low price and incredible ease of use. The grinder also has disadvantages, one of which is the unstable quality of the cut and the danger of skewing the cutting disc during use. You can eliminate annoying shortcomings by making a special frame with your own hands, which will turn a hand tool into a real cutting machine. This will increase the speed of work and achieve accuracy that can only be obtained with industrially manufactured equipment.
Manufacturing algorithm
Considering that home machines will be interchangeable in terms of the type of processing, and the decisive role will be played by the attachment installed in the drill, we will consider two main options for home-made units - horizontal and vertical.
The procedure for assembling a vertical machine is as follows.
- Cut a square base 50 by 50 cm from a piece of metal or wood, with a thickness of 10 to 20 mm.
- Drill a hole in it exactly in the center at a distance of 1-2 cm from the edge for mounting the stand. The diameter of the stand must be at least 5 cm.
- Install the stand, center it using a level and weld it with a welding electrode. If you are making a wooden machine and the stand will be wooden, then firmly fix it with self-tapping screws.
- Using metal clamps, secure the drill to a movable element that will be put on the stand, forming a lowering/raising spindle.
Place the spring on the strut. Its length must be at least 2/3 of the rack. Having placed the drill on the stand, mark the place where the drill will hit when lowering the spindle. According to this place, cut two through hollows in the frame crosswise. A table is installed in the groove on the threaded pin on which the workpiece will be mounted. A nut is screwed onto the pin from the bottom side; it will fix the table in the desired position.
You can also attach the table to the pin from the outside with a nut, recessing it into the surface of the table so that it does not interfere with the placement of workpieces. It is important that after securing with a nut, the length of the outer part of the pin is flush with the top surface of the table.
The assembly algorithm for a horizontal machine looks like this.
- Cut a rectangular frame - dimensions are determined individually.
- At one edge, secure a seat for a drill with a hollow in the upper part corresponding to the size of the tool.
- Secure the drill to it with a clamp.
- Cut a through groove for the pin along the frame, and install two metal corners along the edges along which the pressure sleeve will move.
- The width of the pressure sleeve must exactly match the distance between the guide angles (runners). A threaded pin is screwed into it from below, which will move in the hollow.
- By moving the sleeve close to the drill chuck, determine the place where the special headstock will be installed for fixing the workpieces.
- Attach the headstock to the bushing with a metal cone-shaped pin placed in the center.
- The sleeve is fixed in the desired position (for clamping the workpiece) with a nut screwed onto the pin from below.
In both options, it is necessary to provide special adjustable legs for the frame.
If the bed rests flat on a workbench or table, it will become impossible to adjust and fix the clamping sleeve on a horizontal machine or the workpiece table on a vertical one.
Required tools and materials
When starting to manufacture a cutting machine, you should understand that the accuracy of its operation is directly related to the stability of the structure. Therefore, the choice of a material of a certain thickness is dictated not so much by the requirements for the strength of the body, but by the need for its rigidity.
Before you start working, you need to prepare:
- square profile pipe (25x25x2.5 mm);
- profile pipe “rectangle” (40x20x2.5 mm);
- metal sheet 4–5 mm thick;
- ball bearings No. 202, 203 or 204 – 2 pcs.;
- calibrated rod with a thickness equal to the diameter of the hole in the inner race of the bearing (up to 100 mm);
- rod with a diameter of 8–10 mm;
- metal tire (20x4 mm);
- bolts and nuts with M8 or M thread.
Tools you will need:
- Angle Grinder;
- drill or drilling machine, set of drills;
- a set of dies for cutting metric threads;
- open-end wrenches;
- welding machine.
The presence of electric welding is desirable, but not necessary - all connections can be made on threaded connections. However, it should be understood that this method reduces the reliability and strength of the structure.
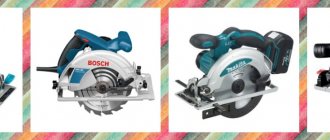
To make a machine, it is better to choose an angle grinder from a well-known manufacturer.
The main component of the cutting machine is the angle grinder. It is not recommended to use a “small” grinder designed for cutting discs with a diameter of up to 125 mm and a power of up to 500–600 W. Remember that the larger the diameter of the cutting wheel, the more versatile and reliable the machine will be.
The careful selection of power tools is also due to the wide variety of angle grinder designs available on the market. Since such equipment is not unified, the cutting machine is built for a specific model and size of angle grinder. If the equipment is unreliable, then if it fails, it will be difficult to install another angle grinder in its place without the need to rework the mounts and pendulum. That is why it is better to choose products from trusted manufacturers - Makita, Bosch and so on.
What you need to make a mini grinder
First, you need to familiarize yourself with the list of materials that you will need to make a grinder from a belt sander with your own hands. To create such a design, you need to prepare the following parts in advance:
- metal tape 3-4 mm thick;
- profile pipe with a diameter of 20 mm;
- bearing with an internal diameter of at least 7 mm;
- 14 mm nut.
Important! If necessary, you can add several additional profile pipes, which will increase the strength of the structure.
What is polishing
You need to understand that polishing a car body is a process of processing it using a certain technology, the training of which is advisable to undergo under the guidance of a specialist or at least become thoroughly familiar with it. To carry it out, in addition to skills, you always need to have a special polishing kit, you need to know what tool is needed and what consumables are needed. Polishing is desirable, and in many cases inevitable, for a number of reasons and is carried out in order to:
- restoring shine to painted surfaces that have aged under the influence of climatic factors;
- removing small scratches, fine dust particles, unevenness or paint smudges;
- eliminating dust and restoring the “gloss” on the boundaries of the repair of a small part of the body using the “spot” painting method to make the latter invisible.
Polishing also has a preventive value. The paintwork is quite easily and quickly covered with microcracks; when gravel gets in, chips form on it. The body metal becomes accessible to aggressive substances that cause a corrosion process that was initially hidden from view. Subsequently, its source grows and as a result, when it is discovered, it is already necessary to invest considerable money to eliminate it and restore the integrity of the paintwork.
Thus, polishing your car on time for the owner not only returns its external shine, but also protects itself from unplanned expenses in the future.
What is a grinder made of?
You can create your own belt sanding machine based on an industrial design, which involves moving the belt over the flat surface of the work table with the abrasive part outward. At the same time, the homemade device will differ from its branded counterpart in its larger size and stationary installation. For these works you will need an electric motor, for example, from a washing machine, a wooden or metal panel, chipboard, material for abrasive tape, glue.
Since a transmission in the form of a gearbox or belt drive significantly complicates the design of the tool in question, they try not to use it on homemade models. To do this, you can equip the device with an electric motor with a power of 2-3 kW with a rotor speed of 1500 rpm.
In this case, with a drive shaft radius of 10 cm, the belt will move at a speed of about 15 m/s. It should be taken into account that the design in question does not provide for adjustment of the belt rotation speed. However, it is possible to regulate the degree of tension due to the fact that the tension shaft, rotating on bearings to reduce friction, is mounted on a fixed axis, which can be shifted relative to the work table. The drive shaft is fixed to the electric motor shaft.
You can make a work table for such a grinding machine yourself from a wooden beam or sheet metal. It should be borne in mind that metal options allow you to process more complex objects. The dimensions of the working table of the tool in question are determined based on the dimensions of the belt and the distance between the axes of the shafts, as well as its purpose. Bevels should be made near the shafts in the work table in order to ensure smooth contact of the tape with it.
Drums can also be made by yourself. Chipboard can be used as the starting material for these elements. Squares with side lengths of 20 cm are cut out of the slab in such a quantity that their total thickness when superimposed on each other is about 25 cm. Then these blanks must be turned into disks with a diameter of 20 cm by processing on a lathe. You can process the cut fragments separately, but it is more convenient to grind them all at once, placing them on the axle and clamping them. It should be taken into account that the drums must have edges of a larger diameter in comparison with the central part to automatically hold the tape.
DIY grinding machine
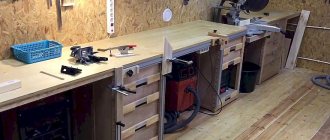
The desire to make wooden structures yourself is always faced with the need to equip your workshop with sawing and grinding machines. Modern manufacturers produce them in a wide range. Such machines have good performance and high reliability. The most important and quite significant drawback is their high cost.
Therefore, many craftsmen try to assemble a grinding machine from existing components. The most experienced ones try not to limit themselves to a machine capable of performing only one function; they immediately try to assemble a universal machine capable of performing several functions: cutting wooden blanks, grinding followed by polishing, removing old coatings and preparing surfaces for renovation.
Homemade grinding machine
This is possible because the basis of any home-made machine is a frame on which are mounted: an engine, drive and driven drums, a set of additional equipment (saws, cutters, grinding wheels, and so on).
Making a grinder from a grinder
Many may say that the “grinder” is the same as an angle grinder, but there are some subtleties hidden here. It should be borne in mind that the angle grinder has very high speeds and often quite a decent weight. To polish a surface with a grinder, you need to have considerable experience in this matter and use special polishing discs and circles. The grinder has much lower engine speed and weight. To operate a factory grinding machine, no specific experience or skill is required. You can independently make a good grinder from an angle grinder, which is not inferior in its parameters to a factory machine, only by modifying its electrical circuit, by installing the regulator at lower speeds and by using special grinding attachments.
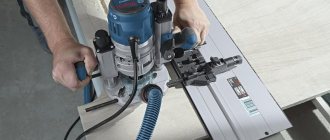
Multifunctional device - miter box
By making the work table for your angle grinder more rotatable, you will get a multifunctional device - a miter box.
This device allows you to work not only with wood, but also to cut profiles, baseboards, baguettes and other workpieces at a certain angle. To make such a part, you need to install the working disk on the grinder and fix the table at an angle of 45 degrees. It is worth noting that such a unit is considered a real salvation for those who need to cut a large number of window casings, skirting boards and glazing beads. A miter box in combination with an angle grinder allows you to work even with paving slabs in a diagonal direction. And this, in turn, helps to diversify styling options.
Types of polishes
You need to choose a product for your car that will not only give you a special shine, but also hide minor defects. You need to study the characteristics well and choose the appropriate type.
Polish is an emulsion or paste that has a long shelf life. Its composition, depending on its purpose, includes synthetic and natural ingredients.
- For mechanical processing, abrasive and restorative compounds and a polishing machine are usually used. This method helps to quickly remove a thin layer of varnish and remove small scratches. In addition, you can return the original color that the car had.
- Protective silicone and polymer polishes do not contain abrasive particles, since they can be used to mask abrasions and create an additional layer that will protect the car from ultraviolet radiation, aggressive acids and climatic influences. They can be applied by hand.
Synthetic and Teflon protective types can withstand up to 10 washes, while those created on a wax basis are washed off much faster.
The color of the car determines the choice of the desired polish, which has the appropriate shade. The kit often includes a soft sponge, but you'll need other tools to polish your car.
Safety precautions when working on a sanding grinder
Like any other work on any other machines, grinding on a homemade belt sanding machine is subject to fairly strict safety rules that must be strictly adhered to.
The principle of operation of the grinder.
These rules are as follows:
- It is strictly forbidden to touch anything that moves with your hands while the machine and working surface are operating.
- Wear safety glasses while working to protect against hot abrasive particles.
- Carefully check that the connections and fastenings of all moving parts of the grinder are tight.
- Monitor the condition of the braiding of electrical wires.
- A protective casing is a must, even though it slightly narrows the viewing angle.
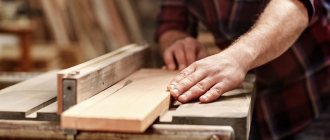
Sanding wood with an angle grinder
The modern market is flooded with various types of power tools, each designed for its own purpose. Purchasing expensive equipment is advisable in the professional field. In everyday life, you can use the same devices for different purposes and not spend extra money.
Thus, the so-called grinder is often used in sanding wood. Or an angle grinder, designated by the abbreviation angle grinder.
With the help of special attachments, a tool originally intended for metal processing is transformed into a wood grinder.
Will need
To make homemade products, we will need quite accessible and inexpensive materials:
- different metal (angle, profile pipe, strip);
- threaded parts (nuts, washers, screws, bolts, studs);
- tension and compression springs;
- bolt with plastic handle head;
- aluminum cable sleeves;
- bearings;
- enamel against rust.
Some operations can be done manually, but the work will go faster and easier if you have:
- grinder with cutting disc;
- drilling machine;
- welding equipment;
- drill with drill and countersink;
- square and pencil;
- caliper and tape measure;
- core and hammer;
- metal file;
- tap, screwdriver and keys.
Making a grinder from a computer hard drive + (Video)
Any old hard drive can be converted into a miniature grinding machine. To do this you need to follow these steps:
- completely disassemble the hard drive and remove from the case everything that is located to the left of the magnetic disks;
- cut out a working circle from sandpaper, make a hole in the center of the circle for the spindle;
- stick several strips of double-sided tape onto the rotating disk of the hard drive and secure it with sandpaper;
- make a protective screen to protect the eyes from the possible ejection of the manufactured sanding disc;
- connect the finished design to the power supply from the computer and use it.
Of course, this design does not have high power, but it is quite possible to sharpen a small knife or scissors.
Options for homemade designs
Making a grinding machine with your own hands is not difficult. The main thing is that it corresponds to the types of work that the master plans to perform. From an economic point of view, it is better to take components that are on hand. If you have to buy the components of the device, then the budget of a home-made device will be comparable to a factory model. All other things being equal, it is better to give preference to an industrial tool, because its quality is disproportionately higher.
Let's look at a few handmade devices. Perhaps one of them will suit you.
Do-it-yourself grinder from an angle grinder
As the name suggests, the grinder is designed for grinding. Cleaning discs successfully cope with rough work: removing old paint, removing metal deposits or traces of corrosion. For finer cleaning, special attachments made from sanding sheets of various grain sizes are sold.
Models for domestic use operate in one mode, and the number of revolutions reaches 15 thousand per minute with an average of 11 thousand. This speed is great for sawing materials, but it is too high for sanding work.
The grinder's motor has excess power. For polishing, 300–400 W will be enough.
A grinder made from an angle grinder will have more weight compared to a factory tool, but it is possible to adapt a homemade one for yourself, which will increase comfort when grinding.
For an angle grinder, you can make a simple attachment that will turn the device into a miniature belt grinder. In this case, work is carried out without a protective casing.
If you do not want to use devices, you can adjust the number of engine revolutions. Independent modernization of the circuit will require specialized knowledge in electrical engineering.
On professional devices, you can set the number of revolutions manually, however, their cost starts from $200.
Making a grinder from a drill
You can use a drill to build a productive belt sander with your own hands. In this case, the tool acts as a drive. The design itself is simple and does not require significant investment. To make it yourself you will need the following materials:
- metal rods with and without threads;
- profile pipe;
- plywood;
- steel sheet;
- bearings;
- hardware;
- wood glue.
You should make sure that you have metalworking tools, an inverter and devices for sawing metal.
Stages of work:
Manufacturing of pulleys. The driving and driven pulleys are designed to transmit torque from the drill to the grinder. They are made from plywood.
By changing the diameter you can obtain the desired torque. One pulley consists of several round timbers, which are connected using wood glue. In the center it is necessary to drill holes for steel rods. After the glue has dried, the workpieces are modified by making a groove that must correspond to the width of the drive belt.
Manufacturing of drive and driven shafts. They are also made from plywood, similar to pulleys. More round logs should be prepared for them.
Assembling the lower part. To do this you will need a profile pipe. First of all, it is necessary to make mountings for the bearings and connect them. This is the base for the working shaft.
Making the top part. The tension mechanism will be attached to it.
We make the thrust part from a steel sheet.
Drive installation
Please note: for normal work it is better to take a powerful drill. Finishing work. All that remains is to install the pulleys, tension the drive belt and assemble the protection
After this, the hand-assembled device needs to be coated with paint.
For small and precise work, it is better to purchase compact drum or plate type attachments, depending on the type of work.
Homemade grinder from a computer hard drive
From an old hard drive you can assemble a small grinding device, the main advantage of which will be the complete absence of investments, with the exception of the cost of abrasive wheels. The DIY manufacturing process is as follows:
- Open the case and remove all elements located next to the magnetic disk.
- According to the size of the upper part of the drive, cut out a circle of sandpaper of the desired grit.
- Using double-sided tape, secure the paper to the surface of the disk.
- We make a casing that protects from dust or abrasive grain.
- To start the design, the hard drive must be connected to the computer's power supply.
How to choose a tape?
The sanding belt is one of the main components of a homemade sanding machine. The main indicator of the quality of a sanding belt is the size of the abrasive grains. They are responsible for the quality of material grinding. Belts can be coarse-grained, medium-grained or fine-grained. The abrasive grains themselves are artificial minerals with a high degree of hardness. Also, the tape material should not be too hard. Such tapes are often prone to breaks. You can also use rolls of regular sandpaper for a homemade sanding machine.
So, you can make a belt sander from an angle grinder without any problems and quite quickly with your own hands. And considering the cost of ready-made grinding machines, making them yourself is quite a relevant and reasonable solution.
To learn how to make a belt sander from an angle grinder, see the video below.
The basic structure of a grinding machine
Without thorough knowledge of the design of grinding machines, it is impossible to assemble a high-quality device with your own hands. Before moving on to the structure, let's get acquainted with the most common types of grinders:
- Corner. Simply put, Bulgarian. Consumables are discs. Grinding wheels are designed for surface grinding. Pressure adjustment is carried out manually.
- Tape. Surface treatment is carried out with a sanding belt. Suitable for working on flat surfaces only.
- Delta sander. For processing products with a curved structure.
- Vibrating. Ideal for finishing smooth surfaces.
In addition to the above, there are several more devices that are less common:
- straight;
- polishing;
- eccentric.
Regardless of whether the device is factory-made or self-assembled, the main design elements are:
- Drive unit. The performance of the device depends on its power. Do-it-yourself devices use an electric drive, but there are pneumatic homemade ones powered by a compressor.
- Gearbox. Transmits torque from the drive to the working tool. The basic part of the gearbox is the spindle.
The gearbox is an integral part of tools such as an angle grinder or a drill. Some models, especially those assembled with your own hands, can do without it.
- Working platform. An abrasive material is attached to it. For this you can use circles, tapes, disks.
- Frame. Protects the structure from mechanical damage and dust, which is why many factory models are equipped with dust collection systems. The materials used to make a device with your own hands, as a rule, are not able to compete with high-quality polymers that are used in the production of professional tools.
- Control system. Includes turning off the power, as well as adjusting the abrasive speed.
How to grind with a grinder
We must not forget that sanding always involves a lot of dust.
When preparing for sanding, don't forget about yourself! A protective mask and respirator are the best assistants when grinding. You can also find an option where the mask is combined with a good respirator. The respirator filter will clog very quickly, so you need to prepare several pieces at once for prompt replacement. Only after thorough preparatory work can you begin sanding.
Sanding wood + (Video)
Wood is a unique material. It can be sanded quite well by hand, but with a grinder you can achieve very good results. Some snobs claim that you can’t grind with a grinder at all, but this is due to ignorance and inability.
The main secret is that the grinder is used at minimum speed. If the grinder has a speed switch, then there will be no problems. At high speeds, the sandpaper will become clogged with wood very quickly and very tightly. In this mode, it will not be enough for even five minutes of work. The optimal speed is no more than 6000 rpm.
Another secret is not to sand the entire area of the wheel. If you sand the entire surface, circular marks will remain on the wood. To ensure that there are no sandpaper marks left at all or that they are minimal, you need to sand only with the upper sector of the wheel. The movements of the machine should be along the grain of the wood.
Using this method you can get excellent results when sanding lining. The board becomes smooth and does not retain tool marks. Just don’t get carried away and change the sanding pads on the wheel in time.
The frame is polished in a similar way. Here it is desirable that the support plate is thin around the edge. With such a plate it will be easier to sand narrow junctions of logs. Otherwise, this work will have to be completed with a chisel.
We work on concrete + (Video)
If you were unable to purchase a branded protective boot with a nozzle for a vacuum cleaner, then you can make it yourself. To do this, take a used putty or glue bucket with a diameter slightly larger than the circle of the grinder. We cut off the bottom part at a height slightly higher than the assembled sanding part.
We cut a hole in the bottom for installation on the gearbox and a hole for the plastic plumbing corner outlet. Now we connect the vacuum cleaner hose to the nozzle and work quietly.
The grinding wheel must be designed for stone processing. It is preferable to grind concrete and concrete surfaces using the entire surface of the wheel. This will save processing time and level the surface well.
When grinding a concrete floor, you must constantly control the plane using a construction ruler, because due to the different densities of concrete, indentations can be made. To process the joints between concrete pours, it will be sufficient to achieve one level combination.
It is good to grind concrete floors and surfaces with a Matrix diamond grinding cup. If the grinder is 150 mm, then the cup is 125 mm.
Grinding metal surfaces + (Video)
The metal is polished to different requirements. Most often, the metal is ground for painting or for further polishing. The main tool is a support cup with replaceable sanding pads. The selection of sandpaper depends on the degree of processing and the condition of the metal.
When sanding, you only need to work with part of the disc. There should be no untreated areas left on the surface.
It is advisable to coat the treated surfaces of ordinary steel with a primer. Moisture in the air can very quickly coat the metal and cause rust.
Characteristics that a belt for a sanding unit must meet
Selecting an abrasive strip is an important step when assembling a mini-grinder with your own hands. First of all, you need to decide on the length of the tape and its width. The geometric parameters of the strip are influenced by two main factors:
- grinder dimensions;
- purpose of the unit.
Fabric base withstands surface tension better
Endless abrasive strips are also classified into grit types. The length of the sanding strips can be different (from 610 to 1830 mm). Such tapes have a width of 50 or 100 mm. The first option is most often found in units assembled by hand at home.
A high-quality abrasive strip must have an elastic fabric base
When choosing the right tool, you also need to pay attention to how many revolutions the strip can withstand. It is recommended to purchase products that can operate at 1500 rpm
This option is best suited for making a belt grinder with your own hands. The drawing drawn up earlier must contain information about the dimensions of the abrasive strip and its other characteristics.
A good tape must have high abrasive resistance. The wear resistance of the tape depends on this indicator. For homemade machines, it is recommended to use belts whose length is no more than 123 cm. The abrasive strip must not only be resistant to wear, but also have good resistance to high temperatures generated during friction against the workpiece during operation.
It is worth noting that short-length tapes are much more susceptible to wear than longer products.
Experts advise paying attention to pictures depicting finished products. Photos of the machines allow us to answer the question of how to make a grinder with your own hands
The design of the device can be significantly simplified if ready-made elements purchased separately are used in its assembly.
The speed and quality of product processing depends on the choice of tape.
And finally, special attention must be paid to the place where the abrasive tape is glued. The junction of the two ends of the strip should be as neat as possible, without any defects or protrusions
How to glue the tape for the sanding unit yourself
Belt grinders contain a spring, which performs a very important function: it tensions the belt that has sagged due to wear. The belt is changed several times even when processing a small workpiece. This should be remembered.
When assembling a grinder with your own hands from plywood or metal, you can make an abrasive strip yourself. Gluing such tape is a complex undertaking that does not tolerate mistakes. There is a lot of advice on the Internet on how to properly glue tape, but many of them are incorrect.
The gluing process is as follows. First you need to select a fabric-based sanding material. Then you should prepare both ends of the abrasive strip. To do this, they are cleaned. The seam on the strip is made exclusively using the butt method. Experts definitely recommend reinforcing the glued tape from the inside with a thick strip of fabric, which is fixed with a special adhesive composition.
Gluing tape is a complex process that does not tolerate mistakes.
In order to connect the ends of the abrasive strip, you need to purchase a special adhesive composition. The best option is to use elastic glue. There is no point in saving money, since cheap products, as a rule, are not of good quality.
Before gluing, it is necessary to prepare a strip for sanding tape. A do-it-yourself grinder (from scrap materials) needs a reliable abrasive strip, which is difficult to do at home. The process is carried out using a glue stick, which is installed on hot-melt guns. First, the composition is heated. To do this, you can use a regular hairdryer, which is found in every home.