Hi all! Do-it-yourself furniture made from profile pipes is on the agenda. I’ll say right away that today I will not give examples of step-by-step instructions with dimensions and drawings.
Even showing the process of assembling one chair from this material would require a lot of time and text. So let's start with the introductory material.
I propose to discuss the profile pipes themselves, as well as their strengths and weaknesses. And I will give a number of examples of what can be done with this material at your disposal.
Log bench
If eco-style or modern style was chosen to decorate your summer cottage, then an excellent option would be to use a single piece of wood to make a bench. But it’s worth noting right away that those who don’t have a large log will have to fork out more. Wood is not cheap, plus not every option is suitable for the job. It is necessary that the wood be durable, able to withstand difficult weather conditions, but easily yield to the hands of a craftsman.
Experts recommend using logs and stumps of oak, larch or pine for such purposes. From these species you can make not only original, but also durable garden furniture. Of course, the bark will come off quickly enough, but the wood itself will definitely last a long time. For greater safety, it is still worth carrying out additional processing. This will protect the tree from premature rotting and fungal development.
From high-quality logs you can make a reliable and very durable structure, which will not only decorate the local area or garden, but also make the landscape design original.
A huge advantage of benches made from a single piece of wood is that there will be a minimum of work. It is enough to place the log in the right place, and then cut exactly a quarter out of it. This creates both a seating area and a backrest. If desired, you can remove only the central part and leave the sides. This will create armrests.
If the master has wood carving skills, then this option opens up unlimited scope for the flight of imagination.
It is very important to carry out the highest quality treatment of the surfaces for the seat and backrest. If the bench leaves splinters, then there will be no comfort from such a rest
Finally, it is worth treating the wood with a special solution, which will preserve the bench for many years.
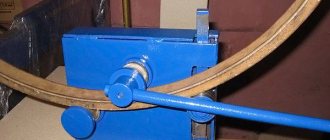
Bent structures
The frame of the bench is made of pipes bent at right angles in two planes, shown in the diagram.
To work you will need:
- Bulgarian;
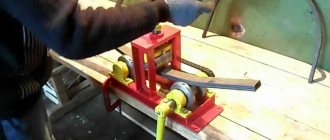
- pipe bender;
- duralumin/steel pipe Ø22 mm;
- measuring tool;
- screws/studs;
- wooden bushings.
The entire frame must be bent from a pipe of the appropriate length. This is done according to the measurements and sketch, and checked on the plaza, as in the previous case. If you have only short sections of pipes at your disposal, then they need to be bent in parts and then connected into a single structure.
The seat frame can be assembled from bars. In this case, it is attached to the frame with screws and corners. In exactly the same way as in the previous case, you can make a table/stool using this sketch.
To make a stool, bend the metal parts in the shape of the letter P. This is necessary for the back, and also the legs. The front legs and the frame for the seat are made according to the same principle as the bench - a bend is made in two planes. As in the previous case, you can use pipe sections, bend them in detail, and then connect them with bushings.
Simple combination bench
The front and back of the chair are connected by welding or screws/screws.
After making the frame, it needs to be processed and painted. So, you can create an imitation of forged furniture, which looks very beautiful and noble. To make a soft seat, screw plywood, previously covered with foam rubber and upholstered with furniture fabric, to the base with self-tapping screws. In the same way, make a soft back.
By increasing the length of the frame and soft parts, you will get a soft garden sofa.
If you master the manufacture of these simple metal furniture elements, then in the future you will be able to make something more complex using the appropriate sketches/drawings.
It doesn’t matter which option you choose for yourself, in any case the result will be exclusive. And furniture created independently will constantly delight the household, giving warmth, comfort and extraordinary beauty.
Drawings and dimensions
Metal benches are not only bought in specialized stores, but also made with your own hands.
It is quite possible to prepare the design and layout of a metal bench yourself; there is nothing complicated about it. However, many people prefer not to carry out such experiments and choose ready-made projects. In this way, it is possible to avoid many mistakes and shortcomings during the work process of creating a bench.
It is important to take into account the fact that the dimensional parameters of the future metal structure are selected strictly individually. There are a small number of rules that it is advisable to consider before starting work:
- the length of the bench should be determined at the rate of 0.6 m per person;
- the minimum width of the product should not exceed 30 cm;
- the back must have a height exceeding 30 cm;
- the angle between the seat and back can be from 105 to 120 degrees, so that it is comfortable to sit on the bench;
- the bench height parameter should be calculated in accordance with the length of the tibia, in most cases it is 38-45 cm.
If the bench is higher than 45 cm, then the legs of the people sitting on it will hang from it. If this parameter is less than 30 cm, then the knees will have to be bent at an acute angle, which has a bad effect on blood circulation and leads to an unpleasant feeling in the legs.
All the dimensions with which you want to make a metal bench must be included in the drawing of the future homemade product. Having a detailed work plan at hand will make it much easier for the craftsman to make the bench.
Required materials and tools
In order to harmoniously fit garden furniture into the surrounding design, it is recommended to give preference to wood. Unique products are made from branches, twigs, logs and trunks. However, not only this material is suitable for self-production.
When choosing the basics, you can show your imagination by trying to create unusual solutions for the site. When selecting raw materials for work, consider not only the overall style, but also practicality. It is worth highlighting several popular materials for decorating a personal plot with furniture of your own production:
- Concrete blocks - you can use them to make a reliable table, which can later be easily covered with patterned tiles;
- Flexible tree branches are used to make attractive chairs, rocking chairs and tables. It is convenient to relax on them in the summer heat under a canopy;
- Metal bases – metal will provide high strength, which cannot be said about wood. It is difficult to work with such raw materials; it must be connected using bolts and anchors. Pipes made of steel or duralumin are used for work;
- Useful materials - home-made furniture can be easily made from leftover raw materials after renovation, as well as unnecessary things, at no extra cost. This includes pallets, tires, and wooden cable spools.
The choice of material will depend on the preferences of the owners: if you want to create original furniture, you should give preference to non-standard solutions. If strength is the main indicator, choose metal. The tools that will definitely come in handy are a jigsaw, a drill, a screwdriver, a tape measure, a simple pencil, a hammer, drills, and screwdrivers.
Tools
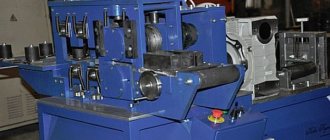
Installation from a profile pipe
To ensure that the garden swing is durable but does not look bulky, we will opt for a profile pipe with a cross-section of 40–70 mm and a wall thickness of approximately 1–2 mm. Its main advantages: resistance to fracture and any weather conditions, easy installation, light weight, strength, budget cost.
For installation you will need the following tools:
- grinder for working with metal parts;
- welding machine;
- level and tape measure;
- saw;
- Sander;
- hammer;
- screwdrivers, bolts and nuts;
- drill.
Don't forget about the appropriate tool
Blueprints
At the initial stage, an area for installing the swing is selected and the dimensions are determined. The most suitable size of a hanging bench is 1.5 m. This is enough for two adults riding.
According to the drawings of the garden swing, the design diagram from the profile includes the following elements:
- support frame in the form of a rectangle at the base;
- side elements made of iron pipes, welded together;
- horizontal crossbar for attaching a bench.
If the width of the base is chosen correctly, the product will be powerful and stable. The rule must be observed: the greater the angle at the apex of the triangle between the base and the side supports, the more stable the structure will be.
Frame
To assemble the frame, you need to start from the side parts. Based on the drawings, markings are applied to the pipes and cutting is carried out using a grinder. Before assembly, check the dimensions. All four side support elements must be equal. Next, they are connected in pairs by welding, resulting in two identical elements in the shape of the letter L.
The sharp end of the top of the pieces is sawed off at the same level in order to form a small support to strengthen the horizontal crossbar.
The width of the support must correspond to the distance that is formed between the paired pipes of the side structures. Using welding, the sidewalls are welded to the support frame, then a horizontal crossbar is installed on top of the side posts.
All stages of assembly should be carried out in compliance with the laws of geometry: the side supports are vertical, the horizontal crossbar for hanging the bench is parallel to the base. A building level is used to control all stages of assembly.
What do you need for work?
If your goal is furniture made from a profile pipe with your own hands, then you will need to prepare tools.
The main set includes the following components:
- circular saw for cutting;
- hand saw with blade for metal;
- welding machine;
- electric drill;
- metal drills;
- hammer;
- roulette;
- bit;
- screwdriver or screwdriver;
- sandpaper.
A rust converter, metal primer, as well as paint or varnishes will not hurt.
For those who are going to make furniture with curves, a profile pipe bender will also be useful.
Wooden grill gazebo for a summer residence with windows
The domestic climate - especially in winter - is similar to Finnish, so grill gazebos from Lapland have become very popular for installation in country houses. The Finnish grill house is a wooden summerhouse with windows and a barbecue stove. In the traditional version, this is a stylization of a Sami log house. It is closed, octagonal, with an area of 6 m2 and a height of 3 m. It can accommodate up to 10 people, and can be used all year round, because the room is heated.
Wooden grill houses look very solid and solid, and at the same time they feel a special atmosphere of comfort and warmth.
The usual material for the walls of such a gazebo is profiled timber. The house is insulated with mineral slabs, extruded polystyrene, wood fiber insulation, the interior is lined with clapboard or similar wood finishing materials.
Wooden gazebos are the most common and popular among owners of country houses.
The “heart” of the grill gazebo is the fireplace, the barbecue stove. Even at the stage of creating the foundation, a special area is allocated for it, where a reinforced foundation is laid (it is better to entrust this to a specialist) and a hole is provided in the roof to bring out the chimney.
Finnish gazebos have large windows, which make the structure lighter in appearance.
Windows give the building a more elegant appearance and allow people relaxing inside to admire the panorama.
Finnish gazebos are becoming increasingly popular in our country.
Important! Grill houses should be used in strict compliance with all fire safety rules: carefully monitor the fireplace during its operation, regularly check the condition of the chimney, and do not allow children and teenagers to operate the grill house on their own.
Overview of species
If we talk about shelves in the loft style in general, then they can be divided into closed and open options. In addition, shelves can have different shapes:
- rectangular - classic options, mounted on the wall;
- corner – suitable for small apartments, installed in corners;
- square - in the form of a mini-rack, while containing several niches at once;
- round - quite rare in the loft, they require careful consideration of the filling;
- designer - can have absolutely any shape, made to order.
We recommend: What is freon, composition, properties and technical characteristics table
Closed
Closed wall-mounted options are the most classic solution, familiar to many since childhood. Similar options were often found in Soviet interiors, where tablecloths, bed linen, and dishes for special occasions were stored behind closed doors. Closed shelves in the loft style are mainly mounted on the wall using bolts. They are considered quite durable and stable structures. In addition, the shelves can be combined, that is, they can contain drawers.
It is worth noting that shelves that completely hide the contents behind the doors are not welcome in a loft. For this style, it is important that the filling is visible, so it is recommended to make the doors from glass. The glass can be frosted or transparent (both options are acceptable). A huge advantage of closed shelves is the fact that less dust gets into them, so they do not require frequent maintenance. However, this design is quite heavy, and several closed shelves will make the interior cluttered, which is unacceptable for a loft. Closed TV shelves are usually floor-mounted. These are low structures that may include drawers.
TV shelves often have an elongated shape or are part of a furniture wall. Such solutions are rare in a loft, but they are not prohibited.
Open
Wall-mounted open shelves are an excellent solution for any loft-style interior. They look light and floating, but at the same time they do not “eat up” the space and show off all their contents. These are not only practical, but also decorative furniture units. Such shelves are very convenient in the kitchen, where any item should be within easy reach. They are also necessary in the corridor so that you can place the things you need to go out, for example, gloves, keys, business card holders, hats and umbrellas.
Hanging options can be used in the living room. They will be an excellent container for flowers, books, and various souvenirs. It is interesting that shelves in the loft style have many configurations: they can be multi-tiered, arranged asymmetrically, or consist of several block modules, which can be given completely unusual shapes, for example, a spiral, a rhombus, a triangle. An unusual solution would be vertical mini-racks, their design reminiscent of a ladder. Living rooms and kitchens often have wine racks with bottle holders. Like closed subspecies, open shelves can also be used for TVs. However, in this case, TVs must be mounted on brackets that will provide them with stability and prevent the equipment from falling and breaking.
List of tools
- Electric welding;
- Bulgarian (angle grinder);
- Jigsaw or parquet saw;
- Screwdriver;
- Belt sander;
- Malka, construction square for marking and maintaining corners;
- Clamps;
- Spray gun and brush;
- Trimming, circular.
The dimensions of the rack determine the consumption of materials.
Production and sale of wooden crafts - business features
Advantages and disadvantages of a business related to wooden crafts
- working with natural materials that are environmentally friendly and free of toxins;
- availability and relatively low cost of raw materials;
- unlimited number of craft ideas.
Legal aspects
To carry out work with wood, it is necessary to obtain permission from the fire authorities. To sell handicrafts, it is important to officially register with the Federal Tax Service. It is enough to register for self-employment if the monthly income does not exceed 200,000 rubles, and the annual income does not exceed 2.4 million
If you earn more, then you need to open an individual entrepreneur.
Start-up capital
- milling machine;
- carpentry workbench;
- electric chisel;
- engraver;
- axe;
- hacksaw;
- plane;
- jigsaw with universal use;
- cordless screwdriver, etc.
- carbon paper, with which the pattern is transferred to the product;
- glass paper, which may be needed for sanding;
- clear nail polish;
- special wood glue.
- machine-tool production of handicrafts - 120–130 thousand rubles;
- manual cutting - 25–30 thousand rubles.
How to make money on handicrafts
Original DIY kitchen
It is difficult to argue with the statement that a favorable atmosphere in the house largely depends on the quality of the kitchen and the ease of use, and experienced housewives will add that a good kitchen also saves nerves. Therefore, the question of how to make a kitchen yourself always remains relevant.
Choosing a factory-made, ready-made kitchen is not so easy. You may not like the design, colors, functionality, or the kitchen simply does not fit into the complex configuration of the room (corner room, etc.). Therefore, many people prefer to roll up their sleeves and start making the kitchen themselves.
The experience of a user of our portal with the nickname himch, who made a kitchen frame with his own hands from a galvanized metal profile, is interesting.
himchFORUMHOUSE Member
I started designing a kitchen by studying the subject. The kitchen consists of several main parts. This is the frame, drawer mechanisms, facades, countertops, built-in household appliances and equipment.
Those. the frame, in fact, is the base of any kitchen, onto which the remaining elements are then hung/attached. Therefore, the overall service life of the kitchen largely depends on the choice of frame material - the “foundation” of the entire structure.
The frame of a standard kitchen is usually made of chipboard or chipboard (chipboard or laminated particleboard).
DIY kitchen frame made of chipboard.
Not everyone likes “pressed chips” (in terms of durability and reliability), especially if a heavy stone countertop is to be installed.
In this case, there is another option for a “kitchen for centuries” - the construction of an original monolithic kitchen, which has been gaining popularity in recent years. But this technology, due to the presence of “wet” processes, labor intensity and the large weight of the final kitchen, is not suitable for everyone.
Looking ahead, let's say that the user wanted to install a granite countertop weighing about 300 kg. Therefore, himch, having considered all the pros and cons of various options, opted for a durable kitchen frame made of galvanized steel profile 42x42 mm (also called a mounting crossbar).
Such a kitchen frame is actually assembled according to the principle of a designer from factory-made parts.
At the first stage, you only need to cut the profile to the required dimensions.
himch
I decided not to save money and used the “brand” profile of a well-known company. One of the advantages of this profile, in addition to the quality of the steel, is that there are teeth on the inner surface of the profile, to which fasteners cling perfectly.
Also, a tooth pitch of 1 mm determines the accuracy with which the frame can be assembled. Another advantage of this frame profile is that for assembly you only need to use a set of conventional tools - a wrench and a metal cutting saw.
During the assembly process, any element of the metal frame can be easily unscrewed, moved, or moved, which greatly simplifies installation.
Having chosen this option, we first calculate the frame parameters, which depend on the size of the purchased facades. Built-in appliances are produced in standard dimensions, which (as well as the dimensions of the facades) can be viewed on the manufacturer’s website.
Do not forget that the built-in oven is mounted inside the frame, on supports, and the dishwasher is simply placed inside the frame like a cabinet.
Only after estimating where and how the household appliances will be located, as well as calculating all the dimensions of the kitchen, height, depth and other parameters of the frame, do we proceed to cutting the profile.
For the functionality of the kitchen, Himch recommends always installing drawers in the lower part and installing a door only in one place - under the sink.
Go ahead. Having cut the profile, we proceed to assembling the frame, which consists of two frames - rear and front.
DIY kitchen frames.
himch
Vertical profiles divide the frame into sections and also serve as support for horizontal connections between the frames, to which the drawer mechanisms are screwed. To ensure spatial rigidity of the frame, I attached the rear frame to the wall.
The next step is to set all parts of the frame strictly level, guiding the vertical profiles in increments of 0.6 and 0.9 m (in accordance with the developed project for this kitchen).
According to the user, thanks to high-quality fasteners, the frame turned out to be very rigid even without horizontal connections, only due to the fact that it was screwed to the wall.
Having assembled the frame, we proceed to installing household appliances. Himch installed the dishwasher first.
A separate module was placed under the machine and secured to the vertical posts using 2 metal corners.
The oven was placed on shelves made from two profiles, placing a tin screen on them, which came with the oven, and the equipment was secured on the front side with four self-tapping screws.
After the equipment has been installed, we move on to the third stage - installation of drawer mechanisms.
himch
To save time, I decided to make the boxes from chipboard.
To do this, at the place of purchase, right in the construction hypermarket, chipboard was cut to size for the bottom and back wall of the boxes.
The user did the edge edging using an iron. After the drawers were assembled, the retractable mechanisms were screwed to the profiles using self-tapping screws and a metal drill.
The following photos clearly demonstrate how the assembly was carried out.
We fasten the brackets to the vertical posts using the provided holes.
We attach horizontal connections to them with screwed retractable mechanisms.
We insert the boxes.
At this stage, it is necessary to carefully align the profiles with retractable mechanisms, because a slight deviation from the horizontal will cause the drawers to close tightly or become skewed. To set everything to 0, the user used two bubble levels and a laser level.
himch
I can say that working with a metal frame is very convenient. Everything is easy to adjust, nothing can be broken. After tightening the screws, the retractable mechanisms are firmly fixed.
We will also say that at first, when opening and closing the drawers, the noise from the operation of the mechanisms was transmitted to the metal of the frame, but after the facades and tabletop were installed, this unpleasant effect disappeared.
To make it easier to adjust the profiles in depth, himch used this trick - he cut the traverse 2 cm shorter than necessary.
This gave me greater freedom of action.
After aligning all the drawers, we proceed to the installation of the facades. To simplify the task of marking, we purchase special templates that we install on the boxes in the places where the facades are attached.
The feature of the template is sharp steel protrusions. We apply the front to the box, lightly hit it with our fist, and on the inside there will be marks/places for installing fasteners. Next, we screw the fastener to the facade, press, press and snap it into place.
We proceed in the same way with the remaining facades. At this stage of work, the kitchen began to look more like a finished product.
We are reaching the finish line - installing granite countertops.
At the very beginning, we mentioned that the tabletop weighs almost three centners. To prevent it from cracking during further use due to possible misalignment (since the area of support on the metal profile of a brittle material is small, and deviations of the supporting surface from the horizontal are possible), himch did the following.
himch
To attach the aquapanel, I did not use screws, but simply glued it. The sheets were glued end to end. The glue should hold tightly. Then I glued the tabletop onto the aquapanel. Because Since its length is 4500 mm, the tabletop was made of three parts.
The cutouts in the working surface for the hob and sink in the aquapanel were made with a crown designed for working on tiles and then the opening was finished with a drywall saw. The hob was fixed with standard fasteners and silicone, the sink was simply placed on silicone, and an LED strip was glued under the edge of the countertop.
Himch's example turned out to be infectious. Other users followed in his footsteps. This time we present to you the kitchen of a FORUMHOUSE member with the nickname Na1ta.
Na1ta
I spent a long time studying various forums, reading, choosing what to make a kitchen out of. I saw this topic and realized: this is what I wanted!
Using visual and detailed instructions from himch, Na1ta began calculations for cutting metal and chipboard into boxes, choosing facades, etc. What she ended up with is dismantled in the following photos.
All that remains is to cover the metal strip with the upper and lower cornices, and also decorate the vertical posts with a self-adhesive wood-like edge.
And at the end of the material, we will give an approximate estimate for a kitchen on a metal frame from himch, measuring 700x4500 mm (in dollars for 2021). Not including the upper cabinets, which still need to be done.
- Frame - 500;
- Table top - 2000;
- Facades - 800;
- Mechanisms - 1000;
- Other expenses - 300.
Total: $4600
In this topic you can find all the information on making a kitchen with your own hands on a metal frame. The section on FORUMHOUSE “Furniture for the kitchen and dining room” contains all the necessary information on the design, manufacture and selection of kitchen furniture.
We also recommend reading articles that tell you how to choose a tool for a furniture workshop and make original designer furniture yourself.
We recommend videos: making modular furniture from boxes and a master class on working with furniture panels.
Advantages and disadvantages
Plastic furniture for dachas is produced by many companies, and is considered the most popular among all items intended for outdoor use. The positive parameters of its use include:
- high strength and reliability;
- resistance to various exposure factors, which include rain or constant exposure to sunlight on different surfaces;
- light weight, allowing these structures to be moved from one place to another at any time;
- caring for such furniture is very simple, since various stains can be easily removed with a regular soap solution, and for serious stains it is possible to use various cleaning agents;
- plastic furniture for a summer cottage has an acceptable cost, so every owner of a summer cottage can arrange the territory attractively, and for this you do not have to spend a lot of money;
- Designs are produced in numerous colors, shapes, textures and sizes, so each dacha owner can independently determine which models are ideal for his territory, and at the same time he can completely adhere to any particular design style.
The disadvantages of furniture made of plastic include the fact that it is incredibly easy to put a scratch on it, but it is impossible to eliminate it with any restoration actions. If you choose a low-quality exterior item, it will fade in the sun and may even become deformed at high temperatures. If you provide plastic furniture with optimal conditions, do not leave it in the sun all day and wipe it regularly, then it will last a long time and will delight you with its attractive appearance.
Furniture made of rattan, teak, aluminum and plastic in Moscow
Online store of furniture and comfort
Country holidays should not turn into harsh work in the garden beds! If you like to relax with a cup of coffee in the fresh air, pay attention to furniture made of artificial rattan, wood or plastic. Here you will find everything to create a living room on the terrace or in the open air - tables and chairs, armchairs and sofas, sun loungers, lounge areas, beautiful accessories. Plastic sheds and outbuildings are also on sale.
Our range
The catalog of the online store includes furniture made of artificial rattan, plastic, metal, and wood. Let's look at the main sections of our catalog:
- artificial rattan furniture. High-quality synthetic parts retain the authentic texture of natural material, but are noticeably superior to it in durability. The artificial material does not dry out in the heat and does not lose its shape in heavy rains. Even the lightest chair is ready for loads of up to 100 kilograms. In our store, rattan wicker furniture is very diverse - here you will find armchairs, tables, chests, dining sets, luxurious modular sets for lounge areas;
- aluminum furniture. Metal tables and chairs are among the most durable; they are not afraid of pressure, shock, precipitation, or rapid temperature changes. In addition, aluminum furniture does not corrode;
- wooden furniture. We offer furniture made from teak, Siberian larch, American walnut, and African wood. Hammocks and artificial chairs are made from thin, durable vines. Durable tables, benches, and deck chairs are made from timber impregnated with resins. Teak furniture lasts up to 70 years even in rainy and windy climates;
- furniture made of plastic. Chaise lounges and chairs made of this material are the lightest and most mobile. In our online store, plastic garden furniture is among the most budget-friendly products;
- sheds and outbuildings. Mobile buildings made of plastic and wood-polymer composite are erected in a couple of hours. The materials do not rot, do not fade in the sun, and can withstand frosts down to -55 °C.
Terms of cooperation
Have you found wicker rattan furniture or other products in our store that are ideal for your garden? Here are some reasons to order:
- Fast shipping. If you contact our online store, plastic garden furniture or any other product will be delivered as soon as possible - in Moscow it will take no more than 3 days;
- quality guarantees. Clients of our online store buy furniture made of artificial rattan, protected by warranty. Detection of a defect is practically impossible, but if this happens, the manager will instantly organize an exchange;
- profitable terms. Many clients of our online store buy artificial rattan furniture with big discounts; during sales they exceed 60%;
- convenient service. Plastic garden furniture purchased in our online store, like other goods, is delivered from Monday to Saturday from 10 to 23. You can order only lifting to the floor or use the services of assemblers. By agreement, departure on Sunday is also possible;
- big choice. The catalog of our online store includes artificial rattan furniture from several dozen Russian, Chinese, Spanish, and Israeli companies. Famous brands include Besta Fiesta, Vinotti, Joygarden, Keter and others.
It’s easy to order garden furniture made of plastic, wood, metal or eco-rattan in our online store - click on the “Add to cart” button and fill out the application. The courier accepts cash, you can also transfer money to a card or pay an invoice.
§
§
Lounge area of the KON PANNA series of 4 items:
Table size included: 100 x 50 x 42 cm;
The size of the included chair is 78 x 80 x 80 cm;
Dimensions of the included sofa: 137 x 80 x 80 cm;
Aluminum frame, round artificial rattan, hand weaving.
§
Lounge area of the KON PANNA C series consisting of 4 items:
Table size included: 100 x 50 x 42 cm;
The size of the included chair is 78 x 80 x 80 cm;
Dimensions of the included sofa: 137 x 80 x 80 cm;
Aluminum frame, round artificial rattan, hand weaving.
Interior benches and benches made of iron
Iron structures without the inclusion of plastic or wood in the frame are considered to be anti-vandal, not prone to damage, impacts and scratches. Only such furniture is irrational and not very suitable for installation in the courtyards of private houses. Metal, unlike other materials, heats up quickly, creates discomfort when sitting and is even harmful to health. The best option would be a combined product: the frame is made of iron, and the seat and backrest itself are made of wood.
The seat base can be completely metal or with wooden elements. Strength is achieved by adding metal plates to the frame that secure the beams, and the surface for the seat is covered with soft fabric.
The number of supporting parts or legs is:
- 2 pcs. – in the form of the letter “T”;
- 4 things. – installed on the ends of the bases;
- 6 pcs. – an additional pair is mounted in the middle.
The appearance of the product will depend on the master’s idea with a pre-designated and drawn pattern.
From pallets
The least expensive and most original way to make garden furniture is to use pallets. This material does not require a specific assembly scheme; it all depends on the imagination and preferences of the owner.
Pallets can be left over after transporting construction materials; they can also be found in large quantities near construction supermarkets. Pallets are on sale at a low price.
The easiest way to use pallets is to make a table. To do this, you should paint the pallet in any color, open it with varnish and place a solid slab of chipboard, plastic or glass on top. You can decorate the table to your liking. A corner resting place for a summer cottage made from pallets will look beautiful and practical. It is advantageous to place it in a cozy corner of the garden under trees or near a pond. For production you will need:
- 8 pallets for seating and 6 pallets for decorating the back;
- Pallets for forming a corner base;
- 2 small pallets for the table;
- Fasteners and screwdriver;
- Paint, brushes, varnish.
First you need to prepare a place to install the corner. To do this, solid pallets are taken, on top of which solid bases are stuffed. They will serve as the basis for the even placement of the sofa corner. Next, 8 pallets for the seat and 6 pieces for the back are sanded, painted and varnished.
To rid the corner of the industrial style features, soft pillows and blankets are placed on the surface of the new sofa. It is advisable that the color of the furniture and bedspreads be contrasting. It is convenient to place glasses with drinks, food and decorative items on the table. The interesting process of making garden furniture with your own hands and the successful homemade products that result motivate the owners to create new masterpieces.
Creating holes
Shapes and sizes
Benches can come in a variety of shapes and sizes. The most common types are standard. This is a regular seat, equipped with or without a backrest. Convenient models of benches, which are often used in the local area, in the country - corner ones. They allow you to use the corner for useful space. In addition, if you put a table of a suitable size there, you will have a place for comfortable eating.
The most functional and easy-to-use products come with drawers for storing things. They are suitable for a country plot, cottage or vegetable garden.
Unusual benches with intricately curved backs will surprise guests, attracting everyone's attention
Objects with original asymmetrical seating are installed as decorative models for the garden. It can go in waves or be made in another unusual form. Such a product will emphasize the individuality of the owner. Non-standard designer benches with a convex shape also look interesting. However, they are quite expensive, so they are most often found in stylized entertainment venues, restaurants, and bars.
Standard products are installed in park areas or gardens. Models with unusual legs are much more common. These can be benches for a summer house or other purposes on a concrete base, logs, or openwork structures. They are installed in stylized parks, institutions or just on the street.
StandardCorner
With storage boxDecorative
Despite the variety of options, there is a standard size of the product. It is considered to be as comfortable as possible:
- The seat width is 380-500 mm.
- The height of the seat should be about 450-500 mm.
- The backrest height should reach 450-500 mm. And its inclination should not exceed 45 degrees, and also be less than 15 degrees.
- Side armrests - 180-220 mm.
- The length of the product is about 2.2 m.
Bench
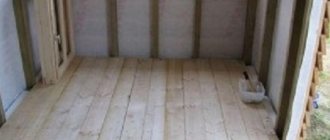
The simplest option for making a garden bench is to use wooden logs. Products made from such material add special coziness to a summer cottage, adding natural textures and colors. You can place the bench anywhere on the site: on the porch, in the gazebo, under trees, near bushes and even near a pond.
For independent production you will need 2 logs, one of which should be thicker than the other. Woodworking tools and thick bars are also needed. It is worth noting that the part used for the seat must be smooth. This is achieved using a milling machine. If it is not possible to use a machine, purchase a pre-rounded log.
Before you start creating a bench for your summer cottage, you should decide on its type. The bench may have a backrest, be round, made from a solid log, or have fixed seats.
This material proposes making a garden bench with a backrest. To do this, you should follow the algorithm of actions:
- Cut a thick log into logs and place them in the chosen location. The distance between them should not exceed 90 cm;
- The length of the blocks should be greater than the seat of the future bench. To do this, it is worth leaving gaps of 20 cm;
- Cut out recesses on the blocks for inserting the seat. To do this, it is worth measuring the diameter of a thin log and making the appropriate cuts;
- A thin log is sawed lengthwise into 2 long halves. One of them is attached to blocks, flat side up. This will be the seat;
- The bars are attached to the base of the blocks - their length will be the height of the back;
- The second part of a thin log is attached to the bars, forming the back.
At the end of the work, all parts of the bench are opened with protective varnish in several layers. To create decor, you can draw a picture on the seat yourself or involve children in such a fun activity.
We process the boards
Garage doors made of profile pipes
If, in addition to installing fence gates near a private house or cottage, you plan to build a garage, the frame for the garage doors can also be made from profile pipes. The most common options for garage door systems are tilt-up and swing.
Installation and weldingCreating a lift-and-turn structure
When opened, the overhead gate rises horizontally, extending outwards and creating a semblance of a canopy. The operating principle of this design is the movement of the canvas mounted on the frame around its axis. This allows you to change the horizontal and vertical position of the sash using a roller mechanism and metal guides.
Before welding the frame, a drawing is made indicating the width and height of the garage entrance opening. Profile pipes with a cross section of 40x20 mm and a wall thickness of 2 mm act as the frame base of the lifting surface.
Diagram with description
- To weld the frame, 4 pieces of profile are cut with the dimensions indicated in the drawing. Gussets are welded at the corners of the frame, increasing the rigidity of the structure.
- The frame is coated with anti-corrosion primers and alkyd paint. Brackets with rollers are welded to the upper corner ends.
- A U-shaped box is installed in the doorway. It is made from a thick corner with a shelf width 1.5 times thicker than the sash. Guides are fixed to the ceiling perpendicular to the door opening.
- The profiled sheet is attached to the sash frame using self-tapping screws. A hinge mechanism is bolted to its ends. Then the sash is installed in the opening.
Drawing and calculation of opening dimensions
Installing overhead gates yourself is quite simple. This design takes up little space, since the unused space under the ceiling is used.
Hinged garage doors
This is the easiest model to install. Before starting the installation of the structure, a diagram is drawn that shows the dimensions of all the constituent elements of the swing system.
Drawing of a welded garage structure with a gate inside
The swing structure consists of the following components:
- internal and external frames, which are placed in the entrance opening;
- sash frame;
- door leaves;
- a drawing is drawn up taking into account the necessary recommendations;
- The width of the shutters should not exceed a distance of 30 cm from the sides of the car to the sides of the entrance opening of the garage.
Option with a gate
The height level of the doors is determined by the height of the car (the standard for a passenger car is 2 m, for a minibus – 5 m). To install the gate structure, external and internal frames from a metal corner are built into the entrance opening.
Their installation must be provided for at the stage of construction of the garage. Garage shutters are installed step by step, taking into account the drawing. The work is performed in the following sequence:
- 8 parts are cut from a rectangular profile pipe. A frame with stiffeners is welded from pipes, after which the seams are sanded. The installation is carried out according to a similar scheme with fence doors.
- For each gate, 2 steel sheets of the required size are cut out, 3–4 cm higher than the height of the garage opening. Both cut out products are welded to the doors.
- Hinges are welded to the outer frame of the opening and the sashes. Then the gates are hung and the locks are cut into place.
As a lesson, you can watch the YouTube video below to properly weld the structure.
For additional security, a locking hatch with a movably fixed massive door equipped with a lock is mounted on the door leaf. This protects the locks from being hacked by eliminating direct access to them.
A photo of garage doors with a gate inside is presented below.
Near the city
Brief introduction
Before making furniture from a profile pipe with your own hands, you need to get acquainted with the material.
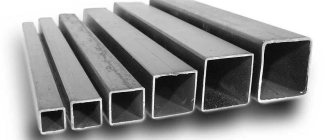
A profile pipe is a hollow metal product that can have different types of cross-sections, except round. The main materials of manufacture are low-alloy and carbon steel. Stainless steel is used much less frequently.
All kinds of crafts and full-fledged structures are assembled from it, which are subject to serious loads.
The shape, as well as the properties of metal pipes, have allowed the material to gain enormous popularity in the construction industry and beyond. This pipe is ideal for performing a large number of tasks. You can get a variety of designs from it.
The main types of sections are:
- square;
- rectangular;
- oval;
- triangular;
- hexagonal;
- flat oval, etc.
Products with right angles in cross-section are in great demand. Oval and flat-oval are less common. And non-standard forms are even used in individual projects.
Tips for choosing
What you should pay attention to when choosing metal furnishings:
- Appearance. The surface is smooth, the edges are well processed, the welds are neat, the fastenings are securely fixed.
- Convenience. All possible doors, locks, drawers open without causing difficulties. Horizontal surfaces are located at the desired height.
- Functionality. The product has a set of all options necessary for convenient operation.
The quality parameters of metal furniture will depend on the purpose, planned load, location of the structure
When choosing shelving for a garage and workshop, special attention should be paid to structural strength, maximum load capacity, and capacity. Industrial furniture must be protected from aggressive chemical influences and have a high degree of fire resistance
And all street items must undergo special treatment. Information about this is indicated in the quality certificate.
AppearanceConvenienceFunctionality
The design of this piece of furniture
In design, loft shelving differs little from its counterparts made in other styles. They have the same racks and shelves attached to them. The structure of this piece of furniture is determined by its function. A rack is primarily a system for storing things , so it must be spacious and reliable. There are several requirements for modern loft-style shelving. It should be durable, stylish and ergonomically designed.
It is better if the racks are collapsible, otherwise transporting a massive piece of furniture will become difficult. A collapsible rack with the possibility of transformation is the best option for a modern piece of furniture. The dimensions of the rack depend on its purpose.
The minimum shelving depth is 300 mm, ideal from 400 mm to 500 mm.
When agreeing on the dimensions of a future product, you must remember its purpose. For example, for a storage system 300 mm is not enough, but for a display rack a depth of 500 mm is not justified in any way. For a high rack with a shallow depth, additional fastening to the wall or floor will be required , otherwise the structure will be shaky.
The optimal height is considered to be from 2000 mm to 2200 mm, but it is important to take into account several factors: first of all, the height of the ceilings in the room and the purpose. It is worth taking care of comfort and providing such a height so that you can get all the necessary items from the top shelf, or add an extension ladder to the structure.
Benches made from plumbing pipes
For beginners, the easiest way would be to make furniture from pipes, since these are almost ready-made pieces that do not need to be given a special shape, but simply cut to size. Making metal furniture with your own hands is, in principle, a simple task and you can assemble it even without the use of welding.
To work with metal parts, you will need a vice, a grinder, and a device for cutting external threads for pipes. The vice must be well secured, because when cutting threads you need to apply force. In addition, some parts will need to be drilled, so you will need a drill with a set of drills. The easiest way is to make a bench for your home or cottage with your own hands.
You will need pipes and fittings. We provide assembly drawings of one of the types of such benches. But your product may differ, so materials should be purchased as needed.
The further algorithm of work is very simple, cut the pipes to the required length and prepare the following elements:
- 2 pcs. long pipes to connect the right and left legs
- 1 PC. for fastening in the middle of the bench (the length will depend on the elements of the legs)
- 8 pcs. for legs - they can be the same length
- 7 pcs. T-fittings - depends on pipe size
- 4 things. corner fittings (see picture above)
- 4 things. - short pipes for connecting T-shaped and corner elements
- 1 piece - round connection, for securing the pipe to a flat surface
- boards for the surface itself
Cut threads on pipes. You can watch a video about how a beginner does this in a garage and what errors were identified during the work.
Then a test structure is assembled from pipes; once you are sure that everything corresponds to its dimensions, you disassemble it. Next, clean off the rust with sandpaper, cover it with primer, and paint it any color. To give it an antique look, you can scratch the pipes after the paint has dried.
Next, the boards are prepared. By attaching the structure to the bottom boards, as shown in the figure, places are marked for the holes into which the bench legs will be screwed. This is not an easy stage in manufacturing; you need to select the exact size of the hole. But you can also use round joints to secure the pipe to a flat surface, such as will be used in the middle.
Cut the boards for the bench itself; they need to be sanded, covered with dark stain and varnish. Using self-tapping screws from below through through holes, the lid is attached to the lower structure of the bench.
Then we adjust the height of the legs, thanks to the thread this is easy to do.
We install decorative elements as desired; in this case, we used painted bolts with a rounded head.
We recommend: Mounting plate for faucet
As you can see, making metal furniture is a simple task, especially if you show a little imagination and use special tools. And thanks to the dark seat and pipes, the bench is as close as possible to the industrial loft style.
Sofas, ottomans, beds
The easiest way to make loft-style sofas and beds is from used pallets. It is enough to put soft pillows and a mattress on top and cover the pallets with matte varnish and the furniture is ready for use. As an option, you can attach wheels to such furniture, so it will be easier to move the furniture around the apartment as you please. You can use various industrial metal structures as a bed frame, if you can get them. If you know how to work with metal yourself, then you can make such a frame with your own hands, supplementing it, as in the previous version, with a soft mattress and a large number of pillows covered with natural fabric.
In addition to intricate metal structures and familiar pallets, you can use deck boards covered with matte varnish or solid layers of wood. Such a bed will look more original and non-standard. You can use metal barrels for the base of the sofa. The top of the barrels is carefully cut off, the cut points are sanded to remove roughness, and inside such a sofa is first filled with something durable as a base and soft stuffed pillows are placed on top.
Almost anything can be used for ottomans. Most often, pallets, metal and wooden barrels, various industrial mechanisms with soft cushions on top, etc. are used. Sometimes you can find more non-standard solutions, such as, for example, large antique suitcases with legs in open and closed form.
Lamp
Original lamps are an expressive detail of an interior in an industrial or urban style. Lampshades are rarely made for them. A cap from an old lamp, a heater reflector or a headlight reflector look interesting in this capacity. Designers also use unusual types of lighting design, enclosing the lamp in a box made of lattice or perforated fabric.
It’s quite easy to assemble a small table lamp-candlestick from pipeline elements with your own hands:
- Prepare a flange for the base, a piece of pipe, a cartridge and a wire with a cartridge, plug and switch. For decoration you will need a lamp with a bulb in the form of a flame, a faucet or other expressive element.
- Connect a short piece of pipe to the flange and install the tap. Its diameter should be selected so that the cartridge fits into the hole.
- Pass the electrical wiring inside the tube, mount the cartridge at the upper end and lower it into the tap hole. Place the lower end into the hole on the flange (on the side); if there is no standard one, drill it or make an outlet from below. In the latter case, to ensure the stability of the product, you will need to make legs by screwing bolts and nuts into the connecting holes of the flange. After installation, align these parts in height. Equip the wire with a plug and a switch.
- Insert the lamp into the socket and connect the product to the network. Check functionality.
To make a candlestick with several arms, different types of splitters are used: tees, crosses. By adding pieces of pipe to the details, the lamp is given the desired look and shape. The main requirement is the stability of the structure. You can make such a candlestick from steel, copper or plastic tubes.
DIY coffee table in loft style
A real loft coffee table looks very stylish, but since the prices for them are quite high, for many it mostly remains a dream. However, with this step-by-step guide, you can make a loft-style coffee table with your own hands . Industrial style is very popular now, but there is one small problem... Not everyone knows how to use welding and afford industrial home decor items. Therefore, you need to think outside the box. If you want a simple loft style table , make the table out of wood and paint the base to make it look like metal! This table is quite easy to make. First assemble the base frame using a Kreg Jig to drill pocket holes at the end of the 3m long 2×2 pieces and screw into a 120cm long 2×2 piece. Make an E shape and then attach the top. Be sure to use glue on each seam for added strength. Once the two frames are in place, connect them to six 2×2 pieces using pocket holes. Use glue again on the joints and wipe up any residue that bleeds through.
Wooden pallet coffee table
First of all, treat the surface of the pallet from burrs and nicks; you can use an orbital sander or sand it by hand. Then, it is better to treat the wooden surface with stain, paint or varnish to protect it so that the furniture lasts longer.
Then simply fasten the pallets together using nails, screws or glue, add legs and voila, your new piece of loft-style furniture is ready.
If you put glass on the finished table, you will get a very practical sample.
Flowerpots
A brutal flower stand is both a mini-shelf and a tabletop (floor-standing) structure, in which the parts and bends of the pipeline act as a support for the container. You can use a flange as a base, as for making a lamp (for a small stand). It is best to equip a suspended product with chains.
The role of the container is played by a piece of large diameter pipe or a tap body or fitting of a suitable size (at least 7-10 cm wide). To connect to thin pipes, adapters (spikes) are used from main networks to small-diameter distributions. The choice of plants can be anything, but succulents and cacti will look especially harmonious.
How to make a bookshelf in a loft style
Step-by-step instructions for making a wooden shelving unit in a loft style:
- The first step is to make a drawing of the future piece of furniture.
- According to the created drawing, cut out wooden blocks for the crossbars and racks.
- Lay out all the cut out posts on a flat floor surface and connect them to the cut out cross members using an electric screwdriver or hammer. By the way, it must be said that self-tapping screws are much more reliable.
- Using special ready-made metal plates, fix the support frames to the wall surface.
- Cut out the required shelves from the OSB board.
- Attach the made shelves to the manufactured shelving frame and secure with self-tapping screws or nails.
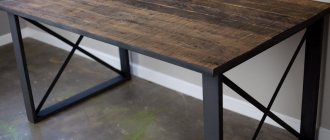
Table with metal legs in loft style
This loft-style wooden table with a beautiful tabletop is made from old fir boards.
True, it’s heavy, but it looks beautiful. For this we used 3 x 10 boards 1.5 m long. As for other supplies, you will need wood glue, tenons and table legs. Also prepare a hammer, circular saw, grinder and drill. If you're using old boards, you'll need to clean them thoroughly—remove nails and other interesting metal objects that got into the wood during its previous life. This is really important because if there is any metal left in the wood, it can ruin your tools. After this, sand well. Take a saw and straighten all the corners so that they are 90°. Then cut the mortises into pieces and glue them together with the tenons. 28 inserts were used here. Sand the surface until it is smooth and free of splinters. This makes a huge difference, so it's worth spending some time on a good sanding. legs for the loft table , even make them yourself. The main thing here is to create a contrast of natural wood and metal, characteristic of the loft style. If you like the contrast of wood and metal, buy metal legs, as in this case. The countertop used General Finishes Arm R Seal, a penetrating oil-based urethane resin coating of the highest quality. This material was really easy to use and has a nice appearance. It is necessary to apply several layers.
We recommend: 5 questions you should ask when buying an apartment
Clothes hanger
Clothes hanger in loft style.
An urban clothes hanger will harmoniously complement the interior of a loft studio. The fashionable element is easy to assemble from parts of a plastic pipeline: they do not require threading on numerous short parts.
Tees and crosses will help connect parts of the structure, and for hooks it is convenient to use 90° and 45° angles.
If you can purchase metal hooks for lifting loads, the product can be given a spectacular industrial look. The hanger is attached to the wall with brackets made of a flange and a short pipe.
Before manufacturing, it is advisable to draw up your own drawing, taking into account the number of hooks and dimensions of the product. A simple hanger can be easily assembled from 1 flange, 1 tee, 2 corners and 2 plugs.
Connect the parts in series. It is advisable to supplement the bolts in the plugs with hooks for mini-loaders, but even without such parts they can already fulfill their purpose. Valves are suitable as a knob hanger (for example, for kitchen towels).
Furniture made from wooden pallets
Usually garden or country furniture is made from wooden pallets. But, in our opinion, such furniture will fit perfectly into a loft-style interior.
You can create almost any piece of furniture: a bed, a sofa, a shelving unit, a coffee table. To make the latter, you can stack a couple of pallets on top of each other, fasten them together in any way known to you, and screw four wheels to the bottom. The finished table can be coated with varnish or paint.
With such a base, you can come up with anything: screw legs of any shape and size instead of wheels, or cover the table with frosted or transparent glass.
You can even construct a bed from wooden pallets. Again, it’s very simple: we fasten several pallets together, cover them with varnish or paint. This option will appeal to students who cannot spend a lot of money on furniture. We put a thick mattress, pillows, linen on top of this design, and the sleeping place is ready.
You can also make a sofa. Here you just need to secure the backrest. This can be done using screws or steel angles.
If you want to make this structure more durable, you can drill narrow wooden slats on the sides.
Other examples of furniture made from wooden pallets
Candlestick
The candlestick is assembled in the same way as the table lamp. The only difference in design is the absence of electrical equipment. The candlestick needs to be assembled from the smallest water pipes (½-¾ inches). Standard candles will fit well into the fitting holes.
Lighting
Another chapter in the loft style is lamps. There is also huge scope for creativity here. The same materials are used in the work.
The advantage of the style lies in the “rough” look of the crafts. The products do not require painting or additional processing. The more factory-like a thing looks, the more firmly it will fit into the interior.
Lovers of the loft style know that you can’t throw away old things. After all, even the most dilapidated objects can become a masterpiece.
For example, old water pipes are turned into a creative lamp.
Or in ceiling spots.
The loft style is fertile ground for creative ideas. And they can be embodied in crafts, for the manufacture of which things that were a pity to throw away will be useful.
Consider lighting: different scenarios, open wiring
Creating several lighting scenarios is a traditional way for a loft to zone the interior. For example, in the kitchen, place a massive pendant above the dining area, several small lamps above the work surface and spots along the perimeter of the ceiling.
By the way, you can choose almost any lamps: either with laconic metal shades or without them at all, or more classic ones - they will contrast interestingly with the brutal atmosphere.
Another trick that can be easily implemented without a designer is not to hide the wiring in the walls, but leave it in plain sight: it will play the role of decoration.
Combinations in the interior
Furniture in the loft style is products of the past, that is, antique. A cabinet or chest of drawers with scuffs will fit well . And along with this, a leather diva in the center will go well. The result is a successful combination of loft bookcases, office chairs and small tea tables. Objects with a proletarian spirit can act as decorative elements.
Wicker furniture for the garden
Wicker furniture is beautiful, environmentally friendly, durable, does not cause allergic reactions and creates an atmosphere of coziness and comfort. | Photo: berkem.ru.
Weaving is one of the oldest methods of making furniture, requiring skills, perseverance, and knowledge of raw material procurement technology. Most of the original interior items in our region are created from willow twigs, bird cherry vines, alder, raspberries, hazel and rattan.
In order for the product to be of high quality and durable, you need to properly prepare the raw materials. | Photo: berkem.ru.
If you still decide to create original and very elegant furniture using these materials, then take into account your capabilities and experience. Those who are taking only the first steps in this direction should not overestimate their capabilities and take on large and complex models. To avoid many mistakes, disappointments and losses of raw materials, you need to start small, mastering the necessary skills, and only then start making real masterpieces.
Most of the furniture is made from rattan, willow twigs, bird cherry vines, alder, raspberry, and hazel. | Photo: berkem.ru.
Another important nuance, with all the advantages of the products - environmental friendliness, aesthetics, mobility, special radiated heat, durability - we must not forget about the disadvantages. Considering that this kind of furniture is very sensitive to moisture and direct sunlight, you need to think about their location and be sure to have a place where to move and store them after rest.
Features of making forged furniture
The opinion that to make forged furniture with your own hands you cannot do without a forge, hammer, or anvil is wrong. A set for an interior or garden can be assembled from ready-made elements, which are selected from the assortment of workshops and building materials stores. For the job, metal welding skills at an amateur level are sufficient.
To make forged furniture you need to know how to use a welding machine.
Work begins with creating a project, drawing up drawings and calculating the amount of materials. But when going to the store, you should not refuse to buy an element you like if it is not on the drawing. Creating forged furniture is a creative process, so there will definitely be a place for an extra detail, if not in the current project, then in the next one.
Assembly is carried out in compliance with the rules for welding work. The main thing is to maintain proportions and have a clear idea of the final result. After assembly is completed, the welds are smoothed out with a grinder so that the structure looks like a single whole.
Forged furniture is traditionally painted black. The surface is pre-primed using a spray bottle, since the brush leaves streaks. To make the furniture look elegant, important parts are covered with patina, gilding, bronze or silver paint.
Forged furniture can be made independently from scratch or assembled from ready-made elements that can be purchased in a workshop or store.
What metals are garden furniture made from?
Garden furniture can be made from different types of metal. They all have their own characteristics and technical characteristics, so it’s worth taking this into account when choosing. For these purposes, iron, cast iron, copper, steel, stainless steel, brass, aluminum and bronze are used.
Let's look at the most common of them in more detail.
Cast iron. It is used to create cast interior items that are resistant to outdoor use. Cast iron is a universal alloy that is virtually resistant to corrosion. It is strong and durable; it is pre-treated with special dyes. Cast iron combines wonderfully with decorative elements made of wood: for tables it can be a tabletop, for chairs it can be seats and armrests.
Chaise lounge
You can make a simple lounger for relaxing in the sun from wooden beams. Do-it-yourself garden furniture does not have to be expensive, and the beams have an affordable price. The following materials will be used in the work:
| Size | Quantity | Purpose |
| Board 5x10 - 88 cm | 2 pcs | For the back |
| Board 5x10 - 39 cm | 3 pcs | |
| Board 5x10 - 60 cm | 1 PC | |
| Longitudinal beam 215 cm | 2 pcs | For frame |
| Cross beam 50 cm | 2 pcs | |
| Legs 35 cm | 6 pcs | For legs |
| Slats 2.5x8x60 cm | 13 pcs | For sitting |
| Slats 2.5x8x88 cm | 6 pcs | For the back |
The first thing you need to do is create a strong and reliable base for the sun lounger. To do this, use frame parts and connect them into a rectangle using screws. Next, the seat itself for the chaise lounge is made. 60 cm slats are attached along the frame, leaving gaps of several centimeters. To ensure uniformity of the cracks, use gaskets of the appropriate size.
The height of the legs for the product can be any; the specified size of 35 cm is considered optimal. The legs are screwed on with self-tapping screws. Place 2 legs at once on the side where the legs will be, and 1 leg at the headboard. Next, a frame for the back is made, it is carefully inserted into the base body, but there should be a small gap left.
Slats for the backrest are placed on the frame; they can be rounded for attractiveness.
The backrest is screwed to the seat so that it can be adjusted. To do this, you need to step back about 9 cm from the edge. For garden furniture, appearance is important, so it is better to paint the chaise longue in a bright color and secure it with acrylic varnish. Assembling the frame
Metal garden furniture
Metal furniture looks no less respectable in garden areas. It is durable, unpretentious and can easily withstand rain and snow for many years. However, metal furniture has one significant drawback - it cools down quite quickly in cold weather and gets very hot in hot weather. Therefore, when using it, it is necessary to have additional textile and wooden accessories: pillows, bedspreads, etc.
Forged furniture especially accentuates the beauty of the garden; with its openwork pattern, it gives the landscape solidity and high cost. Products made of cast iron, bronze, stainless steel and aluminum are considered the most durable.
Types of metals for manufacturing
Depending on the operating conditions, metal furniture can be:
- cast iron;
- steel;
- aluminum;
- stainless steel;
- copper;
- brass;
- bronze.
Furniture can be made of any metal, depending on the operating conditions and interior.
Large-sized structures are made from steel and stainless steel: tables, benches, sun loungers, frames for gazebos. The material is durable and elastic, so it can be easily processed even using artisanal methods. To create wrought iron furniture, low carbon grades are used.
Furnishings cast from cast iron are resistant to corrosion even when placed outdoors. The material can withstand large static loads, but is destroyed by impacts. Cast iron furniture is coated with protective compounds that do not require updating for a long time. This metal goes well with wood.
Aluminum weighs significantly less than steel and cast iron. Therefore, the furniture is not difficult to move, which allows it to be used indoors and outdoors. For convenient storage of tables, chairs, sunbeds, and other aluminum items, they are made foldable. There are also options made by casting. Aluminum does not rust, but over time a dark oxide film forms on the surface. To eliminate this drawback, the metal is painted in the desired color. The strength of aluminum is low, so you need to ask the seller what load the piece of furniture is designed for.
Features of metal models
The metal structure is the most durable.
The following structures can be distinguished by frame type:
- welded or stationary, where the elements are secured by welding;
- collapsible - this design is easy to disassemble and move to any place.
According to the supporting configurations there are:
- A-frame support. Consists of two logs connected at the top. The crossbars are connected by a jumper to give the frame rigidity.
- U-shaped frame. The support pipes are connected to the crossbar in the shape of the letter “P”. It is the simplest to construct. To make the structure more stable, it is necessary to bury the pipes and fill them with concrete mortar.
The stationary swing is installed on a foundation; strong wooden beams are used for the structure.
A hanging swing is a simple design that consists of a double or single seat suspended by cables, chains or ropes from a crossbar or tree.
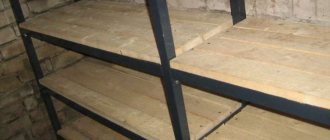
Loft shelving
Loft rack, characteristics:
- Overall dimensions: 1840x1000x440 mm
- Square pipe 40x40 mm
- Shelf: 1000x360x40 mm
Drawing - assembly of loft shelving
Loft shelving detail drawing
Download loft shelving drawing
The drawing can be downloaded HERE or by clicking on the button below:
Add original decor
A loft doesn't have to be minimalistic. Interesting details, natural fabrics, things with history and art objects will add personality to the interior and make it more “livable”. Decor is also an excellent field for experimentation if you want to bring something new into the environment, but you have not yet decided on radical changes.
Sources
- https://stroy-podskazka.ru/mebel/delaem-v-stile-loft/
- https://mblx.ru/napravlenija/566-mebel-v-stile-loft-svoimi-rukami.html
- https://berkem.ru/mebel/mebel-v-stile-loft-uyutnaya-i-sovremennaya-obstanovka-svoimi-rukami/
- https://www.remontbp.com/loft-svoimi-rukami/
- https://stroy-podskazka.ru/loft/polki/
- https://RukiKryki.ru/home/stellazh-v-stile-loft.html
- https://postroika.biz/25453-podelki-v-stile-loft-svoimi-rukami.html
- https://www.sdmeb.ru/polki/stellazh-loft.html
- https://1PoMebeli.ru/gostinaja/mebel-v-stile-loft-svoimi-rukami.html
- https://designm2.ru/mebel-loft-svoimi-rukami
- https://inthi.ru/loft/predmety-mebeli-i-dekora-v-stile-loft-iz-trub
- https://umsad.ru/svoimi-rukami/stol/loft
- https://interieristka.ru/dekor-v-stile-loft-svoimi-rukami/
- https://DekorMyHome.ru/media-obzor-art-i-dizajn/uyutnyj-dom/kak-sdelat-prostye-stellazhi-v-stile-loft-svoimi-rukami.html
- https://tehnolend.ru/predmety-v-stile-loft-svoimi-rukami.html
- https://www.InMyRoom.ru/posts/30912-interer-bez-dizajnera-kak-ego-sozdat
How do you like the article?
Sergey Vladimirovich
Ask a Question
Bet on the texture of materials
A modern loft is not only about red brick. Nowadays, the industrial style implies a rich variety of finishes: it can be concrete, microcement, textured plaster, stone - and a combination of several textures looks especially advantageous.
Of course, using concrete for finishing is quite expensive and labor-intensive: you need to clean and degrease the wall and apply a primer. We recommend choosing imitation cement. For those who like a modern loft, but would like more “warmth” in the room, we can recommend Volare Loggia art concrete with a soft touch effect. It looks like real concrete, but is soft to the touch and not as cold for a living space.
Also one of the modern trends is the use of art concrete in the bathroom, both for the shower itself and for the sink. For such a finish, you will need original Loggia microcement, and not its imitation: it must not only be resistant to moisture, but also specifically designed for areas of direct water exposure. The combination of microcement in the bathroom with other materials - tiles, wood or stone finishes - looks especially impressive.
If you still prefer brick and the space allows, you can line the walls with brick. And if you need to save square centimeters, use brick tiles. You can even make the cladding from real antique bricks - it looks very beautiful, but it is also expensive.
A budget option is to line the walls with MDF or PVC panels to look like brick. They are easy to install, hide uneven walls and can last up to 15 years. Among the disadvantages: such panels can become deformed after installation, and also emit substances harmful to health, especially in hot rooms.
An affordable and original solution is Loggia Infinito decorative plaster. It is produced in collaboration with MAD (Association of the Best Decorators of the World), is easy to use and allows you to create any effect, including brickwork, granite, concrete blocks or natural stone.
Another advantage of this finishing: you don’t have to invite specialists for this. To learn how to decorate walls using decorative coatings, you only need to attend one free master class - the Loggia company conducts them regularly.