08.08.2019 Auto-TOP AvtoVAZ
Car parts are subject to wear and tear. For this reason, a lift for a passenger car, which can be assembled from improvised means, is useful in a private garage. Units produced by different companies often have a high cost, so a jack assembled in your own workshop will help you quickly repair your car without unnecessary financial investments.
Types of homemade lifting mechanisms for the garage
For a one-car garage, car enthusiasts have come up with many different lifting devices. These are blocks, jacks, hoists, hoists and others.
The jack is the most popular device. Such small equipment must be kept in the trunk so that it is possible to lift the car when changing a wheel. Large jacks can be kept in the garage for serious work.
One unit suspended from a garage ceiling beam can halve the force required to lift a specific load. The combination of such mechanisms reduces the required force exponentially with the number of blocks involved. For example, using four blocks suspended from the garage ceiling, you can lift the entire car by the four corners.
The hoist is a structurally designed set of blocks. A hoist is a combination of a hoist and a trolley that moves along a ceiling beam above the machine. The telpher can be equipped with two electric motors: one is designed to move the trolley, the other is designed to rotate the drum with the cable. The result is a miniature crane.
Other designs are based on the principles of converting the horizontal movement of the rod into the vertical movement of the platform with the machine.
equipment requirements
First of all, this equipment will need the ability to lift the machine to a height at which it is convenient to service it. You can simply lift it, or you can raise it to full human height. The second and, perhaps, the most important requirement for it is to ensure the complete safety of people and the integrity of the vehicle. We will not give sad examples, but, unfortunately, they exist.
In addition, you need to think about the drive and lifting mechanism system, think about control, adjustment and fastening to the garage floor. By the way, most factory-made products are tightly anchored to the floor and concreted. This is necessary to prevent tip-overs and reduce the risk of injury and property damage; however, there are also self-propelled hydraulic lifts.
Types of lifts
Before installing a car gearbox lift on a pit in the garage, we study its main varieties in more detail. This will help you figure out what a pit lift can be like.
By drive type
Jacks for lifting cars differ in the type of drive that is installed in them. There are two main models in this classification:
- hydraulic jack;
- devices with manual mechanical drives.
Experts advise using hydraulic models, as they are more efficient. However, it is not easy to make such a device yourself, and that is why many people make manual car lifts.
By type of lifts
Another distinctive feature of car jacks is the type of lift used in them:
- Screw. To install such equipment, use two durable racks in which special screws are installed. They are responsible for raising and lowering the vehicle. The operation of the installed screws is controlled by an electric motor.
- Mini. In the manufacture of such models, hydraulic or mechanical drives are used. A special feature of the equipment is its small size. Therefore, mini-lifts are not used to lift freight vehicles.
Electromechanical Engineering
Some models use different electromechanical technology. Based on this, car lifts are produced:
- Single post. Experienced motorists advise using such models in small garages, as they are compact. They consist of an electric motor, a movable carriage, and a vertical support.
- Scissor. Scissor car lifts can be mobile or stationary. They are equipped with a strong frame for attaching hinges and a compressor device.
By number of plungers
Based on the number of plungers, multi-plunger, double-plunger and single-plunger models are distinguished. In models with several plungers, a special traverse is installed, which is responsible for the efficiency of the equipment.
Drive and lift
The drive of all lifts can be either hydromechanical or electromechanical. In the first case, an electric motor with a pump and a system of hydraulic cylinders are used to lift the platform or table. Its operating principle is quite simple and is clear from the diagrams and drawings provided. As a rule, a three-phase 380-volt electric motor is used to operate the lift hydraulic station, and the hydraulic fittings must be strictly adjusted according to the expected load.
Low-cost hydraulic power plants also operate from a 24-volt electric motor, but their load capacity is severely limited, and reliability, based on the country of manufacture, is incredibly low. That is why it will be much more rational and cheaper to assemble it yourself than to buy Chinese scrap metal, although the manufacturer differs from the manufacturer.
Choosing the most suitable design
First you need to decide what type of structure will be created. To do this, it is enough to pay attention to factory-made lifts - they become the main basis when creating a home-made structure.
The most widespread are:
- Lifting mechanisms with two posts. They are found in almost every car workshop. To create force, such a mechanism can have an electromechanical or electrohydraulic drive. A homemade version, as a rule, has an electromechanical drive, since it is easier to manufacture.
- There are versions with several racks. They only differ in that they better distribute the load.
- The scissor type of design is represented by a platform with a lever system. Such a lift can also have an electromechanical and hydraulic drive, through which force will be transmitted.
According to the method of lifting the car, the following types of construction are distinguished:
- Fork.
- Scissor.
- Platform.
The force can be transmitted from a screw, chain or hydraulic drive.
A homemade car lift with your own hands should be created taking into account the fact that the structure must be safe and securely fix the vehicle. Do not forget that when performing almost any work, the master is under a vehicle that weighs more than a ton.
For passenger cars
Often single-column models are chosen for working with passenger cars. The advantages of such car lifts include:
- ease of operation;
- compactness, thanks to which the equipment does not take up much space in the garage;
- a modern lubrication system that does not require constant maintenance;
- reliable protection aimed at preventing the car from tipping over during repairs.
Scissor-type equipment is also used to repair passenger cars. With its help, a car mechanic can quickly raise or lower the vehicle to the desired height.
For truck
The main feature of any truck is its size and weight. Due to the non-standard dimensions and large weight, not all lifts can lift such cars.
To repair such vehicles, they use cargo devices with a high carrying capacity. They can be movable, stationary and platform. They are used only in service stations that specialize in repairing tractors or trucks.
How to choose a drive
Drives for lifts are divided into electrical and hydromechanical. Electric models have a small carrying capacity and break down quite often.
Considering the costs of repairing the device, such drives are chosen less often; their cost is not recouped. Hydraulic drives include a cylinder, pump and motor.
This equipment has a large load capacity; such designs are much more reliable than electrical devices.
When choosing a drive, it is important to consider the following nuances:
- what cross-section the metal fasteners and beams will have;
- calculate cylindrical axes;
- depending on the required performance, select the cylinder according to the rod length;
- what power will the hydraulic pump have; organize a device control panel.
By dividing the equipment manufacturing process into several stages, it will be possible to minimize shortcomings and make the mechanism reliable and durable.
Where to get materials
All materials and tools are purchased either in the store, or you choose used technical equipment and consumables.
They are found, for example, at enterprises that own old equipment, or at metal collection points.
Prepare immediately:
- welding machine;
- angle grinder;
- drill;
- file.
The metal used is channels or sheet steel, the thickness of which is 1 centimeter. In addition, thick-walled metal pipes and rollers for the lifting mechanism are purchased.
Work order
After all calculations have been completed, assembly of the lifting device begins. Prepare one or two hydraulic cylinders, bushings of a suitable diameter, a pump and a distributor.
The lift platform, as well as its base, are made of U-shaped channels. Scissors are made from metal squares, I-beams or plates with a thickness of at least 10 mm.
For the lifting device, a station with an electric motor with a power of 2-5 kW is prepared.
Hydraulic cylinders are connected to this station, which will move the arms of the scissor structure; these cylinders will raise the platform.
A safety system must be provided to prevent the equipment from collapsing spontaneously.
So, having the knowledge and skills, you can assemble a scissor lift yourself.
If you have no experience in the field of electrical work, it is better to purchase a used lift.
Video tutorial
Be that as it may, design and technological engineering calculations must be taken very seriously. Thus, it will be necessary to calculate the minimum cross-section of beams, calculate the axes of hydraulic cylinders, select hydraulic cylinders based on performance and rod length, and select the correct hydraulic pump and control system. When designing, special attention is paid to safety and emergency mechanisms for raising/lowering the vehicle.
The task is quite difficult, but solvable. If you have the materials and knowledge, you can assemble a small scissor lift that will be useful not only to you, but also to your friends and neighbors. Happy designing!
DIY two-post car lift
The most economical option for a household lifting mechanism is a two-post unit equipped with an electric, electro-hydraulic or hydraulic drive.
In a lift with the first type of drive, threaded shafts with a moving bearing nut mounted on a lifting steel foot are placed in the racks.
There are other models of screw design, which contain 1, 3, 4 racks.
To assemble a cheap but productive device for your own use, you need to understand the operating principle of a factory-made device. You can make a car lift for a garage with your own hands from the following components:
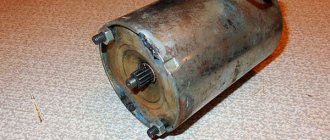
- 3 steel corners 750×750×8 mm;
- worm gearbox;
- steel plate 10 mm thick;
- 2 chains with large thin links made of wire with a diameter of 30 mm;
- hook;
- cable 5 mm thick;
- two star keys.
When choosing the component elements, it should be taken into account that the minimum load capacity of a unit with a gear ratio of 60 kg should be 300 kg.
DIY pit hydraulic jack
Amateur and professional car repairs require specialized equipment, which definitely includes a traverse. This highly specialized pit jack provides tremendous assistance to mechanics at service stations and workshops.
In the household segment, this equipment is much less common, and can only be found in the garages of true car enthusiasts. The professional orientation and cost of tens of thousands of rubles make such a lift not the most cost-effective purchase, but if you wish, you can make a hydraulic pit jack with your own hands, from scraps of rolled metal.
Required tools:
- Welding machine
- Grinder (angle grinder)
- Drill
We will not list measuring instruments, a file, a vice and other auxiliary tools, without which a process of such magnitude would not be complete. If you decide to take on such a serious project, then you have such useful little things.
Required materials:
Angle 63x63x5 For the support platform (2 pcs / 900 mm, welded into a square with a continuous seam) For the upper part of the carriage (2 pcs / 674 mm) For the base for the rollers (2 pcs / 350 mm)
Profile pipe 40x40x4 Add. reinforcement of the supporting platform (630 mm) Guides (2 pcs / 300 mm) Profile pipe 50x50x4 - for guides (2 pcs / 120 mm)
Channel 10P For the sides of the lift carriage (2 pcs / 350 mm) For the base of the carriage (674 mm)
Timing tension rollers – for moving the structure along the pit (4 pcs)
As a lifting device, in this design you can use any bottle jack of suitable lifting capacity.
All materials and sizes are presented as an example and do not claim to be absolute truth. Everyone designs to the best of his ability, from what he has, and as he sees fit. This example shows that for such a width of the pit it is possible to make it using such elements. Based on this, you can make it your own, simplify or modernize it. It all depends on the skills and goals.
To increase convenience and increase functionality, you can equip your homemade hydraulic jack with adjustable legs that extend from the support platform. Since the paws will take on the entire load, they must be made of a thick-walled profile, from 5 mm, and fit into the support area without visible play. If desired, you can make convenient grooves for soft stop pads from a thick-walled pipe or other suitable metal part.
Market prices
In short, there are many advantages, but the price is steep. For example, one of the most reliable types, scissor, costs between 150-220 thousand rubles. The price is steep, especially if you have to service a ten-year-old nine, which costs three times less. And the quality of cheap products leaves much to be desired, while more or less serious models can be bought for as little as 300 thousand.
In order not to spend such a sum, it is quite possible to make it yourself. It’s worth getting acquainted with the factory samples and weighing the pros and cons, which is what we’ll do now. We have posted some drawings and diagrams of scissor devices on the page and they may lead to the necessary design idea. It is clear that it makes no sense to copy dimensions from diagrams, since the conditions are different, as are the different requirements for the mechanism.
How to make a homemade manual scissor lift for a car
The vast majority of homemade lifts can be classified as “scissor type”. This is the most convenient design both from the point of view of operation and from the point of view of maintenance. And, most importantly, it is easiest to make it at home. When assembled, these lifts are quite compact and do not take up much space.
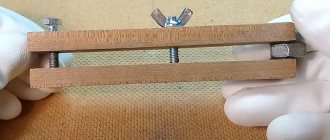
The figure shows a kinematic diagram of a simple scissor lift. On a base welded from a durable profile (pipe, channel or angle), two U-shaped rectangular frames are installed, which can “swing” on the base. One frame is attached to the base with its lower edge through a hinge. Its upper end is also connected through a hinge to the upper end of the other frame.
The lower edge of the second frame moves along the base in special gutters. To do this, a nut is fixedly mounted on the frame, on the cross member. A threaded rod running along the longitudinal axis of the lift is screwed or unscrewed from a stationary nut during rotation. The far end of the rod is articulated with the lower edge of the movable frame.
During its horizontal movement, the rod moves horizontally the lower edge of the movable frame, which, with its lower edge on rollers, rolls along guides fixed on the sidewalls inside the base. At the same time, it rotates around the axis of the lower hinge. The top edge of this frame is raised or lowered.
Along with it, respectively, goes up or down the upper edge of the first frame and a platform installed at the junction of the two frames.
Another version of the scissor lift is shown in the figure. In this design, the base and loading platform are the bottom and top sides of the parallelogram, and the two swing frames are the sides. A jack is installed under the cross member welded to one frame. He changes its inclination, and the entire structure changes its height. The loading platform is raised or lowered.
Homemade scissor lift driven by a jack
Drawing
The principle of operation of the lift is explained by its kinematic diagram. The dimensions of the product as a whole and its parts are determined in specific conditions.
Kinematic diagram of a homemade lift
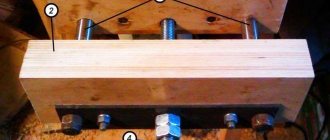
The illustration below shows a lift in which a drive from a handle or electric drill through separate gearboxes rotates two horizontal threaded rods. A nut moves along each of them, which is welded to the lower end of the movable frame. This design has a more uniform distribution of forces.
Homemade lift with screw drive
Drawings of a homemade lift with a jack
Drawings of any lift design show the principle of its operation. Drawings of all its parts, as well as assembly drawings, are also important for the master.
Since during the manufacture of devices they are guided by the size of their car, the actual availability of components and materials, as well as their skills, it is impossible to make a universal drawing.
We must adapt to realities and ensure that the relevant details fit together.
Drawing of a homemade car lift with a jack
Manufacturing instructions
The technology for performing basic plumbing and welding operations depends little on the design. Basically they are identical.
Sequencing:
- materials and tools are selected;
- parts are cut in accordance with the drawings;
- the upper platforms are welded;
- “scissors” are assembled on cotter pins;
- a jack is installed;
- The operation of the entire product is checked.
Work must begin by creating a drawing of the product. Then the necessary materials and tools are selected. Sometimes the drawing has to be adjusted depending on what materials and components were obtained.
The manufacture of these lifts should begin from the base. It must be welded in the form of a rectangle from profile pipes with a cross-section of approximately 60×80 mm or more. The width of the frame should be slightly larger than the width of the car for which the lift is being made. Then frames are welded from channels or profile pipes.
Their width is determined by the base, and their height is determined by the desired lifting height of the car. The threaded rod must be made from a quality steel bar with a diameter of at least 2 inches. The thread must be trapezoidal or persistent, since it will have to withstand great forces.
The corresponding thread is cut into the fixed nut.
This type of lift is not a “screw” lift. It has no vertical load along the screw axis.
This procedure can be applied to the manufacture of a device of any design option.
8 steps to assemble the lifting device
A homemade lift for a car service workshop is assembled quickly and easily. The workflow consists of 8 steps:
- bent steel corners must be secured to opposite flat walls of the room so that the hood of the car is under them;
- a steel plate must be installed on the corners and secured with M8 bolts;
- install the gearbox on the plate;
- secure the key to the drive shaft gearbox;
- drill a hole in the plate and pass the chain, close it in the shape of a ring;
- secure a smaller key to the output shaft of the gearbox;
- drill two holes in the plate, pass the second chain;
- Fix the first end of the drive chain on a small key, and equip the second with a hook.
Using professional drawings, a DIY scissor lift can be made very easily and quickly. A homemade garage lift has a lever transmission system in the form of scissors. Operating torques are carried out by a hydraulic drive powered by an electric motor.
A self-assembled garage lift must have a reserve load capacity and easily withstand the weight of the car for a long time.
During the manufacture of equipment, a locking mechanism should be installed, with the help of which a self-made car lift holds the load in the event of an emergency. Threaded shafts, load-bearing nuts, hoses and cylinders must be inspected and maintained periodically. Configuring the operating parameters of the device is carried out as follows:
- remove the fasteners securing the frame and engine of the car;
- bring the cable under the motor, throw the loops on the hook;
- moving the chain, tighten the cable, slowly raise the load to the desired height;
- move the engine to the repair table.
A simple do-it-yourself lift - materials for work
Many car owners, having the appropriate knowledge and skills, are ready to begin repairing the car engine on their own. To do this, the machine engine should be pulled out of the hood and installed back at the end of the work. It’s difficult to do this, and it’s impossible without a special lifting device.
But you can find a way out of every situation. And if you have a garage, you can take advantage of the experience of many craftsmen and make a car lift for the garage with your own hands.
To produce a motor lift, prepare the following materials and tools:
- a pair of metal corners 7.5 × 7.5 × 0.8 cm;
- steel plate 1 cm wide;
- gearbox with a coefficient of 60 and a load capacity of 300 kilograms;
- bolts;
- chain, 2 pcs.;
- “star” key (suitable for an ordinary moped), 2 pcs.;
- hook.
Car lift diagram
Before starting work, it is best to sketch out a diagram of the future product. The first step is to draw drawings of a channel base, the length of which is equal to the width of the pit (minus a few cm).
The height of the channel structure and its sides must be no lower than the jack used. The remaining details need to be planned and drawn based on these main parameters. It is important that the rollers attached to the side corners fit exactly into the corners of the pit. Another important point will be the precise fit of 40 mm square pipes into the 50 mm square guides welded to the side channels.
If you have experience in welding and manufacturing metal structures, then you will be able to independently make a convenient pit lift for your garage. This will help save your budget and make the product exactly to the parameters of your inspection pit in the garage.
Choosing a design
So, you have decided to rely on your own skillful hands and make a homemade lift for your car garage, rather than purchasing it at a special equipment shopping center. This is an understandable desire: the cost of such equipment may not be much less than the price of your car, and it will be used extremely rarely (only if you do not intend to open a service station in a garage).
The idea and desire have appeared, now it’s time to select the system for the device being created. To do this, you need to focus on industrial lifts demonstrated on the special equipment market, “peek” at their design and imagine whether you can do something like that.
Most likely, the first thing you will come across is a two-post lift, which can be found in almost any auto repair shop. This type of device can be equipped with an electromechanical or electrohydraulic drive.
In the first case, inside any rack there is a threaded shaft rotated by an electric motor with a gearbox. The threaded shaft contains a bearing nut that moves along it and, accordingly, raises and lowers the “legs” on which the car rests.
In a two-post electro-hydraulic lift, the axle is replaced by a drive, the pressure in which is generated by an electric motor. There are other types of similar systems, but with one, three or 4 racks.
Another type of lift is a scissor lift, where the platform has a system of levers (called “scissors”), rises and lowers with the support of hydraulic drives driven by electric motors.
When creating similar systems, you can encounter a large number of problems and difficulties that need to be solved. First of all, this is work safety - no one wants to get seriously injured or damaged due to a broken lift at one not very fortunate moment.
Therefore, it is necessary to select materials and the device system in such a way that it can withstand the weight of the machine with a significant reserve. It is also worth taking care of the production of locking elements that allow you to keep the car on the site in case of emergency situations with the lift. And in order to prevent the latter, you should constantly inspect them. For an electric drive, it is necessary to check the wear of the shaft thread and the bearing nut; for an electrohydraulic drive, it is necessary to monitor the integrity of the hoses and cylinders.
And the main problem faced by those who want to make a two-post or scissor lift with their own hands is the complexity of production and the high cost of the elements. At home, it is almost impossible to form a threaded shaft; selecting cylinders and hydraulic hoses is not an easy task and is not cheap.
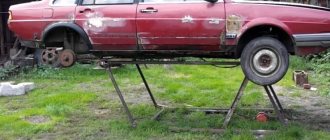
But there is a simpler type of car lift, adapted for production in garage conditions, that turns the car on its side at an angle of 45°-60° and is called a tipper. Let's take a closer look at it and take a look at where and how it can be done.
Simple lift
For several decades now, the most common and durable method of lifting a car has been turning it on its side. In fact, it is not only the engine that needs repair from time to time, but also other components that can only be reached using a test pit. But not everyone has such a pit, and folk craftsmen have constructed an elementary, if not primitive, system.
At least 3 people are required for this lift. This method can hardly be considered ideal, because not a single person wants to tempt fate by scratching a car on a concrete flooring.
However, if there is no other way out, then such a lift can help you out. His system is as simple as possible, and the production method is clear even from photographs.
An alternative to a lift can be an inspection hole (of course, if the garage system makes it possible to dig it). If you make a hole as tall as you are, you can easily examine the bottom of the car. If it is not possible to properly equip the inspection hole, then you can limit yourself to an overpass (but it will require the presence of quite significant ceilings in the room).
Instructions:
- 1. For the base, embed metal corners into the side walls of the room so that the car hood is located just under them. Next, install a centimeter plate on the corner racks and secure it with eight “M8” bolts. It will not merge with the corners, so in the future you will be able to change its placement above the car engine.
- Fix the worm adjuster on the plate. Next, take the key, put it on the electric drive shaft, and secure it. Then make a 2 cm opening in the tile for the chain, then pass the chain through the finished hole and close it into a ring.
- Place another sprocket on the outgoing shaft, smaller this time, and combine them.
- Make 2 more holes of 3 cm in the slab, pass the chain over the key. The 2nd chain must end with a metal hook capable of supporting the weight of the motor.
Model with 2-leg shoe
To make a car lift with your own hands, you should first tackle the lower support. For this purpose, numerous experts advise preparing a clamp in advance. With its support it will be possible to hold the main pin. But first of all, it is important to secure the frame. To do this, it will be necessary to use a welded inverter. Then, in order to assemble the lift with your own hands, it is important to choose a high-quality hydraulic device for raising the beam.
After its installation, the handle is installed. A channel regulator will do for these purposes. The lift stand can be made from an aluminum plate. The supports for the fixture are formed last. Before this, it is important to check the reliability of the clamp, for which it will be necessary to use a welding inverter.
Device with U-shaped rear beam
In this case it will be difficult to make the base. To do this, it is necessary to cut a large number of long plates of iron sheet. In such a situation, experts advise identifying a metal type shoe. In this case, the hydraulic mechanism must be located at the lower beam. Then, to select the lift, you need to assemble the regulator. To do this you need to use a clamp.
The first base is welded only after the nut is secured. The support must be marked on the machine. In this case, the distance between its corners must be at least 230 mm. Certain modifications to the approved lifting device require the use of pumps. In this case, they are necessary to lubricate the hydraulic device. To determine this part, it is important to attach an auxiliary support to the rear beam.
L-shaped rear support device
To assemble a model of this type, first of all, prepare the base. For this purpose, the plates are selected from steel. Their thickness must be at least 2.2 mm. Then, to assemble the lift, you need to secure the side supports. It is not necessary to use a clamp for this purpose.
The support is welded at the appropriate step. To make it without help, you will need 3 sheets of metal of the same size. Their length should be 120 millimeters. After welding them, the upper support is fixed. In this case, it is more expedient to use a compact hydraulic mechanism. In a similar way, the gearbox can be placed next to it.
How to make a reliable car lift from a jack with your own hands
It is not easy to make a car lift from a jack yourself, and therefore you need to read the instructions in advance.
Calculation of dimensions and creation of a drawing
First you need to decide on the size of the equipment for working with cars.
The choice of car lift dimensions depends on the size of the garage in which it will be used. The average height of the device is three and a half meters, and the width is three meters. Equipment with such dimensions is capable of lifting a vehicle whose weight reaches 3-4 tons.
Required Components and Tools
Having decided on the dimensions of the car lift, you can begin to prepare the necessary tools and materials. To work you will need:
- welding machine for joining iron components;
- drill;
- drill;
- tape measure for measuring the dimensions of device parts.
The materials from which the device is made include:
- bedding corners eight centimeters wide;
- iron plates, the thickness of which should be 1-2 centimeters;
- worm gearbox.
Assembly instructions
At the initial stage of creating a lift, steel corners are installed in the walls of the garage pit. After this, a metal plate is installed on their shelves and attached to the surface. The gearbox is installed on top, after which a key is fixed on the drive shaft.
After installing the gearbox, holes are made on the surface of the plate through which the chain will pass. When the chain is installed, a sprocket is put on the shaft. To install the second chain, the same holes are made on the opposite side of the plate.
The resulting structure can withstand a load of 2-3 tons.
Dumper for car
The simplest design for tipping a machine on its side. It will be useful in any garage as an auxiliary device for the rapid repair of vehicles.
To make such a lift with your own hands, you need to make:
- two brackets that are attached to the front and rear axle of the wheel;
- two support platforms (to hold the machine in an overturned position).
Connect the brackets to the platforms using hinges. Thus, two identical structures are made. For the turning mechanism, metal pins with bushings or bearings are used.
Supplies you will need:
Why is it needed?
In most cases there is no point in buying it. Both from a financial point of view and from the point of view of free space in the garage. Although, for car owners who have a large garage-workshop, its presence is already a huge plus.
Firstly, let’s not complicate life and dig an inspection ditch, which, in principle, provides nothing more than access to the bottom. However, in the case of any type of lift, we get certain benefits:
- it is very convenient to carry out welding and straightening work on the body;
- work on maintenance and replacement of the chassis, suspension, brakes, exhaust and the entire transmission;
- tire fitting and wheel replacement using a lift is faster and easier;
- You can combine a preventive inspection with minor repairs.
Difficulties in making a lift
An installed car may break down for the following reasons:
- The weight of the vehicle places a load that the drive or actuator cannot support.
- The locking mechanism is not working properly.
- The supporting device cannot withstand the applied loads.
- Lift supports are not positioned or secured correctly.
Difficulties in manufacturing arise due to the fact that some structural elements cannot be made with your own hands. An example is long-length lead screws. Therefore, they rarely make a scissor lift with their own hands. Drawings of homemade structures often include the creation of a tipper, which is much easier to manufacture. If necessary, do-it-yourself scissor lift drawings can be downloaded on the Internet, but it is worth considering that most of the parts will have to be purchased, due to which the cost of the finished structure will not decrease. In addition, you will have to calculate the strength of all elements used.
Such work can only be performed efficiently by an engineer who has extensive experience. If errors are made at the time of calculations, there is a possibility that the lifting mechanism will not withstand the applied load. Therefore, if there is no confidence that the skills and knowledge will be enough to implement a complex project, it is best to create less complex mechanisms that will be more reliable.
Conclusion
An inexpensive and productive hydraulic scissor lift is ideal for a private service station. Having the design at his own disposal, the owner of a passenger car has the opportunity to carry out repair and maintenance work on the body, replace the chassis, suspension, brake pads and transmission parts. You can make a lift with your own hands using a specially developed technology.
A scissor lift is the best hydraulic lift for small spaces, great for garages with narrow openings, this is the kind of universal scissor lift that is suitable for our garage co-ops. In this article we will look at the complete installation of a hydraulic lift in our garage:
Begin. The first thing we need is to buy a scissor lift, of course you can do it yourself, the design is not complicated, the lift is made from an arrangement of a system of levers (which are called “scissors”), a hydraulic drive, and of course the power supply itself is carried out from an alternating current network, just remember that the components for creating a lift with your own hands will cost more than two new lifts. Therefore, our choice is to buy a new one. How to choose the right hydraulic scissor lift
When choosing a lift of this type, you should pay attention to 2 factors: the lifting capacity, as a rule, is 3 tons, but there are also weaker 2.3 and even 1.9 tons, such lifts should not be purchased due to the fact that the average weight of a passenger car is 1.5 tons, the declared loading capacity from the manufacturer is the rules are not always true; often lifts with small tonnage do not last long.
Although the price is attractive, remember the miser pays twice. The second fact is the maximum lifting height of the platform, this is also one of the important factors because too low a height will not give you the proper clearance to inspect the bottom of the car. As a rule, Chinese lifts suffer from this problem. The normal height for inspection will be approximately 1850mm. The lifting height should be taken into account according to your height. We should not forget about safety, so the lift must have a parachute valve, provided in the design, it prevents the lift from suddenly lowering. Our choice fell on the ever-eternal lift, thanks to the guys from shop korch for helping us bring it. Preparing the garage floor for a scissor lift
Lift operating rules
To make a lift yourself, you need to put in a lot of effort. But in order for this unit to work more efficiently, it is necessary to follow all the rules for its operation:
- Before using the lift, be sure to remove the bolts that hold the engine and vehicle frame together.
- A loop of steel cable is placed under the engine. A lift hook is placed on its end.
- Search the circuit.
- Over time, the movement will transfer to the drive shaft, which will transmit force to the cargo, which will lead to tension in the cables.
- The power unit is lifted slowly and carefully to avoid damage.
- After removing the engine using a lift, it is necessary to stop its operation. The load will now be held by the gearbox.
- The vehicle can be moved away and a sturdy table can be installed in its place to support the load from the engine.