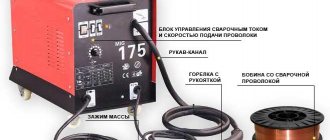
Cordless screwdrivers are used everywhere, both in households and in small industries. Mobility and autonomy allow you to perform work away from the electrical network for a certain period of time. The battery has a certain number of charge cycles, after which it is no longer suitable for further use. There are several reasons; the battery is a very capricious element that fails even if it is not stored correctly and is not used. The high price of a screwdriver prompts you to find out how to convert a cordless screwdriver into a corded one.
Reasons for converting a cordless screwdriver
The absence of a power source makes any energy-dependent thing useless. It is almost impossible to remake a dead battery; there is only one way out - converting the screwdriver into a mains one. The high price of a new battery makes the purchase impractical; to save money, owners of unused tools are wondering how to convert a cordless screwdriver into a corded one.
There are cases when the screwdriver used is discontinued, then it is almost impossible to find a new battery. A screwdriver without a battery is a completely useless thing that will collect dust on the garage shelf if nothing is done. The main advantages of the rework:
- The tool becomes functional and can easily replace a mini drill.
- There is no need to monitor the battery level.
- The tightening force is independent of the remaining battery charge.
The only downsides are the presence of a wire and dependence on the electrical network. After modification, the device acquires an electrical cable, which does not allow work to be done in hard-to-reach places, away from the power source.
Inverter welding machine
Creating a power source from inverter welding is a more complex type of modernization, since it requires certain theoretical knowledge in the field of electrical engineering and practical skills. Rework entails structural changes to the equipment, which will require the ability to make calculations and draw up diagrams.
Do-it-yourself screwdriver conversion
There are plenty of craftsmen in everyday household life; there are many ways to convert a screwdriver to mains power. It is enough to provide the required voltage for the electric drive of the device.
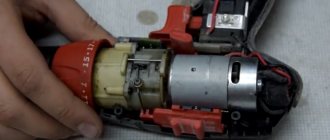
Cordless screwdriver disassembled
In some cases, for rework, it is enough to use the charger from the kit; it is available, because comes complete with a screwdriver. It is quite simple to remake such a design; just disassemble the screwdriver and connect the charging output contacts to the drive wires. The voltage supplied by the charger after modification corresponds to the technical characteristics of the drive; there is no need to worry about the safety of the electrical part. It is also worth noting that there is no need to disassemble the device completely, because Only the wires designated for use should be connected. A significant drawback is the size of the charger; constantly moving it during work is inconvenient and causes discomfort.
Power supply from the screwdriver network can be achieved by several types of blocks. The housing accommodates some of them, the rest are located outside.
There are many ways to convert a cordless screwdriver, all of them have pros and cons.
- In the case of the old battery, a place is organized for the finished power supply. The alteration is simple, intervention in the electrical circuit is not required, it is enough to carry out the work carefully and achieve a perfect appearance. The disadvantages include the time spent searching for a block with the appropriate voltage and dimensions. Also, small devices usually heat up in a closed space; it is necessary to provide ventilation to the device by making holes in the housing.
- Installing a homemade energy source is a more complex solution; it requires finding the necessary radio components and understanding the circuit. The advantages of this conversion method are low financial costs, no losses when using a low-voltage cable, and no changes in the appearance of the device.
- An external power supply can be used when working in one place, since the device’s mobility and compactness are lost. There are also costs associated with finding a suitable voltage for the electric drive of the screwdriver.
- The most common external type device is a computer power supply. The advantages are that it is easy to find at disassembly sites at a reasonable price; there are no complex remodeling processes. However, the bulky design will not be to everyone's taste.
Glamorous trees for boudoir
The next year of the white metal Ox means decoration in white and pastel colors. Nothing red or flashy!
PHOTO: YouTube.com For a glamorous decoration, you will need ready-made Christmas trees from Fix Price, which consist of a conical frame and tinsel, as well as a feather and fluff boa, which can be found in the same store
The bright tinsel will have to be removed - you only need a cone. And then it’s a matter of literally a few seconds: wrap the cone with a lady’s jewelry and secure the ends.
PHOTO: YouTube.com Window sill, mantelpiece, festive table, table in the bedroom - this decor will look unusually gentle and simply chic everywhere
Connecting a screwdriver to a charger
It is necessary to understand that at low voltage there are losses in the cable, so it must have a cross-section of at least 2.5 mm and a length of no more than 1.5 meters. In order to figure out whether it is possible to connect a screwdriver to a charger, you need to perform a number of steps.
Sequence of conversion to power supply from charger:
- Resolder and remake the wires to the charger, usually the contacts are located in a visible place, one is responsible for the plus, the second for ground. When working, the charger must be disconnected from the network.
- Then you need to disassemble the unusable battery and remove the old elements;
- A hole for the cable is drilled in the housing for a tight connection, the cable is wrapped with electrical tape or fixed with thermal shrink tape.
- To balance the weight, it is necessary to place a piece of dense wood or rubber in the remaining space; this will contribute to proper weight distribution and the hand will not get tired when working.
- The final step is to solder the wires to the power supply of the electric drive and assemble the body of the power tool after the alteration.
Step-by-step instruction
The procedure is as follows:
- Disassemble the battery: unscrew all the screws hidden under the stickers. The batteries located inside are interconnected. There are two wires connected to them: red (+) and black (-).
- Cut off the wires from the batteries. You need to cut it off from the elements, and not from the battery contacts.
- Connect the wire to the open contacts of the charger by soldering, having previously treated the brass terminals with phosphoric acid. This will ensure a secure connection between the brass and the copper cable.
- Insulate connections.
- Insert a weight into the housing where the batteries are located as a counterweight.
- Solder the battery terminals inside the case to the free cable contacts, observing polarity. If the polarity is violated, the tool will work, but rotate in the other direction.
- Plug in the plug and check its functionality.
- Additionally, make a hole in the screwdriver body on the left side for the wire. To ensure a tight fit, make a “lock” from insulating tape.
Installation of a finished power supply in the housing of an old battery
If you managed to purchase a power supply unit on the market with the appropriate indicators, installation and modification are carried out in a few simple steps:
- Dismantle the old battery case and remove the spent cells.
- Install the new power supply so that it fits tightly against the case; if necessary, you can glue it, connect the high voltage wires (output from the 220 volt outlet).
- Connect the low voltage terminals to the power supply of the electric motor of the impact wrench; if there are no contacts, the wires will have to be re-soldered.
- Assemble the housing after modification and install the block on the screwdriver.
Installation of a finished power supply in the housing of an old battery
It must be remembered that compact power supplies heat up in a closed space, so it is necessary to drill several holes on different sides of the case for ventilation.
Specifications
When purchasing or assembling a power supply yourself, you always start from the required technical parameters.
- Power. Measured in Watts.
- Input voltage. Domestic networks have 220 Volts. In other countries of the world this parameter is different, for example, in Japan 110 Volts.
- Output voltage. Parameter required for the screwdriver to operate. Typically varies from 12 to 18 Volts.
- Efficiency Reflects the operating efficiency of the power supply. If it is small, it means that most of the converted energy goes to heating the body and parts of the tool.
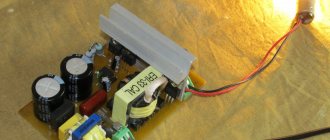
Homemade power supply
When working with a soldering iron, you need to check the connection to the network of the battery elements and the homemade unit; if there is a connection, you must turn off all power sources for safe operation.
The modification work is carried out step by step; to obtain the result you will need a little experience in soldering and mounting boards:
- Dismantling and dismantling the housing of the old battery;
- In accordance with the diagram, install the elements on the circuit board, solder the contacts and connections.
- After soldering, check the output voltage with a multimeter.
- Assemble the circuit board onto the battery case.
- Connect the appropriate wires to the low voltage outputs of the instrument.
- Check operation by connecting the converted device to the network.
Read also: Designations of welding seams on GOST drawings
Preparation, materials and tools
My version of the alteration is quite simple, because a minimum of tools and materials were required.
Tool:
- Cutter or knife;
- Pliers;
- Soldering iron.
I will make a reservation that the alteration is quite domestic/handicraft, and real craftsmen will use a soldering station, a crimper for stripping and other devices here, but the manipulations performed in the kitchen are quite worthy of a basic household tool.
Materials:
- Electrical tape - where would we be without it;
- Wire - 0.5 mm2 is enough for this current;
- A drop of solder (if you solder at all, you can clamp it).
Before starting work, I insulated my place - I lined it with newspapers so as not to litter the living room and used a wooden backing for safe soldering.
Connecting to an external power supply
An external battery is used when compact elements are unavailable or continuous operation of the tool is required.
Cordless screwdriver connected to external power supply
It is worth remembering the steps during disassembly or taking photographs, since intervention and alteration of the electrical circuit of the screwdriver will be carried out, assembly will need to be done exactly in the reverse order.
- Disassemble the device and reinstall the connector for the power supply. Connecting wires by twisting is unacceptable; it is recommended to solder the contacts and insulate them with electrical tape. If necessary, seal the connector with hot glue inside the case.
- In accordance with the parameters of the device’s electric drive, select and remake the required battery. As an option, a power supply from a laptop with a similar configuration is often used; an adapter for a low voltage connector is available at any radio parts store.
- After assembling in reverse order, you need to connect the tool to the network and check the operation.
Connecting to a power supply from a computer
In any computer store or radio components market, you can find used or new computer power supplies for a small fee. You may also need an old computer lying around or a laptop charger. The presence of a switch on the case will be a plus for safe operation; the format must correspond to AT or ATX. To use an average screwdriver, a computer power supply of 300W is sufficient; on older models, the information is provided honestly, so they easily output 16 amps or more, sufficient to operate the impactdriver.
Screwdriver connected to computer power supply
These power supplies are distinguished by the presence of their own cooling system and protection against voltage surges. For connection, only two output wires are used, yellow - 12 volts "plus", black - ground.
The disadvantage of this option is that power supplies must be worn during work and installed in a well-ventilated place.
It is possible to attach a handle for mobility. It is important to understand that cordless screwdrivers with a required voltage of more than 14.4 volts will not operate using this method of power supply.
How to power a screwdriver while maintaining its autonomy
There are situations when you have to work in the absence of electricity. It is possible to power a screwdriver without having a 220 network in several accessible ways. In such cases, if the device’s battery is faulty and alteration from the mains is not possible, there are several ways to operate the impact wrench:
- Replace the battery cells inside the battery with new ones purchased from radio parts.
- Using an external battery-type power source, such as a UPS battery.
- Connected and powered by car battery.
It is important to remember that any alteration requires technical skills and compliance with safety regulations.
Replacing old elements
When purchasing new battery cells from radio components, you need to check their capacity and voltage on site.
If stored incorrectly, batteries lose capacity and do not meet the declared characteristics.
- Unscrew the screws securing the case, remove the cover and old battery cells.
- Place new cells, soldered together, into the battery case.
- Reassemble in the reverse order and test the work after modification.
When soldering, you must act quickly, otherwise overheating the battery may cause it to become unusable due to temperature changes.
Connecting to a car battery
Connecting to a car battery will allow you to work autonomously without an electrical outlet. The screwdriver parameters can be from 10.8 to 14.4 volts; a charged car battery can produce an average of 12.5 volts of voltage. To use it, you need to connect two power wires with alligator clips to the screwdriver.
Connecting to a car battery
The alteration is carried out after the disassembly operation, then connecting the power wires to the wires of the electric drive of the screwdriver. If you don’t have a soldering iron, you can simply connect by twisting, but this does not guarantee reliable contact. After connecting the contacts, insulate the wires and test the tool during operation by connecting it to the battery.
Connecting to an external battery
An external battery source may have a higher capacity; it is necessary to select an element suitable for voltage. Basically, a battery from an uninterruptible power supply is used. Remodeling is not difficult and does not require large financial costs.
For the modification you will need a wire with a cross-section of at least 2.5 mm and a length of up to 2 meters. It is necessary to disassemble the tool, remove old battery cells, and connect the wire to the terminals. Make a neat hole for the power cable, assemble the converted screwdriver and test it during operation.
Precautionary measures
After converting a cordless screwdriver, you need to follow simple rules during operation. The work is carried out intermittently; after every 15 minutes of continuous use of a power tool, it is necessary to give 2-3 minutes of rest. The wire and block are fixed in an accessible and comfortable place for work. The converted tool is not used for work at height; the wire must not be extended to the network.
If you find an error, please select a piece of text and press Ctrl+Enter.
Battery screwdrivers are very convenient to use and are widely used by both professionals and home craftsmen. The battery is usually the first to fail. Currently, all manufacturers of power tools have switched to lithium batteries and purchasing a new nickel-cadmium battery for an old screwdriver is becoming more and more problematic, and the prices for these batteries are much higher than for lithium ones.
Of course, it is possible to purchase batteries on various services that sell Chinese goods. But it takes time for the package with the “cans” to arrive, and again, these are certain costs. There is an alternative to buying batteries/cans - connect the screwdriver to the mains power supply and forget about quickly draining the batteries. Powerful power supply on Aliexpress. There are many inconveniences due to the power cord, but you always have to sacrifice something.
Types of batteries
Batteries are of different types and their charging modes may be different. Nickel-cadmium (Ni-Cd) batteries are a very good source of energy and are capable of delivering high power. However, for environmental reasons their production has ceased and they will become less and less common. Now they have been replaced everywhere by lithium-ion batteries.
Sulfuric acid (Pb) lead gel batteries have good characteristics, but they make the tool heavier and therefore are not very popular, despite their relative cheapness. Since they are gel (the sulfuric acid solution is thickened with sodium silicate), there are no plugs in them, the electrolyte does not leak out of them, and they can be used in any position. (By the way, nickel-cadmium batteries for screwdrivers also belong to the gel class.)
Lithium-ion batteries (Li-ion) are now the most promising and promoted in technology and on the market. Their feature is the complete sealing of the cell. They have a very high power density, are safe to use (thanks to the built-in charge controller!), can be disposed of favorably, are the most environmentally friendly, and are lightweight. They are currently used very often in screwdrivers.
How much current does a screwdriver consume?
Before choosing a suitable power supply, you need to understand what current consumption you need to count on. Unfortunately, cordless screwdriver manufacturers do not indicate the current consumed by the motor. The capacity of the battery itself in ampere-hours, which is necessarily indicated on the battery, does not allow us to understand how much current the screwdriver consumes in operating mode
. The maximum that the manufacturer can indicate is the power in watts, but this is very rare, usually the power is indicated directly in torque.
Read also: Engine power for feather removal machine
If the power in watts is still indicated, we can have an idea of the current consumption and select an appropriate power supply with a small current/power margin. To calculate the current, it is enough to divide the power in watts by the operating voltage of the screwdriver, in this case it is 12 volts. So, if the manufacturer indicated a power of, for example, 200 watts - 200:12 = 16.6 A - this is the current consumed by the screwdriver in operating mode.
However, the indicated power is very rare and there is no universal figure that characterizes all 12-volt screwdrivers. You need to understand that when the motor shaft is fully braked, the currents can significantly exceed the rated ones and calculating this value is not very easy. At the same time, an analysis of various forums and our own experience has shown that a current of 10 A is often enough to operate a screwdriver; this is enough to perform many screwing and drilling functions. It is known that current surges during complete braking of the shaft can exceed 30 A.
Well, what conclusion can be drawn from all this? A 12 V power supply providing 10 A current is suitable for a screwdriver; if it is possible to use a 20-30 A unit, this is even better. These are average figures that apply to most screwdrivers.
general information
AC or DC - which is better? In the 21st century, this question haunts many welders. Previously, the welding machine would work intermittently in any case, and the master actually had no choice. But with the advent of rectifiers and inverters on the market, the choice has increased hundreds of times. And now it’s no longer easy to figure out which device to choose.
We decided to help you and tell you about the features of both alternating and direct current.
Let's start with a break. Alternating current is the basis. This is what we get from the outlet when we connect a welding machine or any other electrical appliance. Welders of the old format (transformers) worked on alternating current. Such a device made it possible to obtain a welding current of several hundred Amperes from 220 Volts. Which is more than enough for manual arc welding.
But times have changed. Technological progress did not stand still, and over time, devices appeared that learned to convert alternating current coming from the network into direct current. Such devices include a rectifier and an inverter. Please note that when they say AC welding inverter, they mean that this device uses alternating current for power, but converts it to direct current.
What does all this mean in practice?
When DC machines went on sale, welders had a unique opportunity to compare them with traditional alternating machines. And they were surprised. Compared to modern inverters and rectifiers, transformers were much more difficult to use.
It's all about the AC characteristics. Because of them, the arc is ignited reluctantly and burns unstable. As a result, the seams are less even and durable. This is especially noticeable when the work is performed by a less experienced craftsman.
It also turned out that AC machines generate more noise, which affects the welder’s performance. In addition, a classic transformer consumes more welding electrodes, and metal is constantly splashed during work.
At this point, you probably thought: “Well, why then do we need AC devices if they have so many disadvantages?” In fact, it's not that simple. It’s not for nothing that the question “Which is better: direct or alternating current?” raises so many questions and discussions.
Alternating devices (transformers) are indispensable when you need an inexpensive, but at the same time powerful and reliable welder. Also, alternating current welding has proven itself to be excellent when welding metals with an oxide film on the surface. These are, first of all, aluminum and stainless steel. Transformers also cope well with welding contaminated parts, if there is no way to clean and grind them.
Also, AC machines can easily handle welding in the field, are unpretentious to storage and operation, and can weld even the thickest metal due to their large power reserve.
A few words about the welding arc
We mentioned above that when welding with alternating current, the arc burns unstable. This is true, and this problem requires special attention if you are a novice welder. When we talk about instability, we mean that the arc seems to “walk” when forming a seam. It deviates from the axis, and sometimes this is even noticeable to the naked eye.
Also, it is sometimes difficult for beginners to ignite an arc, since the alternating current apparatus does practically nothing to facilitate this. Beginners often strike the arc incorrectly, and it may go out during welding due to too much vibration.
These features discourage many newbies from purchasing a transformer because they are concerned about the quality of the work. But we believe that a transformer is, on the contrary, an excellent simulator for honing your welding skills. If you learn how to cook with a transformer, you can use any other device without any difficulties. In addition, the transformer is an excellent basis for rework and modification. It can be easily converted into a DC apparatus if you have knowledge of electrical engineering.
power unit
We will not consider purchasing any units or transformers, and if we do buy it, it will be a new battery! We will consider using what we have on hand. I’ll say right away that the charger from the same screwdriver is only suitable for drilling overripe bananas, its power is too low.
Ideally, a step-down, powerful 12 V transformer, for example from a computer uninterruptible power supply, would be suitable. The power of such a transformer is usually 350-500 watts. But I didn’t have such a transformer, but I had a lot of computer power supplies. I am sure that if someone has various electronic junk, ATX computers are definitely lying around in it.
The computer ATX unit is quite suitable for a screwdriver; the load capacity on the +12 volt bus allows you to remove currents of 10-20 amperes. I would like to dispel a small myth - it will not be possible to stuff the unit into the battery housing of a screwdriver, the ATX board is too large. You will have to make a separate case for the block or leave it in its original metal case. The disadvantage of the original case is sensitivity to dust, and even the smallest repair requires a lot of dust.
Mock Tests
Before starting to build a working structure, you should test everything on the knees, make sure that the screwdriver is operating stable under load and that there is no severe overheating in the power supply.
We take the computer power supply and check it: plug it into the network, find green in the output bundle of wires (they say it can be a different color, but I always came across green ones) and connect it with a jumper to any of the black ones (all black wires at the output are the common output, in our case it is a minus). The unit should turn on and a voltage of 12 volts will appear between the black and yellow wires. You can check this with a multimeter or by connecting any computer cooler to the named terminals.
If everything is in order and the unit produces about 12 volts on the yellow (+) and black (-) terminals, continue. If there is no voltage at the output, we look for another unit or repair this one; this separate topic will be described separately.
We cut off the plug from the output of the block and take 3-4 yellow and black wires coming from the block and connect them in parallel. When cutting off the plug, do not forget about the green starting conductor, it must be shorted to black. We received a 12 V source with a decent current load capacity of 10-20 A, the currents depend on the model and power of the unit.
Now we need to connect our 12 V to the terminals of the screwdriver without a battery; we look at the polarity of the connection using the battery. Well, we check the screwdriver - at idle, then slowing down by hand. At this stage, I encountered a problem: when I press the button fully, the screwdriver works, but when I slowly, smoothly press the screwdriver button, the power supply goes into protection. To reset the protection, you must disconnect the unit from the network and turn it on again. This won’t work at all, we need to somehow correct this instability.
In my opinion, this phenomenon may occur due to the fact that the power supply and the screwdriver button are controlled by PWM controllers; due to interference along the power wires, the controllers somehow interfere with each other. We are trying to solve this problem using an improvised LC filter.
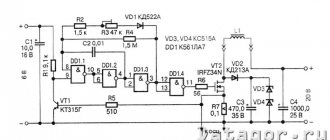
I assembled the filter in 5 minutes from what was at hand: 3 electrolytic capacitors of 1000 uF at 16 volts, a non-polar capacitor of less than 1 uF and wound 20 turns of copper wire with a diameter of 2 mm on a ferrite ring from another unit. Here is his diagram:
And this is what he looks like. This is a purely trial version, in the future this design will be transferred to the battery housing of the screwdriver and will be made more accurately.
We check the entire structure: the block does not go into protection in any position of the button, great! Now you can try to tighten several screws - all in a bunch. It seems that the screwdriver will be able to tighten larger screws.
Well, now you need to remove all the snot and piles of wires, remove the “dead cans” from the battery case, replace them with an LC filter, and test the screwdriver in more realistic conditions.
Charge modes
The nominal voltage of the Ni-Cd cell is 1.2 V. The nickel-cadmium battery is charged with a current of 0.1 to 1.0 rated capacity. This means that a battery with a capacity of 5 ampere hours can be charged with a current of 0.5 to 5 A.
The charge of sulfuric acid batteries is well known to all people who hold a screwdriver in their hands, because almost all of them are also car enthusiasts. The nominal voltage of a Pb-PbO2 cell is 2.0 V, and the charging current of a lead sulfuric acid battery is always 0.1 C (a fraction of the current of the nominal capacity, see above).
The lithium-ion cell has a nominal voltage of 3.3 V. The charging current of a lithium-ion battery is 0.1 C. At room temperature, this current can be gradually increased to 1.0 C - this is a fast charge. However, this is only suitable for batteries that have not been over-discharged. When charging lithium-ion batteries, the voltage must be strictly observed. The charge is made up to 4.2 V exactly. Exceeding it sharply reduces service life, lowering it reduces capacity. When charging, monitor the temperature. A warm battery should either be limited by current to 0.1 C, or disconnected until it cools down.
ATTENTION! If a lithium-ion battery overheats when charging above 60 degrees Celsius, it may explode and catch fire! Do not rely too much on the built-in safety electronics (charge controller).
When charging a lithium battery, the control voltage (end of charge voltage) forms an approximate series (the exact voltages depend on the specific technology and are indicated in the battery passport and on its case):
| Number of elements | Denomination eg, B | According to the passport, B | End of charge, V |
| 1 | 3.6 | 3.6 | 4.2 |
| 2 | 7.2 | 7 | 8.4 |
| 3 | 10.8 | 10 | 12.6 |
| 4 | 14.4 | 12 | 16.8 |
| 5 | 18 | 18 | 21.0 |
The charging voltage should be monitored with a multimeter or a circuit with a voltage comparator tuned exactly to the battery used. But for “entry-level electronics engineers,” only a simple and reliable circuit, described in the next section, can really be offered.
Assembly of the working structure
For ease of use and connection, I brought the cord from the power supply into the battery case. I took a 3.5 meter long cord that was available. I removed all the battery cells from the battery and installed an LC filter. Now, if I somehow get a working battery, I can always put it on a screwdriver and put the power supply away as a reserve. I didn’t throw the batteries out of the battery, I have an idea where to use them, but that’s a topic for another review.
Since the cord connecting the unit to the screwdriver has a certain resistance and inductance, you can try to close the terminals of the L1 coil with a jumper. In theory, this could increase power by a tiny amount.
Read also: Do-it-yourself power supply from EPR 2x36
The screwdriver feels great with a cord, but to be honest, it seemed a little weak to me when braking by hand. But trial tightening of the self-tapping screws dispelled my doubts: self-tapping screws 35 mm long can easily be screwed into 20 mm plywood. This means that a screwdriver will cover most repair needs.
I cut off all the output wires from the block, leaving the green starting wire; I soldered its end to the common conductor of the board, where all the black ones are soldered. It's best to carefully desolder all the wires, but my soldering iron was too weak for this and had to be cut. I soldered two short, hard copper wires to the common contact and +12 (where the yellow ones are soldered) and connected them through the terminal block to the cord to the Shura.
This is where we will finish this review, we have achieved what we wanted - the screwdriver works perfectly with a computer power supply. In the future, I plan to make a high-quality plywood case without cracks for the power supply board - tests have shown that the heatsinks on the board do not heat up at all and you don’t have to worry about overheating of the elements in a closed case.
Few additions
To compensate for losses in the cord connecting the screwdriver to the power supply, it is useful to increase the voltage by 2-3 volts. But this is provided that you know the circuit design of ATX computers and know what to do.
If it is possible to use a powerful transformer, then its output, secondary winding should have an alternating voltage of 12 V. If the voltage is different, it is recommended to adjust the secondary winding by unwinding (if the voltage is more than 12 V) or rewinding (if less than 12 V) several turns. It is worth noting that when rectifying and filtering the 12 V AC voltage, it turns out to be about 14.4 V without load. So don’t let this confuse you, this is the EMF voltage and it is natural that it is higher than the nominal one.
In addition to the transformer, a rectifier is assembled; the diodes should easily hold 30 A. It is more expedient to place the capacitor filter in the battery case, as in the ATX version.
If you have a screwdriver and mainly use it indoors, then I think you will find this article interesting and useful. Here we will talk about converting a 12 volt screwdriver with a ni-cd battery.
It would be a good idea to power a screwdriver for your home from an outlet. That's what we'll do today.
A logical question arises: is there any point in redoing anything at all? So aliexpress will not help us in solving this problem. Therefore, I want to offer you another option that is several times more profitable.
Computer power supplies are pretty powerful guys. Also, finding such a power supply will not be difficult. You probably have something like this lying around at home, unused. And if not, then you can go to any computer repair shop and buy a used power supply for a couple of hundred rubles, say, 500 W.
Let it be wrinkled, dirty, covered in dust, but the main thing is that it works. There is usually a sticker on one of the walls containing detailed information on the power lines. On this block we can see the following characteristics: 25 A per 12 V line, and this is no less than 300 W of power.
Enough for a screwdriver. Such a power supply is of course quite large, but at the same time it is much cheaper even than Chinese units with lower power.
You will need to solder a wire with a cross-section of, say, 3 mm 2 to these terminals. In theory, this should be enough to ensure that the energy does not dissipate into heat, even over a wire length of about 2 m. We take a soldering iron and, having previously prepared the wires (by stripping them of insulation and irradiating them), solder them to the terminals.
I don’t know how it will work with your screwdriver; personally, the author managed to bend the terminal ears directly into the plastic and it turned out very reliably.
Supporting it from below, for example, with a screwdriver, we drill a hole through with a drill with a diameter of 3 mm. Then we remove the chamfer with a large drill. Moreover, we remove it so that the m3 screw with the countersunk head does not stick out.
Well, all that remains is to tighten the nut. This option with a screw is many times better than any other fastening.
Also, it is highly advisable to place a 16 or 25 V capacitor with a capacity of about 10,000 μF in parallel with the terminals. You can buy a capacitor at any radio market, in any radio goods store, or you can also pull it out of a dead computer unit. There is a way to get such a capacitor for free. Most likely they will give it to you for free at any computer repair service. They throw them out anyway. You just have to ask. So take action.
The capacitor will serve as an energy buffer for inrush currents. This is necessary in order to reduce the load on the power supply. If this is not done, with a high degree of probability it (the power supply) will go into protection. We take it and solder it. In this case, the author recommends gluing the nut with superglue. Otherwise you simply won’t be able to tighten it.
Well, let’s finally check the torque ratchet at maximum mode to make sure that the power supply draws the maximum starting current in the ratchet screwdriver mode.
And everything is fine here too. The defense didn't work. The experiment can be considered more than successful.
And finally, if you take a weak power supply and it goes into protection, but you have already installed a capacitor, the voltage protection is most likely triggered. And oddly enough, the problem is solved by additional load on the 5 V power line. That is, we take the red and black wires and connect a separate load to them. On the forums they write that 1 A will be enough. To do this, take a 5 W 6 V bulb or two 3 W bulbs, and let them just shine and load the line and everything will work great.
Thank you for attention. See you again!
Christmas decorations made from yarn
Fix Price stores sell inexpensive acrylic yarn - very soft and pleasant to the touch. It can also be useful to you in creating a New Year's mood.
PHOTO: YouTube.comYou will need some of this yarn in delicate shades and thick cardboardFrom cardboard, cut out stars or figures of deer, crescents, in general - everything that you associate with the New Year and Christmas.
PHOTO: YouTube.com Just wrap the cardboard figures with thread and secure it with a drop of hot glue. The masterpiece is ready
This is how easy it is - with cheap goods from Fix Price - you can not only decorate your home, but also make very glamorous gifts for your friends and acquaintances.
Another idea for New Year's decor using goods from the Fix Price store:
PHOTO: YouTube.comAnd in addition, a few more similar ideas can be seen in this short video:
Watch this video on YouTube
Previous STORIES Without glue: how to cover up any hole or crack, even if it’s old slate