A screwdriver is a great helper for repairs inside and outside the house. Often when purchasing a domestic or imported screwdriver, we want to get a reliable and durable tool.
However, we do not think about it, but also often forget that the reliability and durability of equipment directly depends on storage conditions and operating rules.
Long-term use and constant loads, sometimes exceeding those set by the manufacturer, almost always lead to temporary or complete malfunctions of the equipment or device. In the case of a screwdriver, this may be turning the chuck.
You can encounter such a problem even if you have just bought a screwdriver, but often such a breakdown occurs later in life.
If this happens, don’t panic, it’s better to start looking for the manufacturer’s service centers, because you can’t fix all the breakdowns yourself.
If the screwdriver spins, then there are reasons for this. Let's look at the most common reasons for this phenomenon.
Reasons for screwdriver failure
- Insufficient lubrication of the gearbox. In this case, disassembling and good lubrication of the latter will help you out.
- Gearbox shaft distortion. Here you will most likely be helped by replacing it rather than straightening it. It's better to replace the part than to use the old one, otherwise you'll end up having to buy a new clutch anyway.
- Damage or breakage of the satellite, or the pin to which the satellite itself is attached.
- Wear of bearings or the gearbox shaft itself.
When checking for malfunctions, it is important to understand and see the very first signs of malfunctions in the device.
How to repair a SkiL screwdriver \ The speed in the screwdriver skips \ Repairing the gearbox
Vibration and noise are usually caused by defects in the screwdriver gearbox.
Their more common prerequisites:
- deformation of the gearbox shaft;
- damage to gear teeth;
- destruction of the satellite mounting pin and some others.
To clarify the circumstances, you should disassemble the gearbox, which is housed in a plastic case of the type of two halves. From time to time, malfunctions are caused by misalignment of the satellite axes. Here you can repair the screwdriver by installing these axes into the driver sockets without changing them. In most cases, malfunctions are caused by the destruction of gearbox parts, in other words, their irreversible deformation. Such parts require replacement.
To repair a screwdriver with your own staff, you need to prepare the following tools:
- pliers;
- screwdriver;
- hammer;
- tester or multimeter;
- electronic probe;
- wrenches;
- sandpaper or sanding block;
- chisel;
- knife;
- scissors;
- soldering iron
A screwdriver is a very necessary tool needed in the household. You can't despair if it fails. You need to find out the cause of the malfunction and carry out repairs in artisanal conditions. Repairing a screwdriver at home is possible.
Source
Signs of tool failure
- Sounds that are not typical for the instrument during operation, that is, during normal operation, the instrument produces sounds that are normal for it, and when it breaks down, extraneous sounds are added, for example, a knocking or crackling sound that was not there before.
- Vibration and/or chatter in the chuck. In this case, you may feel uncharacteristic vibration of the tool or the striking of the chuck during the tool.
- The screwdriver constantly or periodically jams during operation.
- When the screwdriver is turned on, the motor begins to rotate the chuck using idle speed. In this case, the rotation can be easily stopped using your hand, even if the device is operating at second speed.
- Scrolling the screwdriver under load during operation. This may be a signal of a breakdown of the breakdown itself or a common cause of breakdown.
Such breakdowns should be looked for in the gearbox, clutch or speed switch. Long uninterrupted operation of a screwdriver under load can cause damage such as shaft bending. Therefore, you should strictly follow the instructions from the manufacturer.
This failure leads to strong beating and vibration of the screwdriver. Well, the most common failure among screwdrivers is wear of the bearing shaft support sleeve.
If, while working with a screwdriver, you hear a sudden crack and notice a twist in the switch position, then most likely there is a problem with the gearbox.
Features of repairing a screwdriver if it does not turn or turns poorly
Before starting repairs, you need to prepare everything. There are several rules and recommendations that should be followed when repairing:
- if parts need to be replaced, you must purchase only original components produced by the tool manufacturer;
- after disassembling the instrument, it is worth checking everything, since there may be several breakdowns;
- After repair, it is necessary to check the fixation of all parts.
Important! If you independently begin to repair equipment that is still under warranty, after disassembly you will lose your rights to free service at a service center.
If the device turns poorly or works slowly, you can identify the fault and repair it without involving a specialist. First, you need to diagnose the causes by checking all the parts of the device, and then begin to fix the problem. If the device is under warranty, it is recommended to contact a service center with the breakdown.
Subscribe to TechnoCouncil on social networks so you don’t miss anything:
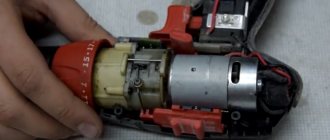
Repairing a screwdriver step by step
- We take out the engine and carefully disconnect the motor and gearbox.
- Let's disassemble the gearbox itself. To assemble it exactly as it was, you need to photograph it or schematically sketch the location of the gearbox.
- If the teeth of the coupling are worn out, then replace it with a new one. It must be firmly fixed.
We carry out repairs using a bench vice, drill and drill of the required size. You will also need wire cutters and some screws.
The repair process will not take much of your time and attention. If you still decide to repair the worn teeth of the old coupling rather than buy a new one, then you will need a drill and a drill bit. To do this, you just need to drill several holes in the places where the teeth were and screw the required number of screws into these holes.
If parts of the screws protrude, then shorten them using wire cutters and turn on the screwdriver to check the functionality of the tool.
Below in the video you can visually watch the repair process itself.
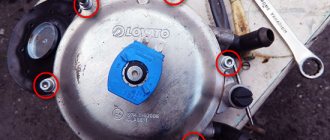
How to remove and change the cartridge
For the safety of the work being carried out and to maintain the mechanical and electrical parts of the device in good working order, the cartridge should be repaired or replaced. To do this you will have to perform a small dismantling operation:
- It is necessary to move the jaws to the side by unscrewing the outer rotating part of the chuck until it stops.
- Then use a Phillips screwdriver to remove the screw (clockwise) that secures the head to the spindle.
- The next stage is more convenient to carry out armed with an auxiliary tool. You can use a gas wrench of the appropriate size. The electrical appliance must be placed on the table. The cartridge is rigidly fixed in the jaws of the key, and the lever is turned counterclockwise with a sharp movement.
- Now all that remains is to install the replacement, not forgetting to secure it with a screw on the spindle.
Design and malfunctions of an electric drill
Drills can come in different sizes and colors, but the pattern inside is always the same.
Impact drill device
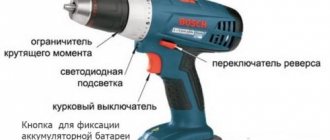
The main components of an impact drill:
- Cartridge.
- Metal gearbox housing.
- Electric motor.
- Start button.
- Button to switch between normal and shock modes.
- Frame.
- Induction rings.
- Capacitor.
- Network cable.
- Brushes.
- Reverse button.
- Speed regulator.
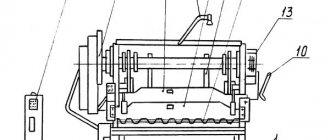
A simple drill without an impact mechanism does not have a metal gear housing. The shaft and gear bearings are inserted into the drill body.
Hammerless drill gearbox
Basic drill malfunctions:
- Doesn't turn on. Causes: damage to the power cord, wires inside the drill, start button, or start capacitor.
- Engine malfunctions.
- Broken or worn brushes.
- Sparks, smokes, crackles, unpleasant smell. The reason is the brushes or the motor.
- Loss of power occurs due to a faulty armature.
- Damage to the power, reverse, and speed control buttons.
- Bearing wear.
- Poor chuck clamp.
Engine faults:
- Shaft deformation.
- Making an anchor.
- Failure to secure the poles to the frame in the stator.
- Winding wire rupture due to overload or abrasive dust.
- Short circuit to body or between turns.
All of these faults, with the exception of engine faults, are easy to fix yourself. Engine repair is possible if you have certain skills and knowledge. Sometimes it's easier to take it to a workshop or buy and install a new one. Installing any new unit is cheaper than repairing it in a workshop, since professionals charge a fee equal to the cost of the unit for one replacement.
Video: drill device
Recommendations for extending the performance of new and repaired drills:
- The drill should not operate for more than 20–25 minutes continuously after being plugged in.
- Do not overheat the device to the point of burning your hands.
- It is necessary to clean the cartridge from dirt and lubricate it.
- Do not use very dull drills.
Drill chucks: varieties (video)
If the mini drill or screwdriver model is equipped with a special type of lock, then it is necessary to use a single-socket clamping element. On tools without a blocker, a two-clutch element or a mini-chuck is used. As a rule, the body of such a device is made of plastic, and a steel alloy is used to make the mechanism and cams.
Any option for performing repair work yourself requires knowledge of the device and its main components:
- cone-shaped gripping lips;
- inner part with lips;
- external clamping part.
If necessary, each individual element of such a device can be replaced, for which it is necessary to disassemble the device correctly.
Operating principle and main components
The drill owes its appearance to the demand for underground drilling to replace manual labor with automated labor. In 1870, American inventor Simon Ingersoll introduced the progenitor of the impact drill. In its work, the tool used a steam drive and a drill. The advent of electric motors at the end of the 19th century made it possible to improve the instrument. So, in 1889, engineer Arthur James Arnot proposed using an electric motor in conjunction with a drill, and already in 1895 a tool appeared that could be held freely in the hands when working.
In early 1917, Arthur Arnot, working for the BLACK&DECKER company, connected a button to a drill and added a pistol grip, making the device one of the most popular power tools in the world. Since then, the design of the electric drill has not undergone fundamental changes.
A classic drill only works in drilling mode , but with the development of manufacturing technology, modern devices began to be equipped with an impact mode. When connected to a 220-volt network, a gear drill, converting electrical energy into mechanical energy, forces the chuck attached to the device mechanism to perform a rotational movement. The number of revolutions of the cartridge is controlled using a rheostat built into the power button, and the direction of rotation is set by reverse. The drill, clamped into the chuck, due to its shape and under the influence of high speed of rotation, easily makes a hole in hard or soft material.
To carry out an impact, the device uses reciprocating movements resulting from the operation of the motor. A ratchet representing a toothed ring is installed on the axis of the cartridge, and teeth are made on the body to create a stop. When the impact drill is switched to hammer drill mode, the ratchet engages and then slides off the fence. The shaft strikes in a vertical direction.
Before you start repairing a drill with your own hands, you need to determine which part of it needs to be restored.
The main parts of the drilling tool are:
- capacitor;
- engine start and stop button;
- speed control device;
- reverse switch;
- bearings;
- electric motor;
- engine cooling device;
- gearbox;
- return spring;
- chuck;
- body elements.
Thus, the electric drill components are divided into electrical and mechanical modules. It should be taken into account that the impact unit has low productivity and, with frequent use of this operating mode, quickly wears out.
Wear of the impact unit not only negatively affects the chiselling work, but also increases the load on the electric motor, causing it to overheat.
Device motor
The engine is the main element of the device that drives the tool gearbox. It consists of a stator and a rotor, while the rotor is a moving part, and the stator, accordingly, is not. The rotor design includes an armature with a commutator. An armature is an engine element assembled from steel plates. Windings made of electrically conductive material—copper—are wound on them. The collector is a cylinder. It is made of dielectric and current-conducting plates, and the armature windings are connected to these plates.
Characteristics of the drill keyless chuck
The standard keyless chuck does not have a very complicated design. Tightening and loosening will require the use of a special metal sleeve that is knurled or grooved. Quite often, a plastic sleeve with ribs is used for this purpose.
The main difference of this element is the absence of a clamping key and the use of an outer shell that allows clamping of the drill lips. Most often, the use of BZP is accompanied by the following problems and difficulties:
- insufficient quality of drill clamping;
- lack of sufficient resistance to dust;
- breakdown of the clamping mechanism.